Operations Manual
Copyright © 2010, 2011 Oracle and/or its affiliates. (The original version of this Operations Manual without the Intel modifications.)
Copyright © 2011, 2017 Intel Corporation. (Intel modifications to the original version of this Operations Manual.)
Important Notice from Intel
INFORMATION IN THIS DOCUMENT IS PROVIDED IN CONNECTION WITH INTEL PRODUCTS. NO LICENSE, EXPRESS OR IMPLIED, BY ESTOPPEL OR OTHERWISE, TO ANY INTELLECTUAL PROPERTY RIGHTS IS GRANTED BY THIS DOCUMENT. EXCEPT AS PROVIDED IN INTEL'S TERMS AND CONDITIONS OF SALE FOR SUCH PRODUCTS, INTEL ASSUMES NO LIABILITY WHATSOEVER AND INTEL DISCLAIMS ANY EXPRESS OR IMPLIED WARRANTY, RELATING TO SALE AND/OR USE OF INTEL PRODUCTS INCLUDING LIABILITY OR WARRANTIES RELATING TO FITNESS FOR A PARTICULAR PURPOSE, MERCHANTABILITY, OR INFRINGEMENT OF ANY PATENT, COPYRIGHT OR OTHER INTELLECTUAL PROPERTY RIGHT.
A "Mission Critical Application" is any application in which failure of the Intel Product could result, directly or indirectly, in personal injury or death. SHOULD YOU PURCHASE OR USE INTEL'S PRODUCTS FOR ANY SUCH MISSION CRITICAL APPLICATION, YOU SHALL INDEMNIFY AND HOLD INTEL AND ITS SUBSIDIARIES, SUBCONTRACTORS AND AFFILIATES, AND THE DIRECTORS, OFFICERS, AND EMPLOYEES OF EACH, HARMLESS AGAINST ALL CLAIMS COSTS, DAMAGES, AND EXPENSES AND REASONABLE ATTORNEYS' FEES ARISING OUT OF, DIRECTLY OR INDIRECTLY, ANY CLAIM OF PRODUCT LIABILITY, PERSONAL INJURY, OR DEATH ARISING IN ANY WAY OUT OF SUCH MISSION CRITICAL APPLICATION, WHETHER OR NOT INTEL OR ITS SUBCONTRACTOR WAS NEGLIGENT IN THE DESIGN, MANUFACTURE, OR WARNING OF THE INTEL PRODUCT OR ANY OF ITS PARTS.
Intel may make changes to specifications and product descriptions at any time, without notice. Designers must not rely on the absence or characteristics of any features or instructions marked "reserved" or "undefined". Intel reserves these for future definition and shall have no responsibility whatsoever for conflicts or incompatibilities arising from future changes to them. The information here is subject to change without notice. Do not finalize a design with this information.
The products described in this document may contain design defects or errors known as errata which may cause the product to deviate from published specifications. Current characterized errata are available on request.
Contact your local Intel sales office or your distributor to obtain the latest specifications and before placing your product order.
Copies of documents which have an order number and are referenced in this document, or other Intel literature, may be obtained by calling 1-800-548-4725, or go to: https://www.intel.com/content/www/us/en/design/resource-design-center.html
Intel and the Intel logo are trademarks of Intel Corporation in the U.S. and/or other countries. Lustre is a registered trademark of Oracle Corporation.
*Other names and brands may be claimed as the property of others.
THE ORIGINAL LUSTRE 2.x FILESYSTEM: OPERATIONS MANUAL HAS BEEN MODIFIED: THIS OPERATIONS MANUAL IS A MODIFIED VERSION OF, AND IS DERIVED FROM, THE LUSTRE 2.0 FILESYSTEM: OPERATIONS MANUAL PUBLISHED BY ORACLE AND AVAILABLE AT [http://www.lustre.org/]. MODIFICATIONS (collectively, the "Modifications") HAVE BEEN MADE BY INTEL CORPORATION ("Intel"). ORACLE AND ITS AFFILIATES HAVE NOT REVIEWED, APPROVED, SPONSORED, OR ENDORSED THIS MODIFIED OPERATIONS MANUAL, OR ENDORSED INTEL, AND ORACLE AND ITS AFFILIATES ARE NOT RESPONSIBLE OR LIABLE FOR ANY MODIFICATIONS THAT INTEL HAS MADE TO THE ORIGINAL OPERATIONS MANUAL.
NOTHING IN THIS MODIFIED OPERATIONS MANUAL IS INTENDED TO AFFECT THE NOTICE PROVIDED BY ORACLE BELOW IN RESPECT OF THE ORIGINAL OPERATIONS MANUAL AND SUCH ORACLE NOTICE CONTINUES TO APPLY TO THIS MODIFIED OPERATIONS MANUAL EXCEPT FOR THE MODIFICATIONS; THIS INTEL NOTICE SHALL APPLY ONLY TO MODIFICATIONS MADE BY INTEL. AS BETWEEN YOU AND ORACLE: (I) NOTHING IN THIS INTEL NOTICE IS INTENDED TO AFFECT THE TERMS OF THE ORACLE NOTICE BELOW; AND (II) IN THE EVENT OF ANY CONFLICT BETWEEN THE TERMS OF THIS INTEL NOTICE AND THE TERMS OF THE ORACLE NOTICE, THE ORACLE NOTICE SHALL PREVAIL.
Your use of any Intel software shall be governed by separate license terms containing restrictions on use and disclosure and are protected by intellectual property laws.
The information contained herein is subject to change without notice and is not warranted to be error-free. If you find any errors, please report them to us in writing.
This work is licensed under a Creative Commons Attribution-Share Alike 3.0 United States License. To view a copy of this license and obtain more information about Creative Commons licensing, visit Creative Commons Attribution-Share Alike 3.0 United States or send a letter to Creative Commons, 171 2nd Street, Suite 300, San Francisco, California 94105, USA.
Important Notice from Oracle
This software and related documentation are provided under a license agreement containing restrictions on use and disclosure and are protected by intellectual property laws. Except as expressly permitted in your license agreement or allowed by law, you may not use, copy, reproduce, translate, broadcast, modify, license, transmit, distribute, exhibit, perform, publish, or display any part, in any form, or by any means. Reverse engineering, disassembly, or decompilation of this software, unless required by law for interoperability, is prohibited.
The information contained herein is subject to change without notice and is not warranted to be error-free. If you find any errors, please report them to us in writing.
If this is software or related software documentation that is delivered to the U.S. Government or anyone licensing it on behalf of the U.S. Government, the following notice is applicable:
U.S. GOVERNMENT RIGHTS. Programs, software, databases, and related documentation and technical data delivered to U.S. Government customers are "commercial computer software" or "commercial technical data" pursuant to the applicable Federal Acquisition Regulation and agency-specific supplemental regulations. As such, the use, duplication, disclosure, modification, and adaptation shall be subject to the restrictions and license terms set forth in the applicable Government contract, and, to the extent applicable by the terms of the Government contract, the additional rights set forth in FAR 52.227-19, Commercial Computer Software License (December 2007). Oracle America, Inc., 500 Oracle Parkway, Redwood City, CA 94065.
This software or hardware is developed for general use in a variety of information management applications. It is not developed or intended for use in any inherently dangerous applications, including applications which may create a risk of personal injury. If you use this software or hardware in dangerous applications, then you shall be responsible to take all appropriate fail-safe, backup, redundancy, and other measures to ensure its safe use. Oracle Corporation and its affiliates disclaim any liability for any damages caused by use of this software or hardware in dangerous applications.
Oracle and Java are registered trademarks of Oracle and/or its affiliates. Other names may be trademarks of their respective owners.
AMD, Opteron, the AMD logo, and the AMD Opteron logo are trademarks or registered trademarks of Advanced Micro Devices. Intel and Intel Xeon are trademarks or registered trademarks of Intel Corporation. All SPARC trademarks are used under license and are trademarks or registered trademarks of SPARC International, Inc. UNIX is a registered trademark licensed through X/Open Company, Ltd.
This software or hardware and documentation may provide access to or information on content, products, and services from third parties. Oracle Corporation and its affiliates are not responsible for and expressly disclaim all warranties of any kind with respect to third-party content, products, and services. Oracle Corporation and its affiliates will not be responsible for any loss, costs, or damages incurred due to your access to or use of third-party content, products, or services.
Copyright © 2011, Oracle et/ou ses affiliés. Tous droits réservés.
Ce logiciel et la documentation qui l'accompagne sont protégés par les lois sur la propriété intellectuelle. Ils sont concédés sous licence et soumis à des restrictions d'utilisation et de divulgation. Sauf disposition de votre contrat de licence ou de la loi, vous ne pouvez pas copier, reproduire, traduire, diffuser, modifier, breveter, transmettre, distribuer, exposer, exécuter, publier ou afficher le logiciel, même partiellement, sous quelque forme et par quelque procédé que ce soit. Par ailleurs, il est interdit de procéder à toute ingénierie inverse du logiciel, de le désassembler ou de le décompiler, excepté à des fins d'interopérabilité avec des logiciels tiers ou tel que prescrit par la loi.
Les informations fournies dans ce document sont susceptibles de modification sans préavis. Par ailleurs, Oracle Corporation ne garantit pas qu'elles soient exemptes d'erreurs et vous invite, le cas échéant, à lui en faire part par écrit.
Si ce logiciel, ou la documentation qui l'accompagne, est concédé sous licence au Gouvernement des Etats-Unis, ou à toute entité qui délivre la licence de ce logiciel ou l'utilise pour le compte du Gouvernement des Etats-Unis, la notice suivante s'applique :
U.S. GOVERNMENT RIGHTS. Programs, software, databases, and related documentation and technical data delivered to U.S. Government customers are "commercial computer software" or "commercial technical data" pursuant to the applicable Federal Acquisition Regulation and agency-specific supplemental regulations. As such, the use, duplication, disclosure, modification, and adaptation shall be subject to the restrictions and license terms set forth in the applicable Government contract, and, to the extent applicable by the terms of the Government contract, the additional rights set forth in FAR 52.227-19, Commercial Computer Software License (December 2007). Oracle America, Inc., 500 Oracle Parkway, Redwood City, CA 94065.
Ce logiciel ou matériel a été développé pour un usage général dans le cadre d'applications de gestion des informations. Ce logiciel ou matériel n'est pas conçu ni n'est destiné à être utilisé dans des applications à risque, notamment dans des applications pouvant causer des dommages corporels. Si vous utilisez ce logiciel ou matériel dans le cadre d'applications dangereuses, il est de votre responsabilité de prendre toutes les mesures de secours, de sauvegarde, de redondance et autres mesures nécessaires à son utilisation dans des conditions optimales de sécurité. Oracle Corporation et ses affiliés déclinent toute responsabilité quant aux dommages causés par l'utilisation de ce logiciel ou matériel pour ce type d'applications.
Oracle et Java sont des marques déposées d'Oracle Corporation et/ou de ses affiliés. Tout autre nom mentionné peut correspondre à des marques appartenant à d'autres propriétaires qu'Oracle.
AMD, Opteron, le logo AMD et le logo AMD Opteron sont des marques ou des marques déposées d'Advanced Micro Devices. Intel et Intel Xeon sont des marques ou des marques déposées d'Intel Corporation. Toutes les marques SPARC sont utilisées sous licence et sont des marques ou des marques déposées de SPARC International, Inc. UNIX est une marque déposée concédée sous licence par X/Open Company, Ltd.
Ce logiciel ou matériel et la documentation qui l'accompagne peuvent fournir des informations ou des liens donnant accès à des contenus, des produits et des services émanant de tiers. Oracle Corporation et ses affiliés déclinent toute responsabilité ou garantie expresse quant aux contenus, produits ou services émanant de tiers. En aucun cas, Oracle Corporation et ses affiliés ne sauraient être tenus pour responsables des pertes subies, des coûts occasionnés ou des dommages causés par l'accès à des contenus, produits ou services tiers, ou à leur utilisation.
This work is licensed under a Creative Commons Attribution-Share Alike 3.0 United States License. To view a copy of this license and obtain more information about Creative Commons licensing, visit Creative Commons Attribution-Share Alike 3.0 United States or send a letter to Creative Commons, 171 2nd Street, Suite 300, San Francisco, California 94105, USA.
Table of Contents
- Preface
- I. Introducing the Lustre* File System
- II. Installing and Configuring Lustre
- 4. Installation Overview
- 5. Determining Hardware Configuration Requirements and Formatting Options
- 6. Configuring Storage on a Lustre File System
- 7. Setting Up Network Interface Bonding
- 8. Installing the Lustre Software
- 9. Configuring Lustre Networking (LNet)
- 9.1. Configuring LNet via
lnetctlL 2.7 - 9.1.1. Configuring LNet
- 9.1.2. Displaying Global Settings
- 9.1.3. Adding, Deleting and Showing Networks
- 9.1.4. Manual Adding, Deleting and Showing PeersL 2.10
- 9.1.5. Dynamic Peer DiscoveryL 2.11
- 9.1.6. Adding, Deleting and Showing routes
- 9.1.7. Enabling and Disabling Routing
- 9.1.8. Showing routing information
- 9.1.9. Configuring Routing Buffers
- 9.1.10. Asymmetrical RoutesL 2.13
- 9.1.11. Importing YAML Configuration File
- 9.1.12. Exporting Configuration in YAML format
- 9.1.13. Showing LNet Traffic Statistics
- 9.1.14. YAML Syntax
- 9.2. Overview of LNet Module Parameters
- 9.3. Setting the LNet Module networks Parameter
- 9.4. Setting the LNet Module ip2nets Parameter
- 9.5. Setting the LNet Module routes Parameter
- 9.6. Testing the LNet Configuration
- 9.7. Configuring the Router Checker
- 9.8. Best Practices for LNet Options
- 9.1. Configuring LNet via
- 10. Configuring a Lustre File System
- 11. Configuring Failover in a Lustre File System
- III. Administering Lustre
- 12. Monitoring a Lustre File System
- 13. Lustre Operations
- 13.1. Mounting by Label
- 13.2. Starting Lustre
- 13.3. Mounting a Server
- 13.4. Stopping the Filesystem
- 13.5. Unmounting a Specific Target on a Server
- 13.6. Specifying Failout/Failover Mode for OSTs
- 13.7. Handling Degraded OST RAID Arrays
- 13.8. Running Multiple Lustre File Systems
- 13.9. Creating a sub-directory on a specific MDT
- 13.10. Creating a directory striped across multiple MDTsL 2.8
- 13.11. Default Dir Stripe Policy
- 13.12. Setting and Retrieving Lustre Parameters
- 13.13. Specifying NIDs and Failover
- 13.14. Erasing a File System
- 13.15. Reclaiming Reserved Disk Space
- 13.16. Replacing an Existing OST or MDT
- 13.17. Identifying To Which Lustre File an OST Object Belongs
- 14. Lustre Maintenance
- 14.1. Working with Inactive OSTs
- 14.2. Finding Nodes in the Lustre File System
- 14.3. Mounting a Server Without Lustre Service
- 14.4. Regenerating Lustre Configuration Logs
- 14.5. Changing a Server NID
- 14.6. Clearing configurationL 2.11
- 14.7. Adding a New MDT to a Lustre File System
- 14.8. Adding a New OST to a Lustre File System
- 14.9. Removing and Restoring MDTs and OSTs
- 14.10. Aborting Recovery
- 14.11. Determining Which Machine is Serving an OST
- 14.12. Changing the Address of a Failover Node
- 14.13. Separate a combined MGS/MDT
- 14.14. Set an MDT to read-onlyL 2.13
- 14.15. Tune Fallocate for ldiskfsL 2.14
- 15. Managing Lustre Networking (LNet)
- 16. LNet Software Multi-RailL 2.10
- 17. Upgrading a Lustre File System
- 18. Backing Up and Restoring a File System
- 18.1. Backing up a File System
- 18.2. Backing Up and Restoring an MDT or OST (ldiskfs Device Level)
- 18.3. Backing Up an OST or MDT (Backend File System Level)
- 18.4. Restoring a File-Level Backup
- 18.5. Using LVM Snapshots with the Lustre File System
- 18.6. Migration Between ZFS and ldiskfs Target Filesystems L 2.11
- 19. Managing File Layout (Striping) and Free Space
- 19.1. How Lustre File System Striping Works
- 19.2. Lustre File Layout (Striping) Considerations
- 19.3. Setting the File Layout/Striping Configuration (
lfs
      setstripe
) - 19.4. Retrieving File Layout/Striping Information (
getstripe) - 19.5. Progressive File Layout(PFL)L 2.10
- 19.6. Self-Extending Layout (SEL)L 2.13
- 19.7. Foreign LayoutL 2.13
- 19.8. Managing Free Space
- 19.9. Lustre Striping Internals
- 20. Data on MDT (DoM)L 2.11
- 21. Lazy Size on MDT (LSoM)L 2.12
- 22. File Level Redundancy (FLR)L 2.11
- 23. Managing the File System and I/O
- 24. Lustre File System Failover and Multiple-Mount Protection
- 25. Configuring and Managing Quotas
- 26. Hierarchical Storage Management (HSM)L 2.5
- 27. Persistent Client Cache (PCC)L 2.13
- 27.1. Introduction
- 27.2. Design
- 27.3. PCC Command Line Tools
- 27.3.1. Add a PCC backend on a client
- 27.3.2. Delete a PCC backend from a client
- 27.3.3. Remove all PCC backends on a client
- 27.3.4. List all PCC backends on a client
- 27.3.5. Attach given files into PCC
- 27.3.6. Attach given files into PCC by FID(s)
- 27.3.7. Detach given files from PCC
- 27.3.8. Detach given files from PCC by FID(s)
- 27.3.9. Display the PCC state for given files
- 27.4. PCC Configuration Example
- 28. Mapping UIDs and GIDs with NodemapL 2.9
- 29. Configuring Shared-Secret Key (SSK) SecurityL 2.9
- 30. Managing Security in a Lustre File System
- 31. Lustre ZFS SnapshotsL 2.10
- IV. Tuning a Lustre File System for Performance
- 32. Testing Lustre Network Performance (LNet Self-Test)
- 33. Benchmarking Lustre File System Performance (Lustre I/O Kit)
- 34. Tuning a Lustre File System
- 34.1. Optimizing the Number of Service Threads
- 34.2. Binding MDS Service Thread to CPU Partitions
- 34.3. Tuning LNet Parameters
- 34.4. libcfs Tuning
- 34.5. LND Tuning
- 34.6. Network Request Scheduler (NRS) Tuning
- 34.7. Lockless I/O Tunables
- 34.8. Server-Side Advice and Hinting L 2.9
- 34.9. Large Bulk IO (16MB RPC) L 2.9
- 34.10. Improving Lustre I/O Performance for Small Files
- 34.11. Understanding Why Write Performance is Better Than Read Performance
- V. Troubleshooting a Lustre File System
- 35. Lustre File System Troubleshooting
- 35.1. Lustre Error Messages
- 35.2. Reporting a Lustre File System Bug
- 35.3. Common Lustre File System Problems
- 35.3.1. OST Object is Missing or Damaged
- 35.3.2. OSTs Become Read-Only
- 35.3.3. Identifying a Missing OST
- 35.3.4. Fixing a Bad LAST_ID on an OST
- 35.3.5. Handling/Debugging "
Bind: Address already in use" Error - 35.3.6. Handling/Debugging Error "- 28"
- 35.3.7. Triggering Watchdog for PID NNN
- 35.3.8. Handling Timeouts on Initial Lustre File System Setup
- 35.3.9. Handling/Debugging "LustreError: xxx went back in time"
- 35.3.10. Lustre Error: "
Slow Start_Page_Write" - 35.3.11. Drawbacks in Doing Multi-client O_APPEND Writes
- 35.3.12. Slowdown Occurs During Lustre File System Startup
- 35.3.13. Log Message
'Out of Memory' on OST - 35.3.14. Setting SCSI I/O Sizes
- 36. Troubleshooting Recovery
- 37. Debugging a Lustre File System
- 37.1. Diagnostic and Debugging Tools
- 37.2. Lustre Debugging Procedures
- 37.2.1. Understanding the Lustre Debug Messaging Format
- 37.2.2. Using the lctl Tool to View Debug Messages
- 37.2.3. Dumping the Buffer to a File (
debug_daemon) - 37.2.4. Controlling Information Written to the Kernel Debug Log
- 37.2.5. Troubleshooting with
strace - 37.2.6. Looking at Disk Content
- 37.2.7. Finding the Lustre UUID of an OST
- 37.2.8. Printing Debug Messages to the Console
- 37.2.9. Tracing Lock Traffic
- 37.2.10. Controlling Console Message Rate Limiting
- 37.3. Lustre Debugging for Developers
- VI. Reference
- 38. Lustre File System Recovery
- 39. Lustre Parameters
- 39.1. Introduction to Lustre Parameters
- 39.2. Tuning Multi-Block Allocation (mballoc)
- 39.3. Monitoring Lustre File System I/O
- 39.4. Tuning Lustre File System I/O
- 39.5. Configuring Timeouts in a Lustre File System
- 39.6. Monitoring LNet
- 39.7. Allocating Free Space on OSTs
- 39.8. Configuring Locking
- 39.9. Setting MDS and OSS Thread Counts
- 39.10. Enabling and Interpreting Debugging Logs
- 40. User Utilities
- 41. Programming Interfaces
- 42. Setting Lustre Properties in a C Program (
llapi) - 43. Configuration Files and Module Parameters
- 44. System Configuration Utilities
- 44.1. l_getidentity
- 44.2. lctl
- 44.3. ll_decode_filter_fid
- 44.4. llobdstat
- 44.5. llog_reader
- 44.6. llstat
- 44.7. llverdev
- 44.8. lshowmount
- 44.9. lst
- 44.10. lustre_rmmod.sh
- 44.11. lustre_rsync
- 44.12. mkfs.lustre
- 44.13. mount.lustre
- 44.14. routerstat
- 44.15. tunefs.lustre
- 44.16. Additional System Configuration Utilities
- 45. LNet Configuration C-API
- 45.1. General API Information
- 45.2. The LNet Configuration C-API
- 45.2.1. Configuring LNet
- 45.2.2. Enabling and Disabling Routing
- 45.2.3. Adding Routes
- 45.2.4. Deleting Routes
- 45.2.5. Showing Routes
- 45.2.6. Adding a Network Interface
- 45.2.7. Deleting a Network Interface
- 45.2.8. Showing Network Interfaces
- 45.2.9. Adjusting Router Buffer Pools
- 45.2.10. Showing Routing information
- 45.2.11. Showing LNet Traffic Statistics
- 45.2.12. Adding/Deleting/Showing Parameters through a YAML Block
- 45.2.13. Adding a route code example
- Glossary
- Index
List of Figures
- 1.1. Lustre file system components in a basic cluster
- 1.2. Lustre cluster at scale
- 1.3. Layout EA on MDT pointing to file data on OSTs
- 1.4. Lustre client requesting file data
- 1.5. File striping on a Lustre file system
- 3.1. Lustre failover configuration for a active/passive MDT
- 3.2. Lustre failover configuration for a active/active MDTs
- 3.3. Lustre failover configuration for an OSTs
- 16.1. Routing Configuration with Multi-Rail
- 19.1. PFL object mapping diagram
- 19.2. Example: create a composite file
- 19.3. Example: add a component to an existing composite file
- 19.4. Example: delete a component from an existing file
- 19.5. Example: migrate normal to composite
- 19.6. Example: migrate composite to composite
- 19.7. Example: migrate composite to normal
- 19.8. Example: create a SEL file
- 19.9. Example: an extension of a SEL file
- 19.10. Example: a spillover in a SEL file
- 19.11. Example: repeat a SEL component
- 19.12. Example: forced extension in a SEL file
- 19.13. LOV/LMV foreign format
- 19.14. Example: create a foreign file
- 20.1. Resulting file layout
- 22.1. FLR Delayed Write
- 26.1. Overview of the Lustre file system HSM
- 27.1. Overview of PCC-RW Architecture
- 28.1. Flow chart: nodemap identity mapping
- 34.1. One of Two Connections to o2ib0 Down
- 34.2. Both Connections to o2ib0 Down
- 34.3. Connection to o2ib1 Down
- 34.4. Connection to o2ib1 Never Came Up
- 34.5. The internal structure of TBF policy
- 44.1. Lustre fileset
List of Tables
- 1.1. Lustre File System Scalability and Performance
- 1.2. Storage and hardware requirements for Lustre file system components
- 5.1. Default Inode Ratios Used for Newly Formatted OSTs
- 5.2. File and file system limits
- 8.1. Packages Installed on Lustre Servers
- 8.2. Packages Installed on Lustre Clients
- 8.3. Network Types Supported by Lustre LNDs
- 10.1. Default stripe pattern
- 16.1. Configuring Module Parameters
- 29.1. SSK Security Flavor Protections
- 29.2. lgss_sk Parameters
- 29.3. lsvcgssd Parameters
- 29.4. Key Descriptions
- 31.1. Write Barrier Status
List of Examples
- 34.1. lustre.conf
Table of Contents
The Lustre*Software Release 2.x Operations Manual provides detailed information and procedures to install, configure and tune a Lustre file system. The manual covers topics such as failover, quotas, striping, and bonding. This manual also contains troubleshooting information and tips to improve the operation and performance of a Lustre file system.
This document is maintained by Whamcloud in Docbook format. The canonical version is available at https://wiki.whamcloud.com/display/PUB/Documentation .
This document does not contain information about basic UNIX* operating system commands and procedures such as shutting down the system, booting the system, and configuring devices. Refer to the following for this information:
Software documentation that you received with your system
Red Hat* Enterprise Linux* documentation, which is at: https://docs.redhat.com/docs/en-US/index.html
Note
The Lustre client module is available for many different Linux* versions and distributions. The Red Hat Enterprise Linux distribution is the best supported and tested platform for Lustre servers.
The shell prompt used in the example text indicates whether a command can or should be executed by a regular user, or whether it requires superuser permission to run. Also, the machine type is often included in the prompt to indicate whether the command should be run on a client node, on an MDS node, an OSS node, or the MGS node.
Some examples are listed below, but other prompt combinations are also used as needed for the example.
|
Shell |
Prompt |
|---|---|
|
Regular user |
|
|
Superuser (root) |
|
|
Regular user on the client |
|
|
Superuser on the MDS |
|
|
Superuser on the OSS |
|
|
Superuser on the MGS |
|
|
Application |
Title |
Format |
Location |
|---|---|---|---|
|
Latest information |
Lustre Software Release 2.x Change Logs |
Wiki page |
Online at https://wiki.whamcloud.com/display/PUB/Documentation |
|
Service |
Lustre Software Release 2.x Operations Manual |
HTML |
Online at https://wiki.whamcloud.com/display/PUB/Documentation |
These web sites provide additional resources:
The Lustre* File System Release 2.x Operations Manual is a community maintained work. Versions of the manual are continually built as suggestions for changes and improvements arrive. Suggestions for improvements can be submitted through the ticketing system maintained at https://jira.whamcloud.com/browse/LUDOC. Instructions for providing a patch to the existing manual are available at: http://wiki.lustre.org/Lustre_Manual_Changes.
This manual covers a range of Lustre 2.x software releases, currently starting with the 2.5 release. Features specific to individual releases are identified within the table of contents using a shorthand notation (e.g. this paragraph is tagged as a Lustre 2.5 specific feature so that it will be updated when the 2.5-specific tagging is removed), and within the text using a distinct box.
Which version am I running?
The current version of Lustre that is in use on the node can be found
using the command lctl get_param version on any Lustre
client or server, for example:
$ lctl get_param version
version=2.10.5
Only the latest revision of this document is made readily available because changes are continually arriving. The current and latest revision of this manual is available from links maintained at: http://lustre.opensfs.org/documentation/.
| Revision History | ||
|---|---|---|
| Revision 0 | Built on 26 May 2026 22:04:13Z | |
| Continuous build of Manual. | ||
Part I provides background information to help you understand the Lustre file system architecture and how the major components fit together. You will find information in this section about:
Table of Contents
This chapter describes the Lustre architecture and features of the Lustre file system. It includes the following sections:
The Lustre architecture is a storage architecture for clusters. The central component of the Lustre architecture is the Lustre file system, which is supported on the Linux operating system and provides a POSIX *standard-compliant UNIX file system interface.
The Lustre storage architecture is used for many different kinds of clusters. It is best known for powering many of the largest high-performance computing (HPC) clusters worldwide, with tens of thousands of client systems, petabytes (PiB) of storage and hundreds of gigabytes per second (GB/sec) of I/O throughput. Many HPC sites use a Lustre file system as a site-wide global file system, serving dozens of clusters.
The ability of a Lustre file system to scale capacity and performance for any need reduces the need to deploy many separate file systems, such as one for each compute cluster. Storage management is simplified by avoiding the need to copy data between compute clusters. In addition to aggregating storage capacity of many servers, the I/O throughput is also aggregated and scales with additional servers. Moreover, throughput and/or capacity can be easily increased by adding servers dynamically.
While a Lustre file system can function in many work environments, it is not necessarily the best choice for all applications. It is best suited for uses that exceed the capacity that a single server can provide, though in some use cases, a Lustre file system can perform better with a single server than other file systems due to its strong locking and data coherency.
A Lustre file system is currently not particularly well suited for "peer-to-peer" usage models where clients and servers are running on the same node, each sharing a small amount of storage, due to the lack of data replication at the Lustre software level. In such uses, if one client/server fails, then the data stored on that node will not be accessible until the node is restarted.
Lustre file systems run on a variety of vendor's kernels. For more details, see the Lustre Test Matrix Section 8.1, “ Preparing to Install the Lustre Software”.
A Lustre installation can be scaled up or down with respect to the number of client nodes, storage capacity and bandwidth. Scalability and performance are dependent on available storage and network bandwidth and the processing power of the servers in the system. A Lustre filesystem can be deployed in a wide variety of configurations that can be scaled well beyond the size and performance observed in production systems to date.
Table 1.1, “Lustre File System Scalability and Performance” shows some of the scalability and performance characteristics of a Lustre file system. For a full list of Lustre file and filesystem limits see Table 5.2, “File and file system limits”.
Table 1.1. Lustre File System Scalability and Performance
|
Feature |
Current Practical Range |
Known Production Usage |
|---|---|---|
|
Client Scalability |
10-100000 |
50000+ clients, several in the 10000 to 20000 range |
|
Client Performance |
Single client: I/O 90% of network bandwidth Aggregate: 50 TB/sec I/O, 225M IOPS |
Single client: 80 GB/sec I/O (8x 100Gbps IB), 100k IOPS Aggregate: 20 TB/sec I/O, 40M IOPS |
|
OSS Scalability |
Single OSS: 1-32 OSTs per OSS Single OST: 1000M objects, 4096TiB per OST OSS count: 1000 OSSs, 4000 OSTs |
Single OSS: 8 OSTs per OSS Single OST: 2048TiB OSTs OSS count: 450 OSSs with 900 750TiB HDD OSTs + 450 25TiB NVMe OSTs 576 OSSs with 576 69TiB NVMe OSTs |
|
OSS Performance |
Single OSS: 50 GB/sec, 1M IOPS Aggregate: 50 TB/sec, 225M IOPS |
Single OSS: 15/25 GB/sec write/read, 750k IOPS Aggregate: 20 TB/sec, 40M IOPS |
|
MDS Scalability |
Single MDS: 1-4 MDTs per MDS Single MDT: 4 billion files, 16TiB per MDT (ldiskfs) 64 billion files, 64TiB per MDT (ZFS) MDS count: 256 MDSs, up to 256 MDTs |
Single MDS: 4 billion files MDS count: 56 MDS with 56 4TiB MDTs 90 billion files |
|
MDS Performance |
1M/s create operations 2M/s stat operations |
100k/s create operations, 200k/s metadata stat operations |
|
File system Scalability |
Single File: 32 PiB max file size (ldiskfs) 2^63 bytes (ZFS) Aggregate: 2048 PiB space, 1 trillion files |
Single File: multi-TiB max file size Aggregate: 700 PiB space, 90 billion files |
Other Lustre software features are:
Performance-enhanced ext4 file system:The Lustre file system uses an improved version of the ext4 journaling file system to store data and metadata. This version, called
ldiskfs, has been enhanced to improve performance and provide additional functionality needed by the Lustre file system.It is also possible to use ZFS as the backing filesystem for Lustre for the MDT, OST, and MGS storage. This allows Lustre to leverage the scalability and data integrity features of ZFS for individual storage targets.
POSIX standard compliance:The full POSIX test suite passes in an identical manner to a local ext4 file system, with limited exceptions on Lustre clients. In a cluster, most operations are atomic so that clients never see stale data or metadata. The Lustre software supports mmap() file I/O.
High-performance heterogeneous networking:The Lustre software supports a variety of high performance, low latency networks and permits Remote Direct Memory Access (RDMA) for InfiniBand *(utilizing OpenFabrics Enterprise Distribution (OFED*), Intel OmniPath®, and other advanced networks for fast and efficient network transport. Multiple RDMA networks can be bridged using Lustre routing for maximum performance. The Lustre software also includes integrated network diagnostics.
High-availability:The Lustre file system supports active/active failover using shared storage partitions for OSS targets (OSTs), and for MDS targets (MDTs). The Lustre file system can work with a variety of high availability (HA) managers to allow automated failover and has no single point of failure (NSPF). This allows application transparent recovery. Multiple mount protection (MMP) provides integrated protection from errors in highly-available systems that would otherwise cause file system corruption.
Security:By default TCP connections are only allowed from privileged ports. UNIX group membership is verified on the MDS.
Access control list (ACL), extended attributes:the Lustre security model follows that of a UNIX file system, enhanced with POSIX ACLs. Noteworthy additional features include root squash.
Interoperability:The Lustre file system runs on a variety of CPU architectures and mixed-endian clusters and is interoperable between successive major Lustre software releases.
Object-based architecture:Clients are isolated from the on-disk file structure enabling upgrading of the storage architecture without affecting the client.
Byte-granular file and fine-grained metadata locking:Many clients can read and modify the same file or directory concurrently. The Lustre distributed lock manager (LDLM) ensures that files are coherent between all clients and servers in the file system. The MDT LDLM manages locks on inode permissions and pathnames. Each OST has its own LDLM for locks on file stripes stored thereon, which scales the locking performance as the file system grows.
Quotas:User and group quotas are available for a Lustre file system.
Capacity growth:The size of a Lustre file system and aggregate cluster bandwidth can be increased without interruption by adding new OSTs and MDTs to the cluster.
Controlled file layout:The layout of files across OSTs can be configured on a per file, per directory, or per file system basis. This allows file I/O to be tuned to specific application requirements within a single file system. The Lustre file system uses RAID-0 striping and balances space usage across OSTs.
Network data integrity protection:A checksum of all data sent from the client to the OSS protects against corruption during data transfer.
MPI I/O:The Lustre architecture has a dedicated MPI ADIO layer that optimizes parallel I/O to match the underlying file system architecture.
NFS and CIFS export:Lustre files can be re-exported using NFS (via Linux knfsd or Ganesha) or CIFS (via Samba), enabling them to be shared with non-Linux clients such as Microsoft*Windows, *Apple *Mac OS X *, and others.
Disaster recovery tool:The Lustre file system provides an online distributed file system check (LFSCK) that can restore consistency between storage components in case of a major file system error. A Lustre file system can operate even in the presence of file system inconsistencies, and LFSCK can run while the filesystem is in use, so LFSCK is not required to complete before returning the file system to production.
Performance monitoring:The Lustre file system offers a variety of mechanisms to examine performance and tuning.
Open source:The Lustre software is licensed under the GPL 2.0 license for use with the Linux operating system.
An installation of the Lustre software includes a management server (MGS) and one or more Lustre file systems interconnected with Lustre networking (LNet).
A basic configuration of Lustre file system components is shown in Figure 1.1, “Lustre file system components in a basic cluster”.
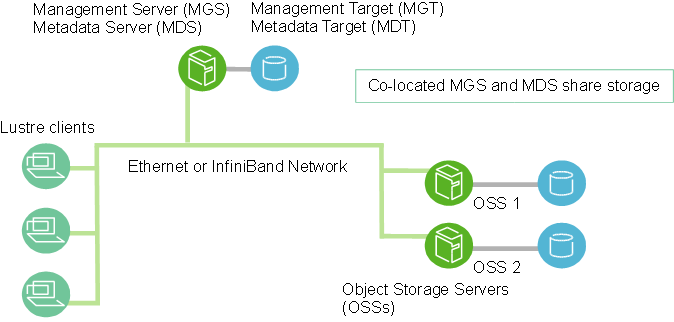
The MGS stores configuration information for all the Lustre file systems in a cluster and provides this information to other Lustre components. Each Lustre target contacts the MGS to provide information, and Lustre clients contact the MGS to retrieve information.
It is preferable that the MGS have its own storage space so that it can be managed independently. However, the MGS can be co-located and share storage space with an MDS as shown in Figure 1.1, “Lustre file system components in a basic cluster”.
Each Lustre file system consists of the following components:
Metadata Servers (MDS)- The MDS makes metadata stored in one or more MDTs available to Lustre clients. Each MDS manages the names and directories in the Lustre file system(s) and provides network request handling for one or more local MDTs.
Metadata Targets (MDT) - Each filesystem has at least one MDT, which holds the root directory. The MDT stores metadata (such as filenames, directories, permissions and file layout) on storage attached to an MDS. Each file system has one MDT. An MDT on a shared storage target can be available to multiple MDSs, although only one can access it at a time. If an active MDS fails, a second MDS node can serve the MDT and make it available to clients. This is referred to as MDS failover.
Multiple MDTs are supported with the Distributed Namespace Environment (Distributed Namespace Environment (DNE)). In addition to the primary MDT that holds the filesystem root, it is possible to add additional MDS nodes, each with their own MDTs, to hold sub-directory trees of the filesystem.
Introduced in Lustre 2.8Since Lustre software release 2.8, DNE also allows the filesystem to distribute files of a single directory over multiple MDT nodes. A directory which is distributed across multiple MDTs is known as a Striped Directory.
Object Storage Servers (OSS): The OSS provides file I/O service and network request handling for one or more local OSTs. Typically, an OSS serves between two and eight OSTs, up to 16 TiB each. A typical configuration is an MDT on a dedicated node, two or more OSTs on each OSS node, and a client on each of a large number of compute nodes.
Object Storage Target (OST): User file data is stored in one or more objects, each object on a separate OST in a Lustre file system. The number of objects per file is configurable by the user and can be tuned to optimize performance for a given workload.
Lustre clients: Lustre clients are computational, visualization or desktop nodes that are running Lustre client software, allowing them to mount the Lustre file system.
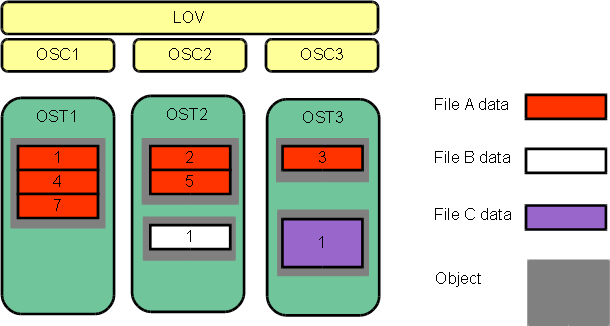
The Lustre client software provides an interface between the Linux virtual file system and the Lustre servers. The client software includes a management client (MGC), a metadata client (MDC), and multiple object storage clients (OSCs), one corresponding to each OST in the file system.
A logical object volume (LOV) aggregates the OSCs to provide transparent access across all the OSTs. Thus, a client with the Lustre file system mounted sees a single, coherent, synchronized namespace. Several clients can write to different parts of the same file simultaneously, while, at the same time, other clients can read from the file.
A logical metadata volume (LMV) aggregates the MDCs to provide transparent access across all the MDTs in a similar manner as the LOV does for file access. This allows the client to see the directory tree on multiple MDTs as a single coherent namespace, and striped directories are merged on the clients to form a single visible directory to users and applications.
Table 1.2, “ Storage and hardware requirements for Lustre file system components”provides the requirements for attached storage for each Lustre file system component and describes desirable characteristics of the hardware used.
Table 1.2. Storage and hardware requirements for Lustre file system components
|
|
Required attached storage |
Desirable hardware characteristics |
|---|---|---|
|
MDSs |
1-2% of file system capacity |
Adequate CPU power, plenty of memory, fast disk storage. |
|
OSSs |
1-128 TiB per OST, 1-8 OSTs per OSS |
Good bus bandwidth. Recommended that storage be balanced evenly across OSSs and matched to network bandwidth. |
|
Clients |
No local storage needed |
Low latency, high bandwidth network. |
For additional hardware requirements and considerations, see Chapter 5, Determining Hardware Configuration Requirements and Formatting Options.
Lustre Networking (LNet) is a custom networking API that provides the communication infrastructure that handles metadata and file I/O data for the Lustre file system servers and clients. For more information about LNet, see Chapter 2, Understanding Lustre Networking (LNet).
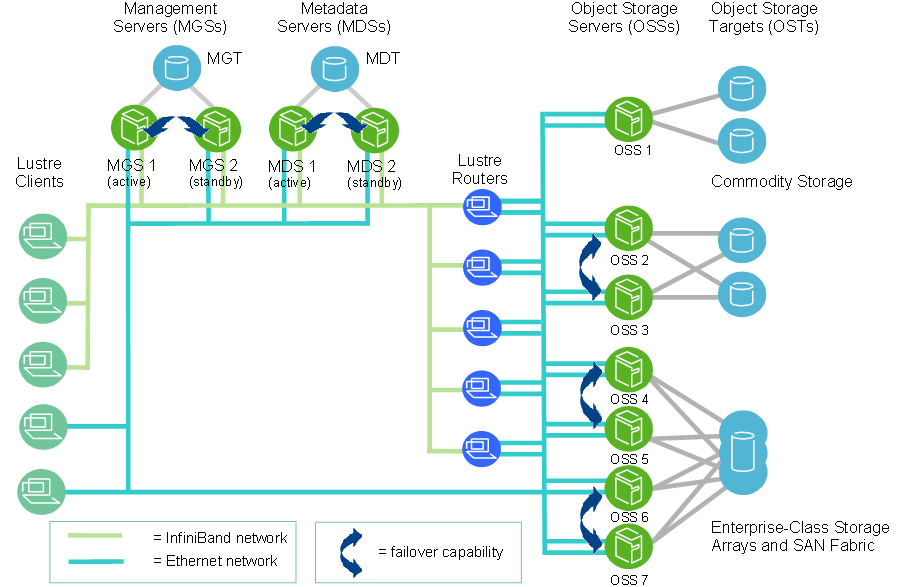
At scale, a Lustre file system cluster can include hundreds of OSSs and thousands of clients (see Figure 1.2, “ Lustre cluster at scale”). More than one type of network can be used in a Lustre cluster. Shared storage between OSSs enables failover capability. For more details about OSS failover, see Chapter 3, Understanding Failover in a Lustre File System.
Lustre File IDentifiers (FIDs) are used internally for identifying files or objects, similar to inode numbers in local filesystems. A FID is a 128-bit identifier, which contains a unique 64-bit sequence number (SEQ), a 32-bit object ID (OID), and a 32-bit version number. The sequence number is unique across all Lustre targets in a file system (OSTs and MDTs). This allows multiple MDTs and OSTs to uniquely identify objects without depending on identifiers in the underlying filesystem (e.g. inode numbers) that are likely to be duplicated between targets. The FID SEQ number also allows mapping a FID to a particular MDT or OST.
The LFSCK file system consistency checking tool provides functionality that enables FID-in-dirent for existing files. It includes the following functionality:
Verifies the FID stored with each directory entry and regenerates it from the inode if it is invalid or missing.
Verifies the linkEA entry for each inode and regenerates it if invalid or missing. The linkEA stores the file name and parent FID. It is stored as an extended attribute in each inode. Thus, the linkEA can be used to reconstruct the full path name of a file from only the FID.
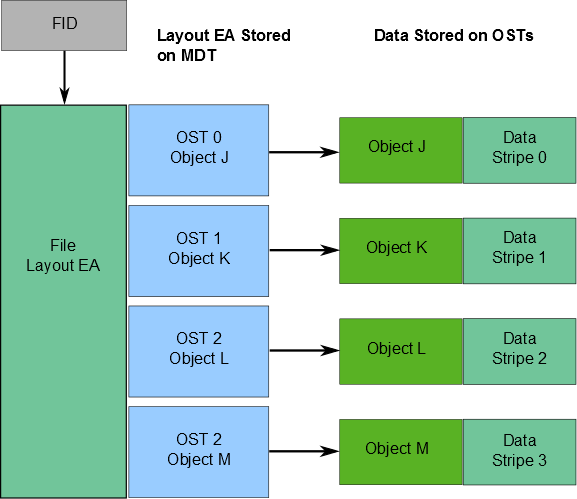
Information about where file data is located on the OST(s) is stored as an extended attribute called layout EA in an MDT object identified by the FID for the file (see Figure 1.3, “Layout EA on MDT pointing to file data on OSTs”). If the file is a regular file (not a directory or symbol link), the MDT object points to 1-to-N OST object(s) on the OST(s) that contain the file data. If the MDT file points to one object, all the file data is stored in that object. If the MDT file points to more than one object, the file data is striped across the objects using RAID 0, and each object is stored on a different OST. (For more information about how striping is implemented in a Lustre file system, see Section 1.3.1, “ Lustre File System and Striping”.
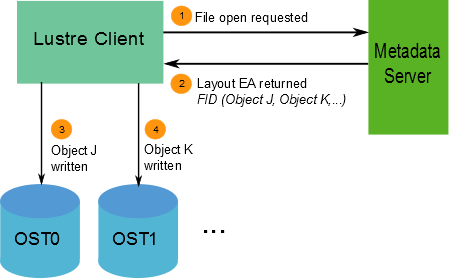
When a client wants to read from or write to a file, it first fetches the layout EA from the MDT object for the file. The client then uses this information to perform I/O on the file, directly interacting with the OSS nodes where the objects are stored. This process is illustrated in Figure 1.4, “Lustre client requesting file data” .
The available bandwidth of a Lustre file system is determined as follows:
The network bandwidth equals the aggregated bandwidth of the OSSs to the targets.
The disk bandwidth equals the sum of the disk bandwidths of the storage targets (OSTs) up to the limit of the network bandwidth.
The aggregate bandwidth equals the minimum of the disk bandwidth and the network bandwidth.
The available file system space equals the sum of the available space of all the OSTs.
One of the main factors leading to the high performance of Lustre file systems is the ability to stripe data across multiple OSTs in a round-robin fashion. Users can optionally configure for each file the number of stripes, stripe size, and OSTs that are used.
Striping can be used to improve performance when the aggregate bandwidth to a single file exceeds the bandwidth of a single OST. The ability to stripe is also useful when a single OST does not have enough free space to hold an entire file. For more information about benefits and drawbacks of file striping, see Section 19.2, “ Lustre File Layout (Striping) Considerations”.
Striping allows segments or 'chunks' of data in a file to be stored
on different OSTs, as shown in
Figure 1.5, “File striping on a
Lustre file system”. In the Lustre file
system, a RAID 0 pattern is used in which data is "striped" across a
certain number of objects. The number of objects in a single file is
called the
stripe_count.
Each object contains a chunk of data from the file. When the chunk
of data being written to a particular object exceeds the
stripe_size, the next chunk of data in the file is
stored on the next object.
Default values for
stripe_count and
stripe_size are set for the file system. The default
value for
stripe_count is 1 stripe for file and the default value
for
stripe_size is 1MB. The user may change these values on
a per directory or per file basis. For more details, see
Section 19.3, “Setting the File Layout/Striping Configuration (lfs
setstripe)”.
Figure 1.5, “File striping on a
Lustre file system”, the
stripe_size for File C is larger than the
stripe_size for File A, allowing more data to be stored
in a single stripe for File C. The
stripe_count for File A is 3, resulting in data striped
across three objects, while the
stripe_count for File B and File C is 1.
No space is reserved on the OST for unwritten data. File A in Figure 1.5, “File striping on a Lustre file system”.
The maximum file size is not limited by the size of a single target. In a Lustre file system, files can be striped across multiple objects (up to 2000), and each object can be up to 16 TiB in size with ldiskfs, or up to 256PiB with ZFS. This leads to a maximum file size of 31.25 PiB for ldiskfs or 8EiB with ZFS. Note that a Lustre file system can support files up to 2^63 bytes (8EiB), limited only by the space available on the OSTs.
Note
ldiskfs filesystems without the ea_inode
feature limit the maximum stripe count for a single file to 160 OSTs.
Although a single file can only be striped over 2000 objects, Lustre file systems can have thousands of OSTs. The I/O bandwidth to access a single file is the aggregated I/O bandwidth to the objects in a file, which can be as much as a bandwidth of up to 2000 servers. On systems with more than 2000 OSTs, clients can do I/O using multiple files to utilize the full file system bandwidth.
For more information about striping, see Chapter 19, Managing File Layout (Striping) and Free Space.
Extended Attributes(xattrs)
Lustre uses lov_user_md_v1/lov_user_md_v3 data-structures to
maintain its file striping information under xattrs. Extended
attributes are created when files and directory are created. Lustre
uses trusted extended attributes to store its
parameters which are root-only accessible. The parameters are:
trusted.lov: Holds layout for a regular file, or default file layout stored on a directory (also accessible aslustre.lovfor non-root users).trusted.lma: Holds FID and extra state flags for current filetrusted.lmv: Holds layout for a striped directory (DNE 2), not present otherwisetrusted.link: Holds parent directory FID + filename for each link to a file (forlfs fid2path)
xattr which are stored and present in the file could be verify using:
# getfattr -d -m - /mnt/testfs/file>
Table of Contents
This chapter introduces Lustre networking (LNet). It includes the following sections:
In a cluster using one or more Lustre file systems, the network communication infrastructure required by the Lustre file system is implemented using the Lustre networking (LNet) feature.
LNet supports many commonly-used network types, such as InfiniBand and IP networks, and allows simultaneous availability across multiple network types with routing between them. Remote direct memory access (RDMA) is permitted when supported by underlying networks using the appropriate Lustre network driver (LND). High availability and recovery features enable transparent recovery in conjunction with failover servers.
An LND is a pluggable driver that provides support for a particular network type, for
example ksocklnd is the driver which implements the TCP Socket LND that
supports TCP networks. LNDs are loaded into the driver stack, with one LND for each network
type in use.
For information about configuring LNet, see Chapter 9, Configuring Lustre Networking (LNet).
For information about administering LNet, see Part III, “Administering Lustre”.
Key features of LNet include:
RDMA, when supported by underlying networks
Support for many commonly-used network types
High availability and recovery
Support of multiple network types simultaneously
Routing among disparate networks
LNet permits end-to-end read/write throughput at or near peak bandwidth rates on a variety of network interconnects.
A Lustre network is comprised of clients and servers running the Lustre software. It need not be confined to one LNet subnet but can span several networks provided routing is possible between the networks. In a similar manner, a single network can have multiple LNet subnets.
The Lustre networking stack is comprised of two layers, the LNet code module and the LND. The LNet layer operates above the LND layer in a manner similar to the way the network layer operates above the data link layer. LNet layer is connectionless, asynchronous and does not verify that data has been transmitted while the LND layer is connection oriented and typically does verify data transmission.
LNets are uniquely identified by a label comprised of a string corresponding to an LND and
a number, such as tcp0, o2ib0, or o2ib1, that uniquely identifies each LNet. Each node on an
LNet has at least one network identifier (NID). A NID is a combination of the address of the
network interface and the LNet label in the
form:address@LNet_label
Examples:
192.168.1.2@tcp0 10.13.24.90@o2ib1
In certain circumstances it might be desirable for Lustre file system traffic to pass between multiple LNets. This is possible using LNet routing. It is important to realize that LNet routing is not the same as network routing. For more details about LNet routing, see Chapter 9, Configuring Lustre Networking (LNet)
Table of Contents
This chapter describes failover in a Lustre file system. It includes:
In a high-availability (HA) system, unscheduled downtime is minimized by using redundant hardware and software components and software components that automate recovery when a failure occurs. If a failure condition occurs, such as the loss of a server or storage device or a network or software fault, the system's services continue with minimal interruption. Generally, availability is specified as the percentage of time the system is required to be available.
Availability is accomplished by replicating hardware and/or software so that when a primary server fails or is unavailable, a standby server can be switched into its place to run applications and associated resources. This process, called failover, is automatic in an HA system and, in most cases, completely application-transparent.
A failover hardware setup requires a pair of servers with a shared resource (typically a physical storage device, which may be based on SAN, NAS, hardware RAID, SCSI or Fibre Channel (FC) technology). The method of sharing storage should be essentially transparent at the device level; the same physical logical unit number (LUN) should be visible from both servers. To ensure high availability at the physical storage level, we encourage the use of RAID arrays to protect against drive-level failures.
Note
The Lustre software does not provide redundancy for data; it depends exclusively on redundancy of backing storage devices. The backing OST storage should be RAID 5 or, preferably, RAID 6 storage. MDT storage should be RAID 1 or RAID 10.
To establish a highly-available Lustre file system, power management software or hardware and high availability (HA) software are used to provide the following failover capabilities:
Resource fencing- Protects physical storage from simultaneous access by two nodes.
Resource management- Starts and stops the Lustre resources as a part of failover, maintains the cluster state, and carries out other resource management tasks.
Health monitoring- Verifies the availability of hardware and network resources and responds to health indications provided by the Lustre software.
These capabilities can be provided by a variety of software and/or hardware solutions. For more information about using power management software or hardware and high availability (HA) software with a Lustre file system, see Chapter 11, Configuring Failover in a Lustre File System.
HA software is responsible for detecting failure of the primary Lustre server node and controlling the failover.The Lustre software works with any HA software that includes resource (I/O) fencing. For proper resource fencing, the HA software must be able to completely power off the failed server or disconnect it from the shared storage device. If two active nodes have access to the same storage device, data may be severely corrupted.
Nodes in a cluster can be configured for failover in several ways. They are often configured in pairs (for example, two OSTs attached to a shared storage device), but other failover configurations are also possible. Failover configurations include:
Active/passive pair - In this configuration, the active node provides resources and serves data, while the passive node is usually standing by idle. If the active node fails, the passive node takes over and becomes active.
Active/active pair - In this configuration, both nodes are active, each providing a subset of resources. In case of a failure, the second node takes over resources from the failed node.
If there is a single MDT in a filesystem, two MDSes can be configured as an active/passive pair, while pairs of OSSes can be deployed in an active/active configuration that improves OST availability without extra overhead. Often the standby MDS is the active MDS for another Lustre file system or the MGS, so no nodes are idle in the cluster. If there are multiple MDTs in a filesystem, active-active failover configurations are available for MDSs that serve MDTs on shared storage.
The failover functionality provided by the Lustre software can be used for the following failover scenario. When a client attempts to do I/O to a failed Lustre target, it continues to try until it receives an answer from any of the configured failover nodes for the Lustre target. A user-space application does not detect anything unusual, except that the I/O may take longer to complete.
Failover in a Lustre file system requires that two nodes be configured as a failover pair, which must share one or more storage devices. A Lustre file system can be configured to provide MDT or OST failover.
For MDT failover, two MDSs can be configured to serve the same MDT. Only one MDS node can serve any MDT at one time. By placing two or more MDT devices on storage shared by two MDSs, one MDS can fail and the remaining MDS can begin serving the unserved MDT. This is described as an active/active failover pair.
For OST failover, multiple OSS nodes can be configured to be able to serve the same OST. However, only one OSS node can serve the OST at a time. An OST can be moved between OSS nodes that have access to the same storage device using
umount/mountcommands.
The
--servicenode option is used to set up nodes in a Lustre
file system for failover at creation time (using
mkfs.lustre) or later when the Lustre file system is
active (using
tunefs.lustre). For explanations of these utilities, see
Section 44.12, “
mkfs.lustre”and
Section 44.15, “
tunefs.lustre”.
Failover capability in a Lustre file system can be used to upgrade the Lustre software between successive minor versions without cluster downtime. For more information, see Chapter 17, Upgrading a Lustre File System.
For information about configuring failover, see Chapter 11, Configuring Failover in a Lustre File System.
Note
The Lustre software provides failover functionality only at the file system level. In a complete failover solution, failover functionality for system-level components, such as node failure detection or power control, must be provided by a third-party tool.
Caution
OST failover functionality does not protect against corruption caused by a disk failure. If the storage media (i.e., physical disk) used for an OST fails, it cannot be recovered by functionality provided in the Lustre software. We strongly recommend that some form of RAID be used for OSTs. Lustre functionality assumes that the storage is reliable, so it adds no extra reliability features.
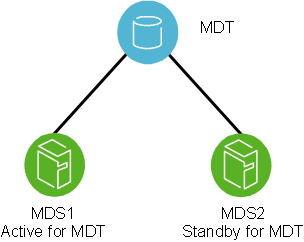
Two MDSs are typically configured as an active/passive failover pair as shown in Figure 3.1, “Lustre failover configuration for a active/passive MDT”. Note that both nodes must have access to shared storage for the MDT(s) and the MGS. The primary (active) MDS manages the Lustre system metadata resources. If the primary MDS fails, the secondary (passive) MDS takes over these resources and serves the MDTs and the MGS.
Note
In an environment with multiple file systems, the MDSs can be configured in a quasi active/active configuration, with each MDS managing metadata for a subset of the Lustre file system.
MDTs can be configured as an active/active failover configuration. A failover cluster is built from two MDSs as shown in Figure 3.2, “Lustre failover configuration for a active/active MDTs”.

OSTs are usually configured in a load-balanced, active/active failover configuration. A failover cluster is built from two OSSs as shown in Figure 3.3, “Lustre failover configuration for an OSTs”.
Note
OSSs configured as a failover pair must have shared disks/RAID.
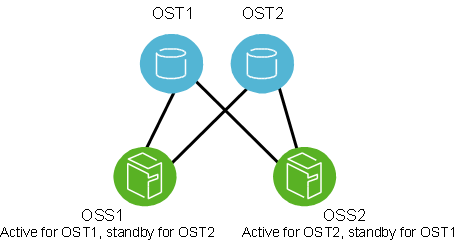
In an active configuration, 50% of the available OSTs are assigned to one OSS and the remaining OSTs are assigned to the other OSS. Each OSS serves as the primary node for half the OSTs and as a failover node for the remaining OSTs.
In this mode, if one OSS fails, the other OSS takes over all of the failed OSTs. The clients attempt to connect to each OSS serving the OST, until one of them responds. Data on the OST is written synchronously, and the clients replay transactions that were in progress and uncommitted to disk before the OST failure.
For more information about configuring failover, see Chapter 11, Configuring Failover in a Lustre File System.
Part II describes how to install and configure a Lustre file system. You will find information in this section about:
Table of Contents
- 4. Installation Overview
- 5. Determining Hardware Configuration Requirements and Formatting Options
- 6. Configuring Storage on a Lustre File System
- 7. Setting Up Network Interface Bonding
- 8. Installing the Lustre Software
- 9. Configuring Lustre Networking (LNet)
- 9.1. Configuring LNet via
lnetctlL 2.7 - 9.1.1. Configuring LNet
- 9.1.2. Displaying Global Settings
- 9.1.3. Adding, Deleting and Showing Networks
- 9.1.4. Manual Adding, Deleting and Showing PeersL 2.10
- 9.1.5. Dynamic Peer DiscoveryL 2.11
- 9.1.6. Adding, Deleting and Showing routes
- 9.1.7. Enabling and Disabling Routing
- 9.1.8. Showing routing information
- 9.1.9. Configuring Routing Buffers
- 9.1.10. Asymmetrical RoutesL 2.13
- 9.1.11. Importing YAML Configuration File
- 9.1.12. Exporting Configuration in YAML format
- 9.1.13. Showing LNet Traffic Statistics
- 9.1.14. YAML Syntax
- 9.2. Overview of LNet Module Parameters
- 9.3. Setting the LNet Module networks Parameter
- 9.4. Setting the LNet Module ip2nets Parameter
- 9.5. Setting the LNet Module routes Parameter
- 9.6. Testing the LNet Configuration
- 9.7. Configuring the Router Checker
- 9.8. Best Practices for LNet Options
- 9.1. Configuring LNet via
- 10. Configuring a Lustre File System
- 11. Configuring Failover in a Lustre File System
Table of Contents
This chapter provides on overview of the procedures required to set up, install and configure a Lustre file system.
Note
If the Lustre file system is new to you, you may find it helpful to refer to Part I, “Introducing the Lustre* File System” for a description of the Lustre architecture, file system components and terminology before proceeding with the installation procedure.
To set up Lustre file system hardware and install and configure the Lustre software, refer the the chapters below in the order listed:
(Required) Set up your Lustre file system hardware.
See Chapter 5, Determining Hardware Configuration Requirements and Formatting Options - Provides guidelines for configuring hardware for a Lustre file system including storage, memory, and networking requirements.
(Optional - Highly Recommended) Configure storage on Lustre storage devices.
See Chapter 6, Configuring Storage on a Lustre File System - Provides instructions for setting up hardware RAID on Lustre storage devices.
(Optional) Set up network interface bonding.
See Chapter 7, Setting Up Network Interface Bonding - Describes setting up network interface bonding to allow multiple network interfaces to be used in parallel to increase bandwidth or redundancy.
(Required) Install Lustre software.
See Chapter 8, Installing the Lustre Software - Describes preparation steps and a procedure for installing the Lustre software.
(Optional) Configure Lustre Networking (LNet).
See Chapter 9, Configuring Lustre Networking (LNet) - Describes how to configure LNet if the default configuration is not sufficient. By default, LNet will use the first TCP/IP interface it discovers on a system. LNet configuration is required if you are using InfiniBand or multiple Ethernet interfaces.
(Required) Configure the Lustre file system.
See Chapter 10, Configuring a Lustre File System - Provides an example of a simple Lustre configuration procedure and points to tools for completing more complex configurations.
(Optional) Configure Lustre failover.
See Chapter 11, Configuring Failover in a Lustre File System - Describes how to configure Lustre failover.
Table of Contents
This chapter describes hardware configuration requirements for a Lustre file system including:
A Lustre file system can utilize any kind of block storage device such as single disks, software RAID, hardware RAID, or a logical volume manager. In contrast to some networked file systems, the block devices are only attached to the MDS and OSS nodes in a Lustre file system and are not accessed by the clients directly.
Since the block devices are accessed by only one or two server nodes, a storage area network (SAN) that is accessible from all the servers is not required. Expensive switches are not needed because point-to-point connections between the servers and the storage arrays normally provide the simplest and best attachments. (If failover capability is desired, the storage must be attached to multiple servers.)
For a production environment, it is preferable that the MGS have separate storage to allow future expansion to multiple file systems. However, it is possible to run the MDS and MGS on the same machine and have them share the same storage device.
For best performance in a production environment, dedicated clients are required. For a non-production Lustre environment or for testing, a Lustre client and server can run on the same machine. However, dedicated clients are the only supported configuration.
Warning
Performance and recovery issues can occur if you put a client on an MDS or OSS:
Running the OSS and a client on the same machine can cause issues with low memory and memory pressure. If the client consumes all the memory and then tries to write data to the file system, the OSS will need to allocate pages to receive data from the client but will not be able to perform this operation due to low memory. This can cause the client to hang.
Running the MDS and a client on the same machine can cause recovery and deadlock issues and impact the performance of other Lustre clients.
Only servers running on 64-bit CPUs are tested and supported. 64-bit CPU clients are typically used for testing to match expected customer usage and avoid limitations due to the 4 GB limit for RAM size, 1 GB low-memory limitation, and 16 TB file size limit of 32-bit CPUs. Also, due to kernel API limitations, performing backups of Lustre filesystems on 32-bit clients may cause backup tools to confuse files that report the same 32-bit inode number, if the backup tools depend on the inode number for correct operation.
The storage attached to the servers typically uses RAID to provide fault tolerance and can optionally be organized with logical volume management (LVM), which is then formatted as a Lustre file system. Lustre OSS and MDS servers read, write and modify data in the format imposed by the file system.
The Lustre file system uses journaling file system technology on both the MDTs and OSTs. For a MDT, as much as a 20 percent performance gain can be obtained by placing the journal on a separate device.
The MDS can effectively utilize a lot of CPU cycles. A minimum of four processor cores are recommended. More are advisable for files systems with many clients.
Note
Lustre clients running on different CPU architectures is supported. One limitation is that the PAGE_SIZE kernel macro on the client must be as large as the PAGE_SIZE of the server. In particular, ARM or PPC clients with large pages (up to 64kB pages) can run with x86 servers (4kB pages).
MGT storage requirements are small (less than 100 MB even in the largest Lustre file systems), and the data on an MGT is only accessed on a server/client mount, so disk performance is not a consideration. However, this data is vital for file system access, so the MGT should be reliable storage, preferably mirrored RAID1.
MDS storage is accessed in a database-like access pattern with many seeks and read-and-writes of small amounts of data. Storage types that provide much lower seek times, such as SSD or NVMe is strongly preferred for the MDT, and high-RPM SAS is acceptable.
For maximum performance, the MDT should be configured as RAID1 with an internal journal and two disks from different controllers.
If you need a larger MDT, create multiple RAID1 devices from pairs
of disks, and then make a RAID0 array of the RAID1 devices. For ZFS,
use mirror VDEVs for the MDT. This ensures
maximum reliability because multiple disk failures only have a small
chance of hitting both disks in the same RAID1 device.
Doing the opposite (RAID1 of a pair of RAID0 devices) has a 50% chance that even two disk failures can cause the loss of the whole MDT device. The first failure disables an entire half of the mirror and the second failure has a 50% chance of disabling the remaining mirror.
If multiple MDTs are going to be present in the system, each MDT should be specified for the anticipated usage and load. For details on how to add additional MDTs to the filesystem, see Section 14.7, “Adding a New MDT to a Lustre File System”.
Warning
MDT0000 contains the root of the Lustre file system. If MDT0000 is unavailable for any reason, the file system cannot be used.
Note
Using the DNE feature it is possible to dedicate additional
MDTs to sub-directories off the file system root directory stored on
MDT0000, or arbitrarily for lower-level subdirectories, using the
lfs mkdir -i
command. If an MDT serving a subdirectory becomes unavailable, any
subdirectories on that MDT and all directories beneath it will also
become inaccessible. This is typically useful for top-level directories
to assign different users or projects to separate MDTs, or to distribute
other large working sets of files to multiple MDTs.mdt_index
Note
Starting in the 2.8 release it is possible
to spread a single large directory across multiple MDTs using the DNE
striped directory feature by specifying multiple stripes (or shards)
at creation time using the
lfs mkdir -c
command, where stripe_countstripe_count is often the
number of MDTs in the filesystem. Striped directories should
not be used for all directories in the filesystem, since this
incurs extra overhead compared to unstriped directories. This is indended
for specific applications where many output files are being created in
one large directory (over 50k entries).
The data access pattern for the OSS storage is a streaming I/O pattern that is dependent on the access patterns of applications being used. Each OSS can manage multiple object storage targets (OSTs), one for each volume with I/O traffic load-balanced between servers and targets. An OSS should be configured to have a balance between the network bandwidth and the attached storage bandwidth to prevent bottlenecks in the I/O path. Depending on the server hardware, an OSS typically serves between 2 and 8 targets, with each target between 24-48TB, but may be up to 256 terabytes (TBs) in size.
Lustre file system capacity is the sum of the capacities provided by the targets. For example, 64 OSSs, each with two 8 TB OSTs, provide a file system with a capacity of nearly 1 PB. If each OST uses ten 1 TB SATA disks (8 data disks plus 2 parity disks in a RAID-6 configuration), it may be possible to get 50 MB/sec from each drive, providing up to 400 MB/sec of disk bandwidth per OST. If this system is used as storage backend with a system network, such as the InfiniBand network, that provides a similar bandwidth, then each OSS could provide 800 MB/sec of end-to-end I/O throughput. (Although the architectural constraints described here are simple, in practice it takes careful hardware selection, benchmarking and integration to obtain such results.)
The desired performance characteristics of the backing file systems on the MDT and OSTs are independent of one another. The size of the MDT backing file system depends on the number of inodes needed in the total Lustre file system, while the aggregate OST space depends on the total amount of data stored on the file system. If MGS data is to be stored on the MDT device (co-located MGT and MDT), add 100 MB to the required size estimate for the MDT.
Each time a file is created on a Lustre file system, it consumes
one inode on the MDT and one OST object over which the file is striped.
Normally, each file's stripe count is based on the system-wide
default stripe count. However, this can be changed for individual files
using the lfs setstripe option. For more details,
see Chapter 19, Managing File Layout (Striping) and Free
Space.
In a Lustre ldiskfs file system, all the MDT inodes and OST objects are allocated when the file system is first formatted. When the file system is in use and a file is created, metadata associated with that file is stored in one of the pre-allocated inodes and does not consume any of the free space used to store file data. The total number of inodes on a formatted ldiskfs MDT or OST cannot be easily changed. Thus, the number of inodes created at format time should be generous enough to anticipate near term expected usage, with some room for growth without the effort of additional storage.
By default, the ldiskfs file system used by Lustre servers to store user-data objects and system data reserves 5% of space that cannot be used by the Lustre file system. Additionally, an ldiskfs Lustre file system reserves up to 400 MB on each OST, and up to 4GB on each MDT for journal use and a small amount of space outside the journal to store accounting data. This reserved space is unusable for general storage. Thus, at least this much space will be used per OST before any file object data is saved.
With a ZFS backing filesystem for the MDT or OST, the space allocation for inodes and file data is dynamic, and inodes are allocated as needed. A minimum of 4kB of usable space (before mirroring) is needed for each inode, exclusive of other overhead such as directories, internal log files, extended attributes, ACLs, etc. ZFS also reserves approximately 3% of the total storage space for internal and redundant metadata, which is not usable by Lustre. Since the size of extended attributes and ACLs is highly dependent on kernel versions and site-specific policies, it is best to over-estimate the amount of space needed for the desired number of inodes, and any excess space will be utilized to store more inodes.
Less than 100 MB of space is typically required for the MGT. The size is determined by the total number of servers in the Lustre file system cluster(s) that are managed by the MGS.
When calculating the MDT size, the important factor to consider is the number of files to be stored in the file system, which depends on at least 2 KiB per inode of usable space on the MDT. Since MDTs typically use RAID-1+0 mirroring, the total storage needed will be double this.
Please note that the actual used space per MDT depends on the number
of files per directory, the number of stripes per file, whether files
have ACLs or user xattrs, and the number of hard links per file. The
storage required for Lustre file system metadata is typically 1-2
percent of the total file system capacity depending upon file size.
If the Chapter 20, Data on MDT (DoM) feature is in use for Lustre
2.11 or later, MDT space should typically be 5 percent or more of the
total space, depending on the distribution of small files within the
filesystem and the lod.*.dom_stripesize limit on
the MDT and file layout used.
For ZFS-based MDT filesystems, the number of inodes created on the MDT and OST is dynamic, so there is less need to determine the number of inodes in advance, though there still needs to be some thought given to the total MDT space compared to the total filesystem size.
For example, if the average file size is 5 MiB and you have 100 TiB of usable OST space, then you can calculate the minimum total number of inodes for MDTs and OSTs as follows:
(500 TB * 1000000 MB/TB) / 5 MB/inode = 100M inodes
It is recommended that the MDT(s) have at least twice the minimum number of inodes to allow for future expansion and allow for an average file size smaller than expected. Thus, the minimum space for ldiskfs MDT(s) should be approximately:
2 KiB/inode x 100 million inodes x 2 = 400 GiB ldiskfs MDT
For details about formatting options for ldiskfs MDT and OST file systems, see Section 5.3.1, “Setting Formatting Options for an ldiskfs MDT”.
Note
If the median file size is very small, 4 KB for example, the MDT would use as much space for each file as the space used on the OST, so the use of Data-on-MDT is strongly recommended in that case. The MDT space per inode should be increased correspondingly to account for the extra data space usage for each inode:
6 KiB/inode x 100 million inodes x 2 = 1200 GiB ldiskfs MDT
Note
If the MDT has too few inodes, this can cause the space on the
OSTs to be inaccessible since no new files can be created. In this
case, the lfs df -i and df -i
commands will limit the number of available inodes reported for the
filesystem to match the total number of available objects on the OSTs.
Be sure to determine the appropriate MDT size needed to support the
filesystem before formatting. It is possible to increase the
number of inodes after the file system is formatted, depending on the
storage. For ldiskfs MDT filesystems the resize2fs
tool can be used if the underlying block device is on a LVM logical
volume and the underlying logical volume size can be increased.
For ZFS new (mirrored) VDEVs can be added to the MDT pool to increase
the total space available for inode storage.
Inodes will be added approximately in proportion to space added.
Note
Note that the number of total and free inodes reported by
lfs df -i for ZFS MDTs and OSTs is estimated based
on the current average space used per inode. When a ZFS filesystem is
first formatted, this free inode estimate will be very conservative
(low) due to the high ratio of directories to regular files created for
internal Lustre metadata storage, but this estimate will improve as
more files are created by regular users and the average file size will
better reflect actual site usage.
Note
Using the DNE remote directory feature it is possible to increase the total number of inodes of a Lustre filesystem, as well as increasing the aggregate metadata performance, by configuring additional MDTs into the filesystem, see Section 14.7, “Adding a New MDT to a Lustre File System” for details.
For the OST, the amount of space taken by each object depends on the usage pattern of the users/applications running on the system. The Lustre software defaults to a conservative estimate for the average object size (between 64 KiB per object for 10 GiB OSTs, and 1 MiB per object for 16 TiB and larger OSTs). If you are confident that the average file size for your applications will be different than this, you can specify a different average file size (number of total inodes for a given OST size) to reduce file system overhead and minimize file system check time. See Section 5.3.2, “Setting Formatting Options for an ldiskfs OST” for more details.
By default, the mkfs.lustre utility applies these
options to the Lustre backing file system used to store data and metadata
in order to enhance Lustre file system performance and scalability. These
options include:
flex_bg- When the flag is set to enable this flexible-block-groups feature, block and inode bitmaps for multiple groups are aggregated to minimize seeking when bitmaps are read or written and to reduce read/modify/write operations on typical RAID storage (with 1 MiB RAID stripe widths). This flag is enabled on both OST and MDT file systems. On MDT file systems theflex_bgfactor is left at the default value of 16. On OSTs, theflex_bgfactor is set to 256 to allow all of the block or inode bitmaps in a singleflex_bgto be read or written in a single 1MiB I/O typical for RAID storage.huge_file- Setting this flag allows files on OSTs to be larger than 2 TiB in size.lazy_journal_init- This extended option is enabled to prevent a full overwrite to zero out the large journal that is allocated by default in a Lustre file system (up to 400 MiB for OSTs, up to 4GiB for MDTs), to reduce the formatting time.
To override the default formatting options, use arguments to
mkfs.lustre to pass formatting options to the backing file system:
--mkfsoptions='backing fs options'
For other mkfs.lustre options, see the Linux man page for
mke2fs(8).
The number of inodes on the MDT is determined at format time based on the total size of the file system to be created. The default bytes-per-inode ratio ("inode ratio") for an ldiskfs MDT is optimized at one inode for every 2560 bytes of file system space.
This setting takes into account the space needed for additional ldiskfs filesystem-wide metadata, such as the journal (up to 4 GB), bitmaps, and directories, as well as files that Lustre uses internally to maintain cluster consistency. There is additional per-file metadata such as file layout for files with a large number of stripes, Access Control Lists (ACLs), and user extended attributes.
Starting in Lustre 2.11, the Chapter 20, Data on MDT (DoM) (DoM) feature allows storing small files on the MDT to take advantage of high-performance flash storage, as well as reduce space and network overhead. If you are planning to use the DoM feature with an ldiskfs MDT, it is recommended to increase the bytes-per-inode ratio to have enough space on the MDT for small files, as described below.
It is possible to change the recommended default of 2560 bytes
per inode for an ldiskfs MDT when it is first formatted by adding the
--mkfsoptions="-i bytes-per-inode" option to
mkfs.lustre. Decreasing the inode ratio tunable
bytes-per-inode will create more inodes for a given
MDT size, but will leave less space for extra per-file metadata and is
not recommended. The inode ratio must always be strictly larger than
the MDT inode size, which is 1024 bytes by default. It is recommended
to use an inode ratio at least 1536 bytes larger than the inode size to
ensure the MDT does not run out of space. Increasing the inode ratio
with enough space for the most commonly file size (e.g. 5632 or 66560
bytes if 4KB or 64KB files are widely used) is recommended for DoM.
The size of the inode may be changed at format time by adding the
--stripe-count-hint=N to have
mkfs.lustre automatically calculate a reasonable
inode size based on the default stripe count that will be used by the
filesystem, or directly by specifying the
--mkfsoptions="-I inode-size" option. Increasing
the inode size will provide more space in the inode for a larger Lustre
file layout, ACLs, user and system extended attributes, SELinux and
other security labels, and other internal metadata and DoM data. However,
if these features or other in-inode xattrs are not needed, a larger inode
size may hurt metadata performance as 2x, 4x, or 8x as much data would be
read or written for each MDT inode access.
When formatting an OST file system, it can be beneficial
to take local file system usage into account, for example by running
df and df -i on a current filesystem
to get the used bytes and used inodes respectively, then computing the
average bytes-per-inode value. When deciding on the ratio for a new
filesystem, try to avoid having too many inodes on each OST, while keeping
enough margin to allow for future usage of smaller files. This helps
reduce the format and e2fsck time and makes more space available for data.
The table below shows the default bytes-per-inode ratio ("inode ratio") used for OSTs of various sizes when they are formatted.
Table 5.1. Default Inode Ratios Used for Newly Formatted OSTs
|
LUN/OST size |
Default Inode ratio |
Total inodes |
|---|---|---|
|
under 10GiB |
1 inode/16KiB |
640 - 655k |
|
10GiB - 1TiB |
1 inode/68KiB |
153k - 15.7M |
|
1TiB - 8TiB |
1 inode/256KiB |
4.2M - 33.6M |
|
over 8TiB |
1 inode/1MiB |
8.4M - 268M |
In environments with few small files, the default inode ratio
may result in far too many inodes for the average file size. In this
case, performance can be improved by increasing the number of
bytes-per-inode. To set the inode
ratio, use the --mkfsoptions="-i
argument to bytes-per-inode"mkfs.lustre to specify the expected
average (mean) size of OST objects. For example, to create an OST
with an expected average object size of 8 MiB run:
[oss#] mkfs.lustre --ost --mkfsoptions="-i $((8192 * 1024))" ...
Note
OSTs formatted with ldiskfs should preferably have fewer than 320 million objects per MDT, and up to a maximum of 4 billion inodes. Specifying a very small bytes-per-inode ratio for a large OST that exceeds this limit can cause either premature out-of-space errors and prevent the full OST space from being used, or will waste space and slow down e2fsck more than necessary. The default inode ratios are chosen to ensure the total number of inodes remain below this limit.
Note
File system check time on OSTs is affected by a number of variables in addition to the number of inodes, including the size of the file system, the number of allocated blocks, the distribution of allocated blocks on the disk, disk speed, CPU speed, and the amount of RAM on the server. Reasonable file system check times for valid filesystems are 5-30 minutes per TiB, but may increase significantly if substantial errors are detected and need to be repaired.
For further details about optimizing MDT and OST file systems, see Section 6.4, “ Formatting Options for ldiskfs RAID Devices”.
Table 5.2, “File and file system limits” describes current known limits of Lustre. These limits may be imposed by either the Lustre architecture or the Linux virtual file system (VFS) and virtual memory subsystems. In a few cases, a limit is defined within the code Lustre based on tested values and could be changed by editing and re-compiling the Lustre software. In these cases, the indicated limit was used for testing of the Lustre software.
Table 5.2. File and file system limits
|
Limit |
Value |
Description |
|---|---|---|
|
256 |
A single MDS can host one or more MDTs, either for separate filesystems, or aggregated into a single namespace. Each filesystem requires a separate MDT for the filesystem root directory. Up to 255 more MDTs can be added to the filesystem and are attached into the filesystem namespace with creation of DNE remote or striped directories. | |
|
8150 |
The maximum number of OSTs is a constant that can be changed at compile time. Lustre file systems with up to 4000 OSTs have been configured in the past. Multiple OST targets can be configured on a single OSS node. | |
|
1024TiB (ldiskfs), 1024TiB (ZFS) |
This is not a hard limit. Larger OSTs are possible, but most production systems do not typically go beyond the stated limit per OST because Lustre can add capacity and performance with additional OSTs, and having more OSTs improves aggregate I/O performance, minimizes contention, and allows parallel recovery (e2fsck for ldiskfs OSTs, scrub for ZFS OSTs). With 32-bit kernels, due to page cache limits, 16TB is the maximum block device size, which in turn applies to the size of OST. It is strongly recommended to run Lustre clients and servers with 64-bit kernels. | |
|
131072 |
The maximum number of clients is a constant that can be changed at compile time. Up to 30000 clients have been used in production accessing a single filesystem. | |
|
2EiB or larger |
Each OST can have a file system up to the "Maximum OST size" limit, and the Maximum number of OSTs can be combined into a single filesystem. | |
|
2000 |
This limit is imposed by the size of the layout that needs to be stored on disk and sent in RPC requests, but is not a hard limit of the protocol. The number of OSTs in the filesystem can exceed the stripe count, but this is the maximum number of OSTs on which a single file can be striped. Introduced in Lustre 2.13
NoteBefore 2.13, the default for ldiskfs
MDTs the maximum stripe count for a
single file is limited to 160 OSTs. In order to
increase the maximum file stripe count, use
| |
|
< 4 GiB |
The amount of data written to each object before moving on to next object. | |
|
64 KiB |
Due to the use of 64 KiB PAGE_SIZE on some CPU architectures such as ARM and POWER, the minimum stripe size is 64 KiB so that a single page is not split over multiple servers. This is also the minimum Data-on-MDT component size that can be specified. | |
|
16TiB (ldiskfs), 256TiB (ZFS) |
The amount of data that can be stored in a single object. An object corresponds to a stripe. The ldiskfs limit of 16 TB for a single object applies. For ZFS the limit is the size of the underlying OST. Files can consist of up to 2000 stripes, each stripe can be up to the maximum object size. | |
|
16 TiB on 32-bit systems
31.25 PiB on 64-bit ldiskfs systems, 8EiB on 64-bit ZFS systems |
Individual files have a hard limit of nearly 16 TiB on 32-bit systems imposed by the kernel memory subsystem. On 64-bit systems this limit does not exist. Hence, files can be 2^63 bits (8EiB) in size if the backing filesystem can support large enough objects and/or the files are sparse. A single file can have a maximum of 2000 stripes, which gives an upper single file data capacity of 31.25 PiB for 64-bit ldiskfs systems. The actual amount of data that can be stored in a file depends upon the amount of free space in each OST on which the file is striped. | |
|
Maximum number of files or subdirectories in a single directory |
600M-3.8B files (ldiskfs), 16T (ZFS) |
The Lustre software uses the ldiskfs hashed directory code, which has a limit of at least 600 million files, depending on the length of the file name. The limit on subdirectories is the same as the limit on regular files. Introduced in Lustre 2.8
NoteStarting in the 2.8 release it is
possible to exceed this limit by striping a single directory
over multiple MDTs with the Introduced in Lustre 2.12
NoteIn the 2.12 release, the
Introduced in Lustre 2.14
NoteStarting in the 2.14 release, the
|
|
4 billion (ldiskfs), 256 trillion (ZFS) per MDT |
The ldiskfs filesystem imposes an upper limit of 4 billion inodes per filesystem. By default, the MDT filesystem is formatted with one inode per 2KB of space, meaning 512 million inodes per TiB of MDT space. This can be increased initially at the time of MDT filesystem creation. For more information, see Chapter 5, Determining Hardware Configuration Requirements and Formatting Options. The ZFS filesystem dynamically allocates inodes and does not have a fixed ratio of inodes per unit of MDT space, but consumes approximately 4KiB of mirrored space per inode, depending on the configuration. Each additional MDT can hold up to the above maximum number of additional files, depending on available space and the distribution directories and files in the filesystem. | |
|
255 bytes (filename) |
This limit is 255 bytes for a single filename, the same as the limit in the underlying filesystems. | |
|
4096 bytes (pathname) |
The Linux VFS imposes a full pathname length of 4096 bytes. | |
|
No limit |
The Lustre software does not impose a maximum for the number of open files, but the practical limit depends on the amount of RAM on the MDS. No "tables" for open files exist on the MDS, as they are only linked in a list to a given client's export. Each client process has a limit of several thousands of open files which depends on its ulimit. |
This section describes the memory requirements for each Lustre file system component.
MDS memory requirements are determined by the following factors:
Number of clients
Size of the directories
Load placed on server
The amount of memory used by the MDS is a function of how many clients are on the system, and how many files they are using in their working set. This is driven, primarily, by the number of locks a client can hold at one time. The number of locks held by clients varies by load and memory availability on the server. Interactive clients can hold in excess of 10,000 locks at times. On the MDS, memory usage is approximately 2 KB per file, including the Lustre distributed lock manager (LDLM) lock and kernel data structures for the files currently in use. Having file data in cache can improve metadata performance by a factor of 10x or more compared to reading it from storage.
MDS memory requirements include:
File system metadata: A reasonable amount of RAM needs to be available for file system metadata. While no hard limit can be placed on the amount of file system metadata, if more RAM is available, then the disk I/O is needed less often to retrieve the metadata.
Network transport: If you are using TCP or other network transport that uses system memory for send/receive buffers, this memory requirement must also be taken into consideration.
Journal size: By default, the journal size is 4096 MB for each MDT ldiskfs file system. This can pin up to an equal amount of RAM on the MDS node per file system.
Failover configuration: If the MDS node will be used for failover from another node, then the RAM for each journal should be doubled, so the backup server can handle the additional load if the primary server fails.
By default, 4096 MB are used for the ldiskfs filesystem journal. Additional RAM is used for caching file data for the larger working set, which is not actively in use by clients but should be kept "hot" for improved access times. Approximately 1.5 KB per file is needed to keep a file in cache without a lock.
For example, for a single MDT on an MDS with 1,024 compute nodes, 12 interactive login nodes, and a 20 million file working set (of which 9 million files are cached on the clients at one time):
Operating system overhead = 4096 MB (RHEL8)
File system journal = 4096 MB
1024 * 32-core clients * 256 files/core * 2KB = 16384 MB
12 interactive clients * 100,000 files * 2KB = 2400 MB
20 million file working set * 1.5KB/file = 30720 MB
Thus, a reasonable MDS configuration for this workload is at least 60 GB of RAM. For active-active DNE MDT failover pairs, each MDS should have at least 96 GB of RAM. The additional memory can be used during normal operation to allow more metadata and locks to be cached and improve performance, depending on the workload.
For directories containing 1 million or more files, more memory can provide a significant benefit. For example, in an environment where clients randomly a single directory with 10 million files can consume as much as 35GB of RAM on the MDS.
When planning the hardware for an OSS node, consider the memory usage of several components in the Lustre file system (i.e., journal, service threads, file system metadata, etc.). Also, consider the effect of the OSS read cache feature, which consumes memory as it caches data on the OSS node.
In addition to the MDS memory requirements mentioned above, the OSS requirements also include:
Service threads: The service threads on the OSS node pre-allocate an RPC-sized MB I/O buffer for each
ost_ioservice thread, so these large buffers do not need to be allocated and freed for each I/O request.OSS read cache: OSS read cache provides read-only caching of data on an HDD-based OSS, using the regular Linux page cache to store the data. Just like caching from a regular file system in the Linux operating system, OSS read cache uses as much physical memory as is available.
The same calculation applies to files accessed from the OSS as for the MDS, but the load is typically distributed over more OSS nodes, so the amount of memory required for locks, inode cache, etc. listed for the MDS is spread out over the OSS nodes.
Because of these memory requirements, the following calculations should be taken as determining the minimum RAM required in an OSS node.
The minimum recommended RAM size for an OSS with eight OSTs, handling objects for 1/4 of the active files for the MDS:
Linux kernel and userspace daemon memory = 4096 MB
Network send/receive buffers (16 MB * 512 threads) = 8192 MB
1024 MB ldiskfs journal size * 8 OST devices = 8192 MB
16 MB read/write buffer per OST IO thread * 512 threads = 8192 MB
2048 MB file system read cache * 8 OSTs = 16384 MB
1024 * 32-core clients * 64 objects/core * 2KB/object = 4096 MB
12 interactive clients * 25,000 objects * 2KB/object = 600 MB
5 million object working set * 1.5KB/object = 7500 MB
For a non-failover configuration, the minimum RAM would be about 60 GB for an OSS node with eight OSTs. Additional memory on the OSS will improve the performance of reading smaller, frequently-accessed files.
For a failover configuration, the minimum RAM would be about 90 GB, as some of the memory is per-node. When the OSS is not handling any failed-over OSTs the extra RAM will be used as a read cache.
As a reasonable rule of thumb, about 24 GB of base memory plus 4 GB per OST can be used. In failover configurations, about 8 GB per primary OST is needed.
As a high performance file system, the Lustre file system places heavy loads on networks. Thus, a network interface in each Lustre server and client is commonly dedicated to Lustre file system traffic. This is often a dedicated TCP/IP subnet, although other network hardware can also be used.
A typical Lustre file system implementation may include the following:
A high-performance backend network for the Lustre servers, typically an InfiniBand (IB) network.
A larger client network.
Lustre routers to connect the two networks.
Lustre networks and routing are configured and managed by specifying parameters to the
Lustre Networking (lnet) module in
/etc/modprobe.d/lustre.conf.
To prepare to configure Lustre networking, complete the following steps:
Identify all machines that will be running Lustre software and the network interfaces they will use to run Lustre file system traffic. These machines will form the Lustre network .
A network is a group of nodes that communicate directly with one another. The Lustre software includes Lustre network drivers (LNDs) to support a variety of network types and hardware (see Chapter 2, Understanding Lustre Networking (LNet) for a complete list). The standard rules for specifying networks applies to Lustre networks. For example, two TCP networks on two different subnets (
tcp0andtcp1) are considered to be two different Lustre networks.If routing is needed, identify the nodes to be used to route traffic between networks.
If you are using multiple network types, then you will need a router. Any node with appropriate interfaces can route Lustre networking (LNet) traffic between different network hardware types or topologies --the node may be a server, a client, or a standalone router. LNet can route messages between different network types (such as TCP-to-InfiniBand) or across different topologies (such as bridging two InfiniBand or TCP/IP networks). Routing will be configured in Chapter 9, Configuring Lustre Networking (LNet).
Identify the network interfaces to include in or exclude from LNet.
If not explicitly specified, LNet uses either the first available interface or a pre-defined default for a given network type. Interfaces that LNet should not use (such as an administrative network or IP-over-IB), can be excluded.
Network interfaces to be used or excluded will be specified using the lnet kernel module parameters
networksandip2netsas described in Chapter 9, Configuring Lustre Networking (LNet).To ease the setup of networks with complex network configurations, determine a cluster-wide module configuration.
For large clusters, you can configure the networking setup for all nodes by using a single, unified set of parameters in the
lustre.conffile on each node. Cluster-wide configuration is described in Chapter 9, Configuring Lustre Networking (LNet).
Note
We recommend that you use 'dotted-quad' notation for IP addresses rather than host names to make it easier to read debug logs and debug configurations with multiple interfaces.
Table of Contents
This chapter describes best practices for storage selection and file system options to optimize performance on RAID, and includes the following sections:
Note
It is strongly recommended that storage used in a Lustre file system be configured with hardware RAID. The Lustre software does not support redundancy at the file system level and RAID is required to protect against disk failure.
The Lustre architecture allows the use of any kind of block device as backend storage. The characteristics of such devices, particularly in the case of failures, vary significantly and have an impact on configuration choices.
This section describes issues and recommendations regarding backend storage.
I/O on the MDT is typically mostly reads and writes of small amounts of data. For this reason, we recommend that you use RAID 1 for MDT storage. If you require more capacity for an MDT than one disk provides, we recommend RAID 1 + 0 or RAID 10.
A quick calculation makes it clear that without further redundancy, RAID 6 is required for large clusters and RAID 5 is not acceptable:
For a 2 PB file system (2,000 disks of 1 TB capacity) assume the mean time to failure (MTTF) of a disk is about 1,000 days. This means that the expected failure rate is 2000/1000 = 2 disks per day. Repair time at 10% of disk bandwidth is 1000 GB at 10MB/sec = 100,000 sec, or about 1 day.
For a RAID 5 stripe that is 10 disks wide, during 1 day of rebuilding, the chance that a second disk in the same array will fail is about 9/1000 or about 1% per day. After 50 days, you have a 50% chance of a double failure in a RAID 5 array leading to data loss.
Therefore, RAID 6 or another double parity algorithm is needed to provide sufficient redundancy for OST storage.
For better performance, we recommend that you create RAID sets with 4 or 8 data disks plus one or two parity disks. Using larger RAID sets will negatively impact performance compared to having multiple independent RAID sets.
To maximize performance for small I/O request sizes, storage configured as RAID 1+0 can yield much better results but will increase cost or reduce capacity.
RAID monitoring software is recommended to quickly detect faulty disks and allow them to be replaced to avoid double failures and data loss. Hot spare disks are recommended so that rebuilds happen without delays.
Backups of the metadata file systems are recommended. For details, see Chapter 18, Backing Up and Restoring a File System.
A writeback cache in a RAID storage controller can dramatically increase write performance on many types of RAID arrays if the writes are not done at full stripe width. Unfortunately, unless the RAID array has battery-backed cache (a feature only found in some higher-priced hardware RAID arrays), interrupting the power to the array may result in out-of-sequence or lost writes, and corruption of RAID parity and/or filesystem metadata, resulting in data loss.
Having a read or writeback cache onboard a PCI adapter card installed in an MDS or OSS is NOT SAFE in a high-availability (HA) failover configuration, as this will result in inconsistencies between nodes and immediate or eventual filesystem corruption. Such devices should not be used, or should have the onboard cache disabled.
If writeback cache is enabled, a file system check is required after the array loses power. Data may also be lost because of this.
Therefore, we recommend against the use of writeback cache when data integrity is critical. You should carefully consider whether the benefits of using writeback cache outweigh the risks.
When formatting an ldiskfs file system on a RAID device, it can be
beneficial to ensure that I/O requests are aligned with the underlying
RAID geometry. This ensures that Lustre RPCs do not generate unnecessary
disk operations which may reduce performance dramatically. Use the
--mkfsoptions parameter to specify additional parameters
when formatting the OST or MDT.
For RAID 5, RAID 6, or RAID 1+0 storage, specifying the following
option to the --mkfsoptions parameter option improves
the layout of the file system metadata, ensuring that no single disk
contains all of the allocation bitmaps:
-E stride = chunk_blocks The chunk_blocks
For more information on how to override the defaults while formatting MDT or OST file systems, see Section 5.3, “ Setting ldiskfs File System Formatting Options ”.
For best results, use RAID 5 with 5 or 9 disks or RAID 6 with 6 or 10 disks, each on a different controller. The stripe width is the optimal minimum I/O size. Ideally, the RAID configuration should allow 1 MB Lustre RPCs to fit evenly on a single RAID stripe without an expensive read-modify-write cycle. Use this formula to determine the
stripe_widthnumber_of_data_disks
stripe_width_blocks = chunk_blocks * number_of_data_disks = 1 MB If the RAID configuration does not allow
chunk_blocksstripe_width_blocks
The
stripe_width_blockschunk_blocks * number_of_data_disksstripe_width_blocks
Run --reformat on the file system device (/dev/sdc), specifying the RAID geometry to the underlying ldiskfs file system, where:
--mkfsoptions "other_options-E stride=chunk_blocks, stripe_width=stripe_width_blocks"
A RAID 6 configuration with 6 disks has 4 data and 2 parity disks. The
chunk_blocks
Because the number of data disks is equal to the power of 2, the stripe width is equal to 1 MB.
--mkfsoptions "other_options-E stride=chunk_blocks, stripe_width=stripe_width_blocks"...
If you have configured a RAID array and use it directly as an OST, it contains both data and metadata. For better performance, we recommend putting the OST journal on a separate device, by creating a small RAID 1 array and using it as an external journal for the OST.
In a typical Lustre file system, the default OST journal size is up to 1GB, and the default MDT journal size is up to 4GB, in order to handle a high transaction rate without blocking on journal flushes. Additionally, a copy of the journal is kept in RAM. Therefore, make sure you have enough RAM on the servers to hold copies of all journals.
The file system journal options are specified to mkfs.lustre using
the --mkfsoptions parameter. For example:
--mkfsoptions "other_options -j -J device=/dev/mdJ" To create an external journal, perform these steps for each OST on the OSS:
Create a 400 MB (or larger) journal partition (RAID 1 is recommended).
In this example,
/dev/sdbis a RAID 1 device.Create a journal device on the partition. Run:
oss# mke2fs -b 4096 -O journal_dev /dev/sdb
journal_sizeThe value of
journal_sizeCreate the OST.
In this example,
/dev/sdcis the RAID 6 device to be used as the OST, run:[oss#] mkfs.lustre --ost ... \ --mkfsoptions="-J device=/dev/sdb1" /dev/sdc
Mount the OST as usual.
Depending on your cluster size and workload, you may want to connect a SAN to a Lustre file system. Before making this connection, consider the following:
In many SAN file systems, clients allocate and lock blocks or inodes individually as they are updated. The design of the Lustre file system avoids the high contention that some of these blocks and inodes may have.
The Lustre file system is highly scalable and can have a very large number of clients. SAN switches do not scale to a large number of nodes, and the cost per port of a SAN is generally higher than other networking.
File systems that allow direct-to-SAN access from the clients have a security risk because clients can potentially read any data on the SAN disks, and misbehaving clients can corrupt the file system for many reasons like improper file system, network, or other kernel software, bad cabling, bad memory, and so on. The risk increases with increase in the number of clients directly accessing the storage.
Table of Contents
This chapter describes how to use multiple network interfaces in parallel to increase bandwidth and/or redundancy. Topics include:
Note
Using network interface bonding is optional.
Bonding, also known as link aggregation, trunking and port trunking, is a method of aggregating multiple physical network links into a single logical link for increased bandwidth.
Several different types of bonding are available in the Linux distribution. All these types are referred to as 'modes', and use the bonding kernel module.
Modes 0 to 3 allow load balancing and fault tolerance by using multiple interfaces. Mode 4 aggregates a group of interfaces into a single virtual interface where all members of the group share the same speed and duplex settings. This mode is described under IEEE spec 802.3ad, and it is referred to as either 'mode 4' or '802.3ad.'
The most basic requirement for successful bonding is that both endpoints of the connection must be capable of bonding. In a normal case, the non-server endpoint is a switch. (Two systems connected via crossover cables can also use bonding.) Any switch used must explicitly handle 802.3ad Dynamic Link Aggregation.
The kernel must also be configured with bonding. All supported Lustre kernels have bonding functionality. The network driver for the interfaces to be bonded must have the ethtool functionality to determine slave speed and duplex settings. All recent network drivers implement it.
To verify that your interface works with ethtool, run:
# which ethtool
/sbin/ethtool
# ethtool eth0
Settings for eth0:
Supported ports: [ TP MII ]
Supported link modes: 10baseT/Half 10baseT/Full
100baseT/Half 100baseT/Full
Supports auto-negotiation: Yes
Advertised link modes: 10baseT/Half 10baseT/Full
100baseT/Half 100baseT/Full
Advertised auto-negotiation: Yes
Speed: 100Mb/s
Duplex: Full
Port: MII
PHYAD: 1
Transceiver: internal
Auto-negotiation: on
Supports Wake-on: pumbg
Wake-on: d
Current message level: 0x00000001 (1)
Link detected: yes
# ethtool eth1
Settings for eth1:
Supported ports: [ TP MII ]
Supported link modes: 10baseT/Half 10baseT/Full
100baseT/Half 100baseT/Full
Supports auto-negotiation: Yes
Advertised link modes: 10baseT/Half 10baseT/Full
100baseT/Half 100baseT/Full
Advertised auto-negotiation: Yes
Speed: 100Mb/s
Duplex: Full
Port: MII
PHYAD: 32
Transceiver: internal
Auto-negotiation: on
Supports Wake-on: pumbg
Wake-on: d
Current message level: 0x00000007 (7)
Link detected: yes
To quickly check whether your kernel supports bonding, run:
# grep ifenslave /sbin/ifup
# which ifenslave
/sbin/ifenslave
Bonding module parameters control various aspects of bonding.
Outgoing traffic is mapped across the slave interfaces according to the transmit hash
policy. We recommend that you set the xmit_hash_policy option to the
layer3+4 option for bonding. This policy uses upper layer protocol information if available to
generate the hash. This allows traffic to a particular network peer to span multiple slaves,
although a single connection does not span multiple slaves.
$ xmit_hash_policy=layer3+4
The miimon option enables users to monitor the link status. (The
parameter is a time interval in milliseconds.) It makes an interface failure transparent to
avoid serious network degradation during link failures. A reasonable default setting is 100
milliseconds; run:
$ miimon=100
For a busy network, increase the timeout.
To set up bonding:
Create a virtual 'bond' interface by creating a configuration file:
# vi /etc/sysconfig/network-scripts/ifcfg-bond0
Append the following lines to the file.
DEVICE=bond0 IPADDR=192.168.10.79 # Use the free IP Address of your network NETWORK=192.168.10.0 NETMASK=255.255.255.0 USERCTL=no BOOTPROTO=none ONBOOT=yes
Attach one or more slave interfaces to the bond interface. Modify the eth0 and eth1 configuration files (using a VI text editor).
Use the VI text editor to open the eth0 configuration file.
# vi /etc/sysconfig/network-scripts/ifcfg-eth0
Modify/append the eth0 file as follows:
DEVICE=eth0 USERCTL=no ONBOOT=yes MASTER=bond0 SLAVE=yes BOOTPROTO=none
Use the VI text editor to open the eth1 configuration file.
# vi /etc/sysconfig/network-scripts/ifcfg-eth1
Modify/append the eth1 file as follows:
DEVICE=eth1 USERCTL=no ONBOOT=yes MASTER=bond0 SLAVE=yes BOOTPROTO=none
Set up the bond interface and its options in
/etc/modprobe.d/bond.conf. Start the slave interfaces by your normal network method.# vi /etc/modprobe.d/bond.conf
Append the following lines to the file.
alias bond0 bonding options bond0 mode=balance-alb miimon=100
Load the bonding module.
# modprobe bonding # ifconfig bond0 up # ifenslave bond0 eth0 eth1
Start/restart the slave interfaces (using your normal network method).
Note
You must
modprobethe bonding module for each bonded interface. If you wish to create bond0 and bond1, two entries inbond.conffile are required.The examples below are from systems running Red Hat Enterprise Linux. For setup use:
/etc/sysconfig/networking-scripts/ifcfg-*The website referenced below includes detailed instructions for other configuration methods, instructions to use DHCP with bonding, and other setup details. We strongly recommend you use this website.Check /proc/net/bonding to determine status on bonding. There should be a file there for each bond interface.
# cat /proc/net/bonding/bond0 Ethernet Channel Bonding Driver: v3.0.3 (March 23, 2006) Bonding Mode: load balancing (round-robin) MII Status: up MII Polling Interval (ms): 0 Up Delay (ms): 0 Down Delay (ms): 0 Slave Interface: eth0 MII Status: up Link Failure Count: 0 Permanent HW addr: 4c:00:10:ac:61:e0 Slave Interface: eth1 MII Status: up Link Failure Count: 0 Permanent HW addr: 00:14:2a:7c:40:1d
Use ethtool or ifconfig to check the interface state. ifconfig lists the first bonded interface as 'bond0.'
ifconfig bond0 Link encap:Ethernet HWaddr 4C:00:10:AC:61:E0 inet addr:192.168.10.79 Bcast:192.168.10.255 \ Mask:255.255.255.0 inet6 addr: fe80::4e00:10ff:feac:61e0/64 Scope:Link UP BROADCAST RUNNING MASTER MULTICAST MTU:1500 Metric:1 RX packets:3091 errors:0 dropped:0 overruns:0 frame:0 TX packets:880 errors:0 dropped:0 overruns:0 carrier:0 collisions:0 txqueuelen:0 RX bytes:314203 (306.8 KiB) TX bytes:129834 (126.7 KiB) eth0 Link encap:Ethernet HWaddr 4C:00:10:AC:61:E0 inet6 addr: fe80::4e00:10ff:feac:61e0/64 Scope:Link UP BROADCAST RUNNING SLAVE MULTICAST MTU:1500 Metric:1 RX packets:1581 errors:0 dropped:0 overruns:0 frame:0 TX packets:448 errors:0 dropped:0 overruns:0 carrier:0 collisions:0 txqueuelen:1000 RX bytes:162084 (158.2 KiB) TX bytes:67245 (65.6 KiB) Interrupt:193 Base address:0x8c00 eth1 Link encap:Ethernet HWaddr 4C:00:10:AC:61:E0 inet6 addr: fe80::4e00:10ff:feac:61e0/64 Scope:Link UP BROADCAST RUNNING SLAVE MULTICAST MTU:1500 Metric:1 RX packets:1513 errors:0 dropped:0 overruns:0 frame:0 TX packets:444 errors:0 dropped:0 overruns:0 carrier:0 collisions:0 txqueuelen:1000 RX bytes:152299 (148.7 KiB) TX bytes:64517 (63.0 KiB) Interrupt:185 Base address:0x6000
This is an example showing bond.conf entries for bonding Ethernet interfaces eth1 and eth2 to bond0:
# cat /etc/modprobe.d/bond.conf alias eth0 8139too alias eth1 via-rhine alias bond0 bonding options bond0 mode=balance-alb miimon=100 # cat /etc/sysconfig/network-scripts/ifcfg-bond0 DEVICE=bond0 BOOTPROTO=none NETMASK=255.255.255.0 IPADDR=192.168.10.79 # (Assign here the IP of the bonded interface.) ONBOOT=yes USERCTL=no ifcfg-ethx # cat /etc/sysconfig/network-scripts/ifcfg-eth0 TYPE=Ethernet DEVICE=eth0 HWADDR=4c:00:10:ac:61:e0 BOOTPROTO=none ONBOOT=yes USERCTL=no IPV6INIT=no PEERDNS=yes MASTER=bond0 SLAVE=yes
In the following example, the bond0 interface is the master (MASTER) while eth0 and eth1 are slaves (SLAVE).
Note
All slaves of bond0 have the same MAC address (Hwaddr) - bond0. All modes, except TLB and ALB, have this MAC address. TLB and ALB require a unique MAC address for each slave.
$ /sbin/ifconfig bond0Link encap:EthernetHwaddr 00:C0:F0:1F:37:B4 inet addr:XXX.XXX.XXX.YYY Bcast:XXX.XXX.XXX.255 Mask:255.255.252.0 UP BROADCAST RUNNING MASTER MULTICAST MTU:1500 Metric:1 RX packets:7224794 errors:0 dropped:0 overruns:0 frame:0 TX packets:3286647 errors:1 dropped:0 overruns:1 carrier:0 collisions:0 txqueuelen:0 eth0Link encap:EthernetHwaddr 00:C0:F0:1F:37:B4 inet addr:XXX.XXX.XXX.YYY Bcast:XXX.XXX.XXX.255 Mask:255.255.252.0 UP BROADCAST RUNNING SLAVE MULTICAST MTU:1500 Metric:1 RX packets:3573025 errors:0 dropped:0 overruns:0 frame:0 TX packets:1643167 errors:1 dropped:0 overruns:1 carrier:0 collisions:0 txqueuelen:100 Interrupt:10 Base address:0x1080 eth1Link encap:EthernetHwaddr 00:C0:F0:1F:37:B4 inet addr:XXX.XXX.XXX.YYY Bcast:XXX.XXX.XXX.255 Mask:255.255.252.0 UP BROADCAST RUNNING SLAVE MULTICAST MTU:1500 Metric:1 RX packets:3651769 errors:0 dropped:0 overruns:0 frame:0 TX packets:1643480 errors:0 dropped:0 overruns:0 carrier:0 collisions:0 txqueuelen:100 Interrupt:9 Base address:0x1400
The Lustre software uses the IP address of the bonded interfaces and requires no special
configuration. The bonded interface is treated as a regular TCP/IP interface. If needed,
specify bond0 using the Lustre networks parameter in
/etc/modprobe.
options lnet networks=tcp(bond0)
We recommend the following bonding references:
In the Linux kernel source tree, see
documentation/networking/bonding.txtLinux Foundation bonding website: https://www.linuxfoundation.org/networking/bonding. This is the most extensive reference and we highly recommend it. This website includes explanations of more complicated setups, including the use of DHCP with bonding.
Table of Contents
This chapter describes how to install the Lustre software from RPM packages. It includes:
For hardware and system requirements and hardware configuration information, see Chapter 5, Determining Hardware Configuration Requirements and Formatting Options.
You can install the Lustre software from downloaded packages (RPMs) or directly from the source code. This chapter describes how to install the Lustre RPM packages. Instructions to install from source code are beyond the scope of this document, and can be found elsewhere online.
The Lustre RPM packages are tested on current versions of Linux enterprise distributions at the time they are created. See the release notes for each version for specific details.
To install the Lustre software from RPMs, the following are required:
Lustre server packages . The required packages for Lustre 2.9 EL7 servers are listed in the table below, where
verrefers to the Lustre release and kernel version (e.g., 2.9.0-1.el7) andarchrefers to the processor architecture (e.g., x86_64). These packages are available in the Lustre Releases repository, and may differ depending on your distro and version.Table 8.1. Packages Installed on Lustre Servers
Package Name Description kernel-ver_lustre.archLinux kernel with Lustre software patches (often referred to as "patched kernel") lustre-ver.archLustre software command line tools kmod-lustre-ver.archLustre-patched kernel modules kmod-lustre-osd-ldiskfs-ver.archLustre back-end file system tools for ldiskfs-based servers. lustre-osd-ldiskfs-mount-ver.archHelper library for mount.lustreandmkfs.lustrefor ldiskfs-based servers.kmod-lustre-osd-zfs-ver.archLustre back-end file system tools for ZFS. This is an alternative to lustre-osd-ldiskfs(kmod-spl and kmod-zfs available separately).lustre-osd-zfs-mount-ver.archHelper library for mount.lustreandmkfs.lustrefor ZFS-based servers (zfs utilities available separately).e2fsprogsUtilities to maintain Lustre ldiskfs back-end file system(s) lustre-tests-ver_lustre.archScripts and programs used for running regression tests for Lustre, but likely only of interest to Lustre developers or testers.
Lustre client packages . The required packages for Lustre 2.9 EL7 clients are listed in the table below, where
verrefers to the Linux distribution (e.g., 3.6.18-348.1.1.el5). These packages are available in the Lustre Releases repository.Table 8.2. Packages Installed on Lustre Clients
Package Name Description kmod-lustre-client-ver.archPatchless kernel modules for client lustre-client-ver.archClient command line tools lustre-client-dkms-ver.archAlternate client RPM to kmod-lustre-client with Dynamic Kernel Module Support (DKMS) installation. This avoids the need to install a new RPM for each kernel update, but requires a full build environment on the client.
Note
The version of the kernel running on a Lustre client must be the same as the version of the
kmod-lustre-client-package being installed, unless the DKMS package is installed. If the kernel running on the client is not compatible, a kernel that is compatible must be installed on the client before the Lustre file system software is used.verLustre LNet network driver (LND) . The Lustre LNDs provided with the Lustre software are listed in the table below. For more information about Lustre LNet, see Chapter 2, Understanding Lustre Networking (LNet).
Table 8.3. Network Types Supported by Lustre LNDs
Supported Network Types Notes TCP Any network carrying TCP traffic, including GigE, 10GigE, and IPoIB InfiniBand network OpenFabrics OFED (o2ib) gni Gemini (Cray)
Note
The InfiniBand and TCP Lustre LNDs are routinely tested during release cycles. The other LNDs are maintained by their respective owners
High availability software . If needed, install third party high-availability software. For more information, see Section 11.2, “Preparing a Lustre File System for Failover”.
Optional packages. Optional packages provided in the Lustre Releases repository may include the following (depending on the operating system and platform):
kernel-debuginfo,kernel-debuginfo-common,lustre-debuginfo,lustre-osd-ldiskfs-debuginfo- Versions of required packages with debugging symbols and other debugging options enabled for use in troubleshooting.kernel-devel, - Portions of the kernel tree needed to compile third party modules, such as network drivers.kernel-firmware- Standard Red Hat Enterprise Linux distribution that has been recompiled to work with the Lustre kernel.kernel-headers- Header files installed under /user/include and used when compiling user-space, kernel-related code.lustre-source- Lustre software source code.(Recommended)
perf,perf-debuginfo,python-perf,python-perf-debuginfo- Linux performance analysis tools that have been compiled to match the Lustre kernel version.
Before installing the Lustre software, make sure the following environmental requirements are met.
(Required) Use the same user IDs (UID) and group IDs (GID) on all clients. If use of supplemental groups is required, see Section 41.1, “User/Group Upcall” for information about supplementary user and group cache upcall (
identity_upcall).(Recommended) Provide remote shell access to clients. It is recommended that all cluster nodes have remote shell client access to facilitate the use of Lustre configuration and monitoring scripts. Parallel Distributed SHell (pdsh) is preferable, although Secure SHell (SSH) is acceptable.
(Recommended) Ensure client clocks are synchronized. The Lustre file system uses client clocks for timestamps. If clocks are out of sync between clients, files will appear with different time stamps when accessed by different clients. Drifting clocks can also cause problems by, for example, making it difficult to debug multi-node issues or correlate logs, which depend on timestamps. We recommend that you use Network Time Protocol (NTP) to keep client and server clocks in sync with each other. For more information about NTP, see: https://www.ntp.org.
(Recommended) Make sure security extensions (such as the Novell AppArmor *security system) and network packet filtering tools (such as iptables) do not interfere with the Lustre software.
Caution
Before installing the Lustre software, back up ALL data. The Lustre software contains kernel modifications that interact with storage devices and may introduce security issues and data loss if not installed, configured, or administered properly.
To install the Lustre software from RPMs, complete the steps below.
Verify that all Lustre installation requirements have been met.
For hardware requirements, see Chapter 5, Determining Hardware Configuration Requirements and Formatting Options.
For software and environmental requirements, see the section Section 8.1, “ Preparing to Install the Lustre Software”above.
Download the
e2fsprogsRPMs for your platform from the Lustre Releases repository.Download the Lustre server RPMs for your platform from the Lustre Releases repository. See Table 8.1, “Packages Installed on Lustre Servers”for a list of required packages.
Install the Lustre server and
e2fsprogspackages on all Lustre servers (MGS, MDSs, and OSSs).Log onto a Lustre server as the
rootuserUse the
yumcommand to install the packages:# yum --nogpgcheck install pkg1.rpm pkg2.rpm ...
Verify the packages are installed correctly:
rpm -qa|egrep "lustre|wc"|sort
Reboot the server.
Repeat these steps on each Lustre server.
Download the Lustre client RPMs for your platform from the Lustre Releases repository. See Table 8.2, “Packages Installed on Lustre Clients”for a list of required packages.
Install the Lustre client packages on all Lustre clients.
Note
The version of the kernel running on a Lustre client must be the same as the version of the
lustre-client-modules-verpackage being installed. If not, a compatible kernel must be installed on the client before the Lustre client packages are installed.Log onto a Lustre client as the root user.
Use the
yumcommand to install the packages:# yum --nogpgcheck install pkg1.rpm pkg2.rpm ...
Verify the packages were installed correctly:
# rpm -qa|egrep "lustre|kernel"|sort
Reboot the client.
Repeat these steps on each Lustre client.
To configure LNet, go to Chapter 9, Configuring Lustre Networking (LNet). If default settings will be used for LNet, go to Chapter 10, Configuring a Lustre File System.
Table of Contents
- 9.1. Configuring LNet via
lnetctlL 2.7 - 9.1.1. Configuring LNet
- 9.1.2. Displaying Global Settings
- 9.1.3. Adding, Deleting and Showing Networks
- 9.1.4. Manual Adding, Deleting and Showing PeersL 2.10
- 9.1.5. Dynamic Peer DiscoveryL 2.11
- 9.1.6. Adding, Deleting and Showing routes
- 9.1.7. Enabling and Disabling Routing
- 9.1.8. Showing routing information
- 9.1.9. Configuring Routing Buffers
- 9.1.10. Asymmetrical RoutesL 2.13
- 9.1.11. Importing YAML Configuration File
- 9.1.12. Exporting Configuration in YAML format
- 9.1.13. Showing LNet Traffic Statistics
- 9.1.14. YAML Syntax
- 9.2. Overview of LNet Module Parameters
- 9.3. Setting the LNet Module networks Parameter
- 9.4. Setting the LNet Module ip2nets Parameter
- 9.5. Setting the LNet Module routes Parameter
- 9.6. Testing the LNet Configuration
- 9.7. Configuring the Router Checker
- 9.8. Best Practices for LNet Options
This chapter describes how to configure Lustre Networking (LNet). It includes the following sections:
Note
Configuring LNet is optional.
LNet will use the first TCP/IP interface it discovers on a
system (eth0) if it's loaded using the
lctl network up. If this network configuration is
sufficient, you do not need to configure LNet. LNet configuration is
required if you are using Infiniband or multiple Ethernet
interfaces.
The lnetctl utility can be used
to initialize LNet without bringing up any network interfaces. Network
interfaces can be added after configuring LNet via
lnetctl. lnetctl can also be used to
manage an operational LNet. However, if it wasn't initialized by
lnetctl then lnetctl lnet configure
must be invoked before lnetctl can be used to manage
LNet.
DLC also introduces a C-API to enable configuring LNet programatically. See Chapter 45, LNet Configuration C-API
The lnetctl utility can be used to initialize
and configure the LNet kernel module after it has been loaded via
modprobe. In general the lnetctl format is as
follows:
lnetctl cmd subcmd [options]
The following configuration items are managed by the tool:
Configuring/unconfiguring LNet
Adding/removing/showing Networks
Adding/removing/showing Routes
Enabling/Disabling routing
Configuring Router Buffer Pools
After LNet has been loaded via modprobe,
lnetctl utility can be used to configure LNet
without bringing up networks which are specified in the module
parameters. It can also be used to configure network interfaces
specified in the module prameters by providing the
--all option.
lnetctl lnet configure [--all] # --all: load NI configuration from module parameters
The lnetctl utility can also be used to
unconfigure LNet.
lnetctl lnet unconfigure
The active LNet global settings can be displayed using the
lnetctl command shown below:
lnetctl global show
For example:
# lnetctl global show
global:
numa_range: 0
max_intf: 200
discovery: 1
drop_asym_route: 0Networks can be added, deleted, or shown after the LNet kernel module is loaded.
The lnetctl net add
command is used to add networks:
lnetctl net add: add a network
--net: net name (ex tcp0)
--if: physical interface (ex eth0)
--peer_timeout: time to wait before declaring a peer dead
--peer_credits: defines the max number of inflight messages
--peer_buffer_credits: the number of buffer credits per peer
--credits: Network Interface credits
--cpts: CPU Partitions configured net uses
--help: display this help text
Example:
lnetctl net add --net tcp2 --if eth0
--peer_timeout 180 --peer_credits 8Note
With the addition of Software based Multi-Rail in Lustre 2.10, the following should be noted:
--net: no longer needs to be unique since multiple interfaces can be added to the same network.
--if: The same interface per network can be added only once, however, more than one interface can now be specified (separated by a comma) for a node. For example: eth0,eth1,eth2.
For examples on adding multiple interfaces via
lnetctl net add and/or YAML, please see
Section 16.2, “Configuring Multi-Rail”
Networks can be deleted with the
lnetctl net del
command:
net del: delete a network
--net: net name (ex tcp0)
--if: physical inerface (e.g. eth0)
Example:
lnetctl net del --net tcp2Note
In a Software Multi-Rail configuration,
specifying only the --net argument will delete the
entire network and all interfaces under it. The new
--if switch should also be used in conjunction with
--net to specify deletion of a specific interface.
All or a subset of the configured networks can be shown with the
lnetctl net show
command. The output can be non-verbose or verbose.
net show: show networks
--net: net name (ex tcp0) to filter on
--verbose: display detailed output per network
Examples:
lnetctl net show
lnetctl net show --verbose
lnetctl net show --net tcp2 --verboseBelow are examples of non-detailed and detailed network configuration show.
# non-detailed show
> lnetctl net show --net tcp2
net:
- nid: 192.168.205.130@tcp2
status: up
interfaces:
0: eth3
# detailed show
> lnetctl net show --net tcp2 --verbose
net:
- nid: 192.168.205.130@tcp2
status: up
interfaces:
0: eth3
tunables:
peer_timeout: 180
peer_credits: 8
peer_buffer_credits: 0
credits: 256The lnetctl peer add
command is used to manually add a remote peer to a software
multi-rail configuration. For the dynamic peer discovery capability
introduced in Lustre Release 2.11.0, please see
Section 9.1.5, “Dynamic Peer Discovery”.
When configuring peers, use the --prim_nid
option to specify the key or primary nid of the peer node. Then
follow that with the --nid option to specify a
set of comma separated NIDs.
peer add: add a peer
--prim_nid: primary NID of the peer
--nid: comma separated list of peer nids (e.g. 10.1.1.2@tcp0)
--non_mr: if specified this interface is created as a non mulit-rail
capable peer. Only one NID can be specified in this case.For example:
lnetctl peer add --prim_nid 10.10.10.2@tcp --nid 10.10.3.3@tcp1,10.4.4.5@tcp2
The --prim-nid (primary nid for the peer
node) can go unspecified. In this case, the first listed NID in the
--nid option becomes the primary nid of the peer.
For example:
lnetctl peer_add --nid 10.10.10.2@tcp,10.10.3.3@tcp1,10.4.4.5@tcp2YAML can also be used to configure peers:
peer:
- primary nid: <key or primary nid>
Multi-Rail: True
peer ni:
- nid: <nid 1>
- nid: <nid 2>
- nid: <nid n>As with all other commands, the result of the
lnetctl peer show command can be used to gather
information to aid in configuring or deleting a peer:
lnetctl peer show -v
Example output from the lnetctl peer show
command:
peer:
- primary nid: 192.168.122.218@tcp
Multi-Rail: True
peer ni:
- nid: 192.168.122.218@tcp
state: NA
max_ni_tx_credits: 8
available_tx_credits: 8
available_rtr_credits: 8
min_rtr_credits: -1
tx_q_num_of_buf: 0
send_count: 6819
recv_count: 6264
drop_count: 0
refcount: 1
- nid: 192.168.122.78@tcp
state: NA
max_ni_tx_credits: 8
available_tx_credits: 8
available_rtr_credits: 8
min_rtr_credits: -1
tx_q_num_of_buf: 0
send_count: 7061
recv_count: 6273
drop_count: 0
refcount: 1
- nid: 192.168.122.96@tcp
state: NA
max_ni_tx_credits: 8
available_tx_credits: 8
available_rtr_credits: 8
min_rtr_credits: -1
tx_q_num_of_buf: 0
send_count: 6939
recv_count: 6286
drop_count: 0
refcount: 1Use the following lnetctl command to delete a
peer:
peer del: delete a peer
--prim_nid: Primary NID of the peer
--nid: comma separated list of peer nids (e.g. 10.1.1.2@tcp0)prim_nid should always be specified. The
prim_nid identifies the peer. If the
prim_nid is the only one specified, then the
entire peer is deleted.
Example of deleting a single nid of a peer (10.10.10.3@tcp):
lnetctl peer del --prim_nid 10.10.10.2@tcp --nid 10.10.10.3@tcp
Example of deleting the entire peer:
lnetctl peer del --prim_nid 10.10.10.2@tcp
Dynamic Discovery (DD) is a feature that allows nodes to dynamically discover a peer's interfaces without having to explicitly configure them. This is very useful for Multi-Rail (MR) configurations. In large clusters, there could be hundreds of nodes and having to configure MR peers on each node becomes error prone. Dynamic Discovery is enabled by default and uses a new protocol based on LNet pings to discover the interfaces of the remote peers on first message.
When LNet on a node is requested to send a message to a peer it first attempts to ping the peer. The reply to the ping contains the peer's NIDs as well as a feature bit outlining what the peer supports. Dynamic Discovery adds a Multi-Rail feature bit. If the peer is Multi-Rail capable, it sets the MR bit in the ping reply. When the node receives the reply it checks the MR bit, and if it is set it then pushes its own list of NIDs to the peer using a new PUT message, referred to as a "push ping". After this brief protocol, both the peer and the node will have each other's list of interfaces. The MR algorithm can then proceed to use the list of interfaces of the corresponding peer.
If the peer is not MR capable, it will not set the MR feature bit in the ping reply. The node will understand that the peer is not MR capable and will only use the interface provided by upper layers for sending messages.
It is possible to configure the peer manually while Dynamic Discovery is running. Manual peer configuration always takes precedence over Dynamic Discovery. If there is a discrepancy between the manual configuration and the dynamically discovered information, a warning is printed.
Dynamic Discovery is very light on the configuration side. It can only be turned on or turned off. To turn the feature on or off, the following command is used:
lnetctl set discovery [0 | 1]
To check the current discovery setting, the
lnetctl global show command can be used as shown in
Section 9.1.2, “Displaying Global Settings”.
A set of routes can be added to identify how LNet messages are to be routed.
lnetctl route add: add a route
--net: net name (ex tcp0) LNet message is destined to.
The can not be a local network.
--gateway: gateway node nid (ex 10.1.1.2@tcp) to route
all LNet messaged destined for the identified
network
--hop: number of hops to final destination
(1 <= hops <= 255) (optional)
--priority: priority of route (0 - highest prio) (optional)
Example:
lnetctl route add --net tcp2 --gateway 192.168.205.130@tcp1 --hop 2 --prio 1Routes can be deleted via the following lnetctl
command.
lnetctl route del: delete a route
--net: net name (ex tcp0)
--gateway: gateway nid (ex 10.1.1.2@tcp)
Example:
lnetctl route del --net tcp2 --gateway 192.168.205.130@tcp1Configured routes can be shown via the following
lnetctl command.
lnetctl route show: show routes
--net: net name (ex tcp0) to filter on
--gateway: gateway nid (ex 10.1.1.2@tcp) to filter on
--hop: number of hops to final destination
(1 <= hops <= 255) to filter on (-1 default)
--priority: priority of route (0 - highest prio)
to filter on (0 default)
--verbose: display detailed output per route
Examples:
# non-detailed show
lnetctl route show
# detailed show
lnetctl route show --verboseWhen showing routes the --verbose option
outputs more detailed information. All show and error output are in
YAML format. Below are examples of both non-detailed and detailed
route show output.
#Non-detailed output
> lnetctl route show
route:
- net: tcp2
gateway: 192.168.205.130@tcp1
#detailed output
> lnetctl route show --verbose
route:
- net: tcp2
gateway: 192.168.205.130@tcp1
hop: 2
priority: 1
state: downWhen an LNet node is configured as a router it will route LNet messages not destined to itself. This feature can be enabled or disabled as follows.
lnetctl set routing [0 | 1] # 0 - disable routing feature # 1 - enable routing feature
When routing is enabled on a node, the tiny, small and large routing buffers are allocated. See Section 34.3, “ Tuning LNet Parameters” for more details on router buffers. This information can be shown as follows:
lnetctl routing show: show routing information Example: lnetctl routing show
An example of the show output:
> lnetctl routing show
routing:
- cpt[0]:
tiny:
npages: 0
nbuffers: 2048
credits: 2048
mincredits: 2048
small:
npages: 1
nbuffers: 16384
credits: 16384
mincredits: 16384
large:
npages: 256
nbuffers: 1024
credits: 1024
mincredits: 1024
- enable: 1The routing buffers values configured specify the number of buffers in each of the tiny, small and large groups.
It is often desirable to configure the tiny, small and large routing buffers to some values other than the default. These values are global values, when set they are used by all configured CPU partitions. If routing is enabled then the values set take effect immediately. If a larger number of buffers is specified, then buffers are allocated to satisfy the configuration change. If fewer buffers are configured then the excess buffers are freed as they become unused. If routing is not set the values are not changed. The buffer values are reset to default if routing is turned off and on.
The lnetctl 'set' command can be
used to set these buffer values. A VALUE greater than 0
will set the number of buffers accordingly. A VALUE of 0
will reset the number of buffers to system defaults.
set tiny_buffers:
set tiny routing buffers
VALUE must be greater than or equal to 0
set small_buffers: set small routing buffers
VALUE must be greater than or equal to 0
set large_buffers: set large routing buffers
VALUE must be greater than or equal to 0Usage examples:
> lnetctl set tiny_buffers 4096 > lnetctl set small_buffers 8192 > lnetctl set large_buffers 2048
The buffers can be set back to the default values as follows:
> lnetctl set tiny_buffers 0 > lnetctl set small_buffers 0 > lnetctl set large_buffers 0
An asymmetrical route is when a message from a remote peer is coming through a router that is not known by this node to reach the remote peer.
Asymmetrical routes can be an issue when debugging network, and allowing them also opens the door to attacks where hostile clients inject data to the servers.
So it is possible to activate a check in LNet, that will detect any asymmetrical route message and drop it.
In order to switch asymmetric route detection on or off, the following command is used:
lnetctl set drop_asym_route [0 | 1]
This command works on a per-node basis. This means each node in a Lustre cluster can decide whether it accepts asymmetrical route messages.
To check the current drop_asym_route setting, the
lnetctl global show command can be used as shown in
Section 9.1.2, “Displaying Global Settings”.
By default, asymmetric route detection is off.
Configuration can be described in YAML format and can be fed
into the lnetctl utility. The
lnetctl utility parses the YAML file and performs
the specified operation on all entities described there in. If no
operation is defined in the command as shown below, the default
operation is 'add'. The YAML syntax is described in a later
section.
lnetctl import FILE.yaml lnetctl import < FILE.yaml
The 'lnetctl import' command provides three
optional parameters to define the operation to be performed on the
configuration items described in the YAML file.
# if no options are given to the command the "add" command is assumed
# by default.
lnetctl import --add FILE.yaml
lnetctl import --add < FILE.yaml
# to delete all items described in the YAML file
lnetctl import --del FILE.yaml
lnetctl import --del < FILE.yaml
# to show all items described in the YAML file
lnetctl import --show FILE.yaml
lnetctl import --show < FILE.yamllnetctl utility provides the 'export'
command to dump current LNet configuration in YAML format
lnetctl export FILE.yaml lnetctl export > FILE.yaml
lnetctl utility can dump the LNet traffic
statistiscs as follows
lnetctl stats show
The lnetctl utility can take in a YAML file
describing the configuration items that need to be operated on and
perform one of the following operations: add, delete or show on the
items described there in.
Net, routing and route YAML blocks are all defined as a YAML
sequence, as shown in the following sections. The stats YAML block
is a YAML object. Each sequence item can take a seq_no field. This
seq_no field is returned in the error block. This allows the caller
to associate the error with the item that caused the error. The
lnetctl utilty does a best effort at configuring
items defined in the YAML file. It does not stop processing the file
at the first error.
Below is the YAML syntax describing the various configuration elements which can be operated on via DLC. Not all YAML elements are required for all operations (add/delete/show). The system ignores elements which are not pertinent to the requested operation.
net:
- net: <network. Ex: tcp or o2ib>
interfaces:
0: <physical interface>
detail: <This is only applicable for show command. 1 - output detailed info. 0 - basic output>
tunables:
peer_timeout: <Integer. Timeout before consider a peer dead>
peer_credits: <Integer. Transmit credits for a peer>
peer_buffer_credits: <Integer. Credits available for receiving messages>
credits: <Integer. Network Interface credits>
SMP: <An array of integers of the form: "[x,y,...]", where each
integer represents the CPT to associate the network interface
with> seq_no: <integer. Optional. User generated, and is
passed back in the YAML error block>Both seq_no and detail fields do not appear in the show output.
routing:
- tiny: <Integer. Tiny buffers>
small: <Integer. Small buffers>
large: <Integer. Large buffers>
enable: <0 - disable routing. 1 - enable routing>
seq_no: <Integer. Optional. User generated, and is passed back in the YAML error block>The seq_no field does not appear in the show output
statistics:
seq_no: <Integer. Optional. User generated, and is passed back in the YAML error block>The seq_no field does not appear in the show output
route:
- net: <network. Ex: tcp or o2ib>
gateway: <nid of the gateway in the form <ip>@<net>: Ex: 192.168.29.1@tcp>
hop: <an integer between 1 and 255. Optional>
detail: <This is only applicable for show commands. 1 - output detailed info. 0. basic output>
seq_no: <integer. Optional. User generated, and is passed back in the YAML error block>Both seq_no and detail fields do not appear in the show output.
LNet kernel module (lnet) parameters specify how LNet is to be configured to work with Lustre, including which NICs will be configured to work with Lustre and the routing to be used with Lustre.
Parameters for LNet can be specified in the
/etc/modprobe.d/lustre.conf file. In some cases
the parameters may have been stored in
/etc/modprobe.conf, but this has been deprecated
since before RHEL5 and SLES10, and having a separate
/etc/modprobe.d/lustre.conf file simplifies
administration and distribution of the Lustre networking
configuration. This file contains one or more entries with the
syntax:
options lnetparameter=value
To specify the network interfaces that are to be used for
Lustre, set either the networks parameter or the
ip2nets parameter (only one of these parameters can
be used at a time):
networks- Specifies the networks to be used.ip2nets- Lists globally-available networks, each with a range of IP addresses. LNet then identifies locally-available networks through address list-matching lookup.
See Section 9.3, “Setting the LNet Module networks Parameter” and Section 9.4, “Setting the LNet Module ip2nets Parameter” for more details.
To set up routing between networks, use:
routes- Lists networks and the NIDs of routers that forward to them.
See Section 9.5, “Setting the LNet Module routes Parameter” for more details.
A router checker can be configured to enable
Lustre nodes to detect router health status, avoid routers that appear
dead, and reuse those that restore service after failures. See Section 9.7, “Configuring the Router Checker” for more details.
For a complete reference to the LNet module parameters, see Chapter 43, Configuration Files and Module ParametersLNet Options.
Note
We recommend that you use 'dotted-quad' notation for IP addresses rather than host names to make it easier to read debug logs and debug configurations with multiple interfaces.
A Lustre network identifier (NID) is used to uniquely identify a Lustre network endpoint by node ID and network type. The format of the NID is:
network_id@network_type
Examples are:
10.67.73.200@tcp0 10.67.75.100@o2ib
The first entry above identifies a TCP/IP node, while the second entry identifies an InfiniBand node.
When a mount command is run on a client, the client uses the NID of the MDS to retrieve configuration information. If an MDS has more than one NID, the client should use the appropriate NID for its local network.
To determine the appropriate NID to specify in
the mount command, use the lctl command. To
display MDS NIDs, run on the MDS :
lctl list_nids
To determine if a client can reach the MDS using a particular NID, run on the client:
lctl which_nid MDS_NIDIf a node has more than one network interface, you'll
typically want to dedicate a specific interface to Lustre. You can do
this by including an entry in the lustre.conf file
on the node that sets the LNet module networks
parameter:
options lnet networks=comma-separated list of
networksThis example specifies that a Lustre node will use a TCP/IP interface and an InfiniBand interface:
options lnet networks=tcp0(eth0),o2ib(ib0)
This example specifies that the Lustre node will use the TCP/IP
interface eth1:
options lnet networks=tcp0(eth1)
Depending on the network design, it may be necessary to specify
explicit interfaces. To explicitly specify that interface
eth2 be used for network tcp0
and eth3 be used for tcp1 , use
this entry:
options lnet networks=tcp0(eth2),tcp1(eth3)
When more than one interface is available during the network setup, Lustre chooses the best route based on the hop count. Once the network connection is established, Lustre expects the network to stay connected. In a Lustre network, connections do not fail over to another interface, even if multiple interfaces are available on the same node.
Note
LNet lines in lustre.conf are only used by
the local node to determine what to call its interfaces. They are
not used for routing decisions.
If a server with multiple IP addresses (multihome server) is connected to a Lustre network, certain configuration setting are required. An example illustrating these setting consists of a network with the following nodes:
Server svr1 with three TCP NICs (
eth0,eth1, andeth2) and an InfiniBand NIC.Server svr2 with three TCP NICs (
eth0,eth1, andeth2) and an InfiniBand NIC. Interface eth2 will not be used for Lustre networking.TCP clients, each with a single TCP interface.
InfiniBand clients, each with a single Infiniband interface and a TCP/IP interface for administration.
To set the networks option for this example:
On each server,
svr1andsvr2, include the following line in thelustre.conffile:
options lnet networks=tcp0(eth0),tcp1(eth1),o2ib
For TCP-only clients, the first available non-loopback IP interface is used for
tcp0. Thus, TCP clients with only one interface do not need to have options defined in thelustre.conffile.On the InfiniBand clients, include the following line in the
lustre.conffile:
options lnet networks=o2ib
Note
By default, Lustre ignores the loopback
(lo0) interface. Lustre does not ignore IP
addresses aliased to the loopback. If you alias IP addresses to
the loopback interface, you must specify all Lustre networks using
the LNet networks parameter.
Note
If the server has multiple interfaces on the same subnet, the Linux kernel will send all traffic using the first configured interface. This is a limitation of Linux, not Lustre. In this case, network interface bonding should be used. For more information about network interface bonding, see Chapter 7, Setting Up Network Interface Bonding.
The ip2nets option is typically used when a
single, universal lustre.conf file is run on all
servers and clients. Each node identifies the locally available
networks based on the listed IP address patterns that match the
node's local IP addresses.
Note that the IP address patterns listed in the
ip2nets option are only used
to identify the networks that an individual node should instantiate.
They are not used by LNet for any other
communications purpose.
For the example below, the nodes in the network have these IP addresses:
Server svr1:
eth0IP address192.168.0.2, IP over Infiniband (o2ib) address132.6.1.2.Server svr2:
eth0IP address192.168.0.4, IP over Infiniband (o2ib) address132.6.1.4.TCP clients have IP addresses
192.168.0.5-255.Infiniband clients have IP over Infiniband (
o2ib) addresses132.6.[2-3].2, .4, .6, .8.
The following entry is placed in the
lustre.conf file on each server and client:
options lnet 'ip2nets="tcp0(eth0) 192.168.0.[2,4]; \ tcp0 192.168.0.*; o2ib0 132.6.[1-3].[2-8/2]"'
Each entry in ip2nets is referred to as a
'rule'.
The order of LNet entries is important when configuring servers.
If a server node can be reached using more than one network, the first
network specified in lustre.conf will be
used.
Because svr1 and svr2
match the first rule, LNet uses eth0 for
tcp0 on those machines. (Although
svr1 and svr2 also match the
second rule, the first matching rule for a particular network is
used).
The [2-8/2] format indicates a range of 2-8
stepped by 2; that is 2,4,6,8. Thus, the clients at
132.6.3.5 will not find a matching o2ib
network.
Note
Multi-rail deprecates the kernel parsing of ip2nets. ip2nets patterns are matched in user space and translated into Network interfaces to be added into the system.
The first interface that matches the IP pattern will be used when adding a network interface.
If an interface is explicitly specified as well as a pattern, the interface matched using the IP pattern will be sanitized against the explicitly-defined interface.
For example, tcp(eth0) 192.168.*.3 and there
exists in the system eth0 == 192.158.19.3 and
eth1 == 192.168.3.3, then the configuration will
fail, because the pattern contradicts the interface specified.
A clear warning will be displayed if inconsistent configuration is encountered.
You could use the following command to configure ip2nets:
lnetctl import < ip2nets.yaml
For example:
ip2nets:
- net-spec: tcp1
interfaces:
0: eth0
1: eth1
ip-range:
0: 192.168.*.19
1: 192.168.100.105
- net-spec: tcp2
interfaces:
0: eth2
ip-range:
0: 192.168.*.*The LNet module routes parameter is used to identify routers in
a Lustre configuration. These parameters are set in
modprobe.conf on each Lustre node.
Routes are typically set to connect to segregated subnetworks or to cross connect two different types of networks such as tcp and o2ib
The LNet routes parameter specifies a colon-separated list of router definitions. Each route is defined as a network number, followed by a list of routers:
routes=net_type router_NID(s)This example specifies bi-directional routing in which TCP clients can reach Lustre resources on the IB networks and IB servers can access the TCP networks:
options lnet 'ip2nets="tcp0 192.168.0.*; \ o2ib0(ib0) 132.6.1.[1-128]"' 'routes="tcp0 132.6.1.[1-8]@o2ib0; \ o2ib0 192.16.8.0.[1-8]@tcp0"'
All LNet routers that bridge two networks are equivalent. They are not configured as primary or secondary, and the load is balanced across all available routers.
The number of LNet routers is not limited. Enough routers should be used to handle the required file serving bandwidth plus a 25 percent margin for headroom.
On the clients, place the following entry in the
lustre.conf file
lnet networks="tcp" routes="o2ib0 192.168.0.[1-8]@tcp0"
On the router nodes, use:
lnet networks="tcp o2ib" forwarding=enabled
On the MDS, use the reverse as shown below:
lnet networks="o2ib0" routes="tcp0 132.6.1.[1-8]@o2ib0"
To start the routers, run:
modprobe lnet lctl network configure
After configuring Lustre Networking, it is highly recommended that you test your LNet configuration using the LNet Self-Test provided with the Lustre software. For more information about using LNet Self-Test, see Chapter 32, Testing Lustre Network Performance (LNet Self-Test).
In a Lustre configuration in which different types of networks, such as a TCP/IP network and an Infiniband network, are connected by routers, a router checker can be run on the clients and servers in the routed configuration to monitor the status of the routers. In a multi-hop routing configuration, router checkers can be configured on routers to monitor the health of their next-hop routers.
A router checker is configured by setting LNet parameters in
lustre.conf by including an entry in this
form:
options lnet
router_checker_parameter=valueThe router checker parameters are:
live_router_check_interval- Specifies a time interval in seconds after which the router checker will ping the live routers. The default value is 0, meaning no checking is done. To set the value to 60, enter:options lnet live_router_check_interval=60
dead_router_check_interval- Specifies a time interval in seconds after which the router checker will check for dead routers. The default value is 0, meaning no checking is done. To set the value to 60, enter:options lnet dead_router_check_interval=60
auto_down - Enables/disables (1/0) the automatic marking of router state as up or down. The default value is 1. To disable router marking, enter:
options lnet auto_down=0
router_ping_timeout- Specifies a timeout for the router checker when it checks live or dead routers. The router checker sends a ping message to each dead or live router once every dead_router_check_interval or live_router_check_interval respectively. The default value is 50. To set the value to 60, enter:options lnet router_ping_timeout=60
Note
The
router_ping_timeoutis consistent with the default LND timeouts. You may have to increase it on very large clusters if the LND timeout is also increased. For larger clusters, we suggest increasing the check interval.check_routers_before_use- Specifies that routers are to be checked before use. Set to off by default. If this parameter is set to on, the dead_router_check_interval parameter must be given a positive integer value.options lnet check_routers_before_use=on
The router checker obtains the following information from each router:
Time the router was disabled
Elapsed disable time
If the router checker does not get a reply message from the router within router_ping_timeout seconds, it considers the router to be down.
If a router is marked 'up' and responds to a ping, the timeout is reset.
If 100 packets have been sent successfully through a router, the sent-packets counter for that router will have a value of 100.
For the networks, ip2nets,
and routes options, follow these best practices to
avoid configuration errors.
Depending on the Linux distribution, commas may need to be
escaped using single or double quotes. In the extreme case, the
options entry would look like this:
options
lnet'networks="tcp0,elan0"'
'routes="tcp [2,10]@elan0"'Added quotes may confuse some distributions. Messages such as the following may indicate an issue related to added quotes:
lnet: Unknown parameter 'networks'
A 'Refusing connection - no matching
NID' message generally points to an error in the LNet
module configuration.
Place the semicolon terminating a comment
immediately after the comment. LNet silently ignores
everything between the # character at the
beginning of the comment and the next semicolon.
In this incorrect example, LNet silently
ignores pt11 192.168.0.[92,96], resulting in
these nodes not being properly initialized. No error message is
generated.
options lnet ip2nets="pt10 192.168.0.[89,93]; # comment
with semicolon BEFORE comment \ pt11 192.168.0.[92,96];This correct example shows the required syntax:
options lnet ip2nets="pt10 192.168.0.[89,93] \ # comment with semicolon AFTER comment; \ pt11 192.168.0.[92,96] # comment
Do not add an excessive number of comments. The Linux kernel limits the length of character strings used in module options (usually to 1KB, but this may differ between vendor kernels). If you exceed this limit, errors result and the specified configuration may not be processed correctly.
Table of Contents
This chapter shows how to configure a simple Lustre file system comprised of a combined MGS/MDT, an OST and a client. It includes:
A Lustre file system can be set up in a variety of configurations by using the administrative utilities provided with the Lustre software. The procedure below shows how to configure a simple Lustre file system consisting of a combined MGS/MDS, one OSS with two OSTs, and a client. For an overview of the entire Lustre installation procedure, see Chapter 4, Installation Overview.
This configuration procedure assumes you have completed the following:
Set up and configured your hardware . For more information about hardware requirements, see Chapter 5, Determining Hardware Configuration Requirements and Formatting Options.
Downloaded and installed the Lustre software.For more information about preparing for and installing the Lustre software, see Chapter 8, Installing the Lustre Software.
The following optional steps should also be completed, if needed, before the Lustre software is configured:
Set up a hardware or software RAID on block devices to be used as OSTs or MDTs.For information about setting up RAID, see the documentation for your RAID controller or Chapter 6, Configuring Storage on a Lustre File System.
Set up network interface bonding on Ethernet interfaces.For information about setting up network interface bonding, see Chapter 7, Setting Up Network Interface Bonding.
Set lnet module parameters to specify how Lustre Networking (LNet) is to be configured to work with a Lustre file system and test the LNet configuration.LNet will, by default, use the first TCP/IP interface it discovers on a system. If this network configuration is sufficient, you do not need to configure LNet. LNet configuration is required if you are using InfiniBand or multiple Ethernet interfaces.
For information about configuring LNet, see Chapter 9, Configuring Lustre Networking (LNet). For information about testing LNet, see Chapter 32, Testing Lustre Network Performance (LNet Self-Test).
Run the benchmark script
sgpdd-surveyto determine baseline performance of your hardware.Benchmarking your hardware will simplify debugging performance issues that are unrelated to the Lustre software and ensure you are getting the best possible performance with your installation. For information about runningsgpdd-survey, see Chapter 33, Benchmarking Lustre File System Performance (Lustre I/O Kit).
Note
The
sgpdd-survey script overwrites the device being tested
so it must be run before the OSTs are configured.
To configure a simple Lustre file system, complete these steps:
Create a combined MGS/MDT file system on a block device. On the MDS node, run:
mkfs.lustre --fsname=
fsname--mgs --mdt --index=0/dev/block_deviceThe default file system name (
fsname) islustre.Note
If you plan to create multiple file systems, the MGS should be created separately on its own dedicated block device, by running:
mkfs.lustre --fsname=
fsname--mgs/dev/block_deviceSee Section 13.8, “ Running Multiple Lustre File Systems”for more details.
Optionally add in additional MDTs.
mkfs.lustre --fsname=
fsname--mgsnode=nid--mdt --index=1/dev/block_deviceNote
Up to 4095 additional MDTs can be added.
Mount the combined MGS/MDT file system on the block device. On the MDS node, run:
mount -t lustre
/dev/block_device/mount_pointNote
If you have created an MGS and an MDT on separate block devices, mount them both.
Create the OST. On the OSS node, run:
mkfs.lustre --fsname=
fsname--mgsnode=MGS_NID--ost --index=OST_index/dev/block_deviceWhen you create an OST, you are formatting a
ldiskfsorZFSfile system on a block storage device like you would with any local file system.You can have as many OSTs per OSS as the hardware or drivers allow. For more information about storage and memory requirements for a Lustre file system, see Chapter 5, Determining Hardware Configuration Requirements and Formatting Options.
You can only configure one OST per block device. You should create an OST that uses the raw block device and does not use partitioning.
You should specify the OST index number at format time in order to simplify translating the OST number in error messages or file striping to the OSS node and block device later on.
If you are using block devices that are accessible from multiple OSS nodes, ensure that you mount the OSTs from only one OSS node at at time. It is strongly recommended that multiple-mount protection be enabled for such devices to prevent serious data corruption. For more information about multiple-mount protection, see Chapter 24, Lustre File System Failover and Multiple-Mount Protection.
Note
The Lustre software currently supports block devices up to 128 TB on Red Hat Enterprise Linux 5 and 6 (up to 8 TB on other distributions). If the device size is only slightly larger that 16 TB, it is recommended that you limit the file system size to 16 TB at format time. We recommend that you not place DOS partitions on top of RAID 5/6 block devices due to negative impacts on performance, but instead format the whole disk for the file system.
Mount the OST. On the OSS node where the OST was created, run:
mount -t lustre
/dev/block_device/mount_pointMount the Lustre file system on the client. On the client node, run:
mount -t lustre
MGS_node:/fsname/mount_pointNote
To mount the filesystem on additional clients, repeat Step 6.
Note
If you have a problem mounting the file system, check the syslogs on the client and all the servers for errors and also check the network settings. A common issue with newly-installed systems is that
hosts.denyor firewall rules may prevent connections on port 988.Verify that the file system started and is working correctly. Do this by running
lfs df,ddandlscommands on the client node.(Optional)Run benchmarking tools to validate the performance of hardware and software layers in the cluster. Available tools include:
obdfilter-survey- Characterizes the storage performance of a Lustre file system. For details, see Section 33.3, “Testing OST Performance (obdfilter-survey) ”.ost-survey- Performs I/O against OSTs to detect anomalies between otherwise identical disk subsystems. For details, see Section 33.4, “ Testing OST I/O Performance (ost-survey)”.
To see the steps to complete for a simple Lustre file system
configuration, follow this example in which a combined MGS/MDT and two
OSTs are created to form a file system called
temp. Three block devices are used, one for the
combined MGS/MDS node and one for each OSS node. Common parameters used
in the example are listed below, along with individual node
parameters.
|
Common Parameters |
Value |
Description | |
|---|---|---|---|
|
|
MGS node |
|
Node for the combined MGS/MDS |
|
|
file system |
|
Name of the Lustre file system |
|
|
network type |
|
Network type used for Lustre file system
|
|
Node Parameters |
Value |
Description | |
|---|---|---|---|
|
MGS/MDS node | |||
|
|
MGS/MDS node |
|
MDS in Lustre file system
|
|
|
block device |
|
Block device for the combined MGS/MDS node |
|
|
mount point |
|
Mount point for the
|
|
First OSS node | |||
|
|
OSS node |
|
First OSS node in Lustre file system
|
|
|
OST |
|
First OST in Lustre file system
|
|
|
block device |
|
Block device for the first OSS node (
|
|
|
mount point |
|
Mount point for the
|
|
Second OSS node | |||
|
OSS node |
|
Second OSS node in Lustre file system
| |
|
OST |
|
Second OST in Lustre file system
| |
|
block device |
|
Block device for the second OSS node (oss1) | |
|
mount point |
|
Mount point for the
| |
|
Client node | |||
|
client node |
|
Client in Lustre file system
| |
|
mount point |
|
Mount point for Lustre file system
| |
Note
We recommend that you use 'dotted-quad' notation for IP addresses rather than host names to make it easier to read debug logs and debug configurations with multiple interfaces.
For this example, complete the steps below:
Create a combined MGS/MDT file system on the block device. On the MDS node, run:
[root@mds /]# mkfs.lustre --fsname=temp --mgs --mdt --index=0 /dev/sdb
This command generates this output:
Permanent disk data: Target: temp-MDT0000 Index: 0 Lustre FS: temp Mount type: ldiskfs Flags: 0x75 (MDT MGS first_time update ) Persistent mount opts: errors=remount-ro,iopen_nopriv,user_xattr Parameters: mdt.identity_upcall=/usr/sbin/l_getidentity checking for existing Lustre data: not found device size = 16MB 2 6 18 formatting backing filesystem ldiskfs on /dev/sdb target name temp-MDTffff 4k blocks 0 options -i 4096 -I 512 -q -O dir_index,uninit_groups -F mkfs_cmd = mkfs.ext2 -j -b 4096 -L temp-MDTffff -i 4096 -I 512 -q -O dir_index,uninit_groups -F /dev/sdb Writing CONFIGS/mountdataMount the combined MGS/MDT file system on the block device. On the MDS node, run:
[root@mds /]# mount -t lustre /dev/sdb /mnt/mdt
This command generates this output:
Lustre: temp-MDT0000: new disk, initializing Lustre: 3009:0:(lproc_mds.c:262:lprocfs_wr_identity_upcall()) temp-MDT0000: group upcall set to /usr/sbin/l_getidentity Lustre: temp-MDT0000.mdt: set parameter identity_upcall=/usr/sbin/l_getidentity Lustre: Server temp-MDT0000 on device /dev/sdb has started
In this example, the OSTs (
ost0andost1) are being created on different OSS nodes (oss0andoss1respectively).Create
ost0. Onoss0node, run:[root@oss0 /]# mkfs.lustre --fsname=temp --mgsnode=10.2.0.1@tcp0 --ost --index=0 /dev/sdc
The command generates this output:
Permanent disk data: Target: temp-OST0000 Index: 0 Lustre FS: temp Mount type: ldiskfs Flags: 0x72 (OST first_time update) Persistent mount opts: errors=remount-ro,extents,mballoc Parameters: mgsnode=10.2.0.1@tcp checking for existing Lustre data: not found device size = 16MB 2 6 18 formatting backing filesystem ldiskfs on /dev/sdc target name temp-OST0000 4k blocks 0 options -I 256 -q -O dir_index,uninit_groups -F mkfs_cmd = mkfs.ext2 -j -b 4096 -L temp-OST0000 -I 256 -q -O dir_index,uninit_groups -F /dev/sdc Writing CONFIGS/mountdataMount ost0 on the OSS on which it was created. On
oss0node, run:root@oss0 /] mount -t lustre /dev/sdc /mnt/ost0
The command generates this output:
LDISKFS-fs: file extents enabled LDISKFS-fs: mballoc enabled Lustre: temp-OST0000: new disk, initializing Lustre: Server temp-OST0000 on device /dev/sdb has started
Shortly afterwards, this output appears:
Lustre: temp-OST0000: received MDS connection from 10.2.0.1@tcp0 Lustre: MDS temp-MDT0000: temp-OST0000_UUID now active, resetting orphans
Create and mount
ost1.Create ost1. On
oss1node, run:[root@oss1 /]# mkfs.lustre --fsname=temp --mgsnode=10.2.0.1@tcp0 \ --ost --index=1 /dev/sddThe command generates this output:
Permanent disk data: Target: temp-OST0001 Index: 1 Lustre FS: temp Mount type: ldiskfs Flags: 0x72 (OST first_time update) Persistent mount opts: errors=remount-ro,extents,mballoc Parameters: mgsnode=10.2.0.1@tcp checking for existing Lustre data: not found device size = 16MB 2 6 18 formatting backing filesystem ldiskfs on /dev/sdd target name temp-OST0001 4k blocks 0 options -I 256 -q -O dir_index,uninit_groups -F mkfs_cmd = mkfs.ext2 -j -b 4096 -L temp-OST0001 -I 256 -q -O dir_index,uninit_groups -F /dev/sdc Writing CONFIGS/mountdataMount ost1 on the OSS on which it was created. On
oss1node, run:root@oss1 /] mount -t lustre /dev/sdd /mnt/ost1
The command generates this output:
LDISKFS-fs: file extents enabled LDISKFS-fs: mballoc enabled Lustre: temp-OST0001: new disk, initializing Lustre: Server temp-OST0001 on device /dev/sdb has started
Shortly afterwards, this output appears:
Lustre: temp-OST0001: received MDS connection from 10.2.0.1@tcp0 Lustre: MDS temp-MDT0000: temp-OST0001_UUID now active, resetting orphans
Mount the Lustre file system on the client. On the client node, run:
root@client1 /] mount -t lustre 10.2.0.1@tcp0:/temp /lustre
This command generates this output:
Lustre: Client temp-client has started
Verify that the file system started and is working by running the
df,ddandlscommands on the client node.Run the
lfs df -hcommand:[root@client1 /] lfs df -h
The
lfs df -hcommand lists space usage per OST and the MDT in human-readable format. This command generates output similar to this:UUID bytes Used Available Use% Mounted on temp-MDT0000_UUID 8.0G 400.0M 7.6G 0% /lustre[MDT:0] temp-OST0000_UUID 800.0G 400.0M 799.6G 0% /lustre[OST:0] temp-OST0001_UUID 800.0G 400.0M 799.6G 0% /lustre[OST:1] filesystem summary: 1.6T 800.0M 1.6T 0% /lustre
Run the
lfs df -ihcommand.[root@client1 /] lfs df -ih
The
lfs df -ihcommand lists inode usage per OST and the MDT. This command generates output similar to this:UUID Inodes IUsed IFree IUse% Mounted on temp-MDT0000_UUID 2.5M 32 2.5M 0% /lustre[MDT:0] temp-OST0000_UUID 5.5M 54 5.5M 0% /lustre[OST:0] temp-OST0001_UUID 5.5M 54 5.5M 0% /lustre[OST:1] filesystem summary: 2.5M 32 2.5M 0% /lustre
Run the
ddcommand:[root@client1 /] cd /lustre [root@client1 /lustre] dd if=/dev/zero of=/lustre/zero.dat bs=4M count=2
The
ddcommand verifies write functionality by creating a file containing all zeros (0s). In this command, an 8 MB file is created. This command generates output similar to this:2+0 records in 2+0 records out 8388608 bytes (8.4 MB) copied, 0.159628 seconds, 52.6 MB/s
Run the
lscommand:[root@client1 /lustre] ls -lsah
The
ls -lsahcommand lists files and directories in the current working directory. This command generates output similar to this:total 8.0M 4.0K drwxr-xr-x 2 root root 4.0K Oct 16 15:27 . 8.0K drwxr-xr-x 25 root root 4.0K Oct 16 15:27 .. 8.0M -rw-r--r-- 1 root root 8.0M Oct 16 15:27 zero.dat
Once the Lustre file system is configured, it is ready for use.
This section describes how to scale the Lustre file system or make configuration changes using the Lustre configuration utilities.
A Lustre file system can be scaled by adding OSTs or clients. For instructions on creating additional OSTs repeat Step 3and Step 5above. For mounting additional clients, repeat Step 6for each client.
The default settings for the file layout stripe pattern are shown in Table 10.1, “Default stripe pattern”.
Table 10.1. Default stripe pattern
|
File Layout Parameter |
Default |
Description |
|
|
1 MB |
Amount of data to write to one OST before moving to the next OST. |
|
|
1 |
The number of OSTs to use for a single file. |
|
|
-1 |
The first OST where objects are created for each file. The default -1 allows the MDS to choose the starting index based on available space and load balancing. It's strongly recommended not to change the default for this parameter to a value other than -1. |
Use the
lfs setstripe command described in
Chapter 19, Managing File Layout (Striping) and Free
Spaceto change the file layout
configuration.
If additional configuration is necessary, several configuration utilities are available:
mkfs.lustre- Use to format a disk for a Lustre service.tunefs.lustre- Use to modify configuration information on a Lustre target disk.lctl- Use to directly control Lustre features via anioctlinterface, allowing various configuration, maintenance and debugging features to be accessed.mount.lustre- Use to start a Lustre client or target service.
For examples using these utilities, see the topic Chapter 44, System Configuration Utilities
The
lfs utility is useful for configuring and querying a
variety of options related to files. For more information, see
Chapter 40, User Utilities.
Note
Some sample scripts are included in the directory where the
Lustre software is installed. If you have installed the Lustre source
code, the scripts are located in the
lustre/tests sub-directory. These scripts enable
quick setup of some simple standard Lustre configurations.
Table of Contents
This chapter describes how to configure failover in a Lustre file system. It includes:
For an overview of failover functionality in a Lustre file system, see Chapter 3, Understanding Failover in a Lustre File System.
The Lustre software provides failover mechanisms only at the layer of the Lustre file system. No failover functionality is provided for system-level components such as failing hardware or applications, or even for the entire failure of a node, as would typically be provided in a complete failover solution. Failover functionality such as node monitoring, failure detection, and resource fencing must be provided by external HA software, such as PowerMan or the open source Corosync and Pacemaker packages provided by Linux operating system vendors. Corosync provides support for detecting failures, and Pacemaker provides the actions to take once a failure has been detected.
Failover in a Lustre file system requires the use of a remote power control (RPC) mechanism, which comes in different configurations. For example, Lustre server nodes may be equipped with IPMI/BMC devices that allow remote power control. For recommended devices, refer to the list of supported RPC devices on the website for the PowerMan cluster power management utility:
Lustre failover requires RPC and management capability to verify that a failed node is off before I/O is directed to the failover node. This avoids double-mounting the two nodes and the risk of unrecoverable data corruption. A variety of power management tools will work. Two packages that have been commonly used with the Lustre software are PowerMan and Pacemaker.
The PowerMan cluster power management utility is used to control RPC devices from a central location. PowerMan provides native support for several RPC varieties and Expect-like configuration simplifies the addition of new devices. The latest versions of PowerMan are available at:
https://github.com/chaos/powerman
STONITH, or "Shoot The Other Node In The Head" is used in conjunction with High Availability node management. This is implemented by Pacemaker to ensure that a peer node that may be importing a shared storage device has been powered off and will not corrupt the shared storage if it continues running.
The Lustre file system must be set up with high-availability (HA) software to enable a complete Lustre failover solution. Except for PowerMan, the HA software packages mentioned above provide both power management and cluster management. For information about setting up failover with Pacemaker, see:
Pacemaker Project website: https://clusterlabs.org/
Article Using Pacemaker with a Lustre File System : https://wiki.whamcloud.com/display/PUB/Using+Pacemaker+with+a+Lustre+File+System
To prepare a Lustre file system to be configured and managed as an HA system by a third-party HA application, each storage target (MGT, MGS, OST) must be associated with a second node to create a failover pair. This configuration information is then communicated by the MGS to a client when the client mounts the file system.
The per-target configuration is relayed to the MGS at mount time. Some rules related to this are:
When a target is initially mounted, the MGS reads the configuration information from the target (such as mgt vs. ost, failnode, fsname) to configure the target into a Lustre file system. If the MGS is reading the initial mount configuration, the mounting node becomes that target's "primary" node.
When a target is subsequently mounted, the MGS reads the current configuration from the target and, as needed, will reconfigure the MGS database target information
When the target is formatted using the mkfs.lustre command, the failover
service node(s) for the target are designated using the --servicenode
option. In the example below, an OST with index 0 in the file system
testfs is formatted with two service nodes designated to serve as a
failover
pair:
mkfs.lustre --reformat --ost --fsname testfs --mgsnode=192.168.10.1@o3ib \
              --index=0 --servicenode=192.168.10.7@o2ib \
              --servicenode=192.168.10.8@o2ib \
              /dev/sdb
More than two potential service nodes can be designated for a target. The target can then be mounted on any of the designated service nodes.
When HA is configured on a storage target, the Lustre software enables multi-mount protection (MMP) on that storage target. MMP prevents multiple nodes from simultaneously mounting and thus corrupting the data on the target. For more about MMP, see Chapter 24, Lustre File System Failover and Multiple-Mount Protection.
If the MGT has been formatted with multiple service nodes designated, this information must be conveyed to the Lustre client in the mount command used to mount the file system. In the example below, NIDs for two MGSs that have been designated as service nodes for the MGT are specified in the mount command executed on the client:
mount -t lustre 10.10.120.1@tcp1:10.10.120.2@tcp1:/testfs /lustre/testfs
When a client mounts the file system, the MGS provides configuration information to the client for the MDT(s) and OST(s) in the file system along with the NIDs for all service nodes associated with each target and the service node on which the target is mounted. Later, when the client attempts to access data on a target, it will try the NID for each specified service node until it connects to the target.
For additional information about administering failover features in a Lustre file system, see:
Part III provides information about tools and procedures to use to administer a Lustre file system. You will find information in this section about:
Tip
The starting point for administering a Lustre file system is to monitor all logs and console logs for system health:
- Monitor logs on all servers and all clients.
- Invest in tools that allow you to condense logs from multiple systems.
- Use the logging resources provided in the Linux distribution.
Table of Contents
- 12. Monitoring a Lustre File System
- 13. Lustre Operations
- 13.1. Mounting by Label
- 13.2. Starting Lustre
- 13.3. Mounting a Server
- 13.4. Stopping the Filesystem
- 13.5. Unmounting a Specific Target on a Server
- 13.6. Specifying Failout/Failover Mode for OSTs
- 13.7. Handling Degraded OST RAID Arrays
- 13.8. Running Multiple Lustre File Systems
- 13.9. Creating a sub-directory on a specific MDT
- 13.10. Creating a directory striped across multiple MDTsL 2.8
- 13.11. Default Dir Stripe Policy
- 13.12. Setting and Retrieving Lustre Parameters
- 13.13. Specifying NIDs and Failover
- 13.14. Erasing a File System
- 13.15. Reclaiming Reserved Disk Space
- 13.16. Replacing an Existing OST or MDT
- 13.17. Identifying To Which Lustre File an OST Object Belongs
- 14. Lustre Maintenance
- 14.1. Working with Inactive OSTs
- 14.2. Finding Nodes in the Lustre File System
- 14.3. Mounting a Server Without Lustre Service
- 14.4. Regenerating Lustre Configuration Logs
- 14.5. Changing a Server NID
- 14.6. Clearing configurationL 2.11
- 14.7. Adding a New MDT to a Lustre File System
- 14.8. Adding a New OST to a Lustre File System
- 14.9. Removing and Restoring MDTs and OSTs
- 14.10. Aborting Recovery
- 14.11. Determining Which Machine is Serving an OST
- 14.12. Changing the Address of a Failover Node
- 14.13. Separate a combined MGS/MDT
- 14.14. Set an MDT to read-onlyL 2.13
- 14.15. Tune Fallocate for ldiskfsL 2.14
- 15. Managing Lustre Networking (LNet)
- 16. LNet Software Multi-RailL 2.10
- 17. Upgrading a Lustre File System
- 18. Backing Up and Restoring a File System
- 18.1. Backing up a File System
- 18.2. Backing Up and Restoring an MDT or OST (ldiskfs Device Level)
- 18.3. Backing Up an OST or MDT (Backend File System Level)
- 18.4. Restoring a File-Level Backup
- 18.5. Using LVM Snapshots with the Lustre File System
- 18.6. Migration Between ZFS and ldiskfs Target Filesystems L 2.11
- 19. Managing File Layout (Striping) and Free Space
- 19.1. How Lustre File System Striping Works
- 19.2. Lustre File Layout (Striping) Considerations
- 19.3. Setting the File Layout/Striping Configuration (
lfs
      setstripe
) - 19.4. Retrieving File Layout/Striping Information (
getstripe) - 19.5. Progressive File Layout(PFL)L 2.10
- 19.6. Self-Extending Layout (SEL)L 2.13
- 19.7. Foreign LayoutL 2.13
- 19.8. Managing Free Space
- 19.9. Lustre Striping Internals
- 20. Data on MDT (DoM)L 2.11
- 21. Lazy Size on MDT (LSoM)L 2.12
- 22. File Level Redundancy (FLR)L 2.11
- 23. Managing the File System and I/O
- 24. Lustre File System Failover and Multiple-Mount Protection
- 25. Configuring and Managing Quotas
- 26. Hierarchical Storage Management (HSM)L 2.5
- 27. Persistent Client Cache (PCC)L 2.13
- 27.1. Introduction
- 27.2. Design
- 27.3. PCC Command Line Tools
- 27.3.1. Add a PCC backend on a client
- 27.3.2. Delete a PCC backend from a client
- 27.3.3. Remove all PCC backends on a client
- 27.3.4. List all PCC backends on a client
- 27.3.5. Attach given files into PCC
- 27.3.6. Attach given files into PCC by FID(s)
- 27.3.7. Detach given files from PCC
- 27.3.8. Detach given files from PCC by FID(s)
- 27.3.9. Display the PCC state for given files
- 27.4. PCC Configuration Example
- 28. Mapping UIDs and GIDs with NodemapL 2.9
- 29. Configuring Shared-Secret Key (SSK) SecurityL 2.9
- 30. Managing Security in a Lustre File System
- 31. Lustre ZFS SnapshotsL 2.10
Table of Contents
This chapter provides information on monitoring a Lustre file system and includes the following sections:
Section 12.1, “ Lustre Changelogs”Lustre Changelogs
Section 12.2, “ Lustre Jobstats”Lustre Jobstats
Section 12.3, “ Lustre Monitoring Tool (LMT)”Lustre Monitoring Tool
Section 12.4, “
CollectL”CollectLSection 12.5, “ Other Monitoring Options”Other Monitoring Options
The changelogs feature records events that change the file system namespace or file metadata. Changes such as file creation, deletion, renaming, attribute changes, etc. are recorded with the target and parent file identifiers (FIDs), the name of the target, a timestamp, and user information. These records can be used for a variety of purposes:
Capture recent changes to feed into an archiving system.
Use changelog entries to exactly replicate changes in a file system mirror.
Set up "watch scripts" that take action on certain events or directories.
Audit activity on Lustre, thanks to user information associated to file/directory changes with timestamps.
Changelogs record types are:
|
Value |
Description |
|---|---|
|
MARK |
Internal recordkeeping |
|
CREAT |
Regular file creation |
|
MKDIR |
Directory creation |
|
HLINK |
Hard link |
|
SLINK |
Soft link |
|
MKNOD |
Other file creation |
|
UNLNK |
Regular file removal |
|
RMDIR |
Directory removal |
|
RENME |
Rename, original |
|
RNMTO |
Rename, final |
|
OPEN * |
Open |
|
CLOSE |
Close |
|
LYOUT |
Layout change |
|
TRUNC |
Regular file truncated |
|
SATTR |
Attribute change |
|
XATTR |
Extended attribute change (setxattr) |
|
HSM |
HSM specific event |
|
MTIME |
MTIME change |
|
CTIME |
CTIME change |
|
ATIME * |
ATIME change |
|
MIGRT |
Migration event |
|
FLRW |
File Level Replication: file initially written |
|
RESYNC |
File Level Replication: file re-synced |
|
GXATR * |
Extended attribute access (getxattr) |
|
NOPEN * |
Denied open |
Note
Event types marked with * are not recorded by default. Refer to Section 12.1.2.7, “Setting the Changelog Mask” for instructions on modifying the Changelogs mask.
FID-to-full-pathname and pathname-to-FID functions are also included to map target and parent FIDs into the file system namespace.
Several commands are available to work with changelogs.
Because changelog records take up space on the MDT, the system administration must register changelog users. As soon as a changelog user is registered, the Changelogs feature is enabled. Users specify which records they have finished processing, and the system purges up to the greatest common processed record.
To register a new changelog user, for each MDT run:
mds# lctl --deviceFSNAME-MDTxxxxchangelog_register \ --userUSERNAME--maskRECORD_TYPES
The USERNAME is a descriptive ASCII
string up to 16 characters that allows identifying registered
changelog users more easily, and is combined with a unique identifier.
The RECORD_TYPES is a comma-separated
list of the above record types that this user is interested in. The
per-user mask is combined with other user masks to form the global
changelog_mask of all record types that are saved.
By registering a per-user mask instead of modifying the global
changelog_mask the changelog will record only the
minimal set of record types that are needed by the currently-registered
users.
Changelog entries are not purged beyond a registered user's
set point (see lfs changelog_clear).
To display the metadata changes on an MDT (the changelog records), run:
client# lfs changelogfsname-MDTnumber[startrec [endrec]]
It is optional whether to specify the start and end records.
These are sample changelog records:
1 02MKDIR 15:15:21.977666834 2018.01.09 0x0 t=[0x200000402:0x1:0x0] j=mkdir.500 ef=0xf \
u=500:500 nid=10.128.11.159@tcp p=[0x200000007:0x1:0x0] pics
2 01CREAT 15:15:36.687592024 2018.01.09 0x0 t=[0x200000402:0x2:0x0] j=cp.500 ef=0xf \
u=500:500 nid=10.128.11.159@tcp p=[0x200000402:0x1:0x0] chloe.jpg
3 06UNLNK 15:15:41.305116815 2018.01.09 0x1 t=[0x200000402:0x2:0x0] j=rm.500 ef=0xf \
u=500:500 nid=10.128.11.159@tcp p=[0x200000402:0x1:0x0] chloe.jpg
4 07RMDIR 15:15:46.468790091 2018.01.09 0x1 t=[0x200000402:0x1:0x0] j=rmdir.500 ef=0xf \
u=500:500 nid=10.128.11.159@tcp p=[0x200000007:0x1:0x0] pics
To clear old changelog records for a specific user (records that the user no longer needs), run:
client# lfs changelog_clearmdt_nameuseridendrec
The changelog_clear command indicates that
changelog records previous to endrec are no
longer of interest to a particular user
userid, potentially allowing the MDT to free
up disk space. An endrecchangelog_clear, the changelog user must be
registered on the MDT node using lctl.
When all changelog users are done with records < X, the records are deleted.
To deregister (unregister) a changelog user, run:
mds# lctl --devicemdt_devicechangelog_deregisterUSERID
If USERID is specified, this matches
only the exact user ID string that was returned when
changelog_register was called.
If USERNAME is specified, then it will match
a changelog username beginning with USERNAME,
to simplify automatic deregistering a service user registered by name
from a script, rather than having to know the exact username.
Running changelog_deregister cl1 effectively
does a lfs changelog_clear cl1 0 as it deregisters.
This section provides examples of different changelog commands.
To register a new "monitor" user for a device
(lustre-MDT0000):
mds# lctl --device lustre-MDT0000 changelog_register --user monitor \
   --mask UNLNK,CLOSE
lustre-MDT0000: Registered changelog userid 'monitor-cl1'
To display changelog records for an MDT
(e.g. lustre-MDT0000):
client# lfs changelog lustre-MDT0000
1 02MKDIR 15:15:21.977666834 2018.01.09 0x0 t=[0x200000402:0x1:0x0] ef=0xf \
u=500:500 nid=10.128.11.159@tcp p=[0x200000007:0x1:0x0] pics
2 01CREAT 15:15:36.687592024 2018.01.09 0x0 t=[0x200000402:0x2:0x0] ef=0xf \
u=500:500 nid=10.128.11.159@tcp p=[0x200000402:0x1:0x0] chloe.jpg
3 06UNLNK 15:15:41.305116815 2018.01.09 0x1 t=[0x200000402:0x2:0x0] ef=0xf \
u=500:500 nid=10.128.11.159@tcp p=[0x200000402:0x1:0x0] chloe.jpg
4 07RMDIR 15:15:46.468790091 2018.01.09 0x1 t=[0x200000402:0x1:0x0] ef=0xf \
u=500:500 nid=10.128.11.159@tcp p=[0x200000007:0x1:0x0] pics
Changelog records include this information:
rec# operation_type(numerical/text) timestamp datestamp flags
t=target_FID ef=extended_flags u=uid:gid nid=client_NID p=parent_FID target_name
Displayed in this format:
rec# operation_type(numerical/text) timestamp datestamp flags t=target_FID \
ef=extended_flags u=uid:gid nid=client_NID p=parent_FID target_name
For example:
2 01CREAT 15:15:36.687592024 2018.01.09 0x0 t=[0x200000402:0x2:0x0] ef=0xf \
u=500:500 nid=10.128.11.159@tcp p=[0x200000402:0x1:0x0] chloe.jpg
To notify a device that a specific user (monitor-cl1)
no longer needs records (up to and including 3):
# lfs changelog_clear lustre-MDT0000 monitor-cl1 3
To confirm that the changelog_clear operation
was successful, run lfs changelog; only records after
id-3 are listed:
# lfs changelog lustre-MDT0000
4 07RMDIR 15:15:46.468790091 2018.01.09 0x1 t=[0x200000402:0x1:0x0] ef=0xf \
u=500:500 nid=10.128.11.159@tcp p=[0x200000007:0x1:0x0] pics
To deregister a changelog user (monitor-cl1)
for a specific device (lustre-MDT0000):
mds# lctl --device lustre-MDT0000 changelog_deregister --user monitor
lustre-MDT0000: Deregistered changelog user 'monitor-cl1'
The deregistration operation clears all changelog records for the
specified user (monitor-cl1).
client# lfs changelog lustre-MDT0000
5 00MARK  15:56:39.603643887 2018.01.09 0x0 t=[0x20001:0x0:0x0] ef=0xf \
u=500:500 nid=0@<0:0> p=[0:0x50:0xb] mdd_obd-lustre-MDT0000-0
Note
MARK records typically indicate changelog recording status changes.
To display the current, maximum changelog index and registered
changelog users for a specific device
(lustre-MDT0000):
mds# lctl get_param mdd.lustre-MDT0000.changelog_users
mdd.lustre-MDT0000.changelog_users=current index: 8
ID    index (idle seconds)
audit-cl2   8 (180)
To show the current changelog mask on a specific device
(lustre-MDT0000):
mds# lctl get_param mdd.lustre-MDT0000.changelog_mask
mdd.lustre-MDT0000.changelog_mask=MARK UNLNK CLOSE
To set the current changelog mask on a specific device
(lustre-MDT0000):
mds# lctl set_param mdd.lustre-MDT0000.changelog_mask=HLINK
mdd.lustre-MDT0000.changelog_mask=HLINK
$ lfs changelog_clear lustre-MDT0000 cl1 0
$ mkdir /mnt/lustre/mydir/foo
$ cp /etc/hosts /mnt/lustre/mydir/foo/file
$ ln /mnt/lustre/mydir/foo/file /mnt/lustre/mydir/myhardlink
Note
Note that setting changelog_mask
explicitly is deprecated and using the --mask
argument when registering a new user is preferred.
Only item types that are in the mask appear in the changelog.
# lfs changelog lustre-MDT0000
9 03HLINK 16:06:35.291636498 2018.01.09 0x0 t=[0x200000402:0x4:0x0] ef=0xf \
u=500:500 nid=10.128.11.159@tcp p=[0x200000007:0x3:0x0] myhardlink
A specific use case for Lustre Changelogs is audit. According to a definition found on Wikipedia, information technology audits are used to evaluate the organization's ability to protect its information assets and to properly dispense information to authorized parties. Basically, audit consists in controlling that all data accesses made were done according to the access control policy in place. And usually, this is done by analyzing access logs.
Audit can be used as a proof of security in place. But Audit can also be a requirement to comply with regulations.
Lustre Changelogs are a good mechanism for audit, because this is a centralized facility, and it is designed to be transactional. Changelog records contain all information necessary for auditing purposes:
ability to identify object of action thanks to file identifiers (FIDs) and name of targets
ability to identify subject of action thanks to UID/GID and NID information
ability to identify time of action thanks to timestamp
To have a fully functional Changelogs-based audit facility, some additional Changelog record types must be enabled, to be able to record events such as OPEN, ATIME, GETXATTR and DENIED OPEN. Please note that enabling these record types may have some performance impact. For instance, recording OPEN and GETXATTR events generate writes in the Changelog records for a read operation from a file-system standpoint.
Being able to record events such as OPEN or DENIED OPEN is important from an audit perspective. For instance, if Lustre file system is used to store medical records on a system dedicated to Life Sciences, data privacy is crucial. Administrators may need to know which doctors accessed, or tried to access, a given medical record and when. And conversely, they might need to know which medical records a given doctor accessed.
To enable all changelog entry types, do:
mds# lctl set_param mdd.lustre-MDT0000.changelog_mask=ALL
mdd.seb-MDT0000.changelog_mask=ALL
Once all required record types have been enabled, just register a Changelogs user and the audit facility is operational.
Note that, however, it is possible to control which Lustre client
nodes can trigger the recording of file system access events to the
Changelogs, thanks to the audit_mode flag on nodemap
entries. The reason to disable audit on a per-nodemap basis is to
prevent some nodes (e.g. backup, HSM agent nodes) from flooding the
audit logs. When audit_mode flag is
set to 1 on a nodemap entry, a client pertaining to this nodemap will be
able to record file system access events to the Changelogs, if
Changelogs are otherwise activated. When set to 0, events are not logged
into the Changelogs, no matter if Changelogs are activated or not. By
default, audit_mode flag is set to 1 in newly created
nodemap entries. And it is also set to 1 in 'default' nodemap.
To prevent nodes pertaining to a nodemap to generate Changelog entries, do:
mgs# lctl nodemap_modify --name nm1 --property audit_mode --value 0
An OPEN changelog entry is in the form:
7 10OPEN  13:38:51.510728296 2017.07.25 0x242 t=[0x200000401:0x2:0x0] \
ef=0x7 u=500:500 nid=10.128.11.159@tcp m=-w-
It includes information about the open mode, in the form m=rwx.
OPEN entries are recorded only once per UID/GID, for a given open mode, as long as the file is not closed by this UID/GID. It avoids flooding the Changelogs for instance if there is an MPI job opening the same file thousands of times from different threads. It reduces the ChangeLog load significantly, without significantly affecting the audit information. Similarly, only the last CLOSE per UID/GID is recorded.
A GETXATTR changelog entry is in the form:
8 23GXATR 09:22:55.886793012 2017.07.27 0x0 t=[0x200000402:0x1:0x0] \
ef=0xf u=500:500 nid=10.128.11.159@tcp x=user.name0
It includes information about the name of the extended attribute
being accessed, in the form x=<xattr name>.
A SETXATTR changelog entry is in the form:
4 15XATTR 09:41:36.157333594 2018.01.10 0x0 t=[0x200000402:0x1:0x0] \
ef=0xf u=500:500 nid=10.128.11.159@tcp x=user.name0
It includes information about the name of the extended attribute
being modified, in the form x=<xattr name>.
A DENIED OPEN changelog entry is in the form:
4 24NOPEN 15:45:44.947406626 2017.08.31 0x2 t=[0x200000402:0x1:0x0] \
ef=0xf u=500:500 nid=10.128.11.158@tcp m=-w-
It has the same information as a regular OPEN entry. In order to
avoid flooding the Changelogs, DENIED OPEN entries are rate limited:
no more than one entry per user per file per time interval, this time
interval (in seconds) being configurable via
mdd.<mdtname>.changelog_deniednext
(default value is 60 seconds).
mds# lctl set_param mdd.lustre-MDT0000.changelog_deniednext=120
mdd.seb-MDT0000.changelog_deniednext=120
mds# lctl get_param mdd.lustre-MDT0000.changelog_deniednext
mdd.seb-MDT0000.changelog_deniednext=120
The Lustre jobstats feature collects file system operation statistics for user processes running on Lustre clients, and exposes on the server using the unique Job Identifier (JobID) provided by the job scheduler for each job. Job schedulers known to be able to work with jobstats include: SLURM, SGE, LSF, Loadleveler, PBS and Maui/MOAB.
Since jobstats is implemented in a scheduler-agnostic manner, it is
likely that it will be able to work with other schedulers also, and also
in environments that do not use a job scheduler, by storing custom format
strings in the jobid_name.
The Lustre jobstats code on the client extracts the unique JobID from an environment variable within the user process, and sends this JobID to the server with all RPCs. This allows the server to tracks statistics for operations specific to each application/command running on the client, and can be useful to identify the source high I/O load.
A Lustre setting on the client, jobid_var,
specifies an environment variable or other client-local source that
to holds a (relatively) unique the JobID for the running application.
Any environment variable can be specified. For example, SLURM sets the
SLURM_JOB_ID environment variable with the unique
JobID for all clients running a particular job launched on one or
more nodes, and
the SLURM_JOB_ID will be inherited by all child
processes started below that process.
There are several reserved values for jobid_var:
disable- disables sending a JobID from this clientprocname_uid- uses the process name and UID, equivalent to settingjobid_name=%e.%unodelocal- use only the JobID format fromjobid_namesession- extract the JobID fromjobid_this_session
Lustre can also be configured to generate a synthetic JobID from
the client's process name and numeric UID, by setting
jobid_var=procname_uid. This will generate a
uniform JobID when running the same binary across multiple client
nodes, but cannot distinguish whether the binary is part of a single
distributed process or multiple independent processes. This can be
useful on login nodes where interactive commands are run.
In Lustre 2.8 and later it is possible to set
jobid_var=nodelocal and then also set
jobid_name=name, which
all processes on that client node will use. This
is useful if only a single job is run on a client at one time, but if
multiple jobs are run on a client concurrently, the
session JobID should be used.
In Lustre 2.12 and later, it is possible to
specify more complex JobID values for jobid_name
by using a string that contains format codes that are evaluated for
each process, in order to generate a site- or node-specific JobID string.
%ePrint executable name.%gPrint group ID number.%hPrint fully-qualified hostname.%HPrint short hostname (preferred over%h).%jPrint JobID from the environment variable named by thejobid_varparameter. If%j?is specified then conditionally use the following format ifjobid_varis empty.%pprint numeric process ID%uprint user ID number
In Lustre 2.13 and later, it is possible to
set a per-session JobID via the jobid_this_session
parameter instead of getting the JobID from an
environment variable. This session ID will be
inherited by all processes that are started in this login session,
though there can be a different JobID for each login session. This
is enabled by setting jobid_var=session instead
of setting it to an environment variable. The session ID will be
substituted for %j in jobid_name.
The setting of jobid_var need not be the same
on all clients. For example, one could use
SLURM_JOB_ID on all clients managed by SLURM, and
use procname_uid on clients not managed by SLURM,
such as interactive login nodes.
It is not possible to have different
jobid_var settings on a single node, since it is
unlikely that multiple job schedulers are active on one client.
However, the actual JobID value is local to each process environment
and it is possible for multiple jobs with different JobIDs to be
active on a single client at one time.
In Lustre 2.16 and later, it is possible to
specify the %j? conditional format operator.
If jobid_var cannot be found in the environment
(e.g. process is run outside of the job scheduler), then the format
immediately following %j? is used
instead of %j.
This is useful on nodes that may have processes accessing the
filesystem outside of the batch-scheduled process group.
For example, %j?%H will resolve to only
jobid_var if it exists in the environment and
is not empty, otherwise it will resolve to the short hostname.
Jobstats are disabled by default. The current state of jobstats
can be verified by checking lctl get_param jobid_var
on a client:
clieht# lctl get_param jobid_var
jobid_var=disable
To enable jobstats on all clients for SLURM:
mgs# lctl set_param -P jobid_var=SLURM_JOB_ID
The lctl set_param command to enable or disable
jobstats should be run on the MGS as root. The change is persistent, and
will be propagated to the MDS, OSS, and client nodes automatically when
it is set on the MGS and for each new client mount.
To temporarily enable jobstats on a client, or to use a different
jobid_var on a subset of nodes, such as nodes in a remote cluster that
use a different job scheduler, or interactive login nodes that do not
use a job scheduler at all, run the lctl set_param
command directly on the client node(s) after the filesystem is mounted.
For example, to enable the procname_uid synthetic
JobID locally on a login node run:
client# lctl set_param jobid_var=procname_uid
The lctl set_param setting is not persistent, and will
be reset if the global jobid_var is set on the MGS or
if the filesystem is unmounted.
The following table shows the environment variables which are set
by various job schedulers. Set jobid_var to the value
for your job scheduler to collect statistics on a per job basis.
|
Job Scheduler |
Environment Variable |
|---|---|
|
Simple Linux Utility for Resource Management (SLURM) |
SLURM_JOB_ID |
|
Sun Grid Engine (SGE) |
JOB_ID |
|
Load Sharing Facility (LSF) |
LSB_JOBID |
|
Loadleveler |
LOADL_STEP_ID |
|
Portable Batch Scheduler (PBS)/MAUI |
PBS_JOBID |
|
Cray Application Level Placement Scheduler (ALPS) |
ALPS_APP_ID |
mgs# lctl set_param -P jobid_var=disable
To track job stats per process name and user ID (for debugging, or
if no job scheduler is in use on some nodes such as login nodes), specify
jobid_var as procname_uid:
client# lctl set_param jobid_var=procname_uid
Metadata operation statistics are collected on MDTs. These statistics
can be accessed for all file systems and all jobs on the MDT via the
lctl get_param mdt.*.job_stats. For example, clients
running with jobid_var=procname_uid:
mds# lctl get_param mdt.*.job_stats
job_stats:
- job_id:          bash.0
  snapshot_time:   1352084992
  open:            { samples:     2, unit:  reqs }
  close:           { samples:     2, unit:  reqs }
  getattr:         { samples:     3, unit:  reqs }
- job_id:          mythbackend.0
  snapshot_time:   1352084996
  open:            { samples:    72, unit:  reqs }
  close:           { samples:    73, unit:  reqs }
  unlink:          { samples:    22, unit:  reqs }
  getattr:         { samples:   778, unit:  reqs }
  setattr:         { samples:    22, unit:  reqs }
  statfs:          { samples: 19840, unit:  reqs }
  sync:            { samples: 33190, unit:  reqs }
Data operation statistics are collected on OSTs. Data operations
statistics can be accessed via
lctl get_param obdfilter.*.job_stats, for example:
oss# lctl get_param obdfilter.*.job_stats
obdfilter.myth-OST0000.job_stats=
job_stats:
- job_id:          mythcommflag.0
  snapshot_time:   1429714922
  read:    { samples: 974, unit: bytes, min: 4096, max: 1048576, sum: 91530035 }
  write:   { samples:   0, unit: bytes, min:    0, max:       0, sum:        0 }
obdfilter.myth-OST0001.job_stats=
job_stats:
- job_id:          mythbackend.0
  snapshot_time:   1429715270
  read:    { samples:   0, unit: bytes, min:     0, max:      0, sum:        0 }
  write:   { samples:   1, unit: bytes, min: 96899, max:  96899, sum:    96899 }
  punch:   { samples:   1, unit:  reqs }
obdfilter.myth-OST0002.job_stats=job_stats:
obdfilter.myth-OST0003.job_stats=job_stats:
obdfilter.myth-OST0004.job_stats=
job_stats:
- job_id:          mythfrontend.500
  snapshot_time:   1429692083
  read:    { samples:   9, unit: bytes, min: 16384, max: 1048576, sum: 4444160 }
  write:   { samples:   0, unit: bytes, min:     0, max:       0, sum:       0 }
- job_id:          mythbackend.500
  snapshot_time:   1429692129
  read:    { samples:   0, unit: bytes, min:     0, max:       0, sum:       0 }
  write:   { samples:   1, unit: bytes, min: 56231, max:   56231, sum:   56231 }
  punch:   { samples:   1, unit:  reqs }
Accumulated job statistics can be reset by writing proc file
job_stats.
Clear statistics for all jobs on the local node:
oss# lctl set_param obdfilter.*.job_stats=clear
Clear statistics only for job 'bash.0' on lustre-MDT0000:
mds# lctl set_param mdt.lustre-MDT0000.job_stats=bash.0
By default, if a job is inactive for 600 seconds (10 minutes) statistics for this job will be dropped. This expiration value can be changed temporarily via:
mds# lctl set_param *.*.job_cleanup_interval={max_age}
It can also be changed permanently, for example to 700 seconds via:
mgs# lctl set_param -P mdt.testfs-*.job_cleanup_interval=700
The job_cleanup_interval can be set
as 0 to disable the auto-cleanup. Note that if auto-cleanup of
Jobstats is disabled, then all statistics will be kept in memory
forever, which may eventually consume all memory on the servers.
In this case, any monitoring tool should explicitly clear
individual job statistics as they are processed, as shown above.
Since Lustre 2.15 the lljobstat
utility can be used to monitor and identify the top JobIDs generating
load on a particular server. This allows the administrator to quickly
see which applications/users/clients (depending on how the JobID is
conigured) are generating the most filesystem RPCs and take appropriate
action if needed.
mds# lljobstat -c 10
---
    timestamp: 1665984678
    top_jobs:
    - ls.500:          {ops: 64, ga: 64}
    - touch.500:       {ops: 6, op: 1, cl: 1, mn: 1, ga: 1, sa: 2}
    - bash.0:          {ops: 3, ga: 3}
    ...
It is possible to specify the number of top jobs to monitor as well as the refresh interval, among other options.
The Lustre Monitoring Tool (LMT) is a Python-based, distributed
system that provides a top-like display of activity
on server-side nodes (MDS, OSS and portals routers) on one or more
Lustre file systems. It does not provide support for monitoring
clients. For more information on LMT, including the setup procedure,
see:
CollectL is another tool that can be used to monitor a Lustre file
system. You can run CollectL on a Lustre system that has any combination of
MDSs, OSTs and clients. The collected data can be written to a file for continuous logging and
played back at a later time. It can also be converted to a format suitable for
plotting.
For more information about CollectL, see:
http://collectl.sourceforge.net
Lustre-specific documentation is also available. See:
A variety of standard tools are available publicly including the following:
lltop- Lustre load monitor with batch scheduler integration. https://github.com/jhammond/lltoptacc_stats- A job-oriented system monitor, analyzation, and visualization tool that probes Lustre interfaces and collects statistics. https://github.com/jhammond/tacc_statsxltop- A continuous Lustre monitor with batch scheduler integration. https://github.com/jhammond/xltop
Another option is to script a simple monitoring solution that looks at various reports
from ipconfig, as well as the procfs files generated by
the Lustre software.
Table of Contents
- 13.1. Mounting by Label
- 13.2. Starting Lustre
- 13.3. Mounting a Server
- 13.4. Stopping the Filesystem
- 13.5. Unmounting a Specific Target on a Server
- 13.6. Specifying Failout/Failover Mode for OSTs
- 13.7. Handling Degraded OST RAID Arrays
- 13.8. Running Multiple Lustre File Systems
- 13.9. Creating a sub-directory on a specific MDT
- 13.10. Creating a directory striped across multiple MDTsL 2.8
- 13.11. Default Dir Stripe Policy
- 13.12. Setting and Retrieving Lustre Parameters
- 13.13. Specifying NIDs and Failover
- 13.14. Erasing a File System
- 13.15. Reclaiming Reserved Disk Space
- 13.16. Replacing an Existing OST or MDT
- 13.17. Identifying To Which Lustre File an OST Object Belongs
Once you have the Lustre file system up and running, you can use the procedures in this section to perform these basic Lustre administration tasks.
The file system name is limited to 8 characters. We have encoded the
file system and target information in the disk label, so you can mount by
label. This allows system administrators to move disks around without
worrying about issues such as SCSI disk reordering or getting the
/dev/device wrong for a shared target. Soon, file system
naming will be made as fail-safe as possible. Currently, Linux disk labels
are limited to 16 characters. To identify the target within the file
system, 8 characters are reserved, leaving 8 characters for the file system
name:
fsname-MDT0000 orfsname-OST0a19
To mount by label, use this command:
mount -t lustre -Lfile_system_label/mount_point
This is an example of mount-by-label:
mds# mount -t lustre -L testfs-MDT0000 /mnt/mdt
Caution
Mount-by-label should NOT be used in a multi-path environment or when snapshots are being created of the device, since multiple block devices will have the same label.
Although the file system name is internally limited to 8 characters, you can mount the clients at any mount point, so file system users are not subjected to short names. Here is an example:
client# mount -t lustre mds0@tcp0:/short /dev/long_mountpoint_name
On the first start of a Lustre file system, the components must be started in the following order:
Mount the MGT.
Note
If a combined MGT/MDT is present, Lustre will correctly mount the MGT and MDT automatically.
Mount the MDT.
Note
Mount all MDTs if multiple MDTs are present.
Mount the OST(s).
Mount the client(s).
Starting a Lustre server is straightforward and only involves the
mount command. Lustre servers can be added to /etc/fstab:
mount -t lustre
The mount command generates output similar to this:
/dev/sda1 on /mnt/test/mdt type lustre (rw)
/dev/sda2 on /mnt/test/ost0 type lustre (rw)
192.168.0.21@tcp:/testfs on /mnt/testfs type lustre (rw)
In this example, the MDT, an OST (ost0) and file system (testfs) are mounted.
LABEL=testfs-MDT0000 /mnt/test/mdt lustre defaults,_netdev,noauto 0 0
LABEL=testfs-OST0000 /mnt/test/ost0 lustre defaults,_netdev,noauto 0 0
In general, it is wise to specify noauto and let your
high-availability (HA) package manage when to mount the device. If you are
not using failover, make sure that networking has been started before
mounting a Lustre server. If you are running Red Hat Enterprise Linux, SUSE
Linux Enterprise Server, Debian operating system (and perhaps others), use
the _netdev flag to ensure that these disks are mounted
after the network is up, unless you are using systemd 232 or greater, which
recognize lustre as a network filesystem.
If you are using lnet.service, use
x-systemd.requires=lnet.service regardless of systemd
version.
We are mounting by disk label here. The label of a device can be read
with e2label. The label of a newly-formatted Lustre
server may end in FFFF if the
--index option is not specified to
mkfs.lustre, meaning that it has yet to be assigned. The
assignment takes place when the server is first started, and the disk label
is updated. It is recommended that the
--index option always be used, which will also ensure
that the label is set at format time.
Caution
Do not do this when the client and OSS are on the same node, as memory pressure between the client and OSS can lead to deadlocks.
Caution
Mount-by-label should NOT be used in a multi-path environment.
A complete Lustre filesystem shutdown occurs by unmounting all clients and servers in the order shown below. Please note that unmounting a block device causes the Lustre software to be shut down on that node.
Note
Please note that the -a -t lustre in the
commands below is not the name of a filesystem, but rather is
specifying to unmount all entries in /etc/mtab that are of type
lustre
Unmount the clients
On each client node, unmount the filesystem on that client using the
umountcommand:umount -a -t lustreThe example below shows the unmount of the
testfsfilesystem on a client node:[root@client1 ~]# mount -t lustre XXX.XXX.0.11@tcp:/testfs on /mnt/testfs type lustre (rw,lazystatfs) [root@client1 ~]# umount -a -t lustre [154523.177714] Lustre: Unmounted testfs-client
Unmount the MDT and MGT
On the MGS and MDS node(s), run the
umountcommand:umount -a -t lustreThe example below shows the unmount of the MDT and MGT for the
testfsfilesystem on a combined MGS/MDS:[root@mds1 ~]# mount -t lustre /dev/sda on /mnt/mgt type lustre (ro) /dev/sdb on /mnt/mdt type lustre (ro) [root@mds1 ~]# umount -a -t lustre [155263.566230] Lustre: Failing over testfs-MDT0000 [155263.775355] Lustre: server umount testfs-MDT0000 complete [155269.843862] Lustre: server umount MGS complete
For a seperate MGS and MDS, the same command is used, first on the MDS and then followed by the MGS.
Unmount all the OSTs
On each OSS node, use the
umountcommand:umount -a -t lustreThe example below shows the unmount of all OSTs for the
testfsfilesystem on serverOSS1:[root@oss1 ~]# mount |grep lustre /dev/sda on /mnt/ost0 type lustre (ro) /dev/sdb on /mnt/ost1 type lustre (ro) /dev/sdc on /mnt/ost2 type lustre (ro) [root@oss1 ~]# umount -a -t lustre Lustre: Failing over testfs-OST0002 Lustre: server umount testfs-OST0002 complete
For unmount command syntax for a single OST, MDT, or MGT target please refer to Section 13.5, “ Unmounting a Specific Target on a Server”
To stop a Lustre OST, MDT, or MGT , use the
umount
command./mount_point
The example below stops an OST, ost0, on mount
point /mnt/ost0 for the testfs
filesystem:
[root@oss1 ~]# umount /mnt/ost0
Lustre: Failing over testfs-OST0000
Lustre: server umount testfs-OST0000 complete
Gracefully stopping a server with the
umount command preserves the state of the connected
clients. The next time the server is started, it waits for clients to
reconnect, and then goes through the recovery procedure.
If the force (
-f) flag is used, then the server evicts all clients and
stops WITHOUT recovery. Upon restart, the server does not wait for
recovery. Any currently connected clients receive I/O errors until they
reconnect.
Note
If you are using loopback devices, use the
-d flag. This flag cleans up loop devices and can
always be safely specified.
In a Lustre file system, an OST that has become unreachable because it fails, is taken off the network, or is unmounted can be handled in one of two ways:
In
failoutmode, Lustre clients immediately receive errors (EIOs) after a timeout, instead of waiting for the OST to recover.In
failovermode, Lustre clients wait for the OST to recover.
By default, the Lustre file system uses
failover mode for OSTs. To specify
failout mode instead, use the
--param="failover.mode=failout" option as shown below
(entered on one line):
oss# mkfs.lustre --fsname=fsname--mgsnode=mgs_NID\ --param=failover.mode=failout --ost --index=ost_index/dev/ost_block_device
In the example below,
failout mode is specified for the OSTs on the MGS
mds0 in the file system
testfs(entered on one line).
oss# mkfs.lustre --fsname=testfs --mgsnode=mds0 --param=failover.mode=failout \
      --ost --index=3 /dev/sdb
Caution
Before running this command, unmount all OSTs that will be affected
by a change in failover/failout mode.
Note
After initial file system configuration, use the
tunefs.lustre utility to change the mode. For example,
to set the failout mode, run:
# tunefs.lustre --param failover.mode=failout /dev/ost_device
Lustre includes functionality that notifies Lustre if an external RAID array has degraded performance (resulting in reduced overall file system performance), either because a disk has failed and not been replaced, or because a disk was replaced and is undergoing a rebuild. To avoid a global performance slowdown due to a degraded OST, the MDS can avoid the OST for new object allocation if it is notified of the degraded state.
A parameter for each OST, called
degraded, specifies whether the OST is running in
degraded mode or not.
To mark the OST as degraded, use:
oss# lctl set_param obdfilter.{OST_name}.degraded=1
To mark that the OST is back in normal operation, use:
oss# lctl set_param obdfilter.{OST_name}.degraded=0
To determine if OSTs are currently in degraded mode, use:
oss# lctl get_param obdfilter.*.degraded
If the OST is remounted due to a reboot or other condition, the flag
resets to
0.
It is recommended that this be implemented by an automated script
that monitors the status of individual RAID devices, such as MD-RAID's
mdadm(8) command with the --monitor
option to mark an affected device degraded or restored.
Lustre supports multiple file systems provided the combination of
NID:fsname is unique. Each file system must be allocated
a unique name during creation with the
--fsname parameter. Unique names for file systems are
enforced if a single MGS is present. If multiple MGSs are present (for
example if you have an MGS on every MDS) the administrator is responsible
for ensuring file system names are unique. A single MGS and unique file
system names provides a single point of administration and allows commands
to be issued against the file system even if it is not mounted.
Lustre supports multiple file systems on a single MGS. With a single MGS fsnames are guaranteed to be unique. Lustre also allows multiple MGSs to co-exist. For example, multiple MGSs will be necessary if multiple file systems on different Lustre software versions are to be concurrently available. With multiple MGSs additional care must be taken to ensure file system names are unique. Each file system should have a unique fsname among all systems that may interoperate in the future.
By default, the
mkfs.lustre command creates a file system named
lustre. To specify a different file system name (limited
to 8 characters) at format time, use the
--fsname option:
oss# mkfs.lustre --fsname=file_system_name
Note
The MDT, OSTs and clients in the new file system must use the same
file system name (prepended to the device name). For example, for a new
file system named foo, the MDT and two OSTs would be
named foo-MDT0000,
foo-OST0000, and
foo-OST0001.
To mount a client on the file system, run:
client# mount -t lustremgsnode:/new_fsname/mount_point
For example, to mount a client on file system foo at mount point /mnt/foo, run:
client# mount -t lustre mgsnode:/foo /mnt/foo
Note
If a client(s) will be mounted on several file systems, add the
following line to /etc/xattr.conf file to avoid
problems when files are moved between the file systems:
lustre.* skip
Note
To ensure that a new MDT is added to an existing MGS create the MDT
by specifying:
--mdt --mgsnode=.
mgs_NID
A Lustre installation with two file systems (
foo and
bar) could look like this, where the MGS node is
mgsnode@tcp0 and the mount points are
/mnt/foo and
/mnt/bar.
mgsnode# mkfs.lustre --mgs /dev/sda
mdtfoonode# mkfs.lustre --fsname=foo --mgsnode=mgsnode@tcp0 --mdt --index=0
/dev/sdb
ossfoonode# mkfs.lustre --fsname=foo --mgsnode=mgsnode@tcp0 --ost --index=0
/dev/sda
ossfoonode# mkfs.lustre --fsname=foo --mgsnode=mgsnode@tcp0 --ost --index=1
/dev/sdb
mdtbarnode# mkfs.lustre --fsname=bar --mgsnode=mgsnode@tcp0 --mdt --index=0
/dev/sda
ossbarnode# mkfs.lustre --fsname=bar --mgsnode=mgsnode@tcp0 --ost --index=0
/dev/sdc
ossbarnode# mkfs.lustre --fsname=bar --mgsnode=mgsnode@tcp0 --ost --index=1
/dev/sdd
To mount a client on file system foo at mount point
/mnt/foo, run:
client# mount -t lustre mgsnode@tcp0:/foo /mnt/foo
To mount a client on file system bar at mount point
/mnt/bar, run:
client# mount -t lustre mgsnode@tcp0:/bar /mnt/bar
It is possible to create individual directories, along with its files and sub-directories, to be stored on specific MDTs. To create a sub-directory on a given MDT use the command:
client$ lfs mkdir -imdt_index/mount_point/remote_dir
This command will allocate the sub-directory
remote_dir onto the MDT with index
mdt_index. For more information on adding additional
MDTs and mdt_index see 2.
Warning
An administrator can allocate remote sub-directories to separate MDTs. Creating remote sub-directories in parent directories not hosted on MDT0000 is not recommended. This is because the failure of the parent MDT will leave the namespace below it inaccessible. For this reason, by default it is only possible to create remote sub-directories off MDT0000. To relax this restriction and enable remote sub-directories off any MDT, an administrator must issue the following command on the MGS:
mgs# lctl set_param -P mdt.fsname-MDT*.enable_remote_dir=1
For Lustre filesystem 'scratch', the command executed is:
mgs# lctl set_param -P mdt.scratch-*.enable_remote_dir=1
To verify the configuration setting execute the following command on any MDS:
mds# lctl get_param mdt.*.enable_remote_dir
With Lustre software version 2.8, a new
tunable is available to allow users with a specific group ID to create
and delete remote and striped directories. This tunable is
enable_remote_dir_gid. For example, setting this
parameter to the 'wheel' or 'admin' group ID allows users with that GID
to create and delete remote and striped directories. Setting this
parameter to -1 on MDT0000 to permanently allow any
non-root users create and delete remote and striped directories.
On the MGS execute the following command:
mgs# lctl set_param -P mdt.fsname-*.enable_remote_dir_gid=-1
For the Lustre filesystem 'scratch', the commands expands to:
mgs# lctl set_param -P mdt.scratch-*.enable_remote_dir_gid=-1
The change can be verified by executing the following command on every MDS:
mds# lctl get_param mdt.*.enable_remote_dir_gid
The Lustre 2.8 DNE feature enables files in a single large directory to be distributed across multiple MDTs (a striped directory), if there are mutliple MDTs added to the filesystem, see Section 14.7, “Adding a New MDT to a Lustre File System”. The result is that metadata requests for files in a single large striped directory are serviced by multiple MDTs and metadata service load is distributed over all the MDTs that service a given directory. By distributing metadata service load over multiple MDTs, performance of very large directories can be improved beyond the limit of one MDT. Normally, all files in a directory must be created on a single MDT.
This command to stripe a directory over
mdt_count MDTs is:
client$ lfs mkdir -cmdt_count/mount_point/new_directory
The striped directory feature is most useful for distributing a single large directory (50k entries or more) across multiple MDTs. This should be used with discretion since creating and removing striped directories incurs more overhead than non-striped directories.
If the starting MDT is not specified when creating a new directory, this directory and its stripes will be distributed on MDTs by space usage. For example the following will create a new directory on an MDT preferring one that has less space usage:
client$ lfs mkdir -c 1 -i -1 dir1
Alternatively, if a default directory stripe is set on a directory,
the subsequent use of mkdir for subdirectories in
dir1 will have the same effect:
client$ lfs setdirstripe -D -c 1 -i -1 dir1
The policy is:
If free inodes/blocks on all MDT are almost the same, i.e.
max_inodes_avail * 84% < min_inodes_availandmax_blocks_avail * 84% < min_blocks_avail, then choose MDT roundrobin.Otherwise, create more subdirectories on MDTs with more free inodes/blocks.
Sometime there are many MDTs. But it is not always desirable to
stripe a directory across all MDTs, even if the directory default
stripe_count=-1 (unlimited).
In this case, the per-filesystem tunable parameter
lod.*.max_mdt_stripecount can be used to limit the
actual stripe count of directory to fewer than the full MDT count.
If lod.*.max_mdt_stripecount is not 0, and the
directory stripe_count=-1, the real directory
stripe count will be the minimum of the number of MDTs and
max_mdt_stripecount.
If lod.*.max_mdt_stripecount=0, or an explicit
stripe count is given for the directory, it is ignored.
To set max_mdt_stripecount, on all MDSes of
file system, run:
mgs# lctl set_param -P lod.$fsname-MDTxxxx-mdtlov.max_mdt_stripecount=<N>
To check max_mdt_stripecount, run:
mds# lctl get_param lod.$fsname-MDTxxxx-mdtlov.max_mdt_stripecount
To reset max_mdt_stripecount, run:
mgs# lctl set_param -P -d lod.$fsname-MDTxxxx-mdtlov.max_mdt_stripecount
Similar to file objects allocation, the directory objects are allocated on MDTs by a round-robin algorithm or a weighted algorithm. For the top three level of directories from the root of the filesystem, if the amount of free inodes and blocks is well balanced (i.e., by default, when the free inodes and blocks across MDTs differ by less than 5%), the round-robin algorithm is used to select the next MDT on which a directory is to be created.
If the directory is more than three levels below the root directory, or MDTs are not balanced, then the weighted algorithm is used to randomly select an MDT with more free inodes and blocks.
To avoid creating unnecessary remote directories, if the MDT where its parent directory is located is not too full (the free inodes and blocks of the parent MDT is not more than 5% full than average of all MDTs), this directory will be created on parent MDT.
If administrator wants to change this default filesystem-wide directory striping, run the following command to limit this striping to the top level below the root directory:
client$ lfs setdirstripe -D -i -1 -c 1 --max-inherit 0 <mountpoint>
To revert to the pre-2.15 behavior of all directories being created only on MDT0000 by default (deleting this striping won't work because it will be recreated if missing):
client$ lfs setdirstripe -D -i 0 -c 1 --max-inherit 0 <mountpoint>
If default dir stripe policy is set to a directory, it will be applied to sub directories created later. For example:
$ mkdir testdir1
$ lfs setdirstripe testdir1 -D -c 2
$ lfs getdirstripe testdir1 -D
lmv_stripe_count: 2 lmv_stripe_offset: -1 lmv_hash_type: none lmv_max_inherit: 3 lmv_max_inherit_rr: 0
$ mkdir dir1/subdir1
$ lfs getdirstripe testdir1/subdir1
lmv_stripe_count: 2 lmv_stripe_offset: 0 lmv_hash_type: crush
mdtidx       FID[seq:oid:ver]
     0       [0x200000400:0x2:0x0]
     1       [0x240000401:0x2:0x0]
Default dir stripe can be inherited by sub directory.
This behavior is controlled by lmv_max_inherit
parameter. If lmv_max_inherit is 0 or 1, sub
directory stops to inherit default dir stripe policy.
Or sub directory decreases its parent's
lmv_max_inherit and uses it as its own
lmv_max_inherit.
-1 is special because it means unlimited. For example:
$ lfs getdirstripe testdir1/subdir1 -D
lmv_stripe_count: 2 lmv_stripe_offset: -1 lmv_hash_type: none lmv_max_inherit: 2 lmv_max_inherit_rr: 0
lmv_max_inherit can be set explicitly with
--max-inherit option in
lfs setdirstripe -D command.
If the max-inherit value is not specified, the default value is -1
when stripe_count is 0 or 1.
For other values of stripe_count, the default value
is 3.
Several options are available for setting parameters in Lustre:
When creating a file system, use mkfs.lustre. See Section 13.12.1, “Setting Tunable Parameters with
mkfs.lustre”below.When a server is stopped, use tunefs.lustre. See Section 13.12.2, “Setting Parameters with
tunefs.lustre”below.When the file system is running, use lctl to set or retrieve Lustre parameters. See Section 13.12.3, “Setting Parameters with
lctl”and Section 13.12.3.6, “Reporting Current Parameter Values”below.
When the file system is first formatted, parameters can simply be
added as a --param option to the
mkfs.lustre command. For example:
mds# mkfs.lustre --mdt --param="sys.timeout=50" /dev/sda
For more details about creating a file system,see
Chapter 10, Configuring a Lustre File
System. For more details about
mkfs.lustre, see
Chapter 44, System Configuration Utilities.
If a server (OSS or MDS) is stopped, parameters can be added to an
existing file system using the
--param option to the
tunefs.lustre command. For example:
oss# tunefs.lustre --param=failover.node=192.168.0.13@tcp0 /dev/sda
With tunefs.lustre, parameters are
additive-- new parameters are specified in addition
to old parameters, they do not replace them. To erase all old
tunefs.lustre parameters and just use newly-specified
parameters, run:
mds# tunefs.lustre --erase-params --param=new_parameters
The tunefs.lustre command can be used to set any parameter settable
via lctl conf_param and that has its own OBD device,
so it can be specified as
. For example:obdname|fsname.
obdtype.
proc_file_name=
value
mds# tunefs.lustre --param mdt.identity_upcall=NONE /dev/sda1
For more details about tunefs.lustre, see
Chapter 44, System Configuration Utilities.
When the file system is running, the
lctl command can be used to set parameters (temporary
or permanent) and report current parameter values. Temporary parameters
are active as long as the server or client is not shut down. Permanent
parameters live through server and client reboots.
Note
The lctl list_param command enables users to
list all parameters that can be set. See
Section 13.12.3.5, “Listing All Tunable Parameters”.
For more details about the
lctl command, see the examples in the sections below
and
Chapter 44, System Configuration Utilities.
Use
lctl set_param to set temporary parameters on the
node where it is run. These parameters internally map to corresponding
items in the kernel /proc/{fs,sys}/{lnet,lustre} and
/sys/{fs,kernel/debug}/lustre virtual filesystems.
However, since the mapping between a particular parameter name and the
underlying virtual pathname may change, it is not
recommended to access the virtual pathname directly. The
lctl set_param command uses this syntax:
# lctl set_param [-n] [-P]obdtype.obdname.proc_file_name=value
For example:
# lctl set_param osc.*.max_dirty_mb=1024
osc.myth-OST0000-osc.max_dirty_mb=32
osc.myth-OST0001-osc.max_dirty_mb=32
osc.myth-OST0002-osc.max_dirty_mb=32
osc.myth-OST0003-osc.max_dirty_mb=32
osc.myth-OST0004-osc.max_dirty_mb=32
Use lctl set_param -P or
lctl conf_param command to set permanent parameters.
In general, the set_param -P command is preferred
for new parameters, as this isolates the parameter settings from the
MDT and OST device configuration, and is consistent with the common
lctl get_param and lctl set_param
commands. The lctl conf_param command
was previously used to specify settable parameter, with the following
syntax (the same as the mkfs.lustre and
tunefs.lustre commands):
obdname|fsname.obdtype.proc_file_name=value)
Note
The lctl conf_param and
lctl set_param syntax is not
the same.
Here are a few examples of
lctl conf_param commands:
mgs# lctl conf_param testfs-MDT0000.sys.timeout=40
mgs# lctl conf_param testfs-MDT0000.mdt.identity_upcall=NONE
mgs# lctl conf_param testfs.llite.max_read_ahead_mb=16
mgs# lctl conf_param testfs-OST0000.osc.max_dirty_mb=29.15
mgs# lctl conf_param testfs-OST0000.ost.client_cache_seconds=15
mgs# lctl conf_param testfs.sys.timeout=40
Caution
Parameters specified with the
lctl conf_param command are set permanently in the
file system's configuration file on the MGS.
The lctl set_param -P command can also
set parameters permanently using the same syntax as
lctl set_param and lctl
get_param commands. Permanent parameter settings must be
issued on the MGS. The given parameter is set on every host using
lctl upcall. The lctl set_param
command uses the following syntax:
lctl set_param -Pobdtype.obdname.proc_file_name=value
For example:
mgs# lctl set_param -P timeout=40 mgs# lctl set_param -P mdt.testfs-MDT*.identity_upcall=NONE mgs# lctl set_param -P llite.testfs-*.max_read_ahead_mb=16 mgs# lctl set_param -P osc.testfs-OST*.max_dirty_mb=29.15 mgs# lctl set_param -P ost.testfs-OST*.client_cache_seconds=15
Use the -P -d option to delete permanent
parameters. Syntax:
lctl set_param -P -dobdtype.obdname.parameter_name
For example:
mgs# lctl set_param -P -d osc.*.max_dirty_mb
Note
Starting in Lustre 2.12, there is
lctl get_param command can provide
tab completion when using an interactive shell
with bash-completion installed. This simplifies
the use of get_param significantly, since it
provides an interactive list of available parameters.
To list tunable parameters stored in the params
log file by lctl set_param -P and applied to nodes at
mount, run the lctl --device MGS llog_print params
command on the MGS. For example:
mgs# lctl --device MGS llog_print params
- { index: 2, event: set_param, device: general, parameter: osc.*.max_dirty_mb, value: 1024 }
To list Lustre or LNet parameters that are available to set, use
the lctl list_param command. For example:
lctl list_param [-FR]obdtype.obdname
The following arguments are available for the
lctl list_param command.
-F Add '
/', '
@' or '
=' for directories, symlinks and writeable files,
respectively
-R Recursively lists all parameters under the
specified path
For example:
oss# lctl list_param obdfilter.lustre-OST0000
To report current Lustre parameter values, use the
lctl get_param command with this syntax:
lctl get_param [-n]obdtype.obdname.proc_file_name
Note
Starting in Lustre 2.12, there is
lctl get_param command can provide
tab completion when using an interactive shell
with bash-completion installed. This simplifies
the use of get_param significantly, since it
provides an interactive list of available parameters.
This example reports data on RPC service times.
oss# lctl get_param -n ost.*.ost_io.timeouts
service : cur 1 worst 30 (at 1257150393, 85d23h58m54s ago) 1 1 1 1
This example reports the amount of space this client has reserved for writeback cache with each OST:
client# lctl get_param osc.*.cur_grant_bytes
osc.myth-OST0000-osc-ffff8800376bdc00.cur_grant_bytes=2097152
osc.myth-OST0001-osc-ffff8800376bdc00.cur_grant_bytes=33890304
osc.myth-OST0002-osc-ffff8800376bdc00.cur_grant_bytes=35418112
osc.myth-OST0003-osc-ffff8800376bdc00.cur_grant_bytes=2097152
osc.myth-OST0004-osc-ffff8800376bdc00.cur_grant_bytes=33808384
If a node has multiple network interfaces, it may have multiple NIDs,
which must all be identified so other nodes can choose the NID that is
appropriate for their network interfaces. Typically, NIDs are specified in
a list delimited by commas (
,). However, when failover nodes are specified, the NIDs
are delimited by a colon (
:) or by repeating a keyword such as
--mgsnode= or
--servicenode=).
To display the NIDs of all servers in networks configured to work with the Lustre file system, run (while LNet is running):
# lctl list_nids
In the example below,
mds0 and
mds1 are configured as a combined MGS/MDT failover pair
and oss0 and
oss1 are configured as an OST failover pair. The Ethernet
address for
mds0 is 192.168.10.1, and for
mds1 is 192.168.10.2. The Ethernet addresses for
oss0 and
oss1 are 192.168.10.20 and 192.168.10.21
respectively.
mds0# mkfs.lustre --fsname=testfs --mdt --mgs \
        --servicenode=192.168.10.2@tcp0 \
        --servicenode=192.168.10.1@tcp0 /dev/sda1
mds0# mount -t lustre /dev/sda1 /mnt/test/mdt
oss0# mkfs.lustre --fsname=testfs --servicenode=192.168.10.20@tcp0 \
        --servicenode=192.168.10.21 --ost --index=0 \
        --mgsnode=192.168.10.1@tcp0 --mgsnode=192.168.10.2@tcp0 \
        /dev/sdb
oss0# mount -t lustre /dev/sdb /mnt/test/ost0
client# mount -t lustre 192.168.10.1@tcp0:192.168.10.2@tcp0:/testfs \
        /mnt/testfs
mds0# umount /mnt/mdt
mds1# mount -t lustre /dev/sda1 /mnt/test/mdt
mds1# lctl get_param mdt.testfs-MDT0000.recovery_status
Where multiple NIDs are specified separated by commas (for example,
10.67.73.200@tcp,192.168.10.1@tcp), the two NIDs refer
to the same host, and the Lustre software chooses the
best one for communication. When a pair of NIDs is
separated by a colon (for example,
10.67.73.200@tcp:10.67.73.201@tcp), the two NIDs refer
to two different hosts and are treated as a failover pair (the Lustre
software tries the first one, and if that fails, it tries the second
one.)
Two options to
mkfs.lustre can be used to specify failover nodes. The
--servicenode option is used to specify all service NIDs,
including those for primary nodes and failover nodes. When the
--servicenode option is used, the first service node to
load the target device becomes the primary service node, while nodes
corresponding to the other specified NIDs become failover locations for the
target device. An older option, --failnode, specifies
just the NIDs of failover nodes. For more information about the
--servicenode and
--failnode options, see
Chapter 11, Configuring Failover in a Lustre
File System.
If you want to erase a file system and permanently delete all the data in the file system, run this command on your targets:
# mkfs.lustre --reformat
If you are using a separate MGS and want to keep other file systems
defined on that MGS, then set the
writeconf flag on the MDT for that file system. The
writeconf flag causes the configuration logs to be
erased; they are regenerated the next time the servers start.
To set the writeconf flag on the MDT:
Unmount all clients/servers using this file system, run:
client# umount /mnt/lustre
Permanently erase the file system and, presumably, replace it with another file system, run:
mgs# mkfs.lustre --reformat --fsname spfs --mgs --mdt --index=0 /dev/
mdsdevIf you have a separate MGS (that you do not want to reformat), then add the
--writeconfflag tomkfs.lustreon the MDT, run:mgs# mkfs.lustre --reformat --writeconf --fsname spfs --mgsnode=
mgs_nid\ --mdt --index=0/dev/mds_device
Note
If you have a combined MGS/MDT, reformatting the MDT reformats the MGS as well, causing all configuration information to be lost; you can start building your new file system. Nothing needs to be done with old disks that will not be part of the new file system, just do not mount them.
All current Lustre installations run the ldiskfs file system internally on service nodes. By default, ldiskfs reserves 5% of the disk space to avoid file system fragmentation. In order to reclaim this space, run the following command on your OSS for each OST in the file system:
# tune2fs [-m reserved_blocks_percent] /dev/ostdev
You do not need to shut down Lustre before running this command or restart it afterwards.
Warning
Reducing the space reservation can cause severe performance degradation as the OST file system becomes more than 95% full, due to difficulty in locating large areas of contiguous free space. This performance degradation may persist even if the space usage drops below 95% again. It is recommended NOT to reduce the reserved disk space below 5%.
To copy the contents of an existing OST to a new OST (or an old MDT to a new MDT), follow the process for either OST/MDT backups in Section 18.2, “ Backing Up and Restoring an MDT or OST (ldiskfs Device Level)”or Section 18.3, “ Backing Up an OST or MDT (Backend File System Level)”. For more information on removing a MDT, see Section 14.9.1, “Removing an MDT from the File System”.
Use this procedure to identify the file containing a given object on a given OST.
On the OST (as root), run
debugfsto display the file identifier (FID) of the file associated with the object.For example, if the object is
34976on/dev/lustre/ost_test2, the debug command is:# debugfs -c -R "stat /O/0/d$((34976 % 32))/34976" /dev/lustre/ost_test2
The command output is:
debugfs 1.45.6.wc1 (20-Mar-2020)
/dev/lustre/ost_test2: catastrophic mode - not reading inode or group bitmaps
Inode: 352365   Type: regular    Mode:  0666   Flags: 0x80000
Generation: 2393149953    Version: 0x0000002a:00005f81
User:  1000   Group:  1000   Size: 260096
File ACL: 0    Directory ACL: 0
Links: 1   Blockcount: 512
Fragment:  Address: 0    Number: 0    Size: 0
ctime: 0x4a216b48:00000000 -- Sat May 30 13:22:16 2009
atime: 0x4a216b48:00000000 -- Sat May 30 13:22:16 2009
mtime: 0x4a216b48:00000000 -- Sat May 30 13:22:16 2009
crtime: 0x4a216b3c:975870dc -- Sat May 30 13:22:04 2009
Size of extra inode fields: 24
Extended attributes stored in inode body:
  fid = "b9 da 24 00 00 00 00 00 6a fa 0d 3f 01 00 00 00 eb 5b 0b 00 00 00 0000
00 00 00 00 00 00 00 00 " (32)
  fid: objid=34976 seq=0 parent=[0x200000400:0x122:0x0] stripe=1
EXTENTS:
(0-64):4620544-4620607
The parent FID will be of the form
[0x200000400:0x122:0x0]and can be resolved directly using the commandlfs fid2path [0x200000404:0x122:0x0] /mnt/lustreon any Lustre client, and the process is complete.In cases of an upgraded 1.x inode (if the first part of the FID is below 0x200000400), the MDT inode number is
0x24dab9and generation0x3f0dfa6aand the pathname can also be resolved usingdebugfs.On the MDS (as root), use
debugfsto find the file associated with the inode:# debugfs -c -R "ncheck 0x24dab9" /dev/lustre/mdt_test debugfs 1.42.3.wc3 (15-Aug-2012) /dev/lustre/mdt_test: catastrophic mode - not reading inode or group bitmaps Inode Pathname 2415289 /ROOT/brian-laptop-guest/clients/client11/~dmtmp/PWRPNT/ZD16.BMP
The command lists the inode and pathname associated with the object.
Note
Debugfs' ''ncheck'' is a brute-force search that may
take a long time to complete.
Note
To find the Lustre file from a disk LBA, follow the steps listed in the document at this URL: https://www.smartmontools.org/wiki/BadBlockHowto. Then, follow the steps above to resolve the Lustre filename.
Table of Contents
- 14.1. Working with Inactive OSTs
- 14.2. Finding Nodes in the Lustre File System
- 14.3. Mounting a Server Without Lustre Service
- 14.4. Regenerating Lustre Configuration Logs
- 14.5. Changing a Server NID
- 14.6. Clearing configurationL 2.11
- 14.7. Adding a New MDT to a Lustre File System
- 14.8. Adding a New OST to a Lustre File System
- 14.9. Removing and Restoring MDTs and OSTs
- 14.10. Aborting Recovery
- 14.11. Determining Which Machine is Serving an OST
- 14.12. Changing the Address of a Failover Node
- 14.13. Separate a combined MGS/MDT
- 14.14. Set an MDT to read-onlyL 2.13
- 14.15. Tune Fallocate for ldiskfsL 2.14
Once you have the Lustre file system up and running, you can use the procedures in this section to perform these basic Lustre maintenance tasks:
To mount a client or an MDT with one or more inactive OSTs, run commands similar to this:
client# mount -o exclude=testfs-OST0000 -t lustre \
           uml1:/testfs /mnt/testfs
            client# lctl get_param lov.testfs-clilov-*.target_obd
To activate an inactive OST on a live client or MDT, use the
lctl activate command on the OSC device. For example:
lctl --device 7 activate
Note
A colon-separated list can also be specified. For example,
exclude=testfs-OST0000:testfs-OST0001.
There may be situations in which you need to find all nodes in your Lustre file system or get the names of all OSTs.
To get a list of all Lustre nodes, run this command on the MGS:
# lctl get_param mgs.MGS.live.*
Note
This command must be run on the MGS.
In this example, file system testfs has three
nodes, testfs-MDT0000,
testfs-OST0000, and
testfs-OST0001.
mgs:/root# lctl get_param mgs.MGS.live.*
                fsname: testfs
                flags: 0x0     gen: 26
                testfs-MDT0000
                testfs-OST0000
                testfs-OST0001
To get the names of all OSTs, run this command on the MDS:
mds:/root# lctl get_param lov.*-mdtlov.target_obd
Note
This command must be run on the MDS.
In this example, there are two OSTs, testfs-OST0000 and testfs-OST0001, which are both active.
mgs:/root# lctl get_param lov.testfs-mdtlov.target_obd
0: testfs-OST0000_UUID ACTIVE
1: testfs-OST0001_UUID ACTIVE
If you are using a combined MGS/MDT, but you only want to start the MGS and not the MDT, run this command:
mount -t lustre/dev/mdt_partition-o nosvc/mount_point
The mdt_partition
In this example, the combined MGS/MDT is testfs-MDT0000 and the mount point is /mnt/test/mdt.
$ mount -t lustre -L testfs-MDT0000 -o nosvc /mnt/test/mdt
If the Lustre file system configuration logs are in a state where
the file system cannot be started, use the
tunefs.lustre --writeconf command to regenerate them.
After the writeconf command is run and the servers
restart, the configuration logs are re-generated and stored on the MGS
(as with a new file system).
You should only use the writeconf command if:
The configuration logs are in a state where the file system cannot start
A server NID is being changed
The writeconf command is destructive to some
configuration items (e.g. OST pools information and tunables set via
conf_param), and should be used with caution.
Caution
The OST pools feature enables a group of OSTs to be named for
file striping purposes. If you use OST pools, be aware that running
the writeconf command erases
all pools information (as well as
any other parameters set via lctl conf_param).
We recommend that the pools definitions (and
conf_param settings) be executed via a script,
so they can be regenerated easily after writeconf
is performed. However, tunables saved with lctl set_param
-P are not erased in this case.
Note
If the MGS still holds any configuration logs, it may be
possible to dump these logs to save any parameters stored with
lctl conf_param by dumping the config logs on
the MGS and saving the output (once for each MDT and OST device):
mgs# lctl --device MGS llog_printfsname-client mgs# lctl --device MGS llog_printfsname-MDT0000 mgs# lctl --device MGS llog_printfsname-OST0000
To regenerate Lustre file system configuration logs:
Stop the file system services in the following order before running the
tunefs.lustre --writeconfcommand:Unmount the clients.
Unmount the MDT(s).
Unmount the OST(s).
If the MGS is separate from the MDT it can remain mounted during this process.
Make sure the MDT and OST devices are available.
Run the
tunefs.lustre --writeconfcommand on all target devices.Run writeconf on the MDT(s) first, and then the OST(s).
On each MDS, for each MDT run:
mds# tunefs.lustre --writeconf
/dev/mdt_deviceOn each OSS, for each OST run:
oss# tunefs.lustre --writeconf
/dev/ost_device
Restart the file system in the following order:
Mount the separate MGT, if it is not already mounted.
Mount the MDT(s) in order, starting with MDT0000.
Mount the OSTs in order, starting with OST0000.
Mount the clients.
After the tunefs.lustre --writeconf command is
run, the configuration logs are re-generated as servers connect to the
MGS.
In order to totally rewrite the Lustre configuration, the
tunefs.lustre --writeconf command is used to
rewrite all of the configuration files.
If you need to change only the NID of the MDT or OST, the
replace_nids command can simplify this process.
The replace_nids command differs from
tunefs.lustre --writeconf in that it does not
erase the entire configuration log, precluding the need the need to
execute the writeconf command on all servers and
re-specify all permanent parameter settings. However, the
writeconf command can still be used if desired.
Change a server NID in these situations:
New server hardware is added to the file system, and the MDS or an OSS is being moved to the new machine.
New network card is installed in the server.
You want to reassign IP addresses.
To change a server NID:
Update the LNet configuration in the
/etc/modprobe.conffile so the list of server NIDs is correct. Uselctl list_nidsto view the list of server NIDS.The
lctl list_nidscommand indicates which network(s) are configured to work with the Lustre file system.Shut down the file system in this order:
Unmount the clients.
Unmount the MDT.
Unmount all OSTs.
If the MGS and MDS share a partition, start the MGS only:
mount -t lustre
MDT partition-o nosvcmount_pointRun the
replace_nidscommand on the MGS:lctl replace_nids
devicenamenid1[,nid2,nid3 ...]where
devicenameis the Lustre target name, e.g.testfs-OST0013If the MGS and MDS share a partition, stop the MGS:
umount
mount_point
Note
The replace_nids command also cleans
all old, invalidated records out of the configuration log, while
preserving all other current settings.
Note
The previous configuration log is backed up on the MGS
disk with the suffix '.bak'.
This command runs on MGS node having the MGS device mounted with
-o nosvc. It cleans up configuration files
stored in the CONFIGS/ directory of any records marked SKIP.
If the device name is given, then the specific logs for that
filesystem (e.g. testfs-MDT0000) are processed. Otherwise, if a
filesystem name is given then all configuration files are cleared.
The previous configuration log is backed up on the MGS disk with
the suffix 'config.timestamp.bak'. Eg: Lustre-MDT0000-1476454535.bak.
To clear a configuration:
Shut down the file system in this order:
Unmount the clients.
Unmount the MDT.
Unmount all OSTs.
If the MGS and MDS share a partition, start the MGS only using "nosvc" option.
mount -t lustre
MDT partition-o nosvcmount_pointRun the
clear_confcommand on the MGS:lctl clear_conf
configExample: To clear the configuration for
MDT0000on a filesystem namedtestfsmgs# lctl clear_conf testfs-MDT0000
Additional MDTs can be added using the DNE feature to serve one or more remote sub-directories within a filesystem, in order to increase the total number of files that can be created in the filesystem, to increase aggregate metadata performance, or to isolate user or application workloads from other users of the filesystem. It is possible to have multiple remote sub-directories reference the same MDT. However, the root directory will always be located on MDT0000. To add a new MDT into the file system:
Discover the maximum MDT index. Each MDT must have unique index.
client$ lctl dl | grep mdc 36 UP mdc testfs-MDT0000-mdc-ffff88004edf3c00 4c8be054-144f-9359-b063-8477566eb84e 5 37 UP mdc testfs-MDT0001-mdc-ffff88004edf3c00 4c8be054-144f-9359-b063-8477566eb84e 5 38 UP mdc testfs-MDT0002-mdc-ffff88004edf3c00 4c8be054-144f-9359-b063-8477566eb84e 5 39 UP mdc testfs-MDT0003-mdc-ffff88004edf3c00 4c8be054-144f-9359-b063-8477566eb84e 5
Add the new block device as a new MDT at the next available index. In this example, the next available index is 4.
mds# mkfs.lustre --reformat --fsname=
testfs--mdt --mgsnode=mgsnode--index 4/dev/mdt4_deviceMount the MDTs.
mds# mount -t lustre
/dev/mdt4_blockdevice/mnt/mdt4In order to start creating new files and directories on the new MDT(s) they need to be attached into the namespace at one or more subdirectories using the
lfs mkdircommand. All files and directories below those created withlfs mkdirwill also be created on the same MDT unless otherwise specified.client# lfs mkdir -i 3 /mnt/testfs/new_dir_on_mdt3 client# lfs mkdir -i 4 /mnt/testfs/new_dir_on_mdt4 client# lfs mkdir -c 4 /mnt/testfs/project/new_large_dir_striped_over_4_mdts
A new OST can be added to existing Lustre file system on either an existing OSS node or on a new OSS node. In order to keep client IO load balanced across OSS nodes for maximum aggregate performance, it is not recommended to configure different numbers of OSTs to each OSS node.
Add a new OST by using
mkfs.lustreas when the filesystem was first formatted, see 4 for details. Each new OST must have a unique index number, uselctl dlto see a list of all OSTs. For example, to add a new OST at index 12 to thetestfsfilesystem run following commands should be run on the OSS:oss# mkfs.lustre --fsname=testfs --mgsnode=mds16@tcp0 --ost --index=12 /dev/sda oss# mkdir -p /mnt/testfs/ost12 oss# mount -t lustre /dev/sda /mnt/testfs/ost12
Balance OST space usage (possibly).
The file system can be quite unbalanced when new empty OSTs are added to a relatively full filesystem. New file creations are automatically balanced to favour the new OSTs. If this is a scratch file system or files are pruned at regular intervals, then no further work may be needed to balance the OST space usage as new files being created will preferentially be placed on the less full OST(s). As old files are deleted, they will release space on the old OST(s).
Files existing prior to the expansion can optionally be rebalanced using the
lfs_migrateutility. This redistributes file data over the entire set of OSTs.For example, to rebalance all files within the directory
/mnt/lustre/dir, enter:client# lfs_migrate /mnt/lustre/dir
To migrate files within the
/testfile system onOST0004that are larger than 4GB in size to other OSTs, enter:client# lfs find /test --ost test-OST0004 -size +4G | lfs_migrate -y
See Section 40.2, “
lfs_migrate” for details.
OSTs and DNE MDTs can be removed from and restored to a Lustre filesystem. Deactivating an OST means that it is temporarily or permanently marked unavailable. Deactivating an OST on the MDS means it will not try to allocate new objects there or perform OST recovery, while deactivating an OST the client means it will not wait for OST recovery if it cannot contact the OST and will instead return an IO error to the application immediately if files on the OST are accessed. An OST may be permanently deactivated from the file system, depending on the situation and commands used.
Note
A permanently deactivated MDT or OST still appears in the
filesystem configuration until the configuration is regenerated with
writeconf or it is replaced with a new MDT or OST
at the same index and permanently reactivated. A deactivated OST
will not be listed by lfs df.
You may want to temporarily deactivate an OST on the MDS to prevent new files from being written to it in several situations:
A hard drive has failed and a RAID resync/rebuild is underway, though the OST can also be marked degraded by the RAID system to avoid allocating new files on the slow OST which can reduce performance, see Section 13.7, “ Handling Degraded OST RAID Arrays” for more details.
OST is nearing its space capacity, though the MDS will already try to avoid allocating new files on overly-full OSTs if possible, see Section 39.7, “Allocating Free Space on OSTs” for details.
MDT/OST storage or MDS/OSS node has failed, and will not be available for some time (or forever), but there is still a desire to continue using the filesystem before it is repaired.
If the MDT is permanently inaccessible,
lfs rm_entry {directory} can be used to delete the
directory entry for the unavailable MDT. Using rmdir
would otherwise report an IO error due to the remote MDT being inactive.
Please note that if the MDT is available, standard
rm -r should be used to delete the remote directory.
After the remote directory has been removed, the administrator should
mark the MDT as permanently inactive with:
lctl conf_param {MDT name}.mdc.active=0A user can identify which MDT holds a remote sub-directory using
the lfs utility. For example:
client$ lfs getstripe --mdt-index /mnt/lustre/remote_dir1 1 client$ mkdir /mnt/lustre/local_dir0 client$ lfs getstripe --mdt-index /mnt/lustre/local_dir0 0
The lfs getstripe --mdt-index command
returns the index of the MDT that is serving the given directory.
Files located on or below an inactive MDT are inaccessible until the MDT is activated again. Clients accessing an inactive MDT will receive an EIO error.
When deactivating an OST, note that the client and MDS each have an OSC device that handles communication with the corresponding OST. To remove an OST from the file system:
If the OST is functional, and there are files located on the OST that need to be migrated off of the OST, the file creation for that OST should be temporarily deactivated on the MDS (each MDS if running with multiple MDS nodes in DNE mode).
- Introduced in Lustre 2.9
With Lustre 2.9 and later, the MDS should be set to only disable file creation on that OST by setting
max_create_countto zero:mds# lctl set_param osp.
osc_name.max_create_count=0This ensures that files deleted or migrated off of the OST will have their corresponding OST objects destroyed, and the space will be freed. For example, to disable
OST0000in the filesystemtestfs, run:mds# lctl set_param osp.testfs-OST0000-osc-MDT*.max_create_count=0
on each MDS in the
testfsfilesystem. With older versions of Lustre, to deactivate the OSC on the MDS node(s) use:
mds# lctl set_param osp.
osc_name.active=0This will prevent the MDS from attempting any communication with that OST, including destroying objects located thereon. This is fine if the OST will be removed permanently, if the OST is not stable in operation, or if it is in a read-only state. Otherwise, the free space and objects on the OST will not decrease when files are deleted, and object destruction will be deferred until the MDS reconnects to the OST.
For example, to deactivate
OST0000in the filesystemtestfs, run:mds# lctl set_param osp.testfs-OST0000-osc-MDT*.active=0
Deactivating the OST on the MDS does not prevent use of existing objects for read/write by a client.
Note
If migrating files from a working OST, do not deactivate the OST on clients. This causes IO errors when accessing files located there, and migrating files on the OST would fail.
Caution
Do not use
lctl set_param -Porlctl conf_paramto deactivate the OST if it is still working, as this immediately and permanently deactivates it in the file system configuration on both the MDS and all clients.
Discover all files that have objects residing on the deactivated OST. Depending on whether the deactivated OST is available or not, the data from that OST may be migrated to other OSTs, or may need to be restored from backup.
If the OST is still online and available, find all files with objects on the deactivated OST, and copy them to other OSTs in the file system to:
client# lfs find --ost
ost_name/mount/point| lfs_migrate -yNote that if multiple OSTs are being deactivated at one time, the
lfs findcommand can take multiple--ostarguments, and will return files that are located on any of the specified OSTs.If the OST is no longer available, delete the files on that OST and restore them from backup:
client# lfs find --ost
ost_uuid-print0/mount/point| tee /tmp/files_to_restore | xargs -0 -n 1 unlinkThe list of files that need to be restored from backup is stored in
/tmp/files_to_restore. Restoring these files is beyond the scope of this document.
Deactivate the OST.
If there is expected to be a replacement OST in some short time (a few days), the OST can temporarily be deactivated on the clients using:
client# lctl set_param osc.
fsname-OSTnumber-*.active=0Note
This setting is only temporary and will be reset if the clients are remounted or rebooted. It needs to be run on all clients.
If there is not expected to be a replacement for this OST in the near future, permanently deactivate it on all clients and the MDS by running the following command on the MGS:
mgs# lctl conf_param
ost_name.osc.active=0Note
A deactivated OST still appears in the file system configuration, though a replacement OST can be created that re-uses the same OST index with the
mkfs.lustre --replaceoption, see Section 14.9.5, “ Restoring OST Configuration Files”.Introduced in Lustre 2.16In Lustre 2.16 and later, it is possible to run the command "
lctl del_ost --target" on the MGS to totally remove an OST from the MGS configuration logs. This will cancel the configuration logs for that OST in the client and MDT configuration logs for the named filesystem. This permanently removes the configuration records for that OST from the filesystem, so that it will not be visible on later client and MDT mounts, and should only be run after earlier steps to migrate files off the OST.fsname-OSTxxxxIf the
del_ostcommand is not available, the OST configuration records should be found in the startup logs by running the command "lctl --device MGS llog_print" on the MGS (and also "fsname-client..." for all the MDTs) to list all$fsname-MDTxxxxattach,setup,add_osc,add_pool, and other records related to the removed OST(s). Once theindexvalue is known for each configuration record, the command "lctl --device MGS llog_cancel" will drop that record from the configuration logllog_name-iindexllog_name. This is needed for each offsname-clientfsname-MDTxxxxadd_uuidrecords for the OSS should similarly be canceled.mgs# lctl --device MGS llog_print testfs-client | egrep "192.168.10.99@tcp|OST0003" - { index: 135, event: add_uuid, nid: 192.168.10.99@tcp(0x20000c0a80a63), node: 192.168.10.99@tcp } - { index: 136, event: attach, device: testfs-OST0003-osc, type: osc, UUID: testfs-clilov_UUID } - { index: 137, event: setup, device: testfs-OST0003-osc, UUID: testfs-OST0003_UUID, node: 192.168.10.99@tcp } - { index: 138, event: add_osc, device: testfs-clilov, ost: testfs-OST0003_UUID, index: 3, gen: 1 } mgs# lctl --device MGS llog_cancel testfs-client -i 138 mgs# lctl --device MGS llog_cancel testfs-client -i 137 mgs# lctl --device MGS llog_cancel testfs-client -i 136
If the OST device is still accessible, then the Lustre configuration files on the OST should be backed up and saved for future use in order to avoid difficulties when a replacement OST is returned to service. These files rarely change, so they can and should be backed up while the OST is functional and accessible. If the deactivated OST is still available to mount (i.e. has not permanently failed or is unmountable due to severe corruption), an effort should be made to preserve these files.
Mount the OST file system.
oss# mkdir -p /mnt/ost oss# mount -t ldiskfs
/dev/ost_device/mnt/ostBack up the OST configuration files.
oss# tar cvf
ost_name.tar -C /mnt/ost last_rcvd \ CONFIGS/ O/0/LAST_IDUnmount the OST file system.
oss# umount /mnt/ost
If the original OST is still available, it is best to follow the OST backup and restore procedure given in either Section 18.2, “ Backing Up and Restoring an MDT or OST (ldiskfs Device Level)”, or Section 18.3, “ Backing Up an OST or MDT (Backend File System Level)” and Section 18.4, “ Restoring a File-Level Backup”.
To replace an OST that was removed from service due to corruption
or hardware failure, the replacement OST needs to be formatted using
mkfs.lustre, and the Lustre file system configuration
should be restored, if available. Any objects stored on the OST will
be permanently lost, and files using the OST should be deleted and/or
restored from backup.
With Lustre 2.5 and later, it is possible to
replace an OST to the same index without restoring the configuration
files, using the --replace option at format time.
oss# mkfs.lustre --ost --reformat --replace --index=old_ost_index\other_options/dev/new_ost_dev
The MDS and OSS will negotiate the LAST_ID value
for the replacement OST.
If the OST configuration files were not backed up, due to the OST file system being completely inaccessible, it is still possible to replace the failed OST with a new one at the same OST index.
For older versions, format the OST file system without the
--replaceoption and restore the saved configuration:oss# mkfs.lustre --ost --reformat --index=
old_ost_index\other_options/dev/new_ost_devMount the OST file system.
oss# mkdir /mnt/ost oss# mount -t ldiskfs
/dev/new_ost_dev/mnt/ostRestore the OST configuration files, if available.
oss# tar xvf
ost_name.tar -C /mnt/ostRecreate the OST configuration files, if unavailable.
Follow the procedure in Section 35.3.4, “Fixing a Bad LAST_ID on an OST” to recreate the LAST_ID file for this OST index. The
last_rcvdfile will be recreated when the OST is first mounted using the default parameters, which are normally correct for all file systems. TheCONFIGS/mountdatafile is created bymkfs.lustreat format time, but has flags set that request it to register itself with the MGS. It is possible to copy the flags from another working OST (which should be the same):oss1# debugfs -c -R "dump CONFIGS/mountdata /tmp"
/dev/other_osdevoss1# scp /tmp/mountdata oss0:/tmp/mountdata oss0# dd if=/tmp/mountdata of=/mnt/ost/CONFIGS/mountdata bs=4 count=1 seek=5 skip=5 conv=notruncUnmount the OST file system.
oss# umount /mnt/ost
If the OST was permanently deactivated, it needs to be reactivated in the MGS configuration.
mgs# lctl conf_param ost_name.osc.active=1If the OST was temporarily deactivated, it needs to be reactivated on the MDS and clients.
mds# lctl set_param osp.fsname-OSTnumber-*.active=1 client# lctl set_param osc.fsname-OSTnumber-*.active=1
You can abort recovery with either the lctl utility or by mounting the target with the abort_recov option (mount -o abort_recov). When starting a target, run:
mds# mount -t lustre -Lmdt_name-o abort_recov/mount_point
Note
The recovery process is blocked until all OSTs are available.
In the course of administering a Lustre file system, you may need to determine which machine is serving a specific OST. It is not as simple as identifying the machine's IP address, as IP is only one of several networking protocols that the Lustre software uses and, as such, LNet does not use IP addresses as node identifiers, but NIDs instead. To identify the NID that is serving a specific OST, run one of the following commands on a client (you do not need to be a root user):
client$ lctl get_param osc.fsname-OSTnumber*.ost_conn_uuid
For example:
client$ lctl get_param osc.*-OST0000*.ost_conn_uuid osc.testfs-OST0000-osc-f1579000.ost_conn_uuid=192.168.20.1@tcp
- OR -
client$ lctl get_param osc.*.ost_conn_uuid osc.testfs-OST0000-osc-f1579000.ost_conn_uuid=192.168.20.1@tcp osc.testfs-OST0001-osc-f1579000.ost_conn_uuid=192.168.20.1@tcp osc.testfs-OST0002-osc-f1579000.ost_conn_uuid=192.168.20.1@tcp osc.testfs-OST0003-osc-f1579000.ost_conn_uuid=192.168.20.1@tcp osc.testfs-OST0004-osc-f1579000.ost_conn_uuid=192.168.20.1@tcp
To change the address of a failover node (e.g, to use node X instead of node Y), run this command on the OSS/OST partition (depending on which option was used to originally identify the NID):
oss# tunefs.lustre --erase-params --servicenode=NID/dev/ost_device
or
oss# tunefs.lustre --erase-params --failnode=NID/dev/ost_device
For more information about the --servicenode and
--failnode options, see Chapter 11, Configuring Failover in a Lustre
File System.
These instructions assume the MGS node will be the same as the MDS node. For instructions on how to move MGS to a different node, see Section 14.5, “ Changing a Server NID”.
These instructions are for doing the split without shutting down other servers and clients.
Stop the MDS.
Unmount the MDT
mds# umount -f
/dev/mdt_deviceCreate the MGT filesystem.
mds# mkfs.lustre --mgs
/dev/mgt_deviceCopy the configuration data from MDT disk to the new MGT disk.
mds# mount -t ldiskfs -o ro
/dev/mdt_device/mdt_mount_pointmds# mount -t ldiskfs -o rw/dev/mgt_device/mgt_mount_pointmds# cp -av/mdt_mount_point/CONFIGS/filesystem_name-*/mgt_mount_point/CONFIGS/ mds# cp -av/mdt_mount_point/CONFIGS/{params,nodemap,sptlrpc}*/mgt_mount_point/CONFIGS/ mds# umount/mgt_mount_pointmds# umount/mdt_mount_pointSee Section 14.4, “ Regenerating Lustre Configuration Logs” for alternative method.
Start the MGS.
mgs# mount -t lustre
/dev/mgt_device/mgt_mount_pointCheck to make sure it knows about all your file system
mgs:/root# lctl get_param mgs.MGS.filesystems
Remove the MGS option from the MDT, and set the new MGS nid.
mds# tunefs.lustre --nomgs --mgsnode=
new_mgs_nid/dev/mdt-deviceStart the MDT.
mds# mount -t lustre
/dev/mdt_device /mdt_mount_pointCheck to make sure the MGS configuration looks right:
mgs# lctl get_param mgs.MGS.live.
filesystem_name
It is sometimes desirable to be able to mark the filesystem read-only directly on the server, rather than remounting the clients and setting the option there. This can be useful if there is a rogue client that is deleting files, or when decommissioning a system to prevent already-mounted clients from modifying it anymore.
Set the mdt.*.readonly parameter to
1 to immediately set the MDT to read-only. All future
MDT access will immediately return a "Read-only file system" error
(EROFS) until the parameter is set to
0 again.
Example of setting the readonly parameter to
1, verifying the current setting, accessing from a
client, and setting the parameter back to 0:
mds# lctl set_param mdt.fs-MDT0000.readonly=1 mdt.fs-MDT0000.readonly=1 mds# lctl get_param mdt.fs-MDT0000.readonly mdt.fs-MDT0000.readonly=1 client$ touch test_file touch: cannot touch 'test_file': Read-only file system mds# lctl set_param mdt.fs-MDT0000.readonly=0 mdt.fs-MDT0000.readonly=0
This section shows how to tune/enable/disable fallocate for ldiskfs OSTs.
The default mode=0 is the standard
"allocate unwritten extents" behavior used by ext4. This is by far the
fastest for space allocation, but requires the unwritten extents to be
split and/or zeroed when they are overwritten.
The OST fallocate mode=1 can also be set to use
"zeroed extents", which may be handled by "WRITE SAME", "TRIM zeroes data",
or other low-level functionality in the underlying block device.
mode=-1 completely disables fallocate.
Example: To completely disable fallocate
lctl set_param osd-ldiskfs.*.fallocate_zero_blocks=-1
Example: To enable fallocate to use 'zeroed extents'
lctl set_param osd-ldiskfs.*.fallocate_zero_blocks=1
Table of Contents
This chapter describes some tools for managing Lustre networking (LNet) and includes the following sections:
There are two mechanisms to update the health status of a peer or a router:
LNet can actively check health status of all routers and mark them as dead or alive automatically. By default, this is off. To enable it set
auto_downand if desiredcheck_routers_before_use. This initial check may cause a pause equal torouter_ping_timeoutat system startup, if there are dead routers in the system.When there is a communication error, all LNDs notify LNet that the peer (not necessarily a router) is down. This mechanism is always on, and there is no parameter to turn it off. However, if you set the LNet module parameter
auto_downto0, LNet ignores all such peer-down notifications.
Several key differences in both mechanisms:
The router pinger only checks routers for their health, while LNDs notices all dead peers, regardless of whether they are a router or not.
The router pinger actively checks the router health by sending pings, but LNDs only notice a dead peer when there is network traffic going on.
The router pinger can bring a router from alive to dead or vice versa, but LNDs can only bring a peer down.
The Lustre software automatically starts and stops LNet, but it can also be manually started in a standalone manner. This is particularly useful to verify that your networking setup is working correctly before you attempt to start the Lustre file system.
To start LNet, run:
$ modprobe lnet $ lctl network up
To see the list of local NIDs, run:
$ lctl list_nids
This command tells you the network(s) configured to work with the Lustre file system.
If the networks are not correctly setup, see the modules.conf "networks=" line and make sure the network layer modules are correctly installed and configured.
To get the best remote NID, run:
$ lctl which_nid NIDswhere NIDs
This command takes the "best" NID from a list of the NIDs of a remote host. The "best" NID is the one that the local node uses when trying to communicate with the remote node.
Before the LNet modules can be removed, LNet references must be removed. In general, these references are removed automatically when the Lustre file system is shut down, but for standalone routers, an explicit step is needed to stop LNet. Run:
lctl network unconfigure
Note
Attempting to remove Lustre modules prior to stopping the network may result in a
crash or an LNet hang. If this occurs, the node must be rebooted (in most cases). Make
sure that the Lustre network and Lustre file system are stopped prior to unloading the
modules. Be extremely careful using rmmod -f.
To unconfigure the LNet network, run:
modprobe -r lnd_and_lnet_modulesNote
To remove all Lustre modules, run:
$ lustre_rmmod
To aggregate bandwidth across both rails of a dual-rail IB cluster (o2iblnd) [1] using LNet, consider these points:
LNet can work with multiple rails, however, it does not load balance across them. The actual rail used for any communication is determined by the peer NID.
Hardware multi-rail LNet configurations do not provide an additional level of network fault tolerance. The configurations described below are for bandwidth aggregation only.
A Lustre node always uses the same local NID to communicate with a given peer NID. The criteria used to determine the local NID are:
- Introduced in Lustre 2.5
Lowest route priority number (lower number, higher priority).
Fewest hops (to minimize routing), and
Appears first in the "
networks" or "ip2nets" LNet configuration strings
A Lustre file system contains OSSs with two InfiniBand HCAs. Lustre clients have only one InfiniBand HCA using OFED-based Infiniband ''o2ib'' drivers. Load balancing between the HCAs on the OSS is accomplished through LNet.
To configure LNet for load balancing on clients and servers:
Set the
lustre.confoptions.Depending on your configuration, set
lustre.confoptions as follows:Dual HCA OSS server
options lnet networks="o2ib0(ib0),o2ib1(ib1)"
Client with the odd IP address
options lnet ip2nets="o2ib0(ib0) 192.168.10.[103-253/2]"
Client with the even IP address
options lnet ip2nets="o2ib1(ib0) 192.168.10.[102-254/2]"
Run the modprobe lnet command and create a combined MGS/MDT file system.
The following commands create an MGS/MDT or OST file system and mount the targets on the servers.
modprobe lnet # mkfs.lustre --fsname lustre --mgs --mdt
/dev/mdt_device# mkdir -p/mount_point# mount -t lustre /dev/mdt_device/mount_pointFor example:
modprobe lnet mds# mkfs.lustre --fsname lustre --mdt --mgs /dev/sda mds# mkdir -p /mnt/test/mdt mds# mount -t lustre /dev/sda /mnt/test/mdt mds# mount -t lustre mgs@o2ib0:/lustre /mnt/mdt oss# mkfs.lustre --fsname lustre --mgsnode=mds@o2ib0 --ost --index=0 /dev/sda oss# mkdir -p /mnt/test/mdt oss# mount -t lustre /dev/sda /mnt/test/ost oss# mount -t lustre mgs@o2ib0:/lustre /mnt/ost0
Mount the clients.
client# mount -t lustre
mgs_node:/fsname/mount_pointThis example shows an IB client being mounted.
client# mount -t lustre 192.168.10.101@o2ib0,192.168.10.102@o2ib1:/mds/client /mnt/lustre
As an example, consider a two-rail IB cluster running the OFED stack with these IPoIB address assignments.
ib0 ib1 Servers 192.168.0.* 192.168.1.* Clients 192.168.[2-127].* 192.168.[128-253].*
You could create these configurations:
A cluster with more clients than servers. The fact that an individual client cannot get two rails of bandwidth is unimportant because the servers are typically the actual bottleneck.
ip2nets="o2ib0(ib0), o2ib1(ib1) 192.168.[0-1].* \
#all servers;\
o2ib0(ib0) 192.168.[2-253].[0-252/2] #even cl\
ients;\
o2ib1(ib1) 192.168.[2-253].[1-253/2] #odd cli\
ents"This configuration gives every server two NIDs, one on each network, and statically load-balances clients between the rails.
A single client that must get two rails of bandwidth, and it does not matter if the maximum aggregate bandwidth is only (# servers) * (1 rail).
ip2nets=" o2ib0(ib0) 192.168.[0-1].[0-252/2] \
#even servers;\
o2ib1(ib1) 192.168.[0-1].[1-253/2] \
#odd servers;\
o2ib0(ib0),o2ib1(ib1) 192.168.[2-253].* \
#clients"This configuration gives every server a single NID on one rail or the other. Clients have a NID on both rails.
All clients and all servers must get two rails of bandwidth.
ip2nets="o2ib0(ib0),o2ib2(ib1) 192.168.[0-1].[0-252/2] \
#even servers;\
o2ib1(ib0),o2ib3(ib1) 192.168.[0-1].[1-253/2] \
#odd servers;\
o2ib0(ib0),o2ib3(ib1) 192.168.[2-253].[0-252/2) \
#even clients;\
o2ib1(ib0),o2ib2(ib1) 192.168.[2-253].[1-253/2) \
#odd clients"This configuration includes two additional proxy o2ib networks to work around the
simplistic NID selection algorithm in the Lustre software. It connects "even"
clients to "even" servers with o2ib0 on
rail0, and "odd" servers with o2ib3 on
rail1. Similarly, it connects "odd" clients to
"odd" servers with o2ib1 on rail0, and
"even" servers with o2ib2 on rail1.
Two scripts are provided:
lustre/scripts/lustre_routes_config and
lustre/scripts/lustre_routes_conversion.
lustre_routes_config sets or cleans up LNet routes
from the specified config file. The
/etc/sysconfig/lnet_routes.conf file can be used to
automatically configure routes on LNet startup.
lustre_routes_conversion converts a legacy routes
configuration file to the new syntax, which is parsed by
lustre_routes_config.
lustre_routes_config usage is as follows
lustre_routes_config [--setup|--cleanup|--dry-run|--verbose] config_file
--setup: configure routes listed in config_file
--cleanup: unconfigure routes listed in config_file
--dry-run: echo commands to be run, but do not execute them
--verbose: echo commands before they are executed The format of the file which is passed into the script is as follows:
network: { gateway: gateway@exit_network [hop: hop] [priority: priority] }
An LNet router is identified when its local NID appears within the list of routes. However, this can not be achieved by the use of this script, since the script only adds extra routes after the router is identified. To ensure that a router is identified correctly, make sure to add its local NID in the routes parameter in the modprobe lustre configuration file. See Section 43.1, “ Introduction”.
lustre_routes_conversion usage is as follows:
lustre_routes_conversion legacy_file new_filelustre_routes_conversion takes as a first parameter a file with routes configured as follows:
network [hop] gateway@exit network[:priority];
The script then converts each routes entry in the provided file to:
network: { gateway: gateway@exit network [hop: hop] [priority: priority] }
and appends each converted entry to the output file passed in as the second parameter to the script.
Below is an example of a legacy LNet route configuration. A legacy configuration file can have multiple entries.
tcp1 10.1.1.2@tcp0:1;
tcp2 10.1.1.3@tcp0:2;
tcp3 10.1.1.4@tcp0;Below is an example of the converted LNet route configuration. The following would be the result of the lustre_routes_conversion script, when run on the above legacy entries.
tcp1: { gateway: 10.1.1.2@tcp0 priority: 1 }
tcp2: { gateway: 10.1.1.2@tcp0 priority: 2 }
tcp1: { gateway: 10.1.1.4@tcp0 }[1] Hardware multi-rail configurations are only supported by o2iblnd; other IB LNDs do not support multiple interfaces.
Table of Contents
This chapter describes LNet Software Multi-Rail configuration and administration.
In computer networking, multi-rail is an arrangement in which two or more network interfaces to a single network on a computer node are employed, to achieve increased throughput. Multi-rail can also be where a node has one or more interfaces to multiple, even different kinds of networks, such as Ethernet, Infiniband, and Intel® Omni-Path. For Lustre clients, multi-rail generally presents the combined network capabilities as a single LNet network. Peer nodes that are multi-rail capable are established during configuration, as are user-defined interface-section policies.
The following link contains a detailed high-level design for the feature: Multi-Rail High-Level Design
Every node using multi-rail networking needs to be properly
configured. Multi-rail uses lnetctl and the LNet
Configuration Library for configuration. Configuring multi-rail for a
given node involves two tasks:
Configuring multiple network interfaces present on the local node.
Adding remote peers that are multi-rail capable (are connected to one or more common networks with at least two interfaces).
This section is a supplement to Section 9.1.3, “Adding, Deleting and Showing Networks” and contains further examples for Multi-Rail configurations.
For information on the dynamic peer discovery feature added in Lustre Release 2.11.0, see Section 9.1.5, “Dynamic Peer Discovery”.
Example lnetctl add command with multiple
interfaces in a Multi-Rail configuration:
lnetctl net add --net tcp --if eth0,eth1
Example of YAML net show:
lnetctl net show -v
net:
- net type: lo
local NI(s):
- nid: 0@lo
status: up
statistics:
send_count: 0
recv_count: 0
drop_count: 0
tunables:
peer_timeout: 0
peer_credits: 0
peer_buffer_credits: 0
credits: 0
lnd tunables:
tcp bonding: 0
dev cpt: 0
CPT: "[0]"
- net type: tcp
local NI(s):
- nid: 192.168.122.10@tcp
status: up
interfaces:
0: eth0
statistics:
send_count: 0
recv_count: 0
drop_count: 0
tunables:
peer_timeout: 180
peer_credits: 8
peer_buffer_credits: 0
credits: 256
lnd tunables:
tcp bonding: 0
dev cpt: -1
CPT: "[0]"
- nid: 192.168.122.11@tcp
status: up
interfaces:
0: eth1
statistics:
send_count: 0
recv_count: 0
drop_count: 0
tunables:
peer_timeout: 180
peer_credits: 8
peer_buffer_credits: 0
credits: 256
lnd tunables:
tcp bonding: 0
dev cpt: -1
CPT: "[0]"Example delete with lnetctl net del:
Assuming the network configuration is as shown above with the
lnetctl net show -v in the previous section, we can
delete a net with following command:
lnetctl net del --net tcp --if eth0
The resultant net information would look like:
lnetctl net show -v
net:
- net type: lo
local NI(s):
- nid: 0@lo
status: up
statistics:
send_count: 0
recv_count: 0
drop_count: 0
tunables:
peer_timeout: 0
peer_credits: 0
peer_buffer_credits: 0
credits: 0
lnd tunables:
tcp bonding: 0
dev cpt: 0
CPT: "[0,1,2,3]"The syntax of a YAML file to perform a delete would be:
- net type: tcp
local NI(s):
- nid: 192.168.122.10@tcp
interfaces:
0: eth0The following example lnetctl peer add
command adds a peer with 2 nids, with
192.168.122.30@tcp being the primary nid:
lnetctl peer add --prim_nid 192.168.122.30@tcp --nid 192.168.122.30@tcp,192.168.122.31@tcp
The resulting lnetctl peer show would be:
lnetctl peer show -v
peer:
- primary nid: 192.168.122.30@tcp
Multi-Rail: True
peer ni:
- nid: 192.168.122.30@tcp
state: NA
max_ni_tx_credits: 8
available_tx_credits: 8
min_tx_credits: 7
tx_q_num_of_buf: 0
available_rtr_credits: 8
min_rtr_credits: 8
refcount: 1
statistics:
send_count: 2
recv_count: 2
drop_count: 0
- nid: 192.168.122.31@tcp
state: NA
max_ni_tx_credits: 8
available_tx_credits: 8
min_tx_credits: 7
tx_q_num_of_buf: 0
available_rtr_credits: 8
min_rtr_credits: 8
refcount: 1
statistics:
send_count: 1
recv_count: 1
drop_count: 0
The following is an example YAML file for adding a peer:
addPeer.yaml
peer:
- primary nid: 192.168.122.30@tcp
Multi-Rail: True
peer ni:
- nid: 192.168.122.31@tcpExample of deleting a single nid of a peer (192.168.122.31@tcp):
lnetctl peer del --prim_nid 192.168.122.30@tcp --nid 192.168.122.31@tcp
Example of deleting the entire peer:
lnetctl peer del --prim_nid 192.168.122.30@tcp
Example of deleting a peer via YAML:
Assuming the following peer configuration:
peer:
- primary nid: 192.168.122.30@tcp
Multi-Rail: True
peer ni:
- nid: 192.168.122.30@tcp
state: NA
- nid: 192.168.122.31@tcp
state: NA
- nid: 192.168.122.32@tcp
state: NA
You can delete 192.168.122.32@tcp as follows:
delPeer.yaml
peer:
- primary nid: 192.168.122.30@tcp
Multi-Rail: True
peer ni:
- nid: 192.168.122.32@tcp
% lnetctl import --del < delPeer.yamlThis section details how to configure Multi-Rail with the routing feature before the Section 16.4, “Multi-Rail Routing with LNet Health” feature landed in Lustre 2.13. Routing code has always monitored the state of the route, in order to avoid using unavailable ones.
This section describes how you can configure multiple interfaces on the same gateway node but as different routes. This uses the existing route monitoring algorithm to guard against interfaces going down. With the Section 16.4, “Multi-Rail Routing with LNet Health” feature introduced in Lustre 2.13, the new algorithm uses the Section 16.5, “LNet Health” feature to monitor the different interfaces of the gateway and always ensures that the healthiest interface is used. Therefore, the configuration described in this section applies to releases prior to Lustre 2.13. It will still work in 2.13 as well, however it is not required due to the reason mentioned above.
The below example outlines a simple system where all the Lustre nodes are MR capable. Each node in the cluster has two interfaces.

The routers can aggregate the interfaces on each side of the network by configuring them on the appropriate network.
An example configuration:
Routers
lnetctl net add --net o2ib0 --if ib0,ib1
lnetctl net add --net o2ib1 --if ib2,ib3
lnetctl peer add --nid <peer1-nidA>@o2ib,<peer1-nidB>@o2ib,...
lnetctl peer add --nid <peer2-nidA>@o2ib1,<peer2-nidB>>@o2ib1,...
lnetctl set routing 1
Clients
lnetctl net add --net o2ib0 --if ib0,ib1
lnetctl route add --net o2ib1 --gateway <rtrX-nidA>@o2ib
lnetctl peer add --nid <rtrX-nidA>@o2ib,<rtrX-nidB>@o2ib
Servers
lnetctl net add --net o2ib1 --if ib0,ib1
lnetctl route add --net o2ib0 --gateway <rtrX-nidA>@o2ib1
lnetctl peer add --nid <rtrX-nidA>@o2ib1,<rtrX-nidB>@o2ib1In the above configuration the clients and the servers are configured with only one route entry per router. This works because the routers are MR capable. By adding the routers as peers with multiple interfaces to the clients and the servers, when sending to the router the MR algorithm will ensure that bot interfaces of the routers are used.
However, as of the Lustre 2.10 release LNet Resiliency is still under development and single interface failure will still cause the entire router to go down.
Currently, LNet provides a mechanism to monitor each route entry. LNet pings each gateway identified in the route entry on regular, configurable interval to ensure that it is alive. If sending over a specific route fails or if the router pinger determines that the gateway is down, then the route is marked as down and is not used. It is subsequently pinged on regular, configurable intervals to determine when it becomes alive again.
This mechanism can be combined with the MR feature in Lustre 2.10 to add this router resiliency feature to the configuration.
Routers
lnetctl net add --net o2ib0 --if ib0,ib1
lnetctl net add --net o2ib1 --if ib2,ib3
lnetctl peer add --nid <peer1-nidA>@o2ib,<peer1-nidB>@o2ib,...
lnetctl peer add --nid <peer2-nidA>@o2ib1,<peer2-nidB>@o2ib1,...
lnetctl set routing 1
Clients
lnetctl net add --net o2ib0 --if ib0,ib1
lnetctl route add --net o2ib1 --gateway <rtrX-nidA>@o2ib
lnetctl route add --net o2ib1 --gateway <rtrX-nidB>@o2ib
Servers
lnetctl net add --net o2ib1 --if ib0,ib1
lnetctl route add --net o2ib0 --gateway <rtrX-nidA>@o2ib1
lnetctl route add --net o2ib0 --gateway <rtrX-nidB>@o2ib1There are a few things to note in the above configuration:
The clients and the servers are now configured with two routes, each route's gateway is one of the interfaces of the route. The clients and servers will view each interface of the same router as a separate gateway and will monitor them as described above.
The clients and the servers are not configured to view the routers as MR capable. This is important because we want to deal with each interface as a separate peers and not different interfaces of the same peer.
The routers are configured to view the peers as MR capable. This is an oddity in the configuration, but is currently required in order to allow the routers to load balance the traffic load across its interfaces evenly.
The above principles can be applied to mixed MR/Non-MR cluster. For example, the same configuration shown above can be applied if the clients and the servers are non-MR while the routers are MR capable. This appears to be a common cluster upgrade scenario.
This section details how routing and pertinent module parameters can be configured beginning with Lustre 2.13.
Multi-Rail with Dynamic Discovery allows LNet to discover and use all configured interfaces of a node. It references a node via it's primary NID. Multi-Rail routing carries forward this concept to the routing infrastructure. The following changes are brought in with the Lustre 2.13 release:
Configuring a different route per gateway interface is no longer needed. One route per gateway should be configured. Gateway interfaces are used according to the Multi-Rail selection criteria.
Routing now relies on Section 16.5, “LNet Health” to keep track of the route aliveness.
Router interfaces are monitored via LNet Health. If an interface fails other interfaces will be used.
Routing uses LNet discovery to discover gateways on regular intervals.
A gateway pushes its list of interfaces upon the discovery of any changes in its interfaces' state.
A gateway can have multiple interfaces on the same or different networks. The peers using the gateway can reach it on one or more of its interfaces. Multi-Rail routing takes care of managing which interface to use.
lnetctl route add --net <remote network>
--gateway <NID for the gateway>
--hop <number of hops> --priority <route priority>
Table 16.1. Configuring Module Parameters
|
Module Parameter |
Usage |
|---|---|
|
|
Defaults to |
|
|
Defaults to |
|
|
Defaults to |
|
|
Defaults to |
|
|
Defaults to |
The routing infrastructure now relies on LNet Health to keep track
of interface health. Each gateway interface has a health value
associated with it. If a send fails to one of these interfaces, then the
interface's health value is decremented and placed on a recovery queue.
The unhealthy interface is then pinged every
lnet_recovery_interval. This value defaults to
1 second.
If the peer receives a message from the gateway, then it immediately assumes that the gateway's interface is up and resets its health value to maximum. This is needed to ensure we start using the gateways immediately instead of holding off until the interface is back to full health.
LNet Discovery is used in place of pinging the peers. This serves two purposes:
The discovery communication infrastructure does not need to be duplicated for the routing feature.
It allows propagation of the gateway's interface state changes to the peers using the gateway.
For (2), if an interface changes state from UP to
DOWN or vice versa, then a discovery
PUSH is sent to all the peers which can be reached.
This allows peers to adapt to changes quicker.
Discovery is designed to be backwards compatible. The discovery
protocol is composed of a GET and a
PUT. The GET requests interface
information from the peer, this is a basic lnet ping. The peer responds
with its interface information and a feature bit. If the peer is
multi-rail capable and discovery is turned on, then the node will
PUSH its interface information. As a result both peers
will be aware of each other's interfaces.
This information is then used by the peers to decide, based on the interface state provided by the gateway, whether the route is alive or not.
A route is considered alive if the following conditions hold:
The gateway can be reached on the local net via at least one path.
For a single-hop route, if
avoid_asym_router_failureis enabled then the remote network defined in the route must have at least one healthy interface on the gateway.
LNet Multi-Rail has implemented the ability for multiple interfaces to be used on the same LNet network or across multiple LNet networks. The LNet Health feature adds the ability to maintain a health value for each local and remote interface. This allows the Multi-Rail algorithm to consider the health of the interface before selecting it for sending. The feature also adds the ability to resend messages across different interfaces when interface or network failures are detected. This allows LNet to mitigate communication failures before passing the failures to upper layers for further error handling. To accomplish this, LNet Health monitors the status of the send and receive operations and uses this status to increment the interface's health value in case of success and decrement it in case of failure.
The initial health value of a local or remote interface is set to
LNET_MAX_HEALTH_VALUE, currently set to be
1000. The value itself is arbitrary and is meant to
allow for health granularity, as opposed to having a simple boolean state.
The granularity allows the Multi-Rail algorithm to select the interface
that has the highest likelihood of sending or receiving a message.
LNet health behavior depends on the type of failure detected:
|
Failure Type |
Behavior |
|---|---|
|
|
A local failure has occurred, such as no route found or an address resolution error. These failures could be temporary, therefore LNet will attempt to resend the message. LNet will decrement the health value of the local interface and will select it less often if there are multiple available interfaces. |
|
|
A local non-recoverable error occurred in the system, such as out of memory error. In these cases LNet will not attempt to resend the message. LNet will decrement the health value of the local interface and will select it less often if there are multiple available interfaces. |
|
|
If LNet successfully sends a message, but the message does not complete or an expected reply is not received, then it is classified as a remote error. LNet will not attempt to resend the message to avoid duplicate messages on the remote end. LNet will decrement the health value of the remote interface and will select it less often if there are multiple available interfaces. |
|
|
There are a set of failures where we can be reasonably sure that the message was dropped before getting to the remote end. In this case, LNet will attempt to resend the message. LNet will decrement the health value of the remote interface and will select it less often if there are multiple available interfaces. |
LNet Health is turned on by default. There are multiple module parameters available to control the LNet Health feature.
All the module parameters are implemented in sysfs and are located in /sys/module/lnet/parameters/. They can be set directly by echoing a value into them as well as from lnetctl.
|
Parameter |
Description |
|---|---|
|
|
When LNet detects a failure on a particular interface it
will decrement its Health Value by
An lnetctl set health_sensitivity: sensitivity to failure
0 - turn off health evaluation
>0 - sensitivity value not more than 1000
|
|
|
When LNet detects a failure on a local or remote interface
it will place that interface on a recovery queue. There is a
recovery queue for local interfaces and another for remote
interfaces. The interfaces on the recovery queues will be LNet
PINGed every Having this value configurable allows system administrators to control the amount of control traffic on the network. lnetctl set recovery_interval: interval to ping unhealthy interfaces
>0 - timeout in seconds
|
|
|
This timeout is somewhat of an overloaded value. It carries the following functionality:
This value defaults to 30 seconds. lnetctl set transaction_timeout: Message/Response timeout
>0 - timeout in seconds
NoteThe LND timeout will now be a fraction of the
This means that in networks where very large delays are expected then it will be necessary to increase this value accordingly. |
|
|
When LNet detects a failure which it deems appropriate for re-sending a message it will check if a message has passed the maximum retry_count specified. After which if a message wasn't sent successfully a failure event will be passed up to the layer which initiated message sending. The default value is 2. Since the message retry interval
( lnetctl set retry_count: number of retries
0 - turn off retries
>0 - number of retries, cannot be more than
|
|
|
This is not a configurable parameter. But it is derived from
two configurable parameters:
lnet_lnd_timeout = (lnet_transaction_timeout-1) / (retry_count+1)
As such there is a restriction that
The core assumption here is that in a healthy network, sending and receiving LNet messages should not have large delays. There could be large delays with RPC messages and their responses, but that's handled at the PtlRPC layer. |
lnetctl can be used to show all the LNet health
configuration settings using the lnetctl global show
command.
#> lnetctl global show
global:
numa_range: 0
max_intf: 200
discovery: 1
retry_count: 3
transaction_timeout: 10
health_sensitivity: 100
recovery_interval: 1LNet Health statistics are shown under a higher verbosity settings. To show the local interface health statistics:
lnetctl net show -v 3
To show the remote interface health statistics:
lnetctl peer show -v 3
Sample output:
#> lnetctl net show -v 3
net:
- net type: tcp
local NI(s):
- nid: 192.168.122.108@tcp
status: up
interfaces:
0: eth2
statistics:
send_count: 304
recv_count: 284
drop_count: 0
sent_stats:
put: 176
get: 138
reply: 0
ack: 0
hello: 0
received_stats:
put: 145
get: 137
reply: 0
ack: 2
hello: 0
dropped_stats:
put: 10
get: 0
reply: 0
ack: 0
hello: 0
health stats:
health value: 1000
interrupts: 0
dropped: 10
aborted: 0
no route: 0
timeouts: 0
error: 0
tunables:
peer_timeout: 180
peer_credits: 8
peer_buffer_credits: 0
credits: 256
dev cpt: -1
tcp bonding: 0
CPT: "[0]"
CPT: "[0]"There is a new YAML block, health stats, which
displays the health statistics for each local or remote network
interface.
Global statistics also dump the global health statistics as shown below:
#> lnetctl stats show
statistics:
msgs_alloc: 0
msgs_max: 33
rst_alloc: 0
errors: 0
send_count: 901
resend_count: 4
response_timeout_count: 0
local_interrupt_count: 0
local_dropped_count: 10
local_aborted_count: 0
local_no_route_count: 0
local_timeout_count: 0
local_error_count: 0
remote_dropped_count: 0
remote_error_count: 0
remote_timeout_count: 0
network_timeout_count: 0
recv_count: 851
route_count: 0
drop_count: 10
send_length: 425791628
recv_length: 69852
route_length: 0
drop_length: 0LNet Health is off by default. This means that
lnet_health_sensitivity and
lnet_retry_count are set to 0.
Setting lnet_health_sensitivity to
0 will not decrement the health of the interface on
failure and will not change the interface selection behavior. Furthermore,
the failed interfaces will not be placed on the recovery queues. In
essence, turning off the LNet Health feature.
The LNet Health settings will need to be tuned for each cluster. However, the base configuration would be as follows:
#> lnetctl global show
global:
numa_range: 0
max_intf: 200
discovery: 1
retry_count: 3
transaction_timeout: 10
health_sensitivity: 100
recovery_interval: 1This setting will allow a maximum of two retries for failed messages within the 5 second transaction timeout.
If there is a failure on the interface the health value will be decremented by 1 and the interface will be LNet PINGed every 1 second.
Table of Contents
This chapter describes interoperability between Lustre software releases. It also provides procedures for upgrading from older Lustre 2.x software releases to a more recent 2.y Lustre release a (major release upgrade), and from a Lustre software release 2.x.y to a more recent Lustre software release 2.x.z (minor release upgrade). It includes the following sections:
Lustre software release 2.x (major) upgrade:
All servers must be upgraded at the same time, while some or all clients may be upgraded independently of the servers.
All servers must be be upgraded to a Linux kernel supported by the Lustre software. See the Lustre Release Notes for your Lustre version for a list of tested Linux distributions.
Clients to be upgraded must be running a compatible Linux distribution as described in the Release Notes.
Lustre software release 2.x.y release (minor) upgrade:
All servers must be upgraded at the same time, while some or all clients may be upgraded.
Rolling upgrades are supported for minor releases allowing individual servers and clients to be upgraded without stopping the Lustre file system.
The procedure for upgrading from a Lustre software release 2.x to a more recent 2.y major release of the Lustre software is described in this section. To upgrade an existing 2.x installation to a more recent major release, complete the following steps:
Create a complete, restorable file system backup.
Caution
Before installing the Lustre software, back up ALL data. The Lustre software contains kernel modifications that interact with storage devices and may introduce security issues and data loss if not installed, configured, or administered properly. If a full backup of the file system is not practical, a device-level backup of the MDT file system is recommended. See Chapter 18, Backing Up and Restoring a File System for a procedure.
Shut down the entire filesystem by following Section 13.4, “ Stopping the Filesystem”
Upgrade the Linux operating system on all servers to a compatible (tested) Linux distribution and reboot.
Upgrade the Linux operating system on all clients to a compatible (tested) distribution and reboot.
Download the Lustre server RPMs for your platform from the Lustre Releases repository. See Table 8.1, “Packages Installed on Lustre Servers”for a list of required packages.
Install the Lustre server packages on all Lustre servers (MGS, MDSs, and OSSs).
Log onto a Lustre server as the
rootuserUse the
yumcommand to install the packages:# yum --nogpgcheck install pkg1.rpm pkg2.rpm ...
Verify the packages are installed correctly:
rpm -qa|egrep "lustre|wc"
Repeat these steps on each Lustre server.
Download the Lustre client RPMs for your platform from the Lustre Releases repository. See Table 8.2, “Packages Installed on Lustre Clients” for a list of required packages.
Note
The version of the kernel running on a Lustre client must be the same as the version of the
lustre-client-modules-verpackage being installed. If not, a compatible kernel must be installed on the client before the Lustre client packages are installed.Install the Lustre client packages on each of the Lustre clients to be upgraded.
Log onto a Lustre client as the
rootuser.Use the
yumcommand to install the packages:# yum --nogpgcheck install pkg1.rpm pkg2.rpm ...
Verify the packages were installed correctly:
# rpm -qa|egrep "lustre|kernel"
Repeat these steps on each Lustre client.
The DNE feature allows using multiple MDTs within a single filesystem namespace, and each MDT can each serve one or more remote sub-directories in the file system. The
rootdirectory is always located on MDT0.Note that clients running a release prior to the Lustre software release 2.4 can only see the namespace hosted by MDT0 and will return an IO error if an attempt is made to access a directory on another MDT.
(Optional) To format an additional MDT, complete these steps:
Determine the index used for the first MDT (each MDT must have unique index). Enter:
client$ lctl dl | grep mdc 36 UP mdc lustre-MDT0000-mdc-ffff88004edf3c00 4c8be054-144f-9359-b063-8477566eb84e 5In this example, the next available index is 1.
Format the new block device as a new MDT at the next available MDT index by entering (on one line):
mds# mkfs.lustre --reformat --fsname=
filesystem_name--mdt \ --mgsnode=mgsnode--indexnew_mdt_index/dev/mdt1_device
(Optional) If you are upgrading from a release before Lustre 2.10, to enable the project quota feature enter the following on every ldiskfs backend target while unmounted:
tune2fs -O project /dev/
devNote
Enabling the
projectfeature will prevent the filesystem from being used by older versions of ldiskfs, so it should only be enabled if the project quota feature is required and/or after it is known that the upgraded release does not need to be downgraded.When setting up the file system, enter:
conf_param $FSNAME.quota.mdt=$QUOTA_TYPE conf_param $FSNAME.quota.ost=$QUOTA_TYPE
- Introduced in Lustre 2.13
(Optional) If upgrading an ldiskfs MDT formatted prior to Lustre 2.13, the "wide striping" feature that allows files to have more than 160 stripes and store other large xattrs was not enabled by default. This feature can be enabled on existing MDTs by running the following command on all MDT devices:
mds# tune2fs -O ea_inode /dev/
mdtdevFor more information about wide striping, see Section 19.9, “Lustre Striping Internals”.
Start the Lustre file system by starting the components in the order shown in the following steps:
Mount the MGT. On the MGS, run
mgs# mount -a -t lustre
Mount the MDT(s). On each MDT, run:
mds# mount -a -t lustre
Mount all the OSTs. On each OSS node, run:
oss# mount -a -t lustre
Note
This command assumes that all the OSTs are listed in the
/etc/fstabfile. OSTs that are not listed in the/etc/fstabfile, must be mounted individually by running the mount command:mount -t lustre
/dev/block_device/mount_pointMount the file system on the clients. On each client node, run:
client# mount -a -t lustre
- Introduced in Lustre 2.7
(Optional) If you are upgrading from a release before Lustre 2.7, to enable OST FIDs to also store the OST index (to improve reliability of LFSCK and debug messages), after the OSTs are mounted run once on each OSS:
oss# lctl set_param osd-ldiskfs.*.osd_index_in_idif=1
Note
Enabling the
index_in_idiffeature will prevent the OST from being used by older versions of Lustre, so it should only be enabled once it is known there is no need for the OST to be downgraded to an earlier release. If a new MDT was added to the filesystem, the new MDT must be attached into the namespace by creating one or more new DNE subdirectories with the
lfs mkdircommand that use the new MDT:client# lfs mkdir -i
new_mdt_index /testfs/new_dirIntroduced in Lustre 2.8In Lustre 2.8 and later, it is possible to split a new directory across multiple MDTs by creating it with multiple stripes:
client# lfs mkdir -c 2
/testfs/new_striped_dirIntroduced in Lustre 2.13In Lustre 2.13 and later, it is possible to set the default directory layout on existing directories so new remote subdirectories are created on less-full MDTs:
client# lfs setdirstripe -D -c 1 -i -1
/testfs/some_dirSee Section 13.10.1, “Directory creation by space/inode usage” for details.
Introduced in Lustre 2.15In Lustre 2.15 and later, if no default directory layout is set on the root directory, the MDS will automatically set the default directory layout the root directory to distribute the top-level directories round-robin across all MDTs, see Section 13.10.2, “Filesystem-wide default directory striping”.
Note
The mounting order described in the steps above must be followed for the initial mount and registration of a Lustre file system after an upgrade. For a normal start of a Lustre file system, the mounting order is MGT, OSTs, MDT(s), clients.
If you have a problem upgrading a Lustre file system, see Section 35.2, “Reporting a Lustre File System Bug”for ways to get help.
Rolling upgrades are supported for upgrading from any Lustre software release 2.x.y to a more recent Lustre software release 2.X.y. This allows the Lustre file system to continue to run while individual servers (or their failover partners) and clients are upgraded one at a time. The procedure for upgrading a Lustre software release 2.x.y to a more recent minor release is described in this section.
To upgrade Lustre software release 2.x.y to a more recent minor release, complete these steps:
Create a complete, restorable file system backup.
Caution
Before installing the Lustre software, back up ALL data. The Lustre software contains kernel modifications that interact with storage devices and may introduce security issues and data loss if not installed, configured, or administered properly. If a full backup of the file system is not practical, a device-level backup of the MDT file system is recommended. See Chapter 18, Backing Up and Restoring a File System for a procedure.
Download the Lustre server RPMs for your platform from the Lustre Releases repository. See Table 8.1, “Packages Installed on Lustre Servers” for a list of required packages.
For a rolling upgrade, complete any procedures required to keep the Lustre file system running while the server to be upgraded is offline, such as failing over a primary server to its secondary partner.
Unmount the Lustre server to be upgraded (MGS, MDS, or OSS)
Install the Lustre server packages on the Lustre server.
Log onto the Lustre server as the
rootuserUse the
yumcommand to install the packages:# yum --nogpgcheck install pkg1.rpm pkg2.rpm ...
Verify the packages are installed correctly:
rpm -qa|egrep "lustre|wc"
Mount the Lustre server to restart the Lustre software on the server:
server# mount -a -t lustre
Repeat these steps on each Lustre server.
Download the Lustre client RPMs for your platform from the Lustre Releases repository. See Table 8.2, “Packages Installed on Lustre Clients” for a list of required packages.
Install the Lustre client packages on each of the Lustre clients to be upgraded.
Log onto a Lustre client as the
rootuser.Use the
yumcommand to install the packages:# yum --nogpgcheck install pkg1.rpm pkg2.rpm ...
Verify the packages were installed correctly:
# rpm -qa|egrep "lustre|kernel"
Mount the Lustre client to restart the Lustre software on the client:
client# mount -a -t lustre
Repeat these steps on each Lustre client.
If you have a problem upgrading a Lustre file system, see Section 35.2, “Reporting a Lustre File System Bug”for some suggestions for how to get help.
Table of Contents
- 18.1. Backing up a File System
- 18.2. Backing Up and Restoring an MDT or OST (ldiskfs Device Level)
- 18.3. Backing Up an OST or MDT (Backend File System Level)
- 18.4. Restoring a File-Level Backup
- 18.5. Using LVM Snapshots with the Lustre File System
- 18.6. Migration Between ZFS and ldiskfs Target Filesystems L 2.11
This chapter describes how to backup and restore at the file system-level, device-level and file-level in a Lustre file system. Each backup approach is described in the the following sections:
It is strongly recommended that sites perform periodic device-level backup of the MDT(s) (Section 18.2, “ Backing Up and Restoring an MDT or OST (ldiskfs Device Level)”), for example twice a week with alternate backups going to a separate device, even if there is not enough capacity to do a full backup of all of the filesystem data. Even if there are separate file-level backups of some or all files in the filesystem, having a device-level backup of the MDT can be very useful in case of MDT failure or corruption. Being able to restore a device-level MDT backup can avoid the significantly longer process of restoring the entire filesystem from backup. Since the MDT is required for access to all files, its loss would otherwise force full restore of the filesystem (if that is even possible) even if the OSTs are still OK.
Performing a periodic device-level MDT backup can be done relatively inexpensively because the storage need only be connected to the primary MDS (it can be manually connected to the backup MDS in the rare case it is needed), and only needs good linear read/write performance. While the device-level MDT backup is not useful for restoring individual files, it is most efficient to handle the case of MDT failure or corruption.
Backing up a complete file system gives you full control over the files to back up, and allows restoration of individual files as needed. File system-level backups are also the easiest to integrate into existing backup solutions.
File system backups are performed from a Lustre client (or many clients working parallel in different directories) rather than on individual server nodes; this is no different than backing up any other file system.
However, due to the large size of most Lustre file systems, it is not always possible to get a complete backup. We recommend that you back up subsets of a file system. This includes subdirectories of the entire file system, filesets for a single user, files incremented by date, and so on, so that restores can be done more efficiently.
Note
Lustre internally uses a 128-bit file identifier (FID) for all
files. To interface with user applications, the 64-bit inode numbers
are returned by the stat(),
fstat(), and
readdir() system calls on 64-bit applications, and
32-bit inode numbers to 32-bit applications.
Some 32-bit applications accessing Lustre file systems (on both
32-bit and 64-bit CPUs) may experience problems with the
stat(),
fstat() or
readdir() system calls under certain circumstances,
though the Lustre client should return 32-bit inode numbers to these
applications.
In particular, if the Lustre file system is exported from a 64-bit
client via NFS to a 32-bit client, the Linux NFS server will export
64-bit inode numbers to applications running on the NFS client. If the
32-bit applications are not compiled with Large File Support (LFS), then
they return
EOVERFLOW errors when accessing the Lustre files. To
avoid this problem, Linux NFS clients can use the kernel command-line
option "nfs.enable_ino64=0" in order to force the
NFS client to export 32-bit inode numbers to the client.
Workaround: We very strongly recommend
that backups using
tar(1) and other utilities that depend on the inode
number to uniquely identify an inode to be run on 64-bit clients. The
128-bit Lustre file identifiers cannot be uniquely mapped to a 32-bit
inode number, and as a result these utilities may operate incorrectly on
32-bit clients. While there is still a small chance of inode number
collisions with 64-bit inodes, the FID allocation pattern is designed
to avoid collisions for long periods of usage.
The
lustre_rsync feature keeps the entire file system in
sync on a backup by replicating the file system's changes to a second
file system (the second file system need not be a Lustre file system, but
it must be sufficiently large).
lustre_rsync uses Lustre changelogs to efficiently
synchronize the file systems without having to scan (directory walk) the
Lustre file system. This efficiency is critically important for large
file systems, and distinguishes the Lustre
lustre_rsync feature from other replication/backup
solutions.
The
lustre_rsync feature works by periodically running
lustre_rsync, a userspace program used to
synchronize changes in the Lustre file system onto the target file
system. The
lustre_rsync utility keeps a status file, which
enables it to be safely interrupted and restarted without losing
synchronization between the file systems.
The first time that
lustre_rsync is run, the user must specify a set of
parameters for the program to use. These parameters are described in
the following table and in
Section 44.11, “
lustre_rsync”. On subsequent runs, these
parameters are stored in the the status file, and only the name of the
status file needs to be passed to
lustre_rsync.
Before using
lustre_rsync:
Register the changelog user. For details, see the Chapter 44, System Configuration Utilities(
changelog_register) parameter in the Chapter 44, System Configuration Utilities(lctl).
- AND -
Verify that the Lustre file system (source) and the replica file system (target) are identical before registering the changelog user. If the file systems are discrepant, use a utility, e.g. regular
rsync(notlustre_rsync), to make them identical.
The
lustre_rsync utility uses the following
parameters:
|
Parameter |
Description |
|---|---|
|
|
The path to the root of the Lustre file system (source)
which will be synchronized. This is a mandatory option if a
valid status log created during a previous synchronization
operation (
|
|
|
The path to the root where the source file system will
be synchronized (target). This is a mandatory option if the
status log created during a previous synchronization
operation (
|
|
|
The metadata device to be synchronized. A changelog
user must be registered for this device. This is a mandatory
option if a valid status log created during a previous
synchronization operation (
|
|
|
The changelog user ID for the specified MDT. To use
|
|
|
A log file to which synchronization status is saved.
When the
|
--xattr
|
Specifies whether extended attributes (
NoteDisabling xattrs causes Lustre striping information not to be synchronized.
|
|
|
Produces verbose output. |
|
|
Shows the output of
|
|
|
Stops processing the
|
Sample
lustre_rsync commands are listed below.
Register a changelog user for an MDT (e.g.
testfs-MDT0000).
# lctl --device testfs-MDT0000 changelog_register testfs-MDT0000 Registered changelog userid 'cl1'
Synchronize a Lustre file system (
/mnt/lustre) to a target file system (
/mnt/target).
$ lustre_rsync --source=/mnt/lustre --target=/mnt/target \
--mdt=testfs-MDT0000 --user=cl1 --statuslog sync.log --verbose
Lustre filesystem: testfs
MDT device: testfs-MDT0000
Source: /mnt/lustre
Target: /mnt/target
Statuslog: sync.log
Changelog registration: cl1
Starting changelog record: 0
Errors: 0
lustre_rsync took 1 seconds
Changelog records consumed: 22After the file system undergoes changes, synchronize the changes
onto the target file system. Only the
statuslog name needs to be specified, as it has all
the parameters passed earlier.
$ lustre_rsync --statuslog sync.log --verbose Replicating Lustre filesystem: testfs MDT device: testfs-MDT0000 Source: /mnt/lustre Target: /mnt/target Statuslog: sync.log Changelog registration: cl1 Starting changelog record: 22 Errors: 0 lustre_rsync took 2 seconds Changelog records consumed: 42
To synchronize a Lustre file system (
/mnt/lustre) to two target file systems (
/mnt/target1 and
/mnt/target2).
$ lustre_rsync --source=/mnt/lustre --target=/mnt/target1 \
--target=/mnt/target2 --mdt=testfs-MDT0000 --user=cl1 \
--statuslog sync.logIn some cases, it is useful to do a full device-level backup of an individual device (MDT or OST), before replacing hardware, performing maintenance, etc. Doing full device-level backups ensures that all of the data and configuration files is preserved in the original state and is the easiest method of doing a backup. For the MDT file system, it may also be the fastest way to perform the backup and restore, since it can do large streaming read and write operations at the maximum bandwidth of the underlying devices.
Note
Keeping an updated full backup of the MDT is especially important because permanent failure or corruption of the MDT file system renders the much larger amount of data in all the OSTs largely inaccessible and unusable. The storage needed for one or two full MDT device backups is much smaller than doing a full filesystem backup, and can use less expensive storage than the actual MDT device(s) since it only needs to have good streaming read/write speed instead of high random IOPS.
If hardware replacement is the reason for the backup or if a spare storage device is available, it is possible to do a raw copy of the MDT or OST from one block device to the other, as long as the new device is at least as large as the original device. To do this, run:
dd if=/dev/{original} of=/dev/{newdev} bs=4MIf hardware errors cause read problems on the original device, use the command below to allow as much data as possible to be read from the original device while skipping sections of the disk with errors:
dd if=/dev/{original} of=/dev/{newdev} bs=4k conv=sync,noerror /
count={original size in 4kB blocks}Even in the face of hardware errors, the ldiskfs
file system is very robust and it may be possible
to recover the file system data after running
e2fsck -fy /dev/{newdev} on the new device.
With Lustre software version 2.6 and later, the
LFSCK scanning will automatically move objects from
lost+found back into its correct location on the OST
after directory corruption.
In order to ensure that the backup is fully consistent, the MDT or
OST must be unmounted, so that there are no changes being made to the
device while the data is being transferred. If the reason for the
backup is preventative (i.e. MDT backup on a running MDS in case of
future failures) then it is possible to perform a consistent backup from
an LVM snapshot. If an LVM snapshot is not available, and taking the
MDS offline for a backup is unacceptable, it is also possible to perform
a backup from the raw MDT block device. While the backup from the raw
device will not be fully consistent due to ongoing changes, the vast
majority of ldiskfs metadata is statically allocated, and inconsistencies
in the backup can be fixed by running e2fsck on the
backup device, and is still much better than not having any backup at all.
This procedure provides an alternative to backup or migrate the data of an OST or MDT at the file level. At the file-level, unused space is omitted from the backup and the process may be completed quicker with a smaller total backup size. Backing up a single OST device is not necessarily the best way to perform backups of the Lustre file system, since the files stored in the backup are not usable without metadata stored on the MDT and additional file stripes that may be on other OSTs. However, it is the preferred method for migration of OST devices, especially when it is desirable to reformat the underlying file system with different configuration options or to reduce fragmentation.
Note
Since Lustre stores internal metadata that maps FIDs to local
inode numbers via the Object Index file, they need to be rebuilt at
first mount after a restore is detected so that file-level MDT backup
and restore is supported. The OI Scrub rebuilds these automatically
at first mount after a restore is detected, which may affect MDT
performance after mount until the rebuild is completed. Progress can
be monitored via lctl get_param osd-*.*.oi_scrub
on the MDS or OSS node where the target filesystem was restored.
Prior to Lustre software release 2.11.0, we can only do the backend file system level backup and restore process for ldiskfs-based systems. The ability to perform a zfs-based MDT/OST file system level backup and restore is introduced beginning in Lustre software release 2.11.0. Differing from an ldiskfs-based system, index objects must be backed up before the unmount of the target (MDT or OST) in order to be able to restore the file system successfully. To enable index backup on the target, execute the following command on the target server:
# lctl set_param osd-*.${fsname}-${target}.index_backup=1${target} is composed of the target type
(MDT or OST) plus the target index, such as MDT0000,
OST0001, and so on.
Note
The index_backup is also valid for an ldiskfs-based system, that will be used when migrating data between ldiskfs-based and zfs-based systems as described in Section 18.6, “ Migration Between ZFS and ldiskfs Target Filesystems ”.
The below examples show backing up an OST filesystem. When backing
up an MDT, substitute mdt for ost
in the instructions below.
Umount the target
Make a mountpoint for the file system.
[oss]# mkdir -p /mnt/ost
Mount the file system.
For ldiskfs-based systems:
[oss]# mount -t ldiskfs /dev/{ostdev} /mnt/ostFor zfs-based systems:
Import the pool for the target if it is exported. For example:
[oss]# zpool import lustre-ost [-d ${ostdev_dir}]Enable the
canmountproperty on the target filesystem. For example:[oss]# zfs set canmount=on ${fsname}-ost/ostYou also can specify the mountpoint property. By default, it will be:
/${fsname}-ost/ostMount the target as 'zfs'. For example:
[oss]# zfs mount ${fsname}-ost/ost
Change to the mountpoint being backed up.
[oss]# cd /mnt/ost
Back up the extended attributes.
[oss]# getfattr -R -d -m '.*' -e hex -P . > ea-$(date +%Y%m%d).bak
Note
If the
tar(1)command supports the--xattroption (see below), thegetfattrstep may be unnecessary as long as tar correctly backs up thetrusted.*attributes. However, completing this step is not harmful and can serve as an added safety measure.Note
In most distributions, the
getfattrcommand is part of theattrpackage. If thegetfattrcommand returns errors likeOperation not supported, then the kernel does not correctly support EAs. Stop and use a different backup method.Verify that the
ea-$date.bakfile has properly backed up the EA data on the OST.Without this attribute data, the MDT restore process will fail and result in an unusable filesystem. The OST restore process may be missing extra data that can be very useful in case of later file system corruption. Look at this file with
moreor a text editor. Each object file should have a corresponding item similar to this:[oss]# file: O/0/d0/100992 trusted.fid= \ 0x0d822200000000004a8a73e500000000808a0100000000000000000000000000
Back up all file system data.
[oss]# tar czvf {backup file}.tgz [--xattrs] [--xattrs-include="trusted.*"] [--acls] --sparse .Note
The tar
--sparseoption is vital for backing up an MDT. Very old versions of tar may not support the--sparseoption correctly, which may cause the MDT backup to take a long time. Known-working versions include the tar from Red Hat Enterprise Linux distribution (RHEL version 6.3 or newer) or GNU tar version 1.25 and newer.Warning
The tar
--xattrsoption is only available in GNU tar version 1.27 or later or in RHEL 6.3 or newer. The--xattrs-include="trusted.*"option is required for correct restoration of the xattrs when using GNU tar 1.27 or RHEL 7 and newer.The tar
--aclsoption is recommended for MDT backup of POSIX ACLs. Or,getfacl -n -Randsetfacl --restorecan be used instead.Change directory out of the file system.
[oss]# cd -
Unmount the file system.
[oss]# umount /mnt/ost
Note
When restoring an OST backup on a different node as part of an OST migration, you also have to change server NIDs and use the
--writeconfcommand to re-generate the configuration logs. See Chapter 14, Lustre Maintenance(Changing a Server NID).
To restore data from a file-level backup, you need to format the device, restore the file data and then restore the EA data.
Format the new device.
[oss]# mkfs.lustre --ost --index {OST index} --replace --fstype=${fstype} {other options} /dev/{newdev}Set the file system label (ldiskfs-based systems only).
[oss]# e2label {fsname}-OST{index in hex} /mnt/ostMount the file system.
For ldiskfs-based systems:
[oss]# mount -t ldiskfs /dev/{newdev} /mnt/ostFor zfs-based systems:
Import the pool for the target if it is exported. For example:
[oss]# zpool import lustre-ost [-d ${ostdev_dir}]Enable the canmount property on the target filesystem. For example:
[oss]# zfs set canmount=on ${fsname}-ost/ostYou also can specify the
mountpointproperty. By default, it will be:/${fsname}-ost/ostMount the target as 'zfs'. For example:
[oss]# zfs mount ${fsname}-ost/ost
Change to the new file system mount point.
[oss]# cd /mnt/ost
Restore the file system backup.
[oss]# tar xzvpf {backup file} [--xattrs] [--xattrs-include="trusted.*"] [--acls] [-P] --sparseWarning
The tar
--xattrsoption is only available in GNU tar version 1.27 or later or in RHEL 6.3 or newer. The--xattrs-include="trusted.*"option is required for correct restoration of the MDT xattrs when using GNU tar 1.27 or RHEL 7 and newer. Otherwise, thesetfattrstep below should be used.The tar
--aclsoption is needed for correct restoration of POSIX ACLs on MDTs. Alternatively,getfacl -n -Randsetfacl --restorecan be used instead.The tar
-P(or--absolute-names) option can be used to speed up extraction of a trusted MDT backup archive.If not using a version of tar that supports direct xattr backups, restore the file system extended attributes.
[oss]# setfattr --restore=ea-${date}.bakNote
If
--xattrsoption is supported by tar and specified in the step above, this step is redundant.Verify that the extended attributes were restored.
[oss]# getfattr -d -m ".*" -e hex O/0/d0/100992 trusted.fid= \ 0x0d822200000000004a8a73e500000000808a0100000000000000000000000000
Remove old OI and LFSCK files.
[oss]# rm -rf oi.16* lfsck_* LFSCK
Remove old CATALOGS.
[oss]# rm -f CATALOGS
Note
This is optional for the MDT side only. The CATALOGS record the llog file handlers that are used for recovering cross-server updates. Before OI scrub rebuilds the OI mappings for the llog files, the related recovery will get a failure if it runs faster than the background OI scrub. This will result in a failure of the whole mount process. OI scrub is an online tool, therefore, a mount failure means that the OI scrub will be stopped. Removing the old CATALOGS will avoid this potential trouble. The side-effect of removing old CATALOGS is that the recovery for related cross-server updates will be aborted. However, this can be handled by LFSCK after the system mount is up.
Change directory out of the file system.
[oss]# cd -
Unmount the new file system.
[oss]# umount /mnt/ost
Note
If the restored system has a different NID from the backup system, please change the NID. For detail, please refer to Section 14.5, “ Changing a Server NID”. For example:
[oss]# mount -t lustre -o nosvc ${fsname}-ost/ost /mnt/ost [oss]# lctl replace_nids ${fsname}-OSTxxxx $new_nids [oss]# umount /mnt/ostMount the target as
lustre.Usually, we will use the
-o abort_recovoption to skip unnecessary recovery. For example:[oss]# mount -t lustre -o abort_recov #{fsname}-ost/ost /mnt/ostLustre can detect the restore automatically when mounting the target, and then trigger OI scrub to rebuild the OIs and index objects asynchronously in the background. You can check the OI scrub status with the following command:
[oss]# lctl get_param -n osd-${fstype}.${fsname}-${target}.oi_scrub
If the file system was used between the time the backup was made and
when it was restored, then the online LFSCK tool will
automatically be run to ensure the filesystem is coherent. If all of the
device filesystems were backed up at the same time after Lustre was
was stopped, this step is unnecessary. In either case, the filesystem
will be immediately although there may be I/O errors reading
from files that are present on the MDT but not the OSTs, and files that
were created after the MDT backup will not be accessible or visible. See
Section 36.4, “
Checking the file system with LFSCK”for details on using LFSCK.
If you want to perform disk-based backups (because, for example, access to the backup system needs to be as fast as to the primary Lustre file system), you can use the Linux LVM snapshot tool to maintain multiple, incremental file system backups.
Because LVM snapshots cost CPU cycles as new files are written, taking snapshots of the main Lustre file system will probably result in unacceptable performance losses. You should create a new, backup Lustre file system and periodically (e.g., nightly) back up new/changed files to it. Periodic snapshots can be taken of this backup file system to create a series of "full" backups.
Note
Creating an LVM snapshot is not as reliable as making a separate backup, because the LVM snapshot shares the same disks as the primary MDT device, and depends on the primary MDT device for much of its data. If the primary MDT device becomes corrupted, this may result in the snapshot being corrupted.
Use this procedure to create a backup Lustre file system for use with the LVM snapshot mechanism.
Create LVM volumes for the MDT and OSTs.
Create LVM devices for your MDT and OST targets. Make sure not to use the entire disk for the targets; save some room for the snapshots. The snapshots start out as 0 size, but grow as you make changes to the current file system. If you expect to change 20% of the file system between backups, the most recent snapshot will be 20% of the target size, the next older one will be 40%, etc. Here is an example:
cfs21:~# pvcreate /dev/sda1 Physical volume "/dev/sda1" successfully created cfs21:~# vgcreate vgmain /dev/sda1 Volume group "vgmain" successfully created cfs21:~# lvcreate -L200G -nMDT0 vgmain Logical volume "MDT0" created cfs21:~# lvcreate -L200G -nOST0 vgmain Logical volume "OST0" created cfs21:~# lvscan ACTIVE '/dev/vgmain/MDT0' [200.00 GB] inherit ACTIVE '/dev/vgmain/OST0' [200.00 GB] inherit
Format the LVM volumes as Lustre targets.
In this example, the backup file system is called
mainand designates the current, most up-to-date backup.cfs21:~# mkfs.lustre --fsname=main --mdt --index=0 /dev/vgmain/MDT0 No management node specified, adding MGS to this MDT. Permanent disk data: Target: main-MDT0000 Index: 0 Lustre FS: main Mount type: ldiskfs Flags: 0x75 (MDT MGS first_time update ) Persistent mount opts: errors=remount-ro,iopen_nopriv,user_xattr Parameters: checking for existing Lustre data device size = 200GB formatting backing filesystem ldiskfs on /dev/vgmain/MDT0 target name main-MDT0000 4k blocks 0 options -i 4096 -I 512 -q -O dir_index -F mkfs_cmd = mkfs.ext2 -j -b 4096 -L main-MDT0000 -i 4096 -I 512 -q -O dir_index -F /dev/vgmain/MDT0 Writing CONFIGS/mountdata cfs21:~# mkfs.lustre --mgsnode=cfs21 --fsname=main --ost --index=0 /dev/vgmain/OST0 Permanent disk data: Target: main-OST0000 Index: 0 Lustre FS: main Mount type: ldiskfs Flags: 0x72 (OST first_time update ) Persistent mount opts: errors=remount-ro,extents,mballoc Parameters: mgsnode=192.168.0.21@tcp checking for existing Lustre data device size = 200GB formatting backing filesystem ldiskfs on /dev/vgmain/OST0 target name main-OST0000 4k blocks 0 options -I 256 -q -O dir_index -F mkfs_cmd = mkfs.ext2 -j -b 4096 -L lustre-OST0000 -J size=400 -I 256 -i 262144 -O extents,uninit_bg,dir_nlink,huge_file,flex_bg -G 256 -E resize=4290772992,lazy_journal_init, -F /dev/vgmain/OST0 Writing CONFIGS/mountdata cfs21:~# mount -t lustre /dev/vgmain/MDT0 /mnt/mdt cfs21:~# mount -t lustre /dev/vgmain/OST0 /mnt/ost cfs21:~# mount -t lustre cfs21:/main /mnt/main
At periodic intervals e.g., nightly, back up new and changed files to the LVM-based backup file system.
cfs21:~# cp /etc/passwd /mnt/main cfs21:~# cp /etc/fstab /mnt/main cfs21:~# ls /mnt/main fstab passwd
Whenever you want to make a "checkpoint" of the main Lustre file system, create LVM snapshots of all target MDT and OSTs in the LVM-based backup file system. You must decide the maximum size of a snapshot ahead of time, although you can dynamically change this later. The size of a daily snapshot is dependent on the amount of data changed daily in the main Lustre file system. It is likely that a two-day old snapshot will be twice as big as a one-day old snapshot.
You can create as many snapshots as you have room for in the volume group. If necessary, you can dynamically add disks to the volume group.
The snapshots of the target MDT and OSTs should be taken at the same point in time. Make sure that the cronjob updating the backup file system is not running, since that is the only thing writing to the disks. Here is an example:
cfs21:~# modprobe dm-snapshot cfs21:~# lvcreate -L50M -s -n MDT0.b1 /dev/vgmain/MDT0 Rounding up size to full physical extent 52.00 MB Logical volume "MDT0.b1" created cfs21:~# lvcreate -L50M -s -n OST0.b1 /dev/vgmain/OST0 Rounding up size to full physical extent 52.00 MB Logical volume "OST0.b1" created
After the snapshots are taken, you can continue to back up new/changed files to "main". The snapshots will not contain the new files.
cfs21:~# cp /etc/termcap /mnt/main cfs21:~# ls /mnt/main fstab passwd termcap
Use this procedure to restore the file system from an LVM snapshot.
Rename the LVM snapshot.
Rename the file system snapshot from "main" to "back" so you can mount it without unmounting "main". This is recommended, but not required. Use the
--reformatflag totunefs.lustreto force the name change. For example:cfs21:~# tunefs.lustre --reformat --fsname=back --writeconf /dev/vgmain/MDT0.b1 checking for existing Lustre data found Lustre data Reading CONFIGS/mountdata Read previous values: Target: main-MDT0000 Index: 0 Lustre FS: main Mount type: ldiskfs Flags: 0x5 (MDT MGS ) Persistent mount opts: errors=remount-ro,iopen_nopriv,user_xattr Parameters: Permanent disk data: Target: back-MDT0000 Index: 0 Lustre FS: back Mount type: ldiskfs Flags: 0x105 (MDT MGS writeconf ) Persistent mount opts: errors=remount-ro,iopen_nopriv,user_xattr Parameters: Writing CONFIGS/mountdata cfs21:~# tunefs.lustre --reformat --fsname=back --writeconf /dev/vgmain/OST0.b1 checking for existing Lustre data found Lustre data Reading CONFIGS/mountdata Read previous values: Target: main-OST0000 Index: 0 Lustre FS: main Mount type: ldiskfs Flags: 0x2 (OST ) Persistent mount opts: errors=remount-ro,extents,mballoc Parameters: mgsnode=192.168.0.21@tcp Permanent disk data: Target: back-OST0000 Index: 0 Lustre FS: back Mount type: ldiskfs Flags: 0x102 (OST writeconf ) Persistent mount opts: errors=remount-ro,extents,mballoc Parameters: mgsnode=192.168.0.21@tcp Writing CONFIGS/mountdataWhen renaming a file system, we must also erase the last_rcvd file from the snapshots
cfs21:~# mount -t ldiskfs /dev/vgmain/MDT0.b1 /mnt/mdtback cfs21:~# rm /mnt/mdtback/last_rcvd cfs21:~# umount /mnt/mdtback cfs21:~# mount -t ldiskfs /dev/vgmain/OST0.b1 /mnt/ostback cfs21:~# rm /mnt/ostback/last_rcvd cfs21:~# umount /mnt/ostback
Mount the file system from the LVM snapshot. For example:
cfs21:~# mount -t lustre /dev/vgmain/MDT0.b1 /mnt/mdtback cfs21:~# mount -t lustre /dev/vgmain/OST0.b1 /mnt/ostback cfs21:~# mount -t lustre cfs21:/back /mnt/back
Note the old directory contents, as of the snapshot time. For example:
cfs21:~/cfs/b1_5/lustre/utils# ls /mnt/back fstab passwds
To reclaim disk space, you can erase old snapshots as your backup policy dictates. Run:
lvremove /dev/vgmain/MDT0.b1
Beginning with Lustre 2.11.0, it is possible to migrate between
ZFS and ldiskfs backends. For migrating OSTs, it is best to use
lfs find/lfs_migrate to empty out
an OST while the filesystem is in use and then reformat it with the new
fstype. For instructions on removing the OST, please see
Section 14.9.3, “Removing an OST from the File System”.
The first step of the process is to make a ZFS backend backup
using tar as described in
Section 18.3, “
Backing Up an OST or MDT (Backend File System Level)”.
Next, restore the backup to an ldiskfs-based system as described in Section 18.4, “ Restoring a File-Level Backup”.
The first step of the process is to make an ldiskfs backend backup
using tar as described in
Section 18.3, “
Backing Up an OST or MDT (Backend File System Level)”.
Caution:For a migration from ldiskfs to zfs, it is required to enable index_backup before the unmount of the target. This is an additional step for a regular ldiskfs-based backup/restore and easy to be missed.
Next, restore the backup to an ldiskfs-based system as described in Section 18.4, “ Restoring a File-Level Backup”.
Table of Contents
- 19.1. How Lustre File System Striping Works
- 19.2. Lustre File Layout (Striping) Considerations
- 19.3. Setting the File Layout/Striping Configuration (
lfs setstripe) - 19.4. Retrieving File Layout/Striping Information (
getstripe) - 19.5. Progressive File Layout(PFL)L 2.10
- 19.6. Self-Extending Layout (SEL)L 2.13
- 19.7. Foreign LayoutL 2.13
- 19.8. Managing Free Space
- 19.9. Lustre Striping Internals
This chapter describes file layout (striping) and I/O options, and includes the following sections:
In a Lustre file system, the MDS allocates objects to OSTs using either a round-robin algorithm or a weighted algorithm. When the amount of free space is well balanced (i.e., by default, when the free space across OSTs differs by less than 17%), the round-robin algorithm is used to select the next OST to which a stripe is to be written. Periodically, the MDS adjusts the striping layout to eliminate some degenerated cases in which applications that create very regular file layouts (striping patterns) preferentially use a particular OST in the sequence.
Normally the usage of OSTs is well balanced. However, if users create a small number of exceptionally large files or incorrectly specify striping parameters, imbalanced OST usage may result. When the free space across OSTs differs by more than a specific amount (17% by default), the MDS then uses weighted random allocations with a preference for allocating objects on OSTs with more free space. (This can reduce I/O performance until space usage is rebalanced again.) For a more detailed description of how striping is allocated, see Section 19.8, “Managing Free Space”.
Files can only be striped over a finite number of OSTs, based on the
maximum size of the attributes that can be stored on the MDT. If the MDT
is ldiskfs-based without the ea_inode feature, a file
can be striped across at most 160 OSTs. With a ZFS-based MDT, or if the
ea_inode feature is enabled for an ldiskfs-based MDT
(the default since Lustre 2.13.0),
a file can be striped across up to 2000 OSTs. For more information, see
Section 19.9, “Lustre Striping Internals”.
Whether you should set up file striping and what parameter values you select depends on your needs. A good rule of thumb is to stripe over as few objects as will meet those needs and no more.
Some reasons for using striping include:
Providing high-bandwidth access. Many applications require high-bandwidth access to a single file, which may be more bandwidth than can be provided by a single OSS. Examples are a scientific application that writes to a single file from hundreds of nodes, or a binary executable that is loaded by many nodes when an application starts.
In cases like these, a file can be striped over as many OSSs as it takes to achieve the required peak aggregate bandwidth for that file. Striping across a larger number of OSSs should only be used when the file size is very large and/or is accessed by many nodes at a time. Currently, Lustre files can be striped across up to 2000 OSTs
Improving performance when OSS bandwidth is exceeded. Striping across many OSSs can improve performance if the aggregate client bandwidth exceeds the server bandwidth and the application reads and writes data fast enough to take advantage of the additional OSS bandwidth. The largest useful stripe count is bounded by the I/O rate of the clients/jobs divided by the performance per OSS.
- Introduced in Lustre 2.13
Matching stripes to I/O pattern.When writing to a single file from multiple nodes, having more than one client writing to a stripe can lead to issues with lock exchange, where clients contend over writing to that stripe, even if their I/Os do not overlap. This can be avoided if I/O can be stripe aligned so that each stripe is accessed by only one client. Since Lustre 2.13, the 'overstriping' feature is available, allowing more than one stripe per OST. This is particularly helpful for the case where thread count exceeds OST count, making it possible to match stripe count to thread count even in this case.
Providing space for very large files. Striping is useful when a single OST does not have enough free space to hold the entire file.
Some reasons to minimize or avoid striping:
Increased overhead. Striping results in more locks and extra network operations during common operations such as
statandunlink. Even when these operations are performed in parallel, one network operation takes less time than 100 operations.Increased overhead also results from server contention. Consider a cluster with 100 clients and 100 OSSs, each with one OST. If each file has exactly one object and the load is distributed evenly, there is no contention and the disks on each server can manage sequential I/O. If each file has 100 objects, then the clients all compete with one another for the attention of the servers, and the disks on each node seek in 100 different directions resulting in needless contention.
Increased risk. When files are striped across all servers and one of the servers breaks down, a small part of each striped file is lost. By comparison, if each file has exactly one stripe, fewer files are lost, but they are lost in their entirety. Many users would prefer to lose some of their files entirely than all of their files partially.
Small files. Small files do not benefit from striping because they can be efficiently stored and accessed as a single OST object or even with Data on MDT.
O_APPEND mode. When files are opened for append, they instantiate all uninitialized components expressed in the layout. Typically, log files are opened for append, and complex layouts can be inefficient.
Note
The
mdd.*.append_stripe_countandmdd.*.append_pooloptions can be used to specify special default striping for files created withO_APPEND.
Choosing a stripe size is a balancing act, but reasonable defaults are described below. The stripe size has no effect on a single-stripe file.
The stripe size must be a multiple of the page size. Lustre software tools enforce a multiple of 64 KB (the maximum page size on ia64 and PPC64 nodes) so that users on platforms with smaller pages do not accidentally create files that might cause problems for ia64 clients.
The smallest recommended stripe size is 512 KB. Although you can create files with a stripe size of 64 KB, the smallest practical stripe size is 512 KB because the Lustre file system sends 1MB chunks over the network. Choosing a smaller stripe size may result in inefficient I/O to the disks and reduced performance.
A good stripe size for sequential I/O using high-speed networks is between 1 MB and 4 MB. In most situations, stripe sizes larger than 4 MB may result in longer lock hold times and contention during shared file access.
The maximum stripe size is 4 GB. Using a large stripe size can improve performance when accessing very large files. It allows each client to have exclusive access to its own part of a file. However, a large stripe size can be counterproductive in cases where it does not match your I/O pattern.
Choose a stripe pattern that takes into account the write patterns of your application. Writes that cross an object boundary are slightly less efficient than writes that go entirely to one server. If the file is written in a consistent and aligned way, make the stripe size a multiple of the
write()size.
Use the lfs setstripe command to create new files with a specific file layout (stripe pattern) configuration.
lfs setstripe [--size|-s stripe_size] [--stripe-count|-c stripe_count] [--overstripe-count|-C stripe_count] \
[--index|-i start_ost] [--pool|-p pool_name] filename|dirname
stripe_size
The stripe_size indicates how much data to write to one OST before
moving to the next OST. The default stripe_size is 1 MB. Passing a
stripe_size of 0 causes the default stripe size to be used. Otherwise,
the stripe_size value must be a multiple of 64 KB.
stripe_count (--stripe-count, --overstripe-count)
The stripe_count indicates how many stripes to use.
The default stripe_count value is 1. Setting
stripe_count to 0 causes the default stripe count to be
used. Setting stripe_count to -1 means stripe over all
available OSTs (full OSTs are skipped). When --overstripe-count is used,
per OST if necessary.
start_ost
The start OST is the first OST to which files are written. The default value for
start_ost is -1, which allows the MDS to choose the starting index. This
setting is strongly recommended, as it allows space and load balancing to be done by the MDS
as needed. If the value of start_ost is set to a value other than -1, the
file starts on the specified OST index. OST index numbering starts at 0.
Note
If the specified OST is inactive or in a degraded mode, the MDS will silently choose another target.
Note
If you pass a start_ost value of 0 and a
stripe_count value of 1, all files are written to
OST 0, until space is exhausted. This is probably not what you meant
to do. If you only want to adjust the stripe count and keep the other
parameters at their default settings, do not specify any of the other parameters:
client# lfs setstripe -cstripe_countfilename
pool_name
The pool_name specifies the OST pool to which the
file will be written. This allows limiting the OSTs used to a subset of
all OSTs in the file system. For more details about using OST pools, see
Section 23.2, “
Creating and Managing OST Pools”.
It is possible to specify the file layout when a new file is created using the command lfs setstripe. This allows users to override the file system default parameters to tune the file layout more optimally for their application. Execution of an lfs setstripe command fails if the file already exists.
The command to create a new file with a specified stripe size is similar to:
[client]# lfs setstripe -s 4M /mnt/lustre/new_file
This example command creates the new file /mnt/lustre/new_file with a stripe size of 4 MB.
Now, when the file is created, the new stripe setting creates the file on a single OST with a stripe size of 4M:
[client]# lfs getstripe /mnt/lustre/new_file /mnt/lustre/4mb_file lmm_stripe_count: 1 lmm_stripe_size: 4194304 lmm_pattern: 1 lmm_layout_gen: 0 lmm_stripe_offset: 1 obdidx objid objid group 1 690550 0xa8976 0
In this example, the stripe size is 4 MB.
The command below creates a new file with a stripe count of -1 to
specify striping over all available OSTs:
[client]# lfs setstripe -c -1 /mnt/lustre/full_stripe
The example below indicates that the file
full_stripe is striped
over all six active OSTs in the configuration:
[client]# lfs getstripe /mnt/lustre/full_stripe /mnt/lustre/full_stripe obdidx objid objid group 0 8 0x8 0 1 4 0x4 0 2 5 0x5 0 3 5 0x5 0 4 4 0x4 0 5 2 0x2 0
This is in contrast to the output in Section 19.3.1.1, “Setting the Stripe Size”, which shows only a single object for the file.
In a directory, the lfs setstripe command sets a default striping
configuration for files created in the directory. The usage is the same as lfs
setstripe for a regular file, except that the directory must exist prior to
setting the default striping configuration. If a file is created in a directory with a
default stripe configuration (without otherwise specifying striping), the Lustre file system
uses those striping parameters instead of the file system default for the new file.
To change the striping pattern for a sub-directory, create a directory with desired file layout as described above. Sub-directories inherit the file layout of the root/parent directory.
Note
Special default striping can be used for files created with O_APPEND.
Files with uninitialized layouts opened with O_APPEND will
override a directory's default striping configuration and abide by the
mdd.*.append_pool and mdd.*.append_stripe_count options (if
they are specified).
Setting the striping specification on the root directory determines
the striping for all new files created in the file system unless an overriding striping
specification takes precedence (such as a striping layout specified by the application, or
set using lfs setstripe, or specified for the parent directory).
Note
The striping settings for a root directory are, by default, applied
to any new child directories created in the root directory, unless striping settings have
been specified for the child directory.
Note
Special default striping can be used for files created with O_APPEND.
Files with uninitialized layouts opened with O_APPEND will
override a file system's default striping configuration and abide by the
mdd.*.append_pool and mdd.*.append_stripe_count options (if
they are specified).
Sometime there are many OSTs in a filesystem, but it is not always
desirable to stripe file to across all OSTs, even if the given
stripe_count=-1 (unlimited).
In this case, the per-filesystem tunable parameter
lod.*.max_stripecount can be used to limit the real
stripe count of file to a lower number than the OST count.
If lod.*.max_stripecount is not 0, and the file
stripe_count=-1, the real stripe count will be
the minimum of the OST count and max_stripecount. If
lod.*.max_stripecount=0, or an explicit stripe count
is given for the file, it is ignored.
To set max_stripecount, on all MDSes of
file system, run:
mgs# lctl set_param -P lod.$fsname-MDTxxxx-mdtlov.max_stripecount=<N>
To check max_stripecount, run:
mds# lctl get_param lod.$fsname-MDTxxxx-mdtlov.max_stripecount
To reset max_stripecount, run:
mgs# lctl set_param -P -d lod.$fsname-MDTxxxx-mdtlov.max_stripecount
You can use lfs setstripe to create a file on a specific OST. In the
following example, the file file1 is created on the first OST (OST index
is 0).
$ lfs setstripe --stripe-count 1 --index 0 file1
$ dd if=/dev/zero of=file1 count=1 bs=100M
1+0 records in
1+0 records out
$ lfs getstripe file1
/mnt/testfs/file1
lmm_stripe_count: 1
lmm_stripe_size: 1048576
lmm_pattern: 1
lmm_layout_gen: 0
lmm_stripe_offset: 0
obdidx objid objid group
0 37364 0x91f4 0The lfs getstripe command is used to display information that shows
over which OSTs a file is distributed. For each OST, the index and UUID is displayed, along
with the OST index and object ID for each stripe in the file. For directories, the default
settings for files created in that directory are displayed.
To see the current stripe size for a Lustre file or directory, use the lfs
getstripe command. For example, to view information for a directory, enter a
command similar to:
[client]# lfs getstripe /mnt/lustre
This command produces output similar to:
/mnt/lustre (Default) stripe_count: 1 stripe_size: 1M stripe_offset: -1
In this example, the default stripe count is 1 (data blocks are
striped over a single OST), the default stripe size is 1 MB, and the objects are created
over all available OSTs.
To view information for a file, enter a command similar to:
$ lfs getstripe /mnt/lustre/foo /mnt/lustre/foo lmm_stripe_count: 1 lmm_stripe_size: 1048576 lmm_pattern: 1 lmm_layout_gen: 0 lmm_stripe_offset: 0 obdidx objid objid group 2 835487 m0xcbf9f 0
In this example, the file is located on obdidx 2, which corresponds
to the OST lustre-OST0002. To see which node is serving that OST, run:
$ lctl get_param osc.lustre-OST0002-osc.ost_conn_uuid osc.lustre-OST0002-osc.ost_conn_uuid=192.168.20.1@tcp
To inspect an entire tree of files, use the lfs find command:
lfs find [--recursive | -r] file|directory ...Lustre can be configured with multiple MDTs in the same file
system. Each directory and file could be located on a different MDT.
To identify which MDT a given subdirectory is located, pass the
getstripe [--mdt-index|-M] parameter to
lfs. An example of this command is provided in
the section Section 14.9.1, “Removing an MDT from the File System”.
The Lustre Progressive File Layout (PFL) feature simplifies the use of Lustre so that users can expect reasonable performance for a variety of normal file IO patterns without the need to explicitly understand their IO model or Lustre usage details in advance. In particular, users do not necessarily need to know the size or concurrency of output files in advance of their creation and explicitly specify an optimal layout for each file in order to achieve good performance for both highly concurrent shared-single-large-file IO or parallel IO to many smaller per-process files.
The layout of a PFL file is stored on disk as composite
layout. A PFL file is essentially an array of
sub-layout components, with each sub-layout component
being a plain layout covering different and non-overlapped extents of
the file. For PFL files, the file layout is composed of a series of
components, therefore it's possible that there are some file extents are
not described by any components.
An example of how data blocks of PFL files are mapped to OST objects of components is shown in the following PFL object mapping diagram:
The PFL file in Figure 19.1, “PFL object mapping diagram” has 3
components and shows the mapping for the blocks of a 2055MB file.
The stripe size for the first two components is 1MB, while the stripe size
for the third component is 4MB. The stripe count is increasing for each
successive component. The first component only has two 1MB blocks and the
single object has a size of 2MB. The second component holds the next 254MB
of the file spread over 4 separate OST objects in RAID-0, each one will
have a size of 256MB / 4 objects = 64MB per object. Note the first two
objects obj 2,0 and obj 2,1
have a 1MB hole at the start where the data is stored in the first
component. The final component holds the next 1800MB spread over 32 OST
objects. There is a 256MB / 32 = 8MB hole at the start each one for the
data stored in the first two components. Each object will be
2048MB / 32 objects = 64MB per object, except the
obj 3,0 that holds an extra 4MB chunk and
obj 3,1 that holds an extra 3MB chunk. If more data
was written to the file, only the objects in component 3 would increase
in size.
When a file range with defined but not instantiated component is accessed, clients will send a Layout Intent RPC to the MDT, and the MDT would instantiate the objects of the components covering that range.
Next, some commands for user to operate PFL files are introduced and
some examples of possible composite layout are illustrated as well.
Lustre provides commands
lfs setstripe and lfs migrate for
users to operate PFL files. lfs setstripe commands
are used to create PFL files, add or delete components to or from an
existing composite file; lfs migrate commands are used
to re-layout the data in existing files using the new layout parameter by
copying the data from the existing OST(s) to the new OST(s). Also,
as introduced in the previous sections, lfs getstripe
commands can be used to list the striping/component information for a
given PFL file, and lfs find commands can be used to
search the directory tree rooted at the given directory or file name for
the files that match the given PFL component parameters.
Note
Using PFL files requires both the client and server to understand the PFL file layout, which isn't available for Lustre 2.9 and earlier. And it will not prevent older clients from accessing non-PFL files in the filesystem.
lfs setstripe commands are used to create PFL
files, add or delete components to or from an existing composite file.
(Suppose we have 8 OSTs in the following examples and stripe size is 1MB
by default.)
Command
lfs setstripe
[--component-end|-E end1] [STRIPE_OPTIONS]
[--component-end|-E end2] [STRIPE_OPTIONS] ... filenameThe -E option is used to specify the end offset
(in bytes or using a suffix kMGTP e.g. 256M)
of each component,
and it also indicates the following STRIPE_OPTIONS
are for this component.
Each component defines the stripe pattern of the
file in the range of [start, end). The first component must start from
offset 0 and all components must be adjacent with each other, no holes
are allowed, so each extent will start at the end of previous extent.
A -1 end offset or eof indicates
this is the last component extending to the end of file.
If no EOF
Example
$ lfs setstripe -E 4M -c 1 -E 64M -c 4 -E -1 -c -1 -i 4 \ /mnt/testfs/create_comp
This command creates a file with composite layout illustrated in the following figure. The first component has 1 stripe and covers [0, 4M), the second component has 4 stripes and covers [4M, 64M), and the last component stripes start at OST4, cross over all available OSTs and covers [64M, EOF).
The composite layout can be output by the following command:
$ lfs getstripe /mnt/testfs/create_comp
/mnt/testfs/create_comp
lcm_layout_gen: 3
lcm_entry_count: 3
lcme_id: 1
lcme_flags: init
lcme_extent.e_start: 0
lcme_extent.e_end: 4194304
lmm_stripe_count: 1
lmm_stripe_size: 1048576
lmm_pattern: 1
lmm_layout_gen: 0
lmm_stripe_offset: 0
lmm_objects:
- 0: { l_ost_idx: 0, l_fid: [0x100000000:0x2:0x0] }
lcme_id: 2
lcme_flags: 0
lcme_extent.e_start: 4194304
lcme_extent.e_end: 67108864
lmm_stripe_count: 4
lmm_stripe_size: 1048576
lmm_pattern: 1
lmm_layout_gen: 0
lmm_stripe_offset: -1
lcme_id: 3
lcme_flags: 0
lcme_extent.e_start: 67108864
lcme_extent.e_end: EOF
lmm_stripe_count: -1
lmm_stripe_size: 1048576
lmm_pattern: 1
lmm_layout_gen: 0
lmm_stripe_offset: 4Note
Only the first component's OST objects of the PFL file are instantiated when the layout is being set. Other instantiation is delayed to later write/truncate operations.
If we write 128M data to this PFL file, the second and third components will be instantiated:
$ dd if=/dev/zero of=/mnt/testfs/create_comp bs=1M count=128
$ lfs getstripe /mnt/testfs/create_comp
/mnt/testfs/create_comp
lcm_layout_gen: 5
lcm_entry_count: 3
lcme_id: 1
lcme_flags: init
lcme_extent.e_start: 0
lcme_extent.e_end: 4194304
lmm_stripe_count: 1
lmm_stripe_size: 1048576
lmm_pattern: 1
lmm_layout_gen: 0
lmm_stripe_offset: 0
lmm_objects:
- 0: { l_ost_idx: 0, l_fid: [0x100000000:0x2:0x0] }
lcme_id: 2
lcme_flags: init
lcme_extent.e_start: 4194304
lcme_extent.e_end: 67108864
lmm_stripe_count: 4
lmm_stripe_size: 1048576
lmm_pattern: 1
lmm_layout_gen: 0
lmm_stripe_offset: 1
lmm_objects:
- 0: { l_ost_idx: 1, l_fid: [0x100010000:0x2:0x0] }
- 1: { l_ost_idx: 2, l_fid: [0x100020000:0x2:0x0] }
- 2: { l_ost_idx: 3, l_fid: [0x100030000:0x2:0x0] }
- 3: { l_ost_idx: 4, l_fid: [0x100040000:0x2:0x0] }
lcme_id: 3
lcme_flags: init
lcme_extent.e_start: 67108864
lcme_extent.e_end: EOF
lmm_stripe_count: 8
lmm_stripe_size: 1048576
lmm_pattern: 1
lmm_layout_gen: 0
lmm_stripe_offset: 4
lmm_objects:
- 0: { l_ost_idx: 4, l_fid: [0x100040000:0x3:0x0] }
- 1: { l_ost_idx: 5, l_fid: [0x100050000:0x2:0x0] }
- 2: { l_ost_idx: 6, l_fid: [0x100060000:0x2:0x0] }
- 3: { l_ost_idx: 7, l_fid: [0x100070000:0x2:0x0] }
- 4: { l_ost_idx: 0, l_fid: [0x100000000:0x3:0x0] }
- 5: { l_ost_idx: 1, l_fid: [0x100010000:0x3:0x0] }
- 6: { l_ost_idx: 2, l_fid: [0x100020000:0x3:0x0] }
- 7: { l_ost_idx: 3, l_fid: [0x100030000:0x3:0x0] }Command
lfs setstripe --component-add
[--component-end|-E end1] [STRIPE_OPTIONS]
[--component-end|-E end2] [STRIPE_OPTIONS] ... filenameThe option --component-add is used to add
components to an existing composite file. The extent start of
the first component to be added is equal to the extent end of last
component in the existing file, and all components to be added must
be adjacent with each other.
Note
If the last existing component is specified by
-E -1 or -E eof, which covers
to the end of the file, it must be deleted before a new one is added.
Example
$ lfs setstripe -E 4M -c 1 -E 64M -c 4 /mnt/testfs/add_comp $ lfs setstripe --component-add -E -1 -c 4 -o 6-7,0,5 \ /mnt/testfs/add_comp
This command adds a new component which starts from the end of the last existing component to the end of file. The layout of this example is illustrated in Figure 19.3, “Example: add a component to an existing composite file”. The last component stripes across 4 OSTs in sequence OST6, OST7, OST0 and OST5, covers [64M, EOF).
The layout can be printed out by the following command:
$ lfs getstripe /mnt/testfs/add_comp
/mnt/testfs/add_comp
lcm_layout_gen: 5
lcm_entry_count: 3
lcme_id: 1
lcme_flags: init
lcme_extent.e_start: 0
lcme_extent.e_end: 4194304
lmm_stripe_count: 1
lmm_stripe_size: 1048576
lmm_pattern: 1
lmm_layout_gen: 0
lmm_stripe_offset: 0
lmm_objects:
- 0: { l_ost_idx: 0, l_fid: [0x100000000:0x2:0x0] }
lcme_id: 2
lcme_flags: init
lcme_extent.e_start: 4194304
lcme_extent.e_end: 67108864
lmm_stripe_count: 4
lmm_stripe_size: 1048576
lmm_pattern: 1
lmm_layout_gen: 0
lmm_stripe_offset: 1
lmm_objects:
- 0: { l_ost_idx: 1, l_fid: [0x100010000:0x2:0x0] }
- 1: { l_ost_idx: 2, l_fid: [0x100020000:0x2:0x0] }
- 2: { l_ost_idx: 3, l_fid: [0x100030000:0x2:0x0] }
- 3: { l_ost_idx: 4, l_fid: [0x100040000:0x2:0x0] }
lcme_id: 5
lcme_flags: 0
lcme_extent.e_start: 67108864
lcme_extent.e_end: EOF
lmm_stripe_count: 4
lmm_stripe_size: 1048576
lmm_pattern: 1
lmm_layout_gen: 0
lmm_stripe_offset: -1The component ID "lcme_id" changes as layout generation changes. It is not necessarily sequential and does not imply ordering of individual components.
Note
Similar to specifying a full-file composite layout at file
creation time, --component-add won't instantiate
OST objects, the instantiation is delayed to later write/truncate
operations. For example, after writing beyond the 64MB start of the
file's last component, the new component has had objects allocated:
$ lfs getstripe -I5 /mnt/testfs/add_comp
/mnt/testfs/add_comp
lcm_layout_gen: 6
lcm_entry_count: 3
lcme_id: 5
lcme_flags: init
lcme_extent.e_start: 67108864
lcme_extent.e_end: EOF
lmm_stripe_count: 4
lmm_stripe_size: 1048576
lmm_pattern: 1
lmm_layout_gen: 0
lmm_stripe_offset: 6
lmm_objects:
- 0: { l_ost_idx: 6, l_fid: [0x100060000:0x4:0x0] }
- 1: { l_ost_idx: 7, l_fid: [0x100070000:0x4:0x0] }
- 2: { l_ost_idx: 0, l_fid: [0x100000000:0x5:0x0] }
- 3: { l_ost_idx: 5, l_fid: [0x100050000:0x4:0x0] }Command
lfs setstripe --component-del
[--component-id|-I comp_id | --component-flags comp_flags]
filenameThe option --component-del is used to remove
the component(s) specified by component ID or flags from an existing
file. Any data stored in the deleted component will be lost after
this operation.
The ID specified by -I option is the numerical
unique ID of the component, which can be obtained by command
lfs getstripe -I command, and the flag specified by
--component-flags option is a certain type of
components, which can be obtained by command
lfs getstripe --component-flags. For now, we only
have two flags init and ^init
for instantiated and un-instantiated components respectively.
Note
Deletion must start with the last component because creation of a hole in the middle of a file layout is not allowed.
Example
$ lfs getstripe -I /mnt/testfs/del_comp 1 2 5 $ lfs setstripe --component-del -I 5 /mnt/testfs/del_comp
This example deletes the component with ID 5 from file
/mnt/testfs/del_comp. If we still use the last
example, the final result is illustrated in
Figure 19.4, “Example: delete a component from an existing file”.
If you try to delete a non-last component, you will see the following error:
$ lfs setstripe -component-del -I 2 /mnt/testfs/del_comp Delete component 0x2 from /mnt/testfs/del_comp failed. Invalid argument error: setstripe: delete component of file '/mnt/testfs/del_comp' failed: Invalid argument
Similar to create a PFL file, you can set default PFL layout to an existing directory. After that, all the files created will inherit this layout by default.
Command
lfs setstripe
[--component-end|-E end1] [STRIPE_OPTIONS]
[--component-end|-E end2] [STRIPE_OPTIONS] ... dirnameExample
$ mkdir /mnt/testfs/pfldir $ lfs setstripe -E 256M -c 1 -E 16G -c 4 -E -1 -S 4M -c -1 /mnt/testfs/pfldir
When you run lfs getstripe, you will see:
$ lfs getstripe /mnt/testfs/pfldir
/mnt/testfs/pfldir
lcm_layout_gen: 0
lcm_entry_count: 3
lcme_id: N/A
lcme_flags: 0
lcme_extent.e_start: 0
lcme_extent.e_end: 268435456
stripe_count: 1 stripe_size: 1048576 stripe_offset: -1
lcme_id: N/A
lcme_flags: 0
lcme_extent.e_start: 268435456
lcme_extent.e_end: 17179869184
stripe_count: 4 stripe_size: 1048576 stripe_offset: -1
lcme_id: N/A
lcme_flags: 0
lcme_extent.e_start: 17179869184
lcme_extent.e_end: EOF
stripe_count: -1 stripe_size: 4194304 stripe_offset: -1
If you create a file under /mnt/testfs/pfldir,
the layout of that file will inherit the layout from its parent
directory:
$ touch /mnt/testfs/pfldir/pflfile
$ lfs getstripe /mnt/testfs/pfldir/pflfile
/mnt/testfs/pfldir/pflfile
lcm_layout_gen: 2
lcm_entry_count: 3
lcme_id: 1
lcme_flags: init
lcme_extent.e_start: 0
lcme_extent.e_end: 268435456
lmm_stripe_count: 1
lmm_stripe_size: 1048576
lmm_pattern: raid0
lmm_layout_gen: 0
lmm_stripe_offset: 1
lmm_objects:
- 0: { l_ost_idx: 1, l_fid: [0x100010000:0xa:0x0] }
lcme_id: 2
lcme_flags: 0
lcme_extent.e_start: 268435456
lcme_extent.e_end: 17179869184
lmm_stripe_count: 4
lmm_stripe_size: 1048576
lmm_pattern: raid0
lmm_layout_gen: 0
lmm_stripe_offset: -1
lcme_id: 3
lcme_flags: 0
lcme_extent.e_start: 17179869184
lcme_extent.e_end: EOF
lmm_stripe_count: -1
lmm_stripe_size: 4194304
lmm_pattern: raid0
lmm_layout_gen: 0
lmm_stripe_offset: -1
Note
lfs setstripe --component-add/del can't be run
on a directory, because the default layout in directory is like a config,
which can be arbitrarily changed by lfs setstripe,
while the layout of a file may have data (OST objects) attached.
If you want to delete the default layout in a directory, run
lfs setstripe -d
to return the directory to the filesystem-wide defaults, like:
dirname
$ lfs setstripe -d /mnt/testfs/pfldir $ lfs getstripe -d /mnt/testfs/pfldir /mnt/testfs/pfldir stripe_count: 1 stripe_size: 1048576 stripe_offset: -1 /mnt/testfs/pfldir/commonfile lmm_stripe_count: 1 lmm_stripe_size: 1048576 lmm_pattern: 1 lmm_layout_gen: 0 lmm_stripe_offset: 0 obdidx objid objid group 2 9 0x9 0
lfs migrate commands are used to re-layout the
data in the existing files with the new layout parameter by copying the
data from the existing OST(s) to the new OST(s).
Command
lfs migrate [--component-end|-E comp_end] [STRIPE_OPTIONS] ...
filenameThe difference between migrate and
setstripe is that migrate is to
re-layout the data in the existing files, while
setstripe is to create new files with the specified
layout.
Example
Case1. Migrate a normal one to a composite layout
$ lfs setstripe -c 1 -S 128K /mnt/testfs/norm_to_2comp
$ dd if=/dev/urandom of=/mnt/testfs/norm_to_2comp bs=1M count=5
$ lfs getstripe /mnt/testfs/norm_to_2comp --yaml
/mnt/testfs/norm_to_comp
lmm_stripe_count: 1
lmm_stripe_size: 131072
lmm_pattern: 1
lmm_layout_gen: 0
lmm_stripe_offset: 7
lmm_objects:
- l_ost_idx: 7
l_fid: 0x100070000:0x2:0x0
$ lfs migrate -E 1M -S 512K -c 1 -E -1 -S 1M -c 2 \
/mnt/testfs/norm_to_2compIn this example, a 5MB size file with 1 stripe and 128K stripe size is migrated to a composite layout file with 2 components, illustrated in Figure 19.5, “Example: migrate normal to composite”.
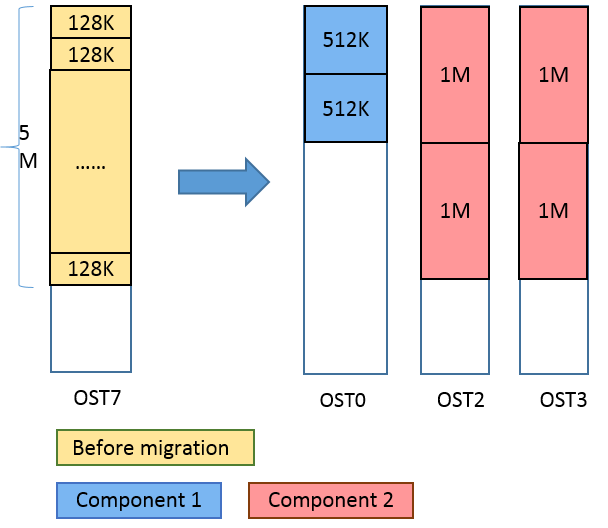
The stripe information after migration is like:
$ lfs getstripe /mnt/testfs/norm_to_2comp
/mnt/testfs/norm_to_2comp
lcm_layout_gen: 4
lcm_entry_count: 2
lcme_id: 1
lcme_flags: init
lcme_extent.e_start: 0
lcme_extent.e_end: 1048576
lmm_stripe_count: 1
lmm_stripe_size: 524288
lmm_pattern: 1
lmm_layout_gen: 0
lmm_stripe_offset: 0
lmm_objects:
- 0: { l_ost_idx: 0, l_fid: [0x100000000:0x2:0x0] }
lcme_id: 2
lcme_flags: init
lcme_extent.e_start: 1048576
lcme_extent.e_end: EOF
lmm_stripe_count: 2
lmm_stripe_size: 1048576
lmm_pattern: 1
lmm_layout_gen: 0
lmm_stripe_offset: 2
lmm_objects:
- 0: { l_ost_idx: 2, l_fid: [0x100020000:0x2:0x0] }
- 1: { l_ost_idx: 3, l_fid: [0x100030000:0x2:0x0] }Case2. Migrate a composite layout to another composite layout
$ lfs setstripe -E 1M -S 512K -c 1 -E -1 -S 1M -c 2 \ /mnt/testfs/2comp_to_3comp $ dd if=/dev/urandom of=/mnt/testfs/norm_to_2comp bs=1M count=5 $ lfs migrate -E 1M -S 1M -c 2 -E 4M -S 1M -c 2 -E -1 -S 3M -c 3 \ /mnt/testfs/2comp_to_3comp
In this example, a composite layout file with 2 components is migrated a composite layout file with 3 components. If we still use the example in case1, the migration process is illustrated in Figure 19.6, “Example: migrate composite to composite”.
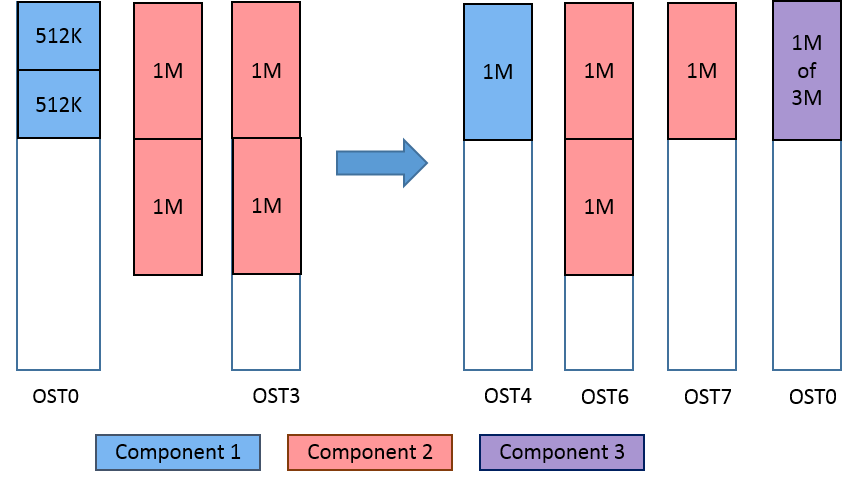
The stripe information is like:
$ lfs getstripe /mnt/testfs/2comp_to_3comp
/mnt/testfs/2comp_to_3comp
lcm_layout_gen: 6
lcm_entry_count: 3
lcme_id: 1
lcme_flags: init
lcme_extent.e_start: 0
lcme_extent.e_end: 1048576
lmm_stripe_count: 2
lmm_stripe_size: 1048576
lmm_pattern: 1
lmm_layout_gen: 0
lmm_stripe_offset: 4
lmm_objects:
- 0: { l_ost_idx: 4, l_fid: [0x100040000:0x2:0x0] }
- 1: { l_ost_idx: 5, l_fid: [0x100050000:0x2:0x0] }
lcme_id: 2
lcme_flags: init
lcme_extent.e_start: 1048576
lcme_extent.e_end: 4194304
lmm_stripe_count: 2
lmm_stripe_size: 1048576
lmm_pattern: 1
lmm_layout_gen: 0
lmm_stripe_offset: 6
lmm_objects:
- 0: { l_ost_idx: 6, l_fid: [0x100060000:0x2:0x0] }
- 1: { l_ost_idx: 7, l_fid: [0x100070000:0x3:0x0] }
lcme_id: 3
lcme_flags: init
lcme_extent.e_start: 4194304
lcme_extent.e_end: EOF
lmm_stripe_count: 3
lmm_stripe_size: 3145728
lmm_pattern: 1
lmm_layout_gen: 0
lmm_stripe_offset: 0
lmm_objects:
- 0: { l_ost_idx: 0, l_fid: [0x100000000:0x3:0x0] }
- 1: { l_ost_idx: 1, l_fid: [0x100010000:0x2:0x0] }
- 2: { l_ost_idx: 2, l_fid: [0x100020000:0x3:0x0] }Case3. Migrate a composite layout to a normal one
$ lfs migrate -E 1M -S 1M -c 2 -E 4M -S 1M -c 2 -E -1 -S 3M -c 3 \ /mnt/testfs/3comp_to_norm $ dd if=/dev/urandom of=/mnt/testfs/norm_to_2comp bs=1M count=5 $ lfs migrate -c 2 -S 2M /mnt/testfs/3comp_to_normal
In this example, a composite file with 3 components is migrated to a normal file with 2 stripes and 2M stripe size. If we still use the example in Case2, the migration process is illustrated in Figure 19.7, “Example: migrate composite to normal”.
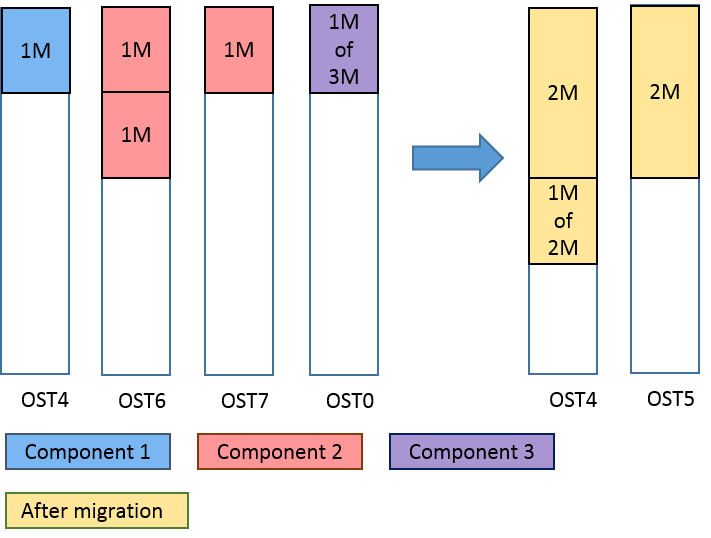
The stripe information is like:
$ lfs getstripe /mnt/testfs/3comp_to_norm --yaml
/mnt/testfs/3comp_to_norm
lmm_stripe_count: 2
lmm_stripe_size: 2097152
lmm_pattern: 1
lmm_layout_gen: 7
lmm_stripe_offset: 4
lmm_objects:
- l_ost_idx: 4
l_fid: 0x100040000:0x3:0x0
- l_ost_idx: 5
l_fid: 0x100050000:0x3:0x0lfs getstripe commands can be used to list the
striping/component information for a given PFL file. Here, only those
parameters new for PFL files are shown.
Command
lfs getstripe
[--component-id|-I [comp_id]]
[--component-flags [comp_flags]]
[--component-count]
[--component-start [+-][N][kMGTPE]]
[--component-end|-E [+-][N][kMGTPE]]
dirname|filenameExample
Suppose we already have a composite file
/mnt/testfs/3comp, created by the following
command:
$ lfs setstripe -E 4M -c 1 -E 64M -c 4 -E -1 -c -1 -i 4 \ /mnt/testfs/3comp
And write some data
$ dd if=/dev/zero of=/mnt/testfs/3comp bs=1M count=5
Case1. List component ID and its related information
List all the components ID
$ lfs getstripe -I /mnt/testfs/3comp 1 2 3
List the detailed striping information of component ID=2
$ lfs getstripe -I2 /mnt/testfs/3comp /mnt/testfs/3comp lcm_layout_gen: 4 lcm_entry_count: 3 lcme_id: 2 lcme_flags: init lcme_extent.e_start: 4194304 lcme_extent.e_end: 67108864 lmm_stripe_count: 4 lmm_stripe_size: 1048576 lmm_pattern: 1 lmm_layout_gen: 0 lmm_stripe_offset: 5 lmm_objects: - 0: { l_ost_idx: 5, l_fid: [0x100050000:0x2:0x0] } - 1: { l_ost_idx: 6, l_fid: [0x100060000:0x2:0x0] } - 2: { l_ost_idx: 7, l_fid: [0x100070000:0x2:0x0] } - 3: { l_ost_idx: 0, l_fid: [0x100000000:0x2:0x0] }List the stripe offset and stripe count of component ID=2
$ lfs getstripe -I2 -i -c /mnt/testfs/3comp lmm_stripe_count: 4 lmm_stripe_offset: 5
Case2. List the component which contains the specified flag
List the flag of each component
$ lfs getstripe -component-flag -I /mnt/testfs/3comp lcme_id: 1 lcme_flags: init lcme_id: 2 lcme_flags: init lcme_id: 3 lcme_flags: 0List component(s) who is not instantiated
$ lfs getstripe --component-flags=^init /mnt/testfs/3comp /mnt/testfs/3comp lcm_layout_gen: 4 lcm_entry_count: 3 lcme_id: 3 lcme_flags: 0 lcme_extent.e_start: 67108864 lcme_extent.e_end: EOF lmm_stripe_count: -1 lmm_stripe_size: 1048576 lmm_pattern: 1 lmm_layout_gen: 4 lmm_stripe_offset: 4
Case3. List the total number of all the component(s)
List the total number of all the components
$ lfs getstripe --component-count /mnt/testfs/3comp 3
Case4. List the component with the specified extent start or end positions
List the start position in bytes of each component
$ lfs getstripe --component-start /mnt/testfs/3comp 0 4194304 67108864
List the start position in bytes of component ID=3
$ lfs getstripe --component-start -I3 /mnt/testfs/3comp 67108864
List the component with start = 64M
$ lfs getstripe --component-start=64M /mnt/testfs/3comp /mnt/testfs/3comp lcm_layout_gen: 4 lcm_entry_count: 3 lcme_id: 3 lcme_flags: 0 lcme_extent.e_start: 67108864 lcme_extent.e_end: EOF lmm_stripe_count: -1 lmm_stripe_size: 1048576 lmm_pattern: 1 lmm_layout_gen: 4 lmm_stripe_offset: 4List the component(s) with start > 5M
$ lfs getstripe --component-start=+5M /mnt/testfs/3comp /mnt/testfs/3comp lcm_layout_gen: 4 lcm_entry_count: 3 lcme_id: 3 lcme_flags: 0 lcme_extent.e_start: 67108864 lcme_extent.e_end: EOF lmm_stripe_count: -1 lmm_stripe_size: 1048576 lmm_pattern: 1 lmm_layout_gen: 4 lmm_stripe_offset: 4List the component(s) with start < 5M
$ lfs getstripe --component-start=-5M /mnt/testfs/3comp /mnt/testfs/3comp lcm_layout_gen: 4 lcm_entry_count: 3 lcme_id: 1 lcme_flags: init lcme_extent.e_start: 0 lcme_extent.e_end: 4194304 lmm_stripe_count: 1 lmm_stripe_size: 1048576 lmm_pattern: 1 lmm_layout_gen: 0 lmm_stripe_offset: 4 lmm_objects: - 0: { l_ost_idx: 4, l_fid: [0x100040000:0x2:0x0] } lcme_id: 2 lcme_flags: init lcme_extent.e_start: 4194304 lcme_extent.e_end: 67108864 lmm_stripe_count: 4 lmm_stripe_size: 1048576 lmm_pattern: 1 lmm_layout_gen: 0 lmm_stripe_offset: 5 lmm_objects: - 0: { l_ost_idx: 5, l_fid: [0x100050000:0x2:0x0] } - 1: { l_ost_idx: 6, l_fid: [0x100060000:0x2:0x0] } - 2: { l_ost_idx: 7, l_fid: [0x100070000:0x2:0x0] } - 3: { l_ost_idx: 0, l_fid: [0x100000000:0x2:0x0] }List the component(s) with start > 3M and end < 70M
$ lfs getstripe --component-start=+3M --component-end=-70M \ /mnt/testfs/3comp /mnt/testfs/3comp lcm_layout_gen: 4 lcm_entry_count: 3 lcme_id: 2 lcme_flags: init lcme_extent.e_start: 4194304 lcme_extent.e_end: 67108864 lmm_stripe_count: 4 lmm_stripe_size: 1048576 lmm_pattern: 1 lmm_layout_gen: 0 lmm_stripe_offset: 5 lmm_objects: - 0: { l_ost_idx: 5, l_fid: [0x100050000:0x2:0x0] } - 1: { l_ost_idx: 6, l_fid: [0x100060000:0x2:0x0] } - 2: { l_ost_idx: 7, l_fid: [0x100070000:0x2:0x0] } - 3: { l_ost_idx: 0, l_fid: [0x100000000:0x2:0x0] }
lfs find commands can be used to search the
directory tree rooted at the given directory or file name for the files
that match the given PFL component parameters. Here, only those
parameters new for PFL files are shown. Their usages are similar to
lfs getstripe commands.
Command
lfs finddirectory|filename[[!] --component-count [+-=]comp_cnt] [[!] --component-start [+-=]N[kMGTPE]] [[!] --component-end|-E [+-=]N[kMGTPE]] [[!] --component-flags=comp_flags]
Note
If you use --component-xxx options, only
the composite files will be searched; but if you use
! --component-xxx options, all the files will be
searched.
Example
We use the following directory and composite files to show how
lfs find works.
$ mkdir /mnt/testfs/testdir $ lfs setstripe -E 1M -E 10M -E eof /mnt/testfs/testdir/3comp $ lfs setstripe -E 4M -E 20M -E 30M -E eof /mnt/testfs/testdir/4comp $ mkdir -p /mnt/testfs/testdir/dir_3comp $ lfs setstripe -E 6M -E 30M -E eof /mnt/testfs/testdir/dir_3comp $ lfs setstripe -E 8M -E eof /mnt/testfs/testdir/dir_3comp/2comp $ lfs setstripe -c 1 /mnt/testfs/testdir/dir_3comp/commnfile
Case1. Find the files that match the specified component count condition
Find the files under directory /mnt/testfs/testdir whose number of components is not equal to 3.
$ lfs find /mnt/testfs/testdir ! --component-count=3 /mnt/testfs/testdir /mnt/testfs/testdir/4comp /mnt/testfs/testdir/dir_3comp/2comp /mnt/testfs/testdir/dir_3comp/commonfile
Case2. Find the files/dirs that match the specified component start/end condition
Find the file(s) under directory /mnt/testfs/testdir with component start = 4M and end < 70M
$ lfs find /mnt/testfs/testdir --component-start=4M -E -30M /mnt/testfs/testdir/4comp
Case3. Find the files/dirs that match the specified component flag condition
Find the file(s) under directory /mnt/testfs/testdir whose component
flags contain init
$ lfs find /mnt/testfs/testdir --component-flag=init /mnt/testfs/testdir/3comp /mnt/testfs/testdir/4comp /mnt/testfs/testdir/dir_3comp/2comp
Note
Since lfs find uses
"!" to do negative search, we don't support
flag ^init here.
The Lustre Self-Extending Layout (SEL) feature is an extension of the
Section 19.5, “Progressive File Layout(PFL)” feature, which allows the MDS to change the defined
PFL layout dynamically. With this feature, the MDS monitors the used space
on OSTs and swaps the OSTs for the current file when they are low on space.
This avoids ENOSPC problems for SEL files when
applications are writing to them.
Whereas PFL delays the instantiation of some components until an IO operation occurs on this region, SEL allows splitting such non-instantiated components in two parts: an extendable component and an extension component. The extendable component is a regular PFL component, covering just a part of the region, which is small originally. The extension (or SEL) component is a new component type which is always non-instantiated and unassigned, covering the other part of the region. When a write reaches this unassigned space, and the client calls the MDS to have it instantiated, the MDS makes a decision as to whether to grant additional space to the extendable component. The granted region moves from the head of the extension component to the tail of the extendable component, thus the extendable component grows and the SEL one is shortened. Therefore, it allows the file to continue on the same OSTs, or in the case where space is low on one of the current OSTs, to modify the layout to switch to a new component on new OSTs. In particular, it lets IO automatically spill over to a large HDD OST pool once a small SSD OST pool is getting low on space.
The default extension policy modifies the layout in the following ways:
Extension: continue on the same OST objects when not low on space on any of the OSTs of the current component; a particular extent is granted to the extendable component.
Spill over: switch to next component OSTs only when not the last component and at least one of the current OSTs is low on space; the whole region of the SEL component moves to the next component and the SEL component is removed in its turn.
Repeating: create a new component with the same layout but on free OSTs, used only for the last component when at least one of the current OSTs is low on space; a new component has the same layout but instantiated on different OSTs (from the same pool) which have enough space.
Forced extension: continue with the current component OSTs when there is a low on space condition for the last component OSTs, but a repeating attempt detected low on space on other OSTs as well, then spillover is impossible and there is no sense in the repeating.
Each spill event increments the
spill_hitcounter, which can be accessed with:lctl lod.*.POOLNAME.spill_hit
Note
The SEL feature does not require clients to understand the SEL format of already created files, only the MDS support is needed which is introduced in Lustre 2.13. However, old clients will have some limitations as the Lustre tools will not support it.
The lfs setstripe command is used to create files
with composite layouts, as well as add or delete components to or from an
existing file. It is extended to support SEL components.
Command
lfs setstripe
[--component-end|-E end1] [STRIPE_OPTIONS] ... FILENAME
STRIPE OPTIONS:
--extension-size, --ext-size, -z <ext_size>The -z option is added to specify the size of
the region which is granted to the extendable component on each
iteration. While declaring any component, this option turns the declared
component to a pair of components: extendable and extension ones.
Example
The following command creates 2 pairs of extendable and extension components:
# lfs setstripe -E 1G -z 64M -E -1 -z 256M /mnt/lustre/file

Note
As usual, only the first PFL component is instantiated at the creation time, thus it is immediately extended to the extension size (64M for the first component), whereas the third component is left zero-length.
# lfs getstripe /mnt/lustre/file
/mnt/lustre/file
lcm_layout_gen: 4
lcm_mirror_count: 1
lcm_entry_count: 4
lcme_id: 1
lcme_mirror_id: 0
lcme_flags: init
lcme_extent.e_start: 0
lcme_extent.e_end: 67108864
lmm_stripe_count: 1
lmm_stripe_size: 1048576
lmm_pattern: raid0
lmm_layout_gen: 0
lmm_stripe_offset: 0
lmm_objects:
- 0: { l_ost_idx: 0, l_fid: [0x100000000:0x5:0x0] }
lcme_id: 2
lcme_mirror_id: 0
lcme_flags: extension
lcme_extent.e_start: 67108864
lcme_extent.e_end: 1073741824
lmm_stripe_count: 0
lmm_extension_size: 67108864
lmm_pattern: raid0
lmm_layout_gen: 0
lmm_stripe_offset: -1
lcme_id: 3
lcme_mirror_id: 0
lcme_flags: 0
lcme_extent.e_start: 1073741824
lcme_extent.e_end: 1073741824
lmm_stripe_count: 1
lmm_stripe_size: 1048576
lmm_pattern: raid0
lmm_layout_gen: 0
lmm_stripe_offset: -1
lcme_id: 4
lcme_mirror_id: 0
lcme_flags: extension
lcme_extent.e_start: 1073741824
lcme_extent.e_end: EOF
lmm_stripe_count: 0
lmm_extension_size: 268435456
lmm_pattern: raid0
lmm_layout_gen: 0
lmm_stripe_offset: -1Similar to PFL, it is possible to set a SEL layout template to a directory. After that, all the files created under it will inherit this layout by default.
# lfs setstripe -E 1G -z 64M -E -1 -z 256M /mnt/lustre/dir
# ./lustre/utils/lfs getstripe /mnt/lustre/dir
/mnt/lustre/dir
lcm_layout_gen: 0
lcm_mirror_count: 1
lcm_entry_count: 4
lcme_id: N/A
lcme_mirror_id: N/A
lcme_flags: 0
lcme_extent.e_start: 0
lcme_extent.e_end: 67108864
stripe_count: 1 stripe_size: 1048576 pattern: raid0 stripe_offset: -1
lcme_id: N/A
lcme_mirror_id: N/A
lcme_flags: extension
lcme_extent.e_start: 67108864
lcme_extent.e_end: 1073741824
stripe_count: 1 extension_size: 67108864 pattern: raid0 stripe_offset: -1
lcme_id: N/A
lcme_mirror_id: N/A
lcme_flags: 0
lcme_extent.e_start: 1073741824
lcme_extent.e_end: 1073741824
stripe_count: 1 stripe_size: 1048576 pattern: raid0 stripe_offset: -1
lcme_id: N/A
lcme_mirror_id: N/A
lcme_flags: extension
lcme_extent.e_start: 1073741824
lcme_extent.e_end: EOF
stripe_count: 1 extension_size: 268435456 pattern: raid0 stripe_offset: -1
lfs getstripe commands can be used to list the
striping/component information for a given SEL file. Here, only those parameters
new for SEL files are shown.
Command
lfs getstripe
[--extension-size|--ext-size|-z] filenameThe -z option is added to print the extension
size in bytes. For composite files this is the extension size of the
first extension component. If a particular component is identified by
other options (--component-id, --component-start,
etc...), this component extension size is printed.
Example 1: List a SEL component information
Suppose we already have a composite file
/mnt/lustre/file, created by the following command:
# lfs setstripe -E 1G -z 64M -E -1 -z 256M /mnt/lustre/file
The 2nd component could be listed with the following command:
# lfs getstripe -I2 /mnt/lustre/file
/mnt/lustre/file
lcm_layout_gen: 4
lcm_mirror_count: 1
lcm_entry_count: 4
lcme_id: 2
lcme_mirror_id: 0
lcme_flags: extension
lcme_extent.e_start: 67108864
lcme_extent.e_end: 1073741824
lmm_stripe_count: 0
lmm_extension_size: 67108864
lmm_pattern: raid0
lmm_layout_gen: 0
lmm_stripe_offset: -1
Note
As you can see the SEL components are marked by the
extension flag and lmm_extension_size field
keeps the specified extension size.
Example 2: List the extension size
Having the same file as in the above example, the extension size of the second component could be listed with:
# lfs getstripe -z -I2 /mnt/lustre/file 67108864
Example 3: Extension
Having the same file as in the above example, suppose there is a write which crosses the end of the first component (64M), and then another write another write which crosses the end of the first component (128M) again, the layout changes as following:
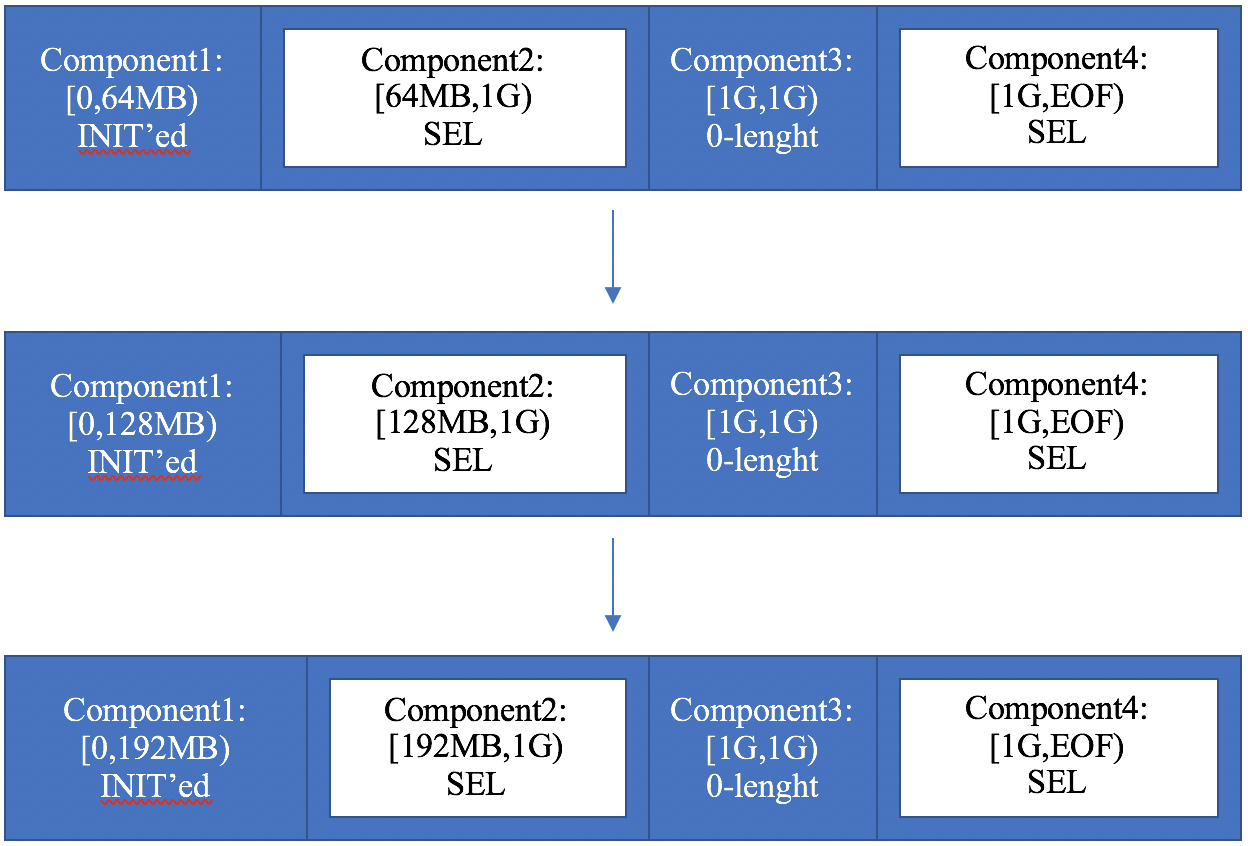
The layout can be printed out by the following command:
# lfs getstripe /mnt/lustre/file
/mnt/lustre/file
lcm_layout_gen: 6
lcm_mirror_count: 1
lcm_entry_count: 4
lcme_id: 1
lcme_mirror_id: 0
lcme_flags: init
lcme_extent.e_start: 0
lcme_extent.e_end: 201326592
lmm_stripe_count: 1
lmm_stripe_size: 1048576
lmm_pattern: raid0
lmm_layout_gen: 0
lmm_stripe_offset: 0
lmm_objects:
- 0: { l_ost_idx: 0, l_fid: [0x100000000:0x5:0x0] }
lcme_id: 2
lcme_mirror_id: 0
lcme_flags: extension
lcme_extent.e_start: 201326592
lcme_extent.e_end: 1073741824
lmm_stripe_count: 0
lmm_extension_size: 67108864
lmm_pattern: raid0
lmm_layout_gen: 0
lmm_stripe_offset: -1
lcme_id: 3
lcme_mirror_id: 0
lcme_flags: 0
lcme_extent.e_start: 1073741824
lcme_extent.e_end: 1073741824
lmm_stripe_count: 1
lmm_stripe_size: 1048576
lmm_pattern: raid0
lmm_layout_gen: 0
lmm_stripe_offset: -1
lcme_id: 4
lcme_mirror_id: 0
lcme_flags: extension
lcme_extent.e_start: 1073741824
lcme_extent.e_end: EOF
lmm_stripe_count: 0
lmm_extension_size: 268435456
lmm_pattern: raid0
lmm_layout_gen: 0
lmm_stripe_offset: -1Example 4: Spillover
In case where OST0 is low on space and an IO
happens to a SEL component, a spillover happens: the full region of the
SEL component is added to the next component, e.g. in the example above
the next layout modification will look like:
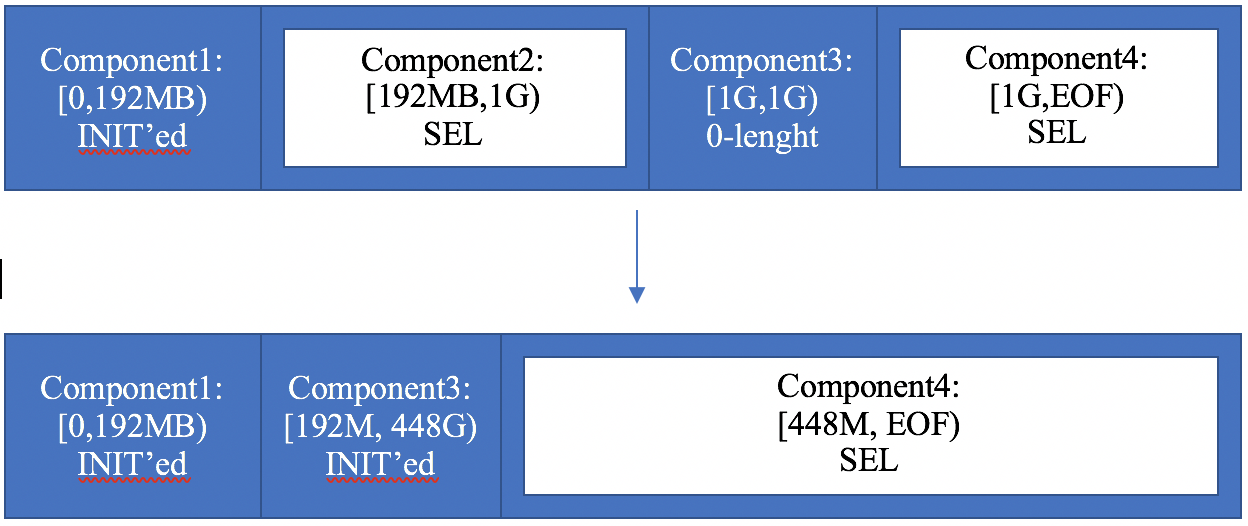
Note
Despite the fact the third component was [1G, 1G] originally,
while it is not instantiated, instead of getting extended backward, it is
moved backward to the start of the previous SEL component (192M) and
extended on its extension size (256M) from that position, thus it becomes
[192M, 448M].
# lfs getstripe /mnt/lustre/file
/mnt/lustre/file
lcm_layout_gen: 7
lcm_mirror_count: 1
lcm_entry_count: 3
lcme_id: 1
lcme_mirror_id: 0
lcme_flags: init
lcme_extent.e_start: 0
lcme_extent.e_end: 201326592
lmm_stripe_count: 1
lmm_stripe_size: 1048576
lmm_pattern: raid0
lmm_layout_gen: 0
lmm_stripe_offset: 0
lmm_objects:
- 0: { l_ost_idx: 0, l_fid: [0x100000000:0x5:0x0] }
lcme_id: 3
lcme_mirror_id: 0
lcme_flags: init
lcme_extent.e_start: 201326592
lcme_extent.e_end: 469762048
lmm_stripe_count: 1
lmm_stripe_size: 1048576
lmm_pattern: raid0
lmm_layout_gen: 0
lmm_stripe_offset: 1
lmm_objects:
- 0: { l_ost_idx: 1, l_fid: [0x100010000:0x8:0x0] }
lcme_id: 4
lcme_mirror_id: 0
lcme_flags: extension
lcme_extent.e_start: 469762048
lcme_extent.e_end: EOF
lmm_stripe_count: 0
lmm_extension_size: 268435456
lmm_pattern: raid0
lmm_layout_gen: 0
lmm_stripe_offset: -1Example 5: Repeating
Suppose in the example above, OST0 got
enough free space back but OST1 is low on space,
the following write to the last SEL component leads to a new component
allocation before the SEL component, which repeats the previous
component layout but instantiated on free OSTs:
# lfs getstripe /mnt/lustre/file
/mnt/lustre/file
lcm_layout_gen: 9
lcm_mirror_count: 1
lcm_entry_count: 4
lcme_id: 1
lcme_mirror_id: 0
lcme_flags: init
lcme_extent.e_start: 0
lcme_extent.e_end: 201326592
lmm_stripe_count: 1
lmm_stripe_size: 1048576
lmm_pattern: raid0
lmm_layout_gen: 0
lmm_stripe_offset: 0
lmm_objects:
- 0: { l_ost_idx: 0, l_fid: [0x100000000:0x5:0x0] }
lcme_id: 3
lcme_mirror_id: 0
lcme_flags: init
lcme_extent.e_start: 201326592
lcme_extent.e_end: 469762048
lmm_stripe_count: 1
lmm_stripe_size: 1048576
lmm_pattern: raid0
lmm_layout_gen: 0
lmm_stripe_offset: 1
lmm_objects:
- 0: { l_ost_idx: 1, l_fid: [0x100010000:0x8:0x0] }
lcme_id: 8
lcme_mirror_id: 0
lcme_flags: init
lcme_extent.e_start: 469762048
lcme_extent.e_end: 738197504
lmm_stripe_count: 1
lmm_stripe_size: 1048576
lmm_pattern: raid0
lmm_layout_gen: 65535
lmm_stripe_offset: 0
lmm_objects:
- 0: { l_ost_idx: 0, l_fid: [0x100000000:0x6:0x0] }
lcme_id: 4
lcme_mirror_id: 0
lcme_flags: extension
lcme_extent.e_start: 738197504
lcme_extent.e_end: EOF
lmm_stripe_count: 0
lmm_extension_size: 268435456
lmm_pattern: raid0
lmm_layout_gen: 0
lmm_stripe_offset: -1Example 6: Forced extension
Suppose in the example above, both OST0 and
OST1 are low on space, the following write to the
last SEL component will behave as an extension as there is no sense to
repeat.
# lfs getstripe /mnt/lustre/file
/mnt/lustre/file
lcm_layout_gen: 11
lcm_mirror_count: 1
lcm_entry_count: 4
lcme_id: 1
lcme_mirror_id: 0
lcme_flags: init
lcme_extent.e_start: 0
lcme_extent.e_end: 201326592
lmm_stripe_count: 1
lmm_stripe_size: 1048576
lmm_pattern: raid0
lmm_layout_gen: 0
lmm_stripe_offset: 0
lmm_objects:
- 0: { l_ost_idx: 0, l_fid: [0x100000000:0x5:0x0] }
lcme_id: 3
lcme_mirror_id: 0
lcme_flags: init
lcme_extent.e_start: 201326592
lcme_extent.e_end: 469762048
lmm_stripe_count: 1
lmm_stripe_size: 1048576
lmm_pattern: raid0
lmm_layout_gen: 0
lmm_stripe_offset: 1
lmm_objects:
- 0: { l_ost_idx: 1, l_fid: [0x100010000:0x8:0x0] }
lcme_id: 8
lcme_mirror_id: 0
lcme_flags: init
lcme_extent.e_start: 469762048
lcme_extent.e_end: 1006632960
lmm_stripe_count: 1
lmm_stripe_size: 1048576
lmm_pattern: raid0
lmm_layout_gen: 65535
lmm_stripe_offset: 0
lmm_objects:
- 0: { l_ost_idx: 0, l_fid: [0x100000000:0x6:0x0] }
lcme_id: 4
lcme_mirror_id: 0
lcme_flags: extension
lcme_extent.e_start: 1006632960
lcme_extent.e_end: EOF
lmm_stripe_count: 0
lmm_extension_size: 268435456
lmm_pattern: raid0
lmm_layout_gen: 0
lmm_stripe_offset: -1lfs find commands can be used to search for
the files that match the given SEL component paremeters. Here, only
those parameters new for the SEL files are shown.
lfs find [[!] --extension-size|--ext-size|-z [+-]ext-size[KMG] [[!] --component-flags=extension]
The -z option is added to specify the extension
size to search for. The files which have any component with the
extension size matched the given criteria are printed out. As always
+ and - signs are allowed to
specify the least and the most size.
A new extension component flag is added. Only
files which have at least one SEL component are printed.
Note
The negative search for flags searches the files which have a non-SEL component (not files which do not have any SEL component).
Example
# lfs setstripe --extension-size 64M -c 1 -E -1 /mnt/lustre/file # lfs find --comp-flags extension /mnt/lustre/* /mnt/lustre/file # lfs find ! --comp-flags extension /mnt/lustre/* /mnt/lustre/file # lfs find -z 64M /mnt/lustre/* /mnt/lustre/file # lfs find -z +64M /mnt/lustre/* # lfs find -z -64M /mnt/lustre/* # lfs find -z +63M /mnt/lustre/* /mnt/lustre/file # lfs find -z -65M /mnt/lustre/* /mnt/lustre/file # lfs find -z 65M /mnt/lustre/* # lfs find ! -z 64M /mnt/lustre/* # lfs find ! -z +64M /mnt/lustre/* /mnt/lustre/file # lfs find ! -z -64M /mnt/lustre/* /mnt/lustre/file # lfs find ! -z +63M /mnt/lustre/* # lfs find ! -z -65M /mnt/lustre/* # lfs find ! -z 65M /mnt/lustre/* /mnt/lustre/file
The Lustre Foreign Layout feature is an extension of both the LOV and LMV formats which allows the creation of empty files and directories with the necessary specifications to point to corresponding objects outside from Lustre namespace.
The new LOV/LMV foreign internal format can be represented as:

The lfs set[dir]stripe commands are used to
create files or directories with foreign layouts, by calling the
corresponding API, itself invoking the appropriate ioctl().
Command
lfs set[dir]stripe \
--foreign[=<foreign_type>] --xattr|-x <layout_string> \
[--flags <hex_bitmask>] [--mode <mode_bits>] \
{file,dir}nameBoth the --foreign and
--xattr|-x options are mandatory.
The <foreign_type> (default is "none", meaning
no special behavior), and both --flags and
--mode (default is 0666) options are optional.
Example
The following command creates a foreign file of "none" type and with "foo@bar" LOV content and specific mode and flags:
# lfs setstripe --foreign=none --flags=0xda08 --mode=0640 \ --xattr=foo@bar /mnt/lustre/file

lfs get[dir]stripe commands can be used to
retrieve foreign LOV/LMV informations and content.
Command
lfs get[dir]stripe [-v] filenameList foreign layout information
Suppose we already have a foreign file
/mnt/lustre/file, created by the following command:
# lfs setstripe --foreign=none --flags=0xda08 --mode=0640 \ --xattr=foo@bar /mnt/lustre/file
The full foreign layout informations can be listed using the following command:
# lfs getstripe -v /mnt/lustre/file
/mnt/lustre/file
lfm_magic: 0x0BD70BD0
lfm_length: 7
lfm_type: none
lfm_flags: 0x0000DA08
lfm_value: foo@bar
Note
As you can see the lfm_length field
value is the characters number in the variable length
lfm_value field.
lfs find commands can be used to search for
all the foreign files/directories or those that match the given
selection paremeters.
lfs find [[!] --foreign[=<foreign_type>]
The --foreign[=<foreign_type>] option
has been added to specify that all [!,but not] files and/or directories
with a foreign layout [and [!,but not] of
<foreign_type>] will be retrieved.
Example
# lfs setstripe --foreign=none --xattr=foo@bar /mnt/lustre/file # touch /mnt/lustre/file2 # lfs find --foreign /mnt/lustre/* /mnt/lustre/file # lfs find ! --foreign /mnt/lustre/* /mnt/lustre/file2 # lfs find --foreign=none /mnt/lustre/* /mnt/lustre/file
To optimize file system performance, the MDT assigns file stripes to OSTs based on two allocation algorithms. The round-robin allocator gives preference to location (spreading out stripes across OSSs to increase network bandwidth utilization) and the weighted allocator gives preference to available space (balancing loads across OSTs). Threshold and weighting factors for these two algorithms can be adjusted by the user. The MDT reserves 0.1 percent of total OST space and 32 inodes for each OST. The MDT stops object allocation for the OST if available space is less than reserved or the OST has fewer than 32 free inodes. The MDT starts object allocation when available space is twice as big as the reserved space and the OST has more than 64 free inodes. Note, clients could append existing files no matter what object allocation state is.
The reserved space for each OST can be adjusted by the user. Use the
lctl set_param command, for example the next command reserve 1GB space
for all OSTs.
lctl set_param -P osp.*.reserved_mb_low=1024
This section describes how to check available free space on disks and how free space is allocated. It then describes how to set the threshold and weighting factors for the allocation algorithms.
Free space is an important consideration in assigning file stripes.
The lfs df command can be used to show available
disk space on the mounted Lustre file system and space consumption per
OST. If multiple Lustre file systems are mounted, a path may be
specified, but is not required. Options to the lfs df
command are shown below.
|
Option |
Description |
|---|---|
|
|
Displays sizes in human readable format (for example: 1K, 234M, 5G) using base-2 (binary) values (i.e. 1G = 1024M). |
|
|
Like |
|
|
Lists inodes instead of block usage. |
|
|
Do not attempt to contact any OST or MDT not currently
connected to the client. This avoids blocking the
|
|
|
Limit the usage to report only OSTs that are in the
specified |
|
|
Display verbose status of MDTs and OSTs. This may include one or more optional flags at the end of each line. |
lfs df may also report additional target status
as the last column in the display, if there are issues with that target.
Target states include:
D: OST/MDT isDegraded. The target has a failed drive in the RAID device, or is undergoing RAID reconstruction. This state is marked on the server automatically for ZFS targets viazed, or a (user-supplied) script that monitors the target device and sets "lctl set_param obdfilter." on the OST. This target will be avoided for new allocations, but will still be used to read existing files located there or if there are not enough non-degraded OSTs to make up a widely-striped file.target.degraded=1R: OST/MDT isRead-only. The target filesystem is marked read-only due to filesystem corruption detected by ldiskfs or ZFS. No modifications are allowed on this OST, and it needs to be unmounted ande2fsckorzpool scrubrun to repair the underlying filesystem.N: OST/MDT isNo-precreate. The target is configured to deny object precreation set by "lctl set_param obdfilter." parameter or the "target.no_precreate=1-o no_precreate" mount option. This may be done to add an OST to the filesystem without allowing objects to be allocated on it yet, or for other reasons.S: OST/MDT is out ofSpace. The target filesystem has less than the minimum required free space and will not be used for new object allocations until it has more free space.I: OST/MDT is out ofInodes. The target filesystem has less than the minimum required free inodes and will not be used for new object allocations until it has more free inodes.f: OST/MDT is onflash. The target filesystem is using a flash (non-rotational) storage device. This is normally detected from the underlying Linux block device, but can be set manually with "lctl set_param osd-*.*.nonrotational=1on the respective OSTs. This lower-case status is only shown in conjunction with the-voption, since it is not an error condition.
Note
The df -i and lfs df -i
commands show the minimum number
of inodes that can be created in the file system at the current time.
If the total number of objects available across all of the OSTs is
smaller than those available on the MDT(s), taking into account the
default file striping, then df -i will also
report a smaller number of inodes than could be created. Running
lfs df -i will report the actual number of inodes
that are free on each target.
For ZFS file systems, the number of inodes that can be created is dynamic and depends on the free space in the file system. The Free and Total inode counts reported for a ZFS file system are only an estimate based on the current usage for each target. The Used inode count is the actual number of inodes used by the file system.
Examples
client$ lfs df UUID 1K-blocks Used Available Use% Mounted on testfs-OST0000_UUID 9174328 1020024 8154304 11% /mnt/lustre[MDT:0] testfs-OST0000_UUID 94181368 56330708 37850660 59% /mnt/lustre[OST:0] testfs-OST0001_UUID 94181368 56385748 37795620 59% /mnt/lustre[OST:1] testfs-OST0002_UUID 94181368 54352012 39829356 57% /mnt/lustre[OST:2] filesystem summary: 282544104 167068468 39829356 57% /mnt/lustre [client1] $ lfs df -hv UUID bytes Used Available Use% Mounted on testfs-MDT0000_UUID 8.7G 996.1M 7.8G 11% /mnt/lustre[MDT:0] testfs-OST0000_UUID 89.8G 53.7G 36.1G 59% /mnt/lustre[OST:0] f testfs-OST0001_UUID 89.8G 53.8G 36.0G 59% /mnt/lustre[OST:1] f testfs-OST0002_UUID 89.8G 51.8G 38.0G 57% /mnt/lustre[OST:2] f filesystem summary: 269.5G 159.3G 110.1G 59% /mnt/lustre [client1] $ lfs df -iH UUID Inodes IUsed IFree IUse% Mounted on testfs-MDT0000_UUID 2.21M 41.9k 2.17M 1% /mnt/lustre[MDT:0] testfs-OST0000_UUID 737.3k 12.1k 725.1k 1% /mnt/lustre[OST:0] testfs-OST0001_UUID 737.3k 12.2k 725.0k 1% /mnt/lustre[OST:1] testfs-OST0002_UUID 737.3k 12.2k 725.0k 1% /mnt/lustre[OST:2] filesystem summary: 2.21M 41.9k 2.17M 1% /mnt/lustre[OST:2]
Two stripe allocation methods are provided:
Round-robin allocator - When the OSTs have approximately the same amount of free space, the round-robin allocator alternates stripes between OSTs on different OSSs, so the OST used for stripe 0 of each file is evenly distributed among OSTs, regardless of the stripe count. In a simple example with eight OSTs numbered 0-7, objects would be allocated like this:
File 1: OST1, OST2, OST3, OST4 File 2: OST5, OST6, OST7 File 3: OST0, OST1, OST2, OST3, OST4, OST5 File 4: OST6, OST7, OST0
Here are several more sample round-robin stripe orders (each letter represents a different OST on a single OSS):
3: AAA
One 3-OST OSS
3x3: ABABAB
Two 3-OST OSSs
3x4: BBABABA
One 3-OST OSS (A) and one 4-OST OSS (B)
3x5: BBABBABA
One 3-OST OSS (A) and one 5-OST OSS (B)
3x3x3: ABCABCABC
Three 3-OST OSSs
Weighted allocator - When the free space difference between the OSTs becomes significant, the weighting algorithm is used to influence OST ordering based on size (amount of free space available on each OST) and location (stripes evenly distributed across OSTs). The weighted allocator fills the emptier OSTs faster, but uses a weighted random algorithm, so the OST with the most free space is not necessarily chosen each time.
The allocation method is determined by the amount of free-space
imbalance on the OSTs. When free space is relatively balanced across
OSTs, the faster round-robin allocator is used, which maximizes network
balancing. The weighted allocator is used when any two OSTs are out of
balance by more than the specified threshold (17% by default). The
threshold between the two allocation methods is defined by the
qos_threshold_rr parameter.
To temporarily set the qos_threshold_rr to
25, enter the folowing on each MDS:
mds# lctl set_param lod.fsname*.qos_threshold_rr=25The weighting priority used by the weighted allocator is set by the
the qos_prio_free parameter.
Increasing the value of qos_prio_free puts more
weighting on the amount of free space available on each OST and less
on how stripes are distributed across OSTs. The default value is
91 (percent). When the free space priority is set to
100 (percent), weighting is based entirely on free space and location
is no longer used by the striping algorithm.
To permanently change the allocator weighting to 100, enter this command on the
MGS:
lctl conf_param fsname-MDT0000-*.lod.qos_prio_free=100.
Note
When qos_prio_free is set to 100, a weighted
random algorithm is still used to assign stripes, so, for example, if OST2 has twice as
much free space as OST1, OST2 is twice as likely to be used, but it is not guaranteed to
be used.
Individual files can only be striped over a finite number of OSTs,
based on the maximum size of the attributes that can be stored on the MDT.
If the MDT is ldiskfs-based without the ea_inode
feature, a file can be striped across at most 160 OSTs. With ZFS-based
MDTs, or if the ea_inode feature is enabled for an
ldiskfs-based MDT, a file can be striped across up to 2000 OSTs.
Lustre inodes use an extended attribute to record on which OST each object is located, and the identifier each object on that OST. The size of the extended attribute is a function of the number of stripes.
If using an ldiskfs-based MDT, the maximum number of OSTs over which
files can be striped can been raised to 2000 by enabling the
ea_inode feature on the MDT:
tune2fs -O ea_inode /dev/mdtdev
Note
Since Lustre 2.13 the
ea_inode feature is enabled by default on all newly
formatted ldiskfs MDT filesystems.
Note
The maximum stripe count for a single file does not limit the maximum number of OSTs that are in the filesystem as a whole, only the maximum possible size and maximum aggregate bandwidth for the file.
Table of Contents
This chapter describes Data on MDT (DoM).
The Lustre Data on MDT (DoM) feature improves small file IO by placing small files directly on the MDT, and also improves large file IO by avoiding the OST being affected by small random IO that can cause device seeking and hurt the streaming IO performance. Therefore, users can expect more consistent performance for both small file IO and mixed IO patterns.
The layout of a DoM file is stored on disk as a composite layout and is a special case of Progressive File Layout (PFL). Please see Section 19.5, “Progressive File Layout(PFL)” for more information on PFL. For DoM files, the file layout is composed of the component of the file, which is placed on an MDT, and the rest of components are placed on OSTs, if needed. The first component is placed on the MDT in the MDT object data blocks. This component always has one stripe with size equal to the component size. Such a component with an MDT layout can be only the first component in composite layout. The rest of components are placed over OSTs as usual with a RAID0 layout. The OST components are not instantiated until a client writes or truncates the file beyond the size of the MDT component.
Note
When specifying a DoM layout, it might be assumed that the
remaning layout will automatically go to the OSTs,
but this is not the case. As with regular PFL layouts, if an
EOF component is not present,
then writes beyond the end of the last existing component will fail
with error ENODATA ("No data available").
For example, creating a DoM file with a component end at 1 MB will
not be writable beyond 1 MiB:
$ lfs setstripe -E 1M -L mdt /mnt/testfs/domdir $ dd if=/dev/zero of=/mnt/testfs/domdir/testfile bs=1M dd: error writing '/myth/tmp/pfl-mdt-only': No data available 2+0 records in 1+0 records out 1048576 bytes (1.0 MB, 1.0 MiB) copied, 0.00186441 s, 562 MB/s
To allow the file to grow beyond 1 MB, add one or more regular
OST components with an EOF component at the end:
lfs setstripe -E 1M -L mdt -E 1G -c1 -E eof -c4 /mnt/testfs/domdir
Lustre provides the lfs setstripe command for
users to create DoM files. Also, as usual,
lfs getstripe command can be used to list the
striping/component information for a given file, while
lfs find command can be used to search the directory
tree rooted at the given directory or file name for the files that match
the given DoM component parameters, e.g. layout type.
The lfs setstripe command is used to create
DoM files.
lfs setstripe --component-end|-E end1 --layout|-L mdt \
[--component-end|-E end2 [STRIPE_OPTIONS] ...] <filename>
The command above creates a file with the special composite
layout, which defines the first component as an MDT component. The
MDT component must start from offset 0 and ends at
end1. The
end1 is also the stripe size of this
component, and is limited by the
lod.*.dom_stripesize of the MDT the file is
created on. No other options are required for this component.
The rest of the components use the normal syntax for composite
files creation.
Note
If the next component doesn't specify striping, such as:
lfs setstripe -E 1M -L mdt -E EOF <filename>
Then that component get its settings from the default filesystem striping.
The command below creates a file with a DoM layout. The first
component has an mdt layout and is placed on the
MDT, covering [0, 1M). The second component covers [1M, EOF) and is
striped over all available OSTs.
client$ lfs setstripe -E 1M -L mdt -E -1 -S 4M -c -1 \
/mnt/lustre/domfileThe resulting layout is illustrated by Figure 20.1, “Resulting file layout”.
The resulting can also be checked with
lfs getstripe as shown below:
client$ lfs getstripe /mnt/lustre/domfile
/mnt/lustre/domfile
lcm_layout_gen: 2
lcm_mirror_count: 1
lcm_entry_count: 2
lcme_id: 1
lcme_flags: init
lcme_extent.e_start: 0
lcme_extent.e_end: 1048576
lmm_stripe_count: 0
lmm_stripe_size: 1048576
lmm_pattern: mdt
lmm_layout_gen: 0
lmm_stripe_offset: 0
lmm_objects:
lcme_id: 2
lcme_flags: 0
lcme_extent.e_start: 1048576
lcme_extent.e_end: EOF
lmm_stripe_count: -1
lmm_stripe_size: 4194304
lmm_pattern: raid0
lmm_layout_gen: 65535
lmm_stripe_offset: -1The output above shows that the first component has size 1MB and
pattern is 'mdt'. The second component is not instantiated yet, which
is seen by lcme_flags: 0.
If more than 1MB of data is written to the file, then
lfs getstripe output is changed accordingly:
client$ lfs getstripe /mnt/lustre/domfile
/mnt/lustre/domfile
lcm_layout_gen: 3
lcm_mirror_count: 1
lcm_entry_count: 2
lcme_id: 1
lcme_flags: init
lcme_extent.e_start: 0
lcme_extent.e_end: 1048576
lmm_stripe_count: 0
lmm_stripe_size: 1048576
lmm_pattern: mdt
lmm_layout_gen: 0
lmm_stripe_offset: 2
lmm_objects:
lcme_id: 2
lcme_flags: init
lcme_extent.e_start: 1048576
lcme_extent.e_end: EOF
lmm_stripe_count: 2
lmm_stripe_size: 4194304
lmm_pattern: raid0
lmm_layout_gen: 0
lmm_stripe_offset: 0
lmm_objects:
- 0: { l_ost_idx: 0, l_fid: [0x100000000:0x2:0x0] }
- 1: { l_ost_idx: 1, l_fid: [0x100010000:0x2:0x0] }The output above shows that the second component now has objects on OSTs with a 4MB stripe.
A DoM layout can be set on an existing directory as well. When set, all the files created after that will inherit this layout by default.
lfs setstripe --component-end|-E end1 --layout|-L mdt \ [--component-end|-E end2 [STRIPE_OPTIONS] ...] <dirname>
client$ mkdir /mnt/lustre/domdir
client$ touch /mnt/lustre/domdir/normfile
client$ lfs setstripe -E 1M -L mdt -E -1 /mnt/lustre/domdir/
client$ lfs getstripe -d /mnt/lustre/domdir
lcm_layout_gen: 0
lcm_mirror_count: 1
lcm_entry_count: 2
lcme_id: N/A
lcme_flags: 0
lcme_extent.e_start: 0
lcme_extent.e_end: 1048576
stripe_count: 0 stripe_size: 1048576 \
pattern: mdt stripe_offset: -1
lcme_id: N/A
lcme_flags: 0
lcme_extent.e_start: 1048576
lcme_extent.e_end: EOF
stripe_count: 1 stripe_size: 1048576 \
pattern: raid0 stripe_offset: -1
In the output above, it can be seen that the directory has a default layout with a DoM component.
The following example will check layouts of files in that directory:
client$ touch /mnt/lustre/domdir/domfile
client$ lfs getstripe /mnt/lustre/domdir/normfile
/mnt/lustre/domdir/normfile
lmm_stripe_count: 2
lmm_stripe_size: 1048576
lmm_pattern: raid0
lmm_layout_gen: 0
lmm_stripe_offset: 1
obdidx objid objid group
1 3 0x3 0
0 3 0x3 0
client$ lfs getstripe /mnt/lustre/domdir/domfile
/mnt/lustre/domdir/domfile
lcm_layout_gen: 2
lcm_mirror_count: 1
lcm_entry_count: 2
lcme_id: 1
lcme_flags: init
lcme_extent.e_start: 0
lcme_extent.e_end: 1048576
lmm_stripe_count: 0
lmm_stripe_size: 1048576
lmm_pattern: mdt
lmm_layout_gen: 0
lmm_stripe_offset: 2
lmm_objects:
lcme_id: 2
lcme_flags: 0
lcme_extent.e_start: 1048576
lcme_extent.e_end: EOF
lmm_stripe_count: 1
lmm_stripe_size: 1048576
lmm_pattern: raid0
lmm_layout_gen: 65535
lmm_stripe_offset: -1We can see that first file normfile in that directory has an ordinary layout, whereas the file domfile inherits the directory default layout and is a DoM file.
Note
The directory default layout setting will be inherited by new files even if the server DoM size limit will be set to a lower value.
The maximum size of a DoM component is restricted in several ways to protect the MDT from being eventually filled with large files.
lfs setstripe allows for setting the
component size for MDT layouts up to 1GB (this is a compile-time
limit to avoid improper configuration), however, the size must
also be aligned by 64KB due to the minimum stripe size in Lustre
(see Table 5.2, “File and file system limits”
Minimum stripe size). There is also a limit
imposed on each file by lfs setstripe -E end
that may be smaller than the MDT-imposed limit if this is better
for a particular usage.
The lod.$fsname-MDTxxxx.dom_stripesize
is used to control the per-MDT maximum size for a DoM component.
Larger DoM components specified by the user will be truncated to
the MDT-specified limit, and as such may be different on each
MDT to balance DoM space usage on each MDT separately, if needed.
It is 1MB by default and can be changed with the
lctl tool. For more information on setting
dom_stripesize please see
Section 20.2.6, “
The dom_stripesize parameter”.
The lfs getstripe command is used to list
the striping/component information for a given file. For DoM files, it
can be used to check its layout and size.
lfs getstripe [--component-id|-I [comp_id]] [--layout|-L] \
[--stripe-size|-S] <dirname|filename>client$ lfs getstripe -I1 /mnt/lustre/domfile
/mnt/lustre/domfile
lcm_layout_gen: 3
lcm_mirror_count: 1
lcm_entry_count: 2
lcme_id: 1
lcme_flags: init
lcme_extent.e_start: 0
lcme_extent.e_end: 1048576
lmm_stripe_count: 0
lmm_stripe_size: 1048576
lmm_pattern: mdt
lmm_layout_gen: 0
lmm_stripe_offset: 2
lmm_objects:Short info about the layout and size of DoM component can
be obtained with the use of the -L option
along with -S or -E options:
client$ lfs getstripe -I1 -L -S /mnt/lustre/domfile
lmm_stripe_size: 1048576
lmm_pattern: mdt
client$ lfs getstripe -I1 -L -E /mnt/lustre/domfile
lcme_extent.e_end: 1048576
lmm_pattern: mdtBoth commands return layout type and its size. The stripe size is equal to the extent size of component in case of DoM files, so both can be used to get size on the MDT.
The lfs find command can be used to search
the directory tree rooted at the given directory or file name for the
files that match the given parameters. The command below shows the new
parameters for DoM files and their usages are similar to the
lfs getstripe command.
Find all files with DoM layout under directory
/mnt/lustre:
client$ lfs find -L mdt /mnt/lustre
/mnt/lustre/domfile
/mnt/lustre/domdir
/mnt/lustre/domdir/domfile
client$ lfs find -L mdt -type f /mnt/lustre
/mnt/lustre/domfile
/mnt/lustre/domdir/domfile
client$ lfs find -L mdt -type d /mnt/lustre
/mnt/lustre/domdirBy using this command you can find all DoM objects, only DoM files, or only directories with default DoM layout.
Find the DoM files/dirs with a particular stripe size:
client$ lfs find -L mdt -S -1200K -type f /mnt/lustre
/mnt/lustre/domfile
/mnt/lustre/domdir/domfile
client$ lfs find -L mdt -S +200K -type f /mnt/lustre
/mnt/lustre/domfile
/mnt/lustre/domdir/domfileThe first command finds all DoM files with stripe size less than 1200KB. The second command above does the same for files with a stripe size greater than 200KB. In both cases, all DoM files are found because their DoM size is 1MB.
The MDT controls the default maximum DoM size on the server via
the parameter dom_stripesize in the LOD device.
The dom_stripesize can be set differently for each
MDT, if necessary. The default value of the parameter is 1MB and can
be changed with lctl tool.
The commands below get the maximum allowed DoM size on the server. The final command is an attempt to create a file with a larger size than the parameter setting and correctly fails.
mds# lctl get_param lod.*MDT0000*.dom_stripesize lod.lustre-MDT0000-mdtlov.dom_stripesize=1048576 mds# lctl get_param -n lod.*MDT0000*.dom_stripesize 1048576 client$ lfs setstripe -E 2M -L mdt /mnt/lustre/dom2mb Create composite file /mnt/lustre/dom2mb failed. Invalid argument error: setstripe: create composite file '/mnt/lustre/dom2mb' failed: Invalid argument
To temporarily set the value of the parameter, the
lctl set_param is used:
lctl set_param lod.*MDT<index>*.dom_stripesize=<value>
The example below shows a change to the default DoM limit on the server to 64KB and try to create a file with 1MB DoM size after that.
mds# lctl set_param -n lod.*MDT0000*.dom_stripesize=64K mds# lctl get_param -n lod.*MDT0000*.dom_stripesize 65536 client$ lfs setstripe -E 1M -L mdt /mnt/lustre/dom Create composite file /mnt/lustre/dom failed. Invalid argument error: setstripe: create composite file '/mnt/lustre/dom' failed: Invalid argument
To persistently set the value of the parameter on a
specific MDT, the
lctl set_param -P command is used:
lctl set_param -P lod.fsname-MDTindex.dom_stripesize=value
This can also use a wildcard '*' for the
index to apply to all MDTs.
When lctl set_param (whether with
-P or not) sets
dom_stripesize to 0, DoM
component creation will be disabled on the specified server(s), and
any new layouts with a specified DoM component
will have that component removed from the file layout. Existing
files and layouts with DoM components on that MDT are not changed.
Note
DoM files can still be created in existing directories with a default DoM layout.
Table of Contents
This chapter describes Lazy Size on MDT (LSoM).
In the Lustre file system, MDSs store the ctime, mtime, owner, and other file attributes. The OSSs store the size and number of blocks used for each file. To obtain the correct file size, the client must contact each OST that the file is stored across, which means multiple RPCs to get the size and blocks for a file when a file is striped over multiple OSTs. The Lazy Size on MDT (LSoM) feature stores the file size on the MDS and avoids the need to fetch the file size from the OST(s) in cases where the application understands that the size may not be accurate. Lazy means there is no guarantee of the accuracy of the attributes stored on the MDS.
Since many Lustre installations use SSD for MDT storage, the
motivation for the LSoM work is to speed up the time it takes to get
the size of a file from the Lustre file system by storing that data on
the MDTs. We expect this feature to be initially used by Lustre policy
engines that scan the backend MDT storage, make decisions based on broad
size categories, and do not depend on a totally accurate file size.
Examples include Lester, Robinhood, Zester, and various vendor offerings.
Future improvements will allow the LSoM data to be accessed by tools such
as lfs find.
LSoM is always enabled and nothing needs to be done to enable the
feature for fetching the LSoM data when scanning the MDT inodes with a
policy engine. It is also possible to access the LSoM data on the client
via the lfs getsom command. Because the LSoM data is
currently accessed on the client via the xattr interface, the
xattr_cache will cache the file size and block count on
the client as long as the inode is cached. In most cases this is
desirable, since it improves access to the LSoM data. However, it also
means that the LSoM data may be stale if the file size is changed after the
xattr is first accessed or if the xattr is accessed shortly after the file
is first created.
If it is necessary to access up-to-date LSoM data that has gone
stale, it is possible to flush the xattr cache from the client by
cancelling the MDC locks via
lctl set_param ldlm.namespaces.*mdc*.lru_size=clear.
Otherwise, the file attributes will be dropped from the client cache if
the file has not been accessed before the LDLM lock timeout. The timeout
is stored via
lctl get_param ldlm.namespaces.*mdc*.lru_max_age.
If repeated access to LSoM attributes for files that are recently
created or frequently modified from a specific client, such as an HSM agent
node, it is possible to disable xattr caching on a client via:
lctl set_param llite.*.xattr_cache=0. This may cause
extra overhead when accessing files, and is not recommended for normal
usage.
Lustre provides the lfs getsom command to list
file attributes that are stored on the MDT.
The llsom_sync command allows the user to sync
the file attributes on the MDT with the valid/up-to-date data on the
OSTs. llsom_sync is called on the client with the
Lustre file system mount point. llsom_sync uses Lustre
MDS changelogs and, thus, a changelog user must be registered to use this
utility.
The lfs getsom command lists file attributes
that are stored on the MDT. lfs getsom is called
with the full path and file name for a file on the Lustre file
system. If no flags are used, then all file attributes stored on the
MDS will be shown.
lfs getsom [-s] [-b] [-f] <filename>
The various lfs getsom options are listed and
described below.
|
Option |
Description |
|---|---|
|
|
Only show the size value of the LSoM data for a given file. This is an optional flag |
|
|
Only show the blocks value of the LSoM data for a given file. This is an optional flag |
|
|
Only show the flag value of the LSoM data for a given file. This is an optional flag. Valid flags are: SOM_FL_UNKNOWN = 0x0000 - Unknown or no SoM data, must get size from OSTs. SOM_FL_STRICT = 0x0001 - Known strictly correct, FLR file (SoM guaranteed) SOM_FL_STALE = 0x0002 - Known stale -was right at some point in the past, but it is known (or likely) to be incorrect now (e.g. opened for write) SOM_FL_LAZY= 0x0004 - Approximate, may never have been strictly correct, need to sync SOM data to achieve eventual consistency. |
The llsom_sync command allows the user to sync
the file attributes on the MDT with the valid/up-to-date data on the
OSTs. llsom_sync is called on the client with the
client mount point for the Lustre file system.
llsom_sync uses Lustre MDS changelogs and, thus, a
changelog user must be registered to use this utility.
llsom_sync --mdt|-m <mdt> --user|-u <user_id>
[--daemonize|-d] [--verbose|-v] [--interval|-i] [--min-age|-a]
[--max-cache|-c] [--sync|-s] <lustre_mount_point>The various llsom_sync options are
listed and described below.
|
Option |
Description |
|---|---|
|
|
The metadata device which need to be synced the LSoM xattr of files. A changelog user must be registered for this device.Required flag. |
|
|
The changelog user id for the MDT device. Required flag. |
|
|
Optional flag to run the program in the background. In daemon mode, the utility will scan and process the changelog records and sync the LSoM xattr for files periodically. |
|
|
Optional flag to produce verbose output. |
|
|
Optional flag for the time interval to scan the Lustre changelog and process the log record in daemon mode. |
|
|
Optional flag for the time that
|
|
|
Optional flag for the total memory used for the FID cache which can be with a suffix [KkGgMm].The default max-cache value is 256MB. For the parameter value < 100, it is taken as the percentage of total memory size used for the FID cache instead of the cache size. |
|
|
Optional flag to sync file data to make the dirty data out of cache to ensure the blocks count is correct when update the file LSoM xattr. This option could hurt server performance significantly if thousands of fsync requests are sent. |
Table of Contents
This chapter describes File Level Redundancy (FLR).
The Lustre file system was initially designed and implemented for HPC use. It has been working well on high-end storage that has internal redundancy and fault-tolerance. However, despite the expense and complexity of these storage systems, storage failures still occur, and before release 2.11, Lustre could not be more reliable than the individual storage and server components on which it was based. The Lustre file system had no mechanism to mitigate storage hardware failures and files would become inaccessible if a server was inaccessible or otherwise out of service.
With the File Level Redundancy (FLR) feature introduced in Lustre Release 2.11, any Lustre file can store the same data on multiple OSTs in order for the system to be robust in the event of storage failures or other outages. With the choice of multiple mirrors, the best suited mirror can be chosen to satisfy an individual request, which has a direct impact on IO availability. Furthermore, for files that are concurrently read by many clients (e.g. input decks, shared libraries, or executables) the aggregate parallel read performance of a single file can be improved by creating multiple mirrors of the file data.
The first phase of the FLR feature has been implemented with delayed write (Figure 22.1, “FLR Delayed Write”). While writing to a mirrored file, only one primary or preferred mirror will be updated directly during the write, while other mirrors will be simply marked as stale. The file can subsequently return to a mirrored state again by synchronizing among mirrors with command line tools (run by the user or administrator directly or via automated monitoring tools).
Lustre provides lfs mirror command line tools for
users to operate on mirrored files or directories.
Command:
lfs mirror create <--mirror-count|-N[mirror_count] [setstripe_options|[--flags<=flags>]]> ... <filename|directory>
The above command will create a mirrored file or directory specified
by filename or
directory, respectively.
| Option | Description |
|---|---|
| --mirror-count|-N[mirror_count] |
Indicates the number of mirrors to be created with the following setstripe options. It can be repeated multiple times to separate mirrors that have different layouts. The |
| setstripe_options |
Specifies a specific layout for the mirror. It can be a
plain layout with a specific striping pattern or a composite
layout, such as Section 19.5, “Progressive File Layout(PFL)”. The options are
the same as those for the If |
| --flags<=flags> |
Sets flags to the mirror to be created. Only the Note: This flag will
be set to all components that belong to the corresponding
mirror. The |
Note: For redundancy and fault-tolerance, users need to make sure that different mirrors must be on different OSTs, even OSSs and racks. An understanding of cluster topology is necessary to achieve this architecture. In the initial implementation the use of the existing OST pools mechanism will allow separating OSTs by any arbitrary criteria: i.e. fault domain. In practice, users can take advantage of OST pools by grouping OSTs by topological information. Therefore, when creating a mirrored file, users can indicate which OST pools can be used by mirrors.
Examples:
The following command creates a mirrored file with 2 plain layout mirrors:
client# lfs mirror create -N -S 4M -c 2 -p flash \
-N -c -1 -p archive /mnt/testfs/file1The following command displays the layout information of the
mirrored file /mnt/testfs/file1:
client# lfs getstripe /mnt/testfs/file1
/mnt/testfs/file1
lcm_layout_gen: 2
lcm_mirror_count: 2
lcm_entry_count: 2
lcme_id: 65537
lcme_mirror_id: 1
lcme_flags: init
lcme_extent.e_start: 0
lcme_extent.e_end: EOF
lmm_stripe_count: 2
lmm_stripe_size: 4194304
lmm_pattern: raid0
lmm_layout_gen: 0
lmm_stripe_offset: 1
lmm_pool: flash
lmm_objects:
- 0: { l_ost_idx: 1, l_fid: [0x100010000:0x2:0x0] }
- 1: { l_ost_idx: 0, l_fid: [0x100000000:0x2:0x0] }
lcme_id: 131074
lcme_mirror_id: 2
lcme_flags: init
lcme_extent.e_start: 0
lcme_extent.e_end: EOF
lmm_stripe_count: 6
lmm_stripe_size: 4194304
lmm_pattern: raid0
lmm_layout_gen: 0
lmm_stripe_offset: 3
lmm_pool: archive
lmm_objects:
- 0: { l_ost_idx: 3, l_fid: [0x100030000:0x2:0x0] }
- 1: { l_ost_idx: 4, l_fid: [0x100040000:0x2:0x0] }
- 2: { l_ost_idx: 5, l_fid: [0x100050000:0x2:0x0] }
- 3: { l_ost_idx: 6, l_fid: [0x100060000:0x2:0x0] }
- 4: { l_ost_idx: 7, l_fid: [0x100070000:0x2:0x0] }
- 5: { l_ost_idx: 2, l_fid: [0x100020000:0x2:0x0] } The first mirror has 4MB stripe size and two stripes across OSTs in
the flash OST pool.
The second mirror has 4MB stripe size inherited from the first mirror,
and stripes across all of the available OSTs in the
archive OST pool.
As mentioned above, it is recommended to use the
--pool|-p option (one of the
lfs setstripe options) with OST pools configured with
independent fault domains to ensure different mirrors will be placed on
different OSTs, servers, and/or racks, thereby improving availability
and performance. If the setstripe options are not specified, it is
possible to create mirrors with objects on the same OST(s), which would
remove most of the benefit of using replication.
In the layout information printed by lfs getstripe,
lcme_mirror_id shows mirror ID, which is the unique
numerical identifier for a mirror. And lcme_flags shows
mirrored component flags. Valid flag names are:
init- indicates mirrored component has been initialized (has allocated OST objects).stale- indicates mirrored component does not have up-to-date data. Stale components will not be used for read or write operations, and need to be resynchronized by runninglfs mirror resynccommand before they can be accessed again.prefer- indicates mirrored component is preferred for read or write. For example, the mirror is located on SSD-based OSTs or is closer, fewer hops, on the network to the client. This flag can be set by users at mirror creation time.
The following command creates a mirrored file with 3 PFL mirrors:
client# lfs mirror create -N -E 4M -p flash --flags=prefer -E eof -c 2 \ -N -E 16M -S 8M -c 4 -p archive -E eof -c -1 \ -N -E 32M -c 1 -p archive2 -E eof -c -1 /mnt/testfs/file2
The following command displays the layout information of the
mirrored file /mnt/testfs/file2:
client# lfs getstripe /mnt/testfs/file2
/mnt/testfs/file2
lcm_layout_gen: 6
lcm_mirror_count: 3
lcm_entry_count: 6
lcme_id: 65537
lcme_mirror_id: 1
lcme_flags: init,prefer
lcme_extent.e_start: 0
lcme_extent.e_end: 4194304
lmm_stripe_count: 1
lmm_stripe_size: 1048576
lmm_pattern: raid0
lmm_layout_gen: 0
lmm_stripe_offset: 1
lmm_pool: flash
lmm_objects:
- 0: { l_ost_idx: 1, l_fid: [0x100010000:0x3:0x0] }
lcme_id: 65538
lcme_mirror_id: 1
lcme_flags: prefer
lcme_extent.e_start: 4194304
lcme_extent.e_end: EOF
lmm_stripe_count: 2
lmm_stripe_size: 1048576
lmm_pattern: raid0
lmm_layout_gen: 0
lmm_stripe_offset: -1
lmm_pool: flash
lcme_id: 131075
lcme_mirror_id: 2
lcme_flags: init
lcme_extent.e_start: 0
lcme_extent.e_end: 16777216
lmm_stripe_count: 4
lmm_stripe_size: 8388608
lmm_pattern: raid0
lmm_layout_gen: 0
lmm_stripe_offset: 4
lmm_pool: archive
lmm_objects:
- 0: { l_ost_idx: 4, l_fid: [0x100040000:0x3:0x0] }
- 1: { l_ost_idx: 5, l_fid: [0x100050000:0x3:0x0] }
- 2: { l_ost_idx: 6, l_fid: [0x100060000:0x3:0x0] }
- 3: { l_ost_idx: 7, l_fid: [0x100070000:0x3:0x0] }
lcme_id: 131076
lcme_mirror_id: 2
lcme_flags: 0
lcme_extent.e_start: 16777216
lcme_extent.e_end: EOF
lmm_stripe_count: 6
lmm_stripe_size: 8388608
lmm_pattern: raid0
lmm_layout_gen: 0
lmm_stripe_offset: -1
lmm_pool: archive
lcme_id: 196613
lcme_mirror_id: 3
lcme_flags: init
lcme_extent.e_start: 0
lcme_extent.e_end: 33554432
lmm_stripe_count: 1
lmm_stripe_size: 8388608
lmm_pattern: raid0
lmm_layout_gen: 0
lmm_stripe_offset: 0
lmm_pool: archive2
lmm_objects:
- 0: { l_ost_idx: 8, l_fid: [0x3400000000:0x3:0x0] }
lcme_id: 196614
lcme_mirror_id: 3
lcme_flags: 0
lcme_extent.e_start: 33554432
lcme_extent.e_end: EOF
lmm_stripe_count: -1
lmm_stripe_size: 8388608
lmm_pattern: raid0
lmm_layout_gen: 0
lmm_stripe_offset: -1
lmm_pool: archive2
For the first mirror, the first component inherits the stripe count
and stripe size from filesystem-wide default values. The second
component inherits the stripe size and OST pool from the first
component, and has two stripes. Both of the components are allocated
from the flash OST pool.
Also, the flag prefer is
applied to all the components of the first mirror, which tells the
client to read data from those components whenever they are available.
For the second mirror, the first component has an 8MB stripe size
and 4 stripes across OSTs in the archive OST pool.
The second component inherits the stripe size and OST pool from the
first component, and stripes across all of the available OSTs in the
archive OST pool.
For the third mirror, the first component inherits the stripe size
of 8MB from the last component of the second mirror, and has one single
stripe. The OST pool name is set to archive2.
The second component inherits stripe size from the first component,
and stripes across all of the available OSTs in that pool.
Command:
lfs mirror extend [--no-verify] <--mirror-count|-N[mirror_count] [setstripe_options|-f <victim_file>]> ... <filename>
The above command will append mirror(s) indicated by
setstripe options or just take the layout from
existing file victim_file into the file
filename. The
filename must be an existing file, however,
it can be a mirrored or regular non-mirrored file. If it is a
non-mirrored file, the command will convert it to a mirrored file.
| Option | Description |
|---|---|
| --mirror-count|-N[mirror_count] |
Indicates the number of mirrors to be added with the
following The |
| setstripe_options |
Specifies a specific layout for the mirror. It can be a
plain layout with specific striping pattern or a composite
layout, such as Section 19.5, “Progressive File Layout(PFL)”. The options are the
same as those for the If |
| -f <victim_file> |
If Note: The
|
| --no-verify | If victim_file is specified, the
command will verify that the file contents from
victim_file are the same as
filename. Otherwise, the command
will return a failure. However, the option
--no-verify can be used to override this
verification. This option can save significant time on file
comparison if the file size is large, but use it only when the
file contents are known to be the same. |
Note: The
lfs mirror extend operation won't be applied to the
directory.
Examples:
The following commands create a non-mirrored file, convert it to a mirrored file, and extend it with a plain layout mirror:
# lfs setstripe -p flash /mnt/testfs/file1
# lfs getstripe /mnt/testfs/file1
/mnt/testfs/file1
lmm_stripe_count: 1
lmm_stripe_size: 1048576
lmm_pattern: raid0
lmm_layout_gen: 0
lmm_stripe_offset: 0
lmm_pool: flash
obdidx objid objid group
0 4 0x4 0
# lfs mirror extend -N -S 8M -c -1 -p archive /mnt/testfs/file1
# lfs getstripe /mnt/testfs/file1
/mnt/testfs/file1
lcm_layout_gen: 2
lcm_mirror_count: 2
lcm_entry_count: 2
lcme_id: 65537
lcme_mirror_id: 1
lcme_flags: init
lcme_extent.e_start: 0
lcme_extent.e_end: EOF
lmm_stripe_count: 1
lmm_stripe_size: 1048576
lmm_pattern: raid0
lmm_layout_gen: 0
lmm_stripe_offset: 0
lmm_pool: flash
lmm_objects:
- 0: { l_ost_idx: 0, l_fid: [0x100000000:0x4:0x0] }
lcme_id: 131073
lcme_mirror_id: 2
lcme_flags: init
lcme_extent.e_start: 0
lcme_extent.e_end: EOF
lmm_stripe_count: 6
lmm_stripe_size: 8388608
lmm_pattern: raid0
lmm_layout_gen: 0
lmm_stripe_offset: 3
lmm_pool: archive
lmm_objects:
- 0: { l_ost_idx: 3, l_fid: [0x100030000:0x3:0x0] }
- 1: { l_ost_idx: 4, l_fid: [0x100040000:0x4:0x0] }
- 2: { l_ost_idx: 5, l_fid: [0x100050000:0x4:0x0] }
- 3: { l_ost_idx: 6, l_fid: [0x100060000:0x4:0x0] }
- 4: { l_ost_idx: 7, l_fid: [0x100070000:0x4:0x0] }
- 5: { l_ost_idx: 2, l_fid: [0x100020000:0x3:0x0] }The following commands split the PFL layout from a
victim_file and use it as a mirror added to
the mirrored file /mnt/testfs/file1 created in the
above example without data verification:
# lfs setstripe -E 16M -c 2 -p none \
-E eof -c -1 /mnt/testfs/victim_file
# lfs getstripe /mnt/testfs/victim_file
/mnt/testfs/victim_file
lcm_layout_gen: 2
lcm_mirror_count: 1
lcm_entry_count: 2
lcme_id: 1
lcme_mirror_id: 0
lcme_flags: init
lcme_extent.e_start: 0
lcme_extent.e_end: 16777216
lmm_stripe_count: 2
lmm_stripe_size: 1048576
lmm_pattern: raid0
lmm_layout_gen: 0
lmm_stripe_offset: 5
lmm_objects:
- 0: { l_ost_idx: 5, l_fid: [0x100050000:0x5:0x0] }
- 1: { l_ost_idx: 6, l_fid: [0x100060000:0x5:0x0] }
lcme_id: 2
lcme_mirror_id: 0
lcme_flags: 0
lcme_extent.e_start: 16777216
lcme_extent.e_end: EOF
lmm_stripe_count: -1
lmm_stripe_size: 1048576
lmm_pattern: raid0
lmm_layout_gen: 0
lmm_stripe_offset: -1
# lfs mirror extend --no-verify -N -f /mnt/testfs/victim_file \
/mnt/testfs/file1
# lfs getstripe /mnt/testfs/file1
/mnt/testfs/file1
lcm_layout_gen: 3
lcm_mirror_count: 3
lcm_entry_count: 4
lcme_id: 65537
lcme_mirror_id: 1
lcme_flags: init
lcme_extent.e_start: 0
lcme_extent.e_end: EOF
lmm_stripe_count: 1
lmm_stripe_size: 1048576
lmm_pattern: raid0
lmm_layout_gen: 0
lmm_stripe_offset: 0
lmm_pool: flash
lmm_objects:
- 0: { l_ost_idx: 0, l_fid: [0x100000000:0x4:0x0] }
lcme_id: 131073
lcme_mirror_id: 2
lcme_flags: init
lcme_extent.e_start: 0
lcme_extent.e_end: EOF
lmm_stripe_count: 6
lmm_stripe_size: 8388608
lmm_pattern: raid0
lmm_layout_gen: 0
lmm_stripe_offset: 3
lmm_pool: archive
lmm_objects:
- 0: { l_ost_idx: 3, l_fid: [0x100030000:0x3:0x0] }
- 1: { l_ost_idx: 4, l_fid: [0x100040000:0x4:0x0] }
- 2: { l_ost_idx: 5, l_fid: [0x100050000:0x4:0x0] }
- 3: { l_ost_idx: 6, l_fid: [0x100060000:0x4:0x0] }
- 4: { l_ost_idx: 7, l_fid: [0x100070000:0x4:0x0] }
- 5: { l_ost_idx: 2, l_fid: [0x100020000:0x3:0x0] }
lcme_id: 196609
lcme_mirror_id: 3
lcme_flags: init
lcme_extent.e_start: 0
lcme_extent.e_end: 16777216
lmm_stripe_count: 2
lmm_stripe_size: 1048576
lmm_pattern: raid0
lmm_layout_gen: 0
lmm_stripe_offset: 5
lmm_objects:
- 0: { l_ost_idx: 5, l_fid: [0x100050000:0x5:0x0] }
- 1: { l_ost_idx: 6, l_fid: [0x100060000:0x5:0x0] }
lcme_id: 196610
lcme_mirror_id: 3
lcme_flags: 0
lcme_extent.e_start: 16777216
lcme_extent.e_end: EOF
lmm_stripe_count: -1
lmm_stripe_size: 1048576
lmm_pattern: raid0
lmm_layout_gen: 0
lmm_stripe_offset: -1After extending, the victim_file was
removed:
# ls /mnt/testfs/victim_file ls: cannot access /mnt/testfs/victim_file: No such file or directory
Command:
lfs mirror split <--mirror-id <mirror_id>> [--destroy|-d] [-f <new_file>] <mirrored_file>
The above command will split a specified mirror with ID
<mirror_id> out of an existing mirrored
file specified by
mirrored_file. By default, a new file named
<mirrored_file>.mirror~<mirror_id> will
be created with the layout of the split mirror. If the
--destroy|-d option is specified, then the split
mirror will be destroyed. If the -f <new_file>
option is specified, then a file named
new_file will be created with the layout of
the split mirror. If mirrored_file has only
one mirror existing after split, it will be converted to a regular
non-mirrored file. If the original
mirrored_file is not a mirrored file, then
the command will return an error.
| Option | Description |
|---|---|
| --mirror-id <mirror_id> | The unique numerical identifier for a mirror. The mirror
ID is unique within a mirrored file and is automatically
assigned at file creation or extension time. It can be fetched
by the lfs getstripe command.
|
| --destroy|-d | Indicates the split mirror will be destroyed. |
| -f <new_file> | Indicates a file named new_file
will be created with the layout of the split mirror. |
Examples:
The following commands create a mirrored file with 4 mirrors, then split 3 mirrors separately from the mirrored file.
Creating a mirrored file with 4 mirrors:
# lfs mirror create -N2 -E 4M -p flash -E eof -c -1 \
-N2 -S 8M -c 2 -p archive /mnt/testfs/file1
# lfs getstripe /mnt/testfs/file1
/mnt/testfs/file1
lcm_layout_gen: 6
lcm_mirror_count: 4
lcm_entry_count: 6
lcme_id: 65537
lcme_mirror_id: 1
lcme_flags: init
lcme_extent.e_start: 0
lcme_extent.e_end: 4194304
lmm_stripe_count: 1
lmm_stripe_size: 1048576
lmm_pattern: raid0
lmm_layout_gen: 0
lmm_stripe_offset: 1
lmm_pool: flash
lmm_objects:
- 0: { l_ost_idx: 1, l_fid: [0x100010000:0x4:0x0] }
lcme_id: 65538
lcme_mirror_id: 1
lcme_flags: 0
lcme_extent.e_start: 4194304
lcme_extent.e_end: EOF
lmm_stripe_count: 2
lmm_stripe_size: 1048576
lmm_pattern: raid0
lmm_layout_gen: 0
lmm_stripe_offset: -1
lmm_pool: flash
lcme_id: 131075
lcme_mirror_id: 2
lcme_flags: init
lcme_extent.e_start: 0
lcme_extent.e_end: 4194304
lmm_stripe_count: 1
lmm_stripe_size: 1048576
lmm_pattern: raid0
lmm_layout_gen: 0
lmm_stripe_offset: 0
lmm_pool: flash
lmm_objects:
- 0: { l_ost_idx: 0, l_fid: [0x100000000:0x5:0x0] }
lcme_id: 131076
lcme_mirror_id: 2
lcme_flags: 0
lcme_extent.e_start: 4194304
lcme_extent.e_end: EOF
lmm_stripe_count: 2
lmm_stripe_size: 1048576
lmm_pattern: raid0
lmm_layout_gen: 0
lmm_stripe_offset: -1
lmm_pool: flash
lcme_id: 196613
lcme_mirror_id: 3
lcme_flags: init
lcme_extent.e_start: 0
lcme_extent.e_end: EOF
lmm_stripe_count: 2
lmm_stripe_size: 8388608
lmm_pattern: raid0
lmm_layout_gen: 0
lmm_stripe_offset: 4
lmm_pool: archive
lmm_objects:
- 0: { l_ost_idx: 4, l_fid: [0x100040000:0x5:0x0] }
- 1: { l_ost_idx: 5, l_fid: [0x100050000:0x6:0x0] }
lcme_id: 262150
lcme_mirror_id: 4
lcme_flags: init
lcme_extent.e_start: 0
lcme_extent.e_end: EOF
lmm_stripe_count: 2
lmm_stripe_size: 8388608
lmm_pattern: raid0
lmm_layout_gen: 0
lmm_stripe_offset: 7
lmm_pool: archive
lmm_objects:
- 0: { l_ost_idx: 7, l_fid: [0x100070000:0x5:0x0] }
- 1: { l_ost_idx: 2, l_fid: [0x100020000:0x4:0x0] }Splitting the mirror with ID 1 from
/mnt/testfs/file1 and creating
/mnt/testfs/file1.mirror~1 with the layout of the
split mirror:
# lfs mirror split --mirror-id 1 /mnt/testfs/file1
# lfs getstripe /mnt/testfs/file1.mirror~1
/mnt/testfs/file1.mirror~1
lcm_layout_gen: 1
lcm_mirror_count: 1
lcm_entry_count: 2
lcme_id: 65537
lcme_mirror_id: 1
lcme_flags: init
lcme_extent.e_start: 0
lcme_extent.e_end: 4194304
lmm_stripe_count: 1
lmm_stripe_size: 1048576
lmm_pattern: raid0
lmm_layout_gen: 0
lmm_stripe_offset: 1
lmm_pool: flash
lmm_objects:
- 0: { l_ost_idx: 1, l_fid: [0x100010000:0x4:0x0] }
lcme_id: 65538
lcme_mirror_id: 1
lcme_flags: 0
lcme_extent.e_start: 4194304
lcme_extent.e_end: EOF
lmm_stripe_count: 2
lmm_stripe_size: 1048576
lmm_pattern: raid0
lmm_layout_gen: 0
lmm_stripe_offset: -1
lmm_pool: flashSplitting the mirror with ID 2 from
/mnt/testfs/file1 and destroying it:
# lfs mirror split --mirror-id 2 -d /mnt/testfs/file1
# lfs getstripe /mnt/testfs/file1
/mnt/testfs/file1
lcm_layout_gen: 8
lcm_mirror_count: 2
lcm_entry_count: 2
lcme_id: 196613
lcme_mirror_id: 3
lcme_flags: init
lcme_extent.e_start: 0
lcme_extent.e_end: EOF
lmm_stripe_count: 2
lmm_stripe_size: 8388608
lmm_pattern: raid0
lmm_layout_gen: 0
lmm_stripe_offset: 4
lmm_pool: archive
lmm_objects:
- 0: { l_ost_idx: 4, l_fid: [0x100040000:0x5:0x0] }
- 1: { l_ost_idx: 5, l_fid: [0x100050000:0x6:0x0] }
lcme_id: 262150
lcme_mirror_id: 4
lcme_flags: init
lcme_extent.e_start: 0
lcme_extent.e_end: EOF
lmm_stripe_count: 2
lmm_stripe_size: 8388608
lmm_pattern: raid0
lmm_layout_gen: 0
lmm_stripe_offset: 7
lmm_pool: archive
lmm_objects:
- 0: { l_ost_idx: 7, l_fid: [0x100070000:0x5:0x0] }
- 1: { l_ost_idx: 2, l_fid: [0x100020000:0x4:0x0] }Splitting the mirror with ID 3 from
/mnt/testfs/file1 and creating
/mnt/testfs/file2 with the layout of the split
mirror:
# lfs mirror split --mirror-id 3 -f /mnt/testfs/file2 \
/mnt/testfs/file1
# lfs getstripe /mnt/testfs/file2
/mnt/testfs/file2
lcm_layout_gen: 1
lcm_mirror_count: 1
lcm_entry_count: 1
lcme_id: 196613
lcme_mirror_id: 3
lcme_flags: init
lcme_extent.e_start: 0
lcme_extent.e_end: EOF
lmm_stripe_count: 2
lmm_stripe_size: 8388608
lmm_pattern: raid0
lmm_layout_gen: 0
lmm_stripe_offset: 4
lmm_pool: archive
lmm_objects:
- 0: { l_ost_idx: 4, l_fid: [0x100040000:0x5:0x0] }
- 1: { l_ost_idx: 5, l_fid: [0x100050000:0x6:0x0] }
# lfs getstripe /mnt/testfs/file1
/mnt/testfs/file1
lcm_layout_gen: 9
lcm_mirror_count: 1
lcm_entry_count: 1
lcme_id: 262150
lcme_mirror_id: 4
lcme_flags: init
lcme_extent.e_start: 0
lcme_extent.e_end: EOF
lmm_stripe_count: 2
lmm_stripe_size: 8388608
lmm_pattern: raid0
lmm_layout_gen: 0
lmm_stripe_offset: 7
lmm_pool: archive
lmm_objects:
- 0: { l_ost_idx: 7, l_fid: [0x100070000:0x5:0x0] }
- 1: { l_ost_idx: 2, l_fid: [0x100020000:0x4:0x0] }The above layout information showed that mirrors with ID
1, 2, and 3 were all split from the mirrored file
/mnt/testfs/file1.
Command:
lfs mirror resync [--only <mirror_id[,...]>] <mirrored_file> [<mirrored_file2>...]
The above command will resynchronize out-of-sync mirrored file(s)
specified by mirrored_file. It
supports specifying multiple mirrored files in one command line.
If there is no stale mirror for the specified mirrored file(s), then
the command does nothing. Otherwise, it will copy data from synced
mirror to the stale mirror(s), and mark all successfully copied
mirror(s) as SYNC. If the
--only <mirror_id[,...]> option is specified,
then the command will only resynchronize the mirror(s) specified by the
mirror_id(s). This option cannot be used when
multiple mirrored files are specified.
| Option | Description |
|---|---|
| --only <mirror_id[,...]> | Indicates which mirror(s) specified by
mirror_id(s) needs to be
resynchronized. The mirror_id is the
unique numerical identifier for a mirror. Multiple
mirror_ids are separated by comma.
This option cannot be used when multiple mirrored files are
specified. |
Note: With delayed write
implemented in FLR phase 1, after writing to a mirrored file, users
need to run lfs mirror resync command to get all
mirrors synchronized.
Examples:
The following commands create a mirrored file with 3 mirrors, then write some data into the file and resynchronizes stale mirrors.
Creating a mirrored file with 3 mirrors:
# lfs mirror create -N -E 4M -p flash -E eof \
-N2 -p archive /mnt/testfs/file1
# lfs getstripe /mnt/testfs/file1
/mnt/testfs/file1
lcm_layout_gen: 4
lcm_mirror_count: 3
lcm_entry_count: 4
lcme_id: 65537
lcme_mirror_id: 1
lcme_flags: init
lcme_extent.e_start: 0
lcme_extent.e_end: 4194304
lmm_stripe_count: 1
lmm_stripe_size: 1048576
lmm_pattern: raid0
lmm_layout_gen: 0
lmm_stripe_offset: 1
lmm_pool: flash
lmm_objects:
- 0: { l_ost_idx: 1, l_fid: [0x100010000:0x5:0x0] }
lcme_id: 65538
lcme_mirror_id: 1
lcme_flags: 0
lcme_extent.e_start: 4194304
lcme_extent.e_end: EOF
lmm_stripe_count: 1
lmm_stripe_size: 1048576
lmm_pattern: raid0
lmm_layout_gen: 0
lmm_stripe_offset: -1
lmm_pool: flash
lcme_id: 131075
lcme_mirror_id: 2
lcme_flags: init
lcme_extent.e_start: 0
lcme_extent.e_end: EOF
lmm_stripe_count: 1
lmm_stripe_size: 1048576
lmm_pattern: raid0
lmm_layout_gen: 0
lmm_stripe_offset: 3
lmm_pool: archive
lmm_objects:
- 0: { l_ost_idx: 3, l_fid: [0x100030000:0x4:0x0] }
lcme_id: 196612
lcme_mirror_id: 3
lcme_flags: init
lcme_extent.e_start: 0
lcme_extent.e_end: EOF
lmm_stripe_count: 1
lmm_stripe_size: 1048576
lmm_pattern: raid0
lmm_layout_gen: 0
lmm_stripe_offset: 4
lmm_pool: archive
lmm_objects:
- 0: { l_ost_idx: 4, l_fid: [0x100040000:0x6:0x0] }Writing some data into the mirrored file
/mnt/testfs/file1:
# yes | dd of=/mnt/testfs/file1 bs=1M count=2
2+0 records in
2+0 records out
2097152 bytes (2.1 MB) copied, 0.0320613 s, 65.4 MB/s
# lfs getstripe /mnt/testfs/file1
/mnt/testfs/file1
lcm_layout_gen: 5
lcm_mirror_count: 3
lcm_entry_count: 4
lcme_id: 65537
lcme_mirror_id: 1
lcme_flags: init
lcme_extent.e_start: 0
lcme_extent.e_end: 4194304
......
lcme_id: 65538
lcme_mirror_id: 1
lcme_flags: 0
lcme_extent.e_start: 4194304
lcme_extent.e_end: EOF
......
lcme_id: 131075
lcme_mirror_id: 2
lcme_flags: init,stale
lcme_extent.e_start: 0
lcme_extent.e_end: EOF
......
lcme_id: 196612
lcme_mirror_id: 3
lcme_flags: init,stale
lcme_extent.e_start: 0
lcme_extent.e_end: EOF
......
The above layout information showed that data were written into the
first component of mirror with ID 1, and mirrors with
ID 2 and 3 were marked with
stale flag.
Resynchronizing the stale mirror with ID 2 for
the mirrored file /mnt/testfs/file1:
# lfs mirror resync --only 2 /mnt/testfs/file1
# lfs getstripe /mnt/testfs/file1
/mnt/testfs/file1
lcm_layout_gen: 7
lcm_mirror_count: 3
lcm_entry_count: 4
lcme_id: 65537
lcme_mirror_id: 1
lcme_flags: init
lcme_extent.e_start: 0
lcme_extent.e_end: 4194304
......
lcme_id: 65538
lcme_mirror_id: 1
lcme_flags: 0
lcme_extent.e_start: 4194304
lcme_extent.e_end: EOF
......
lcme_id: 131075
lcme_mirror_id: 2
lcme_flags: init
lcme_extent.e_start: 0
lcme_extent.e_end: EOF
......
lcme_id: 196612
lcme_mirror_id: 3
lcme_flags: init,stale
lcme_extent.e_start: 0
lcme_extent.e_end: EOF
......
The above layout information showed that after resynchronizing, the
stale flag was removed from mirror with ID
2.
Resynchronizing all of the stale mirrors for the mirrored file
/mnt/testfs/file1:
# lfs mirror resync /mnt/testfs/file1
# lfs getstripe /mnt/testfs/file1
/mnt/testfs/file1
lcm_layout_gen: 9
lcm_mirror_count: 3
lcm_entry_count: 4
lcme_id: 65537
lcme_mirror_id: 1
lcme_flags: init
lcme_extent.e_start: 0
lcme_extent.e_end: 4194304
......
lcme_id: 65538
lcme_mirror_id: 1
lcme_flags: 0
lcme_extent.e_start: 4194304
lcme_extent.e_end: EOF
......
lcme_id: 131075
lcme_mirror_id: 2
lcme_flags: init
lcme_extent.e_start: 0
lcme_extent.e_end: EOF
......
lcme_id: 196612
lcme_mirror_id: 3
lcme_flags: init
lcme_extent.e_start: 0
lcme_extent.e_end: EOF
......
The above layout information showed that after resynchronizing, none of the mirrors were marked as stale.
Command:
lfs mirror verify [--only <mirror_id,mirror_id2[,...]>] [--verbose|-v] <mirrored_file> [<mirrored_file2> ...]
The above command will verify that each SYNC mirror (contains
up-to-date data) of a mirrored file, specified by
mirrored_file, has exactly the same data. It
supports specifying multiple mirrored files in one command line.
This is a scrub tool that should be run on regular basis to make
sure that mirrored files are not corrupted. The command won't repair the
file if it turns out to be corrupted. Usually, an administrator should
check the file content from each mirror and decide which one is correct
and then invoke lfs mirror resync to repair it
manually.
| Option | Description |
|---|---|
| --only <mirror_id,mirror_id2[,...]> | Indicates which mirrors specified by
Note: At least two |
| --verbose|-v | Indicates the command will print where the differences are if the data do not match. Otherwise, the command will just return an error in that case. This option can be repeated for multiple times to print more information. |
Note:
Mirror components that have stale or
offline flags will be skipped and not verified.
Examples:
The following command verifies that each mirror of a mirrored file contains exactly the same data:
# lfs mirror verify /mnt/testfs/file1
The following command has the -v option specified
to print where the differences are if the data does not match:
# lfs mirror verify -vvv /mnt/testfs/file2 Chunks to be verified in /mnt/testfs/file2: [0, 0x200000) [1, 2, 3, 4] 4 [0x200000, 0x400000) [1, 2, 3, 4] 4 [0x400000, 0x600000) [1, 2, 3, 4] 4 [0x600000, 0x800000) [1, 2, 3, 4] 4 [0x800000, 0xa00000) [1, 2, 3, 4] 4 [0xa00000, 0x1000000) [1, 2, 3, 4] 4 [0x1000000, 0xffffffffffffffff) [1, 2, 3, 4] 4 Verifying chunk [0, 0x200000) on mirror: 1 2 3 4 CRC-32 checksum value for chunk [0, 0x200000): Mirror 1: 0x207b02f1 Mirror 2: 0x207b02f1 Mirror 3: 0x207b02f1 Mirror 4: 0x207b02f1 Verifying chunk [0, 0x200000) on mirror: 1 2 3 4 PASS Verifying chunk [0x200000, 0x400000) on mirror: 1 2 3 4 CRC-32 checksum value for chunk [0x200000, 0x400000): Mirror 1: 0x207b02f1 Mirror 2: 0x207b02f1 Mirror 3: 0x207b02f1 Mirror 4: 0x207b02f1 Verifying chunk [0x200000, 0x400000) on mirror: 1 2 3 4 PASS Verifying chunk [0x400000, 0x600000) on mirror: 1 2 3 4 CRC-32 checksum value for chunk [0x400000, 0x600000): Mirror 1: 0x42571b66 Mirror 2: 0x42571b66 Mirror 3: 0x42571b66 Mirror 4: 0xabdaf92 lfs mirror verify: chunk [0x400000, 0x600000) has different checksum value on mirror 1 and mirror 4. Verifying chunk [0x600000, 0x800000) on mirror: 1 2 3 4 CRC-32 checksum value for chunk [0x600000, 0x800000): Mirror 1: 0x1f8ad0d8 Mirror 2: 0x1f8ad0d8 Mirror 3: 0x1f8ad0d8 Mirror 4: 0x18975bf9 lfs mirror verify: chunk [0x600000, 0x800000) has different checksum value on mirror 1 and mirror 4. Verifying chunk [0x800000, 0xa00000) on mirror: 1 2 3 4 CRC-32 checksum value for chunk [0x800000, 0xa00000): Mirror 1: 0x69c17478 Mirror 2: 0x69c17478 Mirror 3: 0x69c17478 Mirror 4: 0x69c17478 Verifying chunk [0x800000, 0xa00000) on mirror: 1 2 3 4 PASS lfs mirror verify: '/mnt/testfs/file2' chunk [0xa00000, 0x1000000] exceeds file size 0xa00000: skipped
The following command uses the --only option to
only verify the specified mirrors:
# lfs mirror verify -v --only 1,4 /mnt/testfs/file2 CRC-32 checksum value for chunk [0, 0x200000): Mirror 1: 0x207b02f1 Mirror 4: 0x207b02f1 CRC-32 checksum value for chunk [0x200000, 0x400000): Mirror 1: 0x207b02f1 Mirror 4: 0x207b02f1 CRC-32 checksum value for chunk [0x400000, 0x600000): Mirror 1: 0x42571b66 Mirror 4: 0xabdaf92 lfs mirror verify: chunk [0x400000, 0x600000) has different checksum value on mirror 1 and mirror 4. CRC-32 checksum value for chunk [0x600000, 0x800000): Mirror 1: 0x1f8ad0d8 Mirror 4: 0x18975bf9 lfs mirror verify: chunk [0x600000, 0x800000) has different checksum value on mirror 1 and mirror 4. CRC-32 checksum value for chunk [0x800000, 0xa00000): Mirror 1: 0x69c17478 Mirror 4: 0x69c17478 lfs mirror verify: '/mnt/testfs/file2' chunk [0xa00000, 0x1000000] exceeds file size 0xa00000: skipped
The lfs find command is used to list files and
directories with specific attributes. The following two attribute
parameters are specific to a mirrored file or directory:
lfs find <directory|filename ...>
[[!] --mirror-count|-N [+-]n]
[[!] --mirror-state <[^]state>]| Option | Description |
|---|---|
| --mirror-count|-N [+-]n | Indicates mirror count. |
| --mirror-state <[^]state> |
Indicates mirrored file state. If Valid state names are:
|
Note:
Specifying ! before an option negates its meaning
(files NOT matching the parameter). Using + before a
numeric value means 'more than n', while - before a
numeric value means 'less than n'. If neither is used, it means
'equal to n', within the bounds of the unit specified (if any).
Examples:
The following command recursively lists all mirrored files that have
more than 2 mirrors under directory /mnt/testfs:
# lfs find --mirror-count +2 --type f /mnt/testfs
The following command recursively lists all out-of-sync mirrored
files under directory /mnt/testfs:
# lfs find --mirror-state=^ro --type f /mnt/testfs
Introduced in Lustre release 2.11.0, the FLR feature is based on the Section 19.5, “Progressive File Layout(PFL)” feature introduced in Lustre 2.10.0
For Lustre release 2.9 and older clients, which do not understand the PFL layout, they cannot access and open mirrored files created in the Lustre 2.11 filesystem.
The following example shows the errors returned by accessing and opening a mirrored file (created in Lustre 2.11 filesystem) on a Lustre 2.9 client:
# ls /mnt/testfs/mirrored_file ls: cannot access /mnt/testfs/mirrored_file: Invalid argument # cat /mnt/testfs/mirrored_file cat: /mnt/testfs/mirrored_file: Operation not supported
For Lustre release 2.10 clients, which understand the PFL layout, but do not understand a mirrored layout, they can access mirrored files created in Lustre 2.11 filesystem, however, they cannot open them. This is because the Lustre 2.10 clients do not verify overlapping components so they would read and write mirrored files just as if they were normal PFL files, which will cause a problem where synced mirrors actually contain different data.
The following example shows the results returned by accessing and opening a mirrored file (created in Lustre 2.11 filesystem) on a Lustre 2.10 client:
# ls /mnt/testfs/mirrored_file /mnt/testfs/mirrored_file # cat /mnt/testfs/mirrored_file cat: /mnt/testfs/mirrored_file: Operation not supported
Table of Contents
Sometimes a Lustre file system becomes unbalanced, often due to incorrectly-specified stripe settings, or when very large files are created that are not striped over all of the OSTs. Lustre will automatically avoid allocating new files on OSTs that are full. If an OST is completely full and more data is written to files already located on that OST, an error occurs. The procedures below describe how to handle a full OST.
The MDS will normally handle space balancing automatically at file creation time, and this procedure is normally not needed, but manual data migration may be desirable in some cases (e.g. creating very large files that would consume more than the total free space of the full OSTs).
The example below shows an unbalanced file system:
client# lfs df -h UUID bytes Used Available \ Use% Mounted on testfs-MDT0000_UUID 4.4G 214.5M 3.9G \ 4% /mnt/testfs[MDT:0] testfs-OST0000_UUID 2.0G 751.3M 1.1G \ 37% /mnt/testfs[OST:0] testfs-OST0001_UUID 2.0G 755.3M 1.1G \ 37% /mnt/testfs[OST:1] testfs-OST0002_UUID 2.0G 1.7G 155.1M \ 86% /mnt/testfs[OST:2] **** testfs-OST0003_UUID 2.0G 751.3M 1.1G \ 37% /mnt/testfs[OST:3] testfs-OST0004_UUID 2.0G 747.3M 1.1G \ 37% /mnt/testfs[OST:4] testfs-OST0005_UUID 2.0G 743.3M 1.1G \ 36% /mnt/testfs[OST:5] filesystem summary: 11.8G 5.4G 5.8G \ 45% /mnt/testfs
In this case, OST0002 is almost full and when an attempt is made to write additional information to the file system (even with uniform striping over all the OSTs), the write command fails as follows:
client# lfs setstripe /mnt/testfs 4M 0 -1 client# dd if=/dev/zero of=/mnt/testfs/test_3 bs=10M count=100 dd: writing '/mnt/testfs/test_3': No space left on device 98+0 records in 97+0 records out 1017192448 bytes (1.0 GB) copied, 23.2411 seconds, 43.8 MB/s
To avoid running out of space in the file system, if the OST usage is imbalanced and one or more OSTs are close to being full while there are others that have a lot of space, the MDS will typically avoid file creation on the full OST(s) automatically. The full OSTs may optionally be deactivated manually on the MDS to ensure the MDS will not allocate new objects there.
Log into the MDS server and use the
lctlcommand to stop new object creation on the full OST(s):mds# lctl set_param osp.
fsname-OSTnnnn*.max_create_count=0
When new files are created in the file system, they will only use the remaining OSTs. Either manual space rebalancing can be done by migrating data to other OSTs, as shown in the next section, or normal file deletion and creation can passively rebalance the space usage.
If there is a need to move the file data from the current
OST(s) to new OST(s), the data must be migrated (copied)
to the new location. The simplest way to do this is to use the
lfs_migrate command, as described in
Section 14.8, “
Adding a New OST to a Lustre File System”.
Once the full OST(s) no longer are severely imbalanced, due to either active or passive data redistribution, they should be reactivated so they will again have new files allocated on them.
[mds]# lctl set_param osp.testfs-OST0002.max_create_count=20000
Lustre software version 2.8 includes a feature
to migrate metadata (directories and inodes therein) between MDTs.
This migration can only be performed on whole directories. Striped
directories are not supported until Lustre 2.12. For example, to
migrate the contents of the /testfs/remotedir
directory from the MDT where it currently is located to MDT0000 to
allow that MDT to be removed, the sequence of commands is as follows:
$ cd /testfs $ lfs getdirstripe -m ./remotedir which MDT is dir on? 1 $ touch ./remotedir/file.{1,2,3}.txtcreate test files $ lfs getstripe -m ./remotedir/file.*.txtcheck files are on MDT0001 1 1 1 $ lfs migrate -m 0 ./remotedir migrate testremote to MDT0000 $ lfs getdirstripe -m ./remotedir which MDT is dir on now? 0 $ lfs getstripe -m ./remotedir/file.*.txtcheck files are on MDT0000 0 0 0
For more information, see man lfs-migrate.
Warning
During migration each file receives a new identifier (FID). As a consequence, the file will report a new inode number to userspace applications. Some system tools (for example, backup and archiving tools, NFS, Samba) that identify files by inode number may consider the migrated files to be new, even though the contents are unchanged. If a Lustre system is re-exporting to NFS, the migrated files may become inaccessible during and after migration if the client or server are caching a stale file handle with the old FID. Restarting the NFS service will flush the local file handle cache, but clients may also need to be restarted as they may cache stale file handles as well.
Lustre 2.8 included a feature to migrate metadata (directories
and inodes therein) between MDTs, however it did not support migration
of striped directories, or changing the stripe count of an existing
directory. Lustre 2.12 adds support for migrating and restriping
directories. The lfs migrate -m command can only
only be performed on whole directories, though it will migrate both
the specified directory and its sub-entries recursively.
For example, to migrate the contents of a large directory
/testfs/largedir from its current location on
MDT0000 to MDT0001 and MDT0003, run the following command:
$ lfs migrate -m 1,3 /testfs/largedir
Metadata migration will migrate file dirent and inode to other
MDTs, but it won't touch file data. During migration, directory and
its sub-files can be accessed like normal ones, though the same
warning above applies to tools that depend on the file inode number.
Migration may fail for various reasons such as MDS restart, or disk
full. In those cases, some of the sub-files may have been migrated to
the new MDTs, while others are still on the original MDT. The files
can be accessed normally. The same lfs migrate -m
command should be executed again when these issues are fixed to finish
this migration. However, you cannot abort a failed migration, or
migrate to different MDTs from previous migration command.
Lustre 2.14 includs a feature to change the stripe count of an
existing directory. The lfs setdirstripe -c command
can be performed on an existing directory to change its stripe count.
For example, a directory /testfs/testdir is becoming
large, run the following command to increase its stripe count to
2:
$ lfs setdirstripe -c 2 /testfs/testdir
By default directory restriping will migrate sub-file dirents only, but it won't move inodes. To enable moving both dirents and inodes, run the following command on all MDS's:
mds$ lctl set_param mdt.*.dir_restripe_nsonly=0
It's not allowed to specify MDTs in directory restriping, instead server will pick MDTs for the added stripes by space and inode usages. During restriping, directory and its sub-files can be accessed like normal ones, which is the same as directory migration. Similarly you cannot abort a failed restriping, and server will resume the failed restriping automatically when it notices an unfinished restriping.
Lustre 2.14 includs a feature to automatically increase the stripe count of a directory when it becomes large. This can be enabled by the following command:
mds$ lctl set_param mdt.*.enable_dir_auto_split=1
The sub file count that triggers directory auto-split is 50k, and it can be changed by the following command:
mds$ lctl set_param mdt.*.dir_split_count=value
The directory stripe count will be increased from 0 to 4 if it's a plain directory, and from 4 to 8 upon the second split, and so on. However the final stripe count won't exceed total MDT count, and it will stop splitting when it's distributed among all MDTs. This delta value can be changed by the following command:
mds$ lctl set_param mdt.*.dir_split_delta=value
The OST pools feature enables users to group OSTs together to make object placement more flexible. A 'pool' is the name associated with an arbitrary subset of OSTs in a Lustre cluster.
OST pools follow these rules:
An OST can be a member of multiple pools.
No ordering of OSTs in a pool is defined or implied.
Stripe allocation within a pool follows the same rules as the normal stripe allocator.
OST membership in a pool is flexible, and can change over time.
When an OST pool is defined, it can be used to allocate files. When file or directory striping is set to a pool, only OSTs in the pool are candidates for striping. If a stripe_index is specified which refers to an OST that is not a member of the pool, an error is returned.
OST pools are used only at file creation. If the definition of a pool changes (an OST is added or removed or the pool is destroyed), already-created files are not affected.
Note
An error (
EINVAL) results if you create a file using an empty
pool.
Note
If a directory has pool striping set and the pool is subsequently removed, the new files created in this directory have the (non-pool) default striping pattern for that directory applied and no error is returned.
OST pools are defined in the configuration log on the MGS. Use the lctl command to:
Create/destroy a pool
Add/remove OSTs in a pool
List pools and OSTs in a specific pool
The lctl command MUST be run on the MGS. Another requirement for managing OST pools is to either have the MDT and MGS on the same node or have a Lustre client mounted on the MGS node, if it is separate from the MDS. This is needed to validate the pool commands being run are correct.
Caution
Running the
writeconf command on the MDS erases all pools
information (as well as any other parameters set using
lctl conf_param). We recommend that the pools
definitions (and
conf_param settings) be executed using a script, so
they can be reproduced easily after a
writeconf is performed.
To create a new pool, run:
mgs# lctl pool_newfsname.poolname
Note
The pool name is an ASCII string up to 15 characters.
To add the named OST to a pool, run:
mgs# lctl pool_addfsname.poolnameost_list
Where:
ost_listisfsname-OSTindex_rangeindex_rangeisost_index_start-ost_index_end[,index_range]ost_index_start-ost_index_end/step
If the leading
and/or ending
fsname
_UUID are missing, they are automatically added.
For example, to add even-numbered OSTs to
pool1 on file system
testfs, run a single command (
pool_add) to add many OSTs to the pool at one
time:
lctl pool_add testfs.pool1 OST[0-10/2]
Note
Each time an OST is added to a pool, a new
llog configuration record is created. For
convenience, you can run a single command.
To remove a named OST from a pool, run:
mgs# lctl pool_removefsname.poolnameost_list
To destroy a pool, run:
mgs# lctl pool_destroyfsname.poolname
Note
All OSTs must be removed from a pool before it can be destroyed.
To list pools in the named file system, run:
mgs# lctl pool_list
fsname|pathname
To list OSTs in a named pool, run:
lctl pool_listfsname.poolname
Several lfs commands can be run with OST pools. Use the
lfs setstripe command to associate a directory with
an OST pool. This causes all new regular files and directories in the
directory to be created in the pool. The lfs command can be used to
list pools in a file system and OSTs in a named pool.
To associate a directory with a pool, so all new files and directories will be created in the pool, run:
client# lfs setstripe --pool|-p pool_name
filename|dirname
To set striping patterns, run:
client# lfs setstripe [--size|-s stripe_size] [--offset|-o start_ost]
[--stripe-count|-c stripe_count] [--overstripe-count|-C stripe_count]
[--pool|-p pool_name]
dir|filename
Note
If you specify striping with an invalid pool name, because the
pool does not exist or the pool name was mistyped,
lfs setstripe returns an error. Run
lfs pool_list to make sure the pool exists and the
pool name is entered correctly.
Note
The
--pool option for lfs setstripe is compatible with
other modifiers. For example, you can set striping on a directory to
use an explicit starting index.
Note
There are several reserved pool keywords:
Use
--pool '' or --pool inheritto force a component to inherit the pool from the parent or root directory instead of the previous PFL's component (see Section 19.5, “Progressive File Layout(PFL)”).Use
--pool ignoreto force creation of a file or a PFL's component without a pool set (no inheritance from last component, root or parent).
Here are several suggestions for using OST pools.
A directory or file can be given an extended attribute (EA), that restricts striping to a pool.
Pools can be used to group OSTs with the same technology or performance (slower or faster), or that are preferred for certain jobs. Examples are SATA OSTs versus SAS OSTs or remote OSTs versus local OSTs.
A file created in an OST pool tracks the pool by keeping the pool name in the file LOV EA.
To add an OST to existing Lustre file system:
Add a new OST by passing on the following commands, run:
oss# mkfs.lustre --fsname=testfs --mgsnode=mds16@tcp0 --ost --index=12 /dev/sda
oss# mkdir -p /mnt/testfs/ost12
oss# mount -t lustre /dev/sda /mnt/testfs/ost12
Migrate the data (possibly).
The file system is quite unbalanced when new empty OSTs are added. New file creations are automatically balanced. If this is a scratch file system or files are pruned at a regular interval, then no further work may be needed. Files existing prior to the expansion can be rebalanced with an in-place copy, which can be done with a simple script.
The basic method is to copy existing files to a temporary file, then move the temp file over the old one. This should not be attempted with files which are currently being written to by users or applications. This operation redistributes the stripes over the entire set of OSTs.
A very clever migration script would do the following:
Examine the current distribution of data.
Calculate how much data should move from each full OST to the empty ones.
Search for files on a given full OST (using
lfs getstripe).Force the new destination OST (using
lfs setstripe).Copy only enough files to address the imbalance.
If a Lustre file system administrator wants to explore this approach
further, per-OST disk-usage statistics can be found in the
osc.*.rpc_stats parameter file.
The Lustre software supports the
O_DIRECT flag to open.
Applications using the
read() and
write() calls must supply buffers aligned on a page
boundary (usually 4 K). If the alignment is not correct, the call returns
-EINVAL. Direct I/O may help performance in cases where
the client is doing a large amount of I/O and is CPU-bound (CPU utilization
100%).
This section describes other I/O options, including checksums, and the ptlrpcd thread pool.
To guard against network data corruption, a Lustre client can
perform two types of data checksums: in-memory (for data in client
memory) and wire (for data sent over the network). For each checksum
type, a 32-bit checksum of the data read or written on both the client
and server is computed, to ensure that the data has not been corrupted in
transit over the network. The
ldiskfs backing file system does NOT do any persistent
checksumming, so it does not detect corruption of data in the OST file
system.
The checksumming feature is enabled, by default, on individual client nodes. If the client or OST detects a checksum mismatch, then an error is logged in the syslog of the form:
LustreError: BAD WRITE CHECKSUM: changed in transit before arrival at OST: \ from 192.168.1.1@tcp inum 8991479/2386814769 object 1127239/0 extent [10240\ 0-106495]
If this happens, the client will re-read or re-write the affected data up to five times to get a good copy of the data over the network. If it is still not possible, then an I/O error is returned to the application.
To enable both types of checksums (in-memory and wire), run:
lctl set_param llite.*.checksum_pages=1
To disable both types of checksums (in-memory and wire), run:
lctl set_param llite.*.checksum_pages=0
To check the status of a wire checksum, run:
lctl get_param osc.*.checksums
By default, the Lustre software uses the adler32 checksum
algorithm, because it is robust and has a lower impact on performance
than crc32. The Lustre file system administrator can change the
checksum algorithm via
lctl get_param, depending on what is supported in
the kernel.
To check which checksum algorithm is being used by the Lustre software, run:
$ lctl get_param osc.*.checksum_type
To change the wire checksum algorithm, run:
$ lctl set_param osc.*.checksum_type=
algorithm
Note
The in-memory checksum always uses the adler32 algorithm, if available, and only falls back to crc32 if adler32 cannot be used.
In the following example, the
lctl get_param command is used to determine that the
Lustre software is using the adler32 checksum algorithm. Then the
lctl set_param command is used to change the checksum
algorithm to crc32. A second
lctl get_param command confirms that the crc32
checksum algorithm is now in use.
$ lctl get_param osc.*.checksum_type osc.testfs-OST0000-osc-ffff81012b2c48e0.checksum_type=crc32 [adler] $ lctl set_param osc.*.checksum_type=crc32 osc.testfs-OST0000-osc-ffff81012b2c48e0.checksum_type=crc32 $ lctl get_param osc.*.checksum_type osc.testfs-OST0000-osc-ffff81012b2c48e0.checksum_type=[crc32] adler
The use of large SMP nodes for Lustre clients requires significant parallelism within the kernel to avoid cases where a single CPU would be 100% utilized and other CPUs would be relativity idle. This is especially noticeable when a single thread traverses a large directory.
The Lustre client implements a PtlRPC daemon thread pool, so that multiple threads can be created to serve asynchronous RPC requests, even if only a single userspace thread is running. The number of ptlrpcd threads spawned is controlled at module load time using module options. By default two service threads are spawned per CPU socket.
One of the issues with thread operations is the cost of moving a thread context from one CPU to another with the resulting loss of CPU cache warmth. To reduce this cost, PtlRPC threads can be bound to a CPU. However, if the CPUs are busy, a bound thread may not be able to respond quickly, as the bound CPU may be busy with other tasks and the thread must wait to schedule.
Because of these considerations, the pool of ptlrpcd threads can be a mixture of bound and unbound threads. The system operator can balance the thread mixture based on system size and workload.
These parameters should be set in
/etc/modprobe.conf or in the
etc/modprobe.d directory, as options for the ptlrpc
module.
options ptlrpcd ptlrpcd_per_cpt_max=XXX
Sets the number of ptlrpcd threads created per socket. The default if not specified is two threads per CPU socket, including hyper-threaded CPUs. The lower bound is 2 threads per socket.
options ptlrpcd ptlrpcd_bind_policy=[1-4]
Controls the binding of threads to CPUs. There are four policy options.
PDB_POLICY_NONE(ptlrpcd_bind_policy=1) All threads are unbound.PDB_POLICY_FULL(ptlrpcd_bind_policy=2) All threads attempt to bind to a CPU.PDB_POLICY_PAIR(ptlrpcd_bind_policy=3) This is the default policy. Threads are allocated as a bound/unbound pair. Each thread (bound or free) has a partner thread. The partnering is used by the ptlrpcd load policy, which determines how threads are allocated to CPUs.PDB_POLICY_NEIGHBOR(ptlrpcd_bind_policy=4) Threads are allocated as a bound/unbound pair. Each thread (bound or free) has two partner threads.
Table of Contents
This chapter describes the multiple-mount protection (MMP) feature, which protects the file system from being mounted simultaneously to more than one node. It includes the following sections:
Note
For information about configuring a Lustre file system for failover, see Chapter 11, Configuring Failover in a Lustre File System
The multiple-mount protection (MMP) feature protects the Lustre file system from being mounted simultaneously to more than one node. This feature is important in a shared storage environment (for example, when a failover pair of OSSs share a LUN).
The backend file system, ldiskfs, supports the MMP mechanism. A block
in the file system is updated by a kmmpd daemon at one second intervals,
and a sequence number is written in this block. If the file system is cleanly unmounted, then
a special "clean" sequence is written to this block. When mounting the file system,
ldiskfs checks if the MMP block has a clean sequence or not.
Even if the MMP block has a clean sequence, ldiskfs waits for some interval to guard against the following situations:
If I/O traffic is heavy, it may take longer for the MMP block to be updated.
If another node is trying to mount the same file system, a "race" condition may occur.
With MMP enabled, mounting a clean file system takes at least 10 seconds. If the file system was not cleanly unmounted, then the file system mount may require additional time.
Note
The MMP feature is only supported on Linux kernel versions newer than 2.6.9.
On a new Lustre file system, MMP is automatically enabled by
mkfs.lustre at format time if failover is being used and the kernel and
e2fsprogs version support it. On an existing file system, a Lustre file
system administrator can manually enable MMP when the file system is unmounted.
Use the following commands to determine whether MMP is running in the Lustre file system and to enable or disable the MMP feature.
To determine if MMP is enabled, run:
dumpe2fs -h /dev/block_device | grep mmpHere is a sample command:
dumpe2fs -h /dev/sdc | grep mmp Filesystem features: has_journal ext_attr resize_inode dir_index filetype extent mmp sparse_super large_file uninit_bg
To manually disable MMP, run:
tune2fs -O ^mmp /dev/block_deviceTo manually enable MMP, run:
tune2fs -O mmp /dev/block_deviceWhen MMP is enabled, if ldiskfs detects multiple mount attempts after
the file system is mounted, it blocks these later mount attempts and reports the time when the
MMP block was last updated, the node name, and the device name of the node where the file
system is currently mounted.
Table of Contents
Quotas allow a system administrator to limit the amount of disk space a user, group, or project can use. Quotas are set by root, and can be specified for individual users, groups, and/or projects. Before a file is written to a partition where quotas are set, the quota of the creator's group is checked. If a quota exists, then the file size counts towards the group's quota. If no quota exists, then the owner's user quota is checked before the file is written. Similarly, inode usage for specific functions can be controlled if a user over-uses the allocated space.
Lustre quota enforcement differs from standard Linux quota enforcement in several ways:
Quotas are administered via the
lfsandlctlcommands (post-mount).The quota feature in Lustre software is distributed throughout the system (as the Lustre file system is a distributed file system). Because of this, quota setup and behavior on Lustre is somewhat different from local disk quotas in the following ways:
No single point of administration: some commands must be executed on the MGS, other commands on the MDSs and OSSs, and still other commands on the client.
Granularity: a local quota is typically specified for kilobyte resolution, Lustre uses one megabyte as the smallest quota resolution.
Accuracy: quota information is distributed throughout the file system and can only be accurately calculated with a quiescent file system in order to minimize performance overhead during normal use.
Quotas are allocated and consumed in a quantized fashion.
Client does not set the
usrquotaorgrpquotaoptions to mount. Space accounting is enabled by default and quota enforcement can be enabled/disabled on a per-filesystem basis withlctl set_param -P.
Caution
Although a quota feature is available in the Lustre software, root quotas are NOT enforced.
lfs setquota -u root (limits are not enforced)
lfs quota -u root (usage includes internal Lustre data
that is dynamic in size and does not accurately reflect mount point
visible block and inode usage).
The design of quotas on Lustre has management and enforcement separated from resource usage and accounting. Lustre software is responsible for management and enforcement. The back-end file system is responsible for resource usage and accounting. Because of this, it is necessary to begin enabling quotas by enabling quotas on the back-end disk system.
Caution
Quota setup is orchestrated by the MGS and all setup commands in this section must be run directly on the MGS. Support for project quotas specifically requires Lustre Release 2.10 or later. A patched server may be required, depending on the kernel version and backend filesystem type:
|
Configuration |
Patched Server Required? |
|---|---|
ldiskfs with kernel version < 4.5 | Yes |
ldiskfs with kernel version >= 4.5 | No |
zfs version >=0.8 with kernel version < 4.5 | Yes |
zfs version >=0.8 with kernel version > 4.5 | No |
*Note: Project quotas are not supported on zfs versions earlier than 0.8.
Once setup, verification of the quota state must be performed on the MDT. Although quota enforcement is managed by the Lustre software, each OSD implementation relies on the back-end file system to maintain per-user/group/project block and inode usage. Hence, differences exist when setting up quotas with ldiskfs or ZFS back-ends:
For ldiskfs backends,
mkfs.lustrenow creates empty quota files and enables the QUOTA feature flag in the superblock which turns quota accounting on at mount time automatically. e2fsck was also modified to fix the quota files when the QUOTA feature flag is present. The project quota feature is disabled by default, andtune2fsneeds to be run to enable every target manually. If user, group, and project quota usage is inconsistent, rune2fsck -fon all unmounted MDTs and OSTs.For ZFS backend, the project quota feature is not supported on zfs versions less than 0.8.0. Accounting ZAPs are created and maintained by the ZFS file system itself. While ZFS tracks per-user and group block usage, it does not handle inode accounting for ZFS versions prior to zfs-0.7.0. The ZFS OSD previously implemented its own support for inode tracking. Two options are available:
The ZFS OSD can estimate the number of inodes in-use based on the number of blocks used by a given user or group. This mode can be enabled by running the following command on the server running the target:
lctl set_param osd-zfs.${FSNAME}-${TARGETNAME}.quota_iused_estimate=1.Similarly to block accounting, dedicated ZAPs are also created the ZFS OSD to maintain per-user and group inode usage. This is the default mode which corresponds to
quota_iused_estimateset to 0.
Note
To (re-)enable space usage quota on ldiskfs filesystems, run
tune2fs -O quota against all targets. This command
sets the QUOTA feature flag in the superblock and runs e2fsck internally.
As a result, the target must be offline to build the per-UID/GID disk
usage database.
Lustre filesystems formatted with a Lustre release
prior to 2.10 can be still safely upgraded to release 2.10, but will not
have project quota usage reporting functional until 2.15.0 or
tune2fs -O project is run against all ldiskfs backend
targets. This command sets the PROJECT feature flag in the superblock and
runs e2fsck (as a result, the target must be offline). See
Section 25.6, “
Quotas and Version Interoperability” for further important
considerations.
Caution
Lustre requires a version of e2fsprogs that supports quota to be installed on the server nodes when using the ldiskfs backend (e2fsprogs is not needed with ZFS backend). In general, we recommend to use the latest e2fsprogs version available on https://downloads.whamcloud.com/public/e2fsprogs/.
The ldiskfs OSD relies on the standard Linux quota to maintain
accounting information on disk. As a consequence, the Linux kernel
running on the Lustre servers using ldiskfs backend must have
CONFIG_QUOTA,
CONFIG_QUOTACTL and
CONFIG_QFMT_V2 enabled.
Quota enforcement is turned on/off independently of space
accounting which is always enabled. There is a single per-file
system quota parameter controlling inode/block quota enforcement.
Like all permanent parameters, this quota parameter can be set via
lctl set_param -P on the MGS via the command:
lctl set_param -P osd-*.fsname-*.quota_slave_md|dt.enabled=u|g|p|none
dt-- to configure data/block quota managed by OSTs (and MDTs for DoM files)md-- to configure metadata/inode quota managed by MDTsu-- to enable quota enforcement for users onlyg-- to enable quota enforcement for groups onlyp-- to enable quota enforcement for projects onlyug-- to enable quota enforcement for all users and groupsugp-- to enable quota enforcement for all users, groups, and projectsnone-- to disable quota enforcement for all users, groups and projects
Examples:
To turn on user, group, and project quotas for block only on
file system
testfs1, on the MGS run:
mgs# lctl set_param -P osd-*.testfs1*.quota_slave_dt.enabled=ugp
To turn on only group quotas for inodes on file system
testfs2, on the MGS run:
mgs# lctl set_param -P osd*.testfs2*.quota_slave_md.enabled=g
To turn off user, group, and project quotas for both inode and block
on file system
testfs3, on the MGS run:
mgs# lctl set_param -P osd*.testfs3*.quota*.enabled=none
Once the quota parameters have been configured, all targets which are part of the file system will be automatically notified of the new quota settings and enable/disable quota enforcement as needed. The per-target enforcement status can still be verified by running the following command on the servers:
$ lctl get_param osd-*.*.quota_slave_*.enabled
osd-zfs.testfs1-MDT0000.quota_slave_dt.enabled=ugp
osd-zfs.testfs1-OST0000.quota_slave_dt.enabled=ugp
Once the file system is up and running, quota limits on blocks and inodes can be set for user, group, and project. This is controlled entirely from a client via three quota parameters:
Grace period-- The period of time (in seconds) within which users are allowed to exceed their soft limit. There are six types of grace periods:
user block soft limit
user inode soft limit
group block soft limit
group inode soft limit
project block soft limit
project inode soft limit
The grace period applies to all users. The user block soft limit is for all users who are using a blocks quota.
Soft limit -- The grace timer is started once the soft limit is exceeded. At this point, the user/group/project can still allocate block/inode. When the grace time expires and if the user is still above the soft limit, the soft limit becomes a hard limit and the user/group/project can't allocate any new block/inode any more. The user/group/project should then delete files to be under the soft limit. The soft limit MUST be smaller than the hard limit. If the soft limit is not needed, it should be set to zero (0).
Hard limit -- Block or inode allocation
will fail with
EDQUOT(i.e. quota exceeded) when the hard limit is
reached. The hard limit is the absolute limit. When a grace period is set,
one can exceed the soft limit within the grace period if under the hard
limit.
Due to the distributed nature of a Lustre file system and the need to
maintain performance under load, those quota parameters may not be 100%
accurate. The quota settings can be manipulated via the
lfs command, executed on a client, and includes several
options to work with quotas:
quota-- displays general quota information (disk usage and limits)setquota-- specifies quota limits and tunes the grace period. By default, the grace period is one week.
Usage:
lfs quota [-q] [-v] [-h] [-o obd_uuid] [-u|-g|-puname|uid|gname|gid|projid]/mount_pointlfs quota -t {-u|-g|-p}/mount_pointlfs setquota {-u|--user|-g|--group|-p|--project}username|groupname[-bblock-softlimit] \ [-Bblock_hardlimit] [-iinode_softlimit] \ [-Iinode_hardlimit]/mount_point
To display general quota information (disk usage and limits) for the user running the command and his primary group, run:
$ lfs quota /mnt/testfs
To display general quota information for a specific user ("
bob" in this example), run:
$ lfs quota -u bob /mnt/testfs
To display general quota information for a specific user ("
bob" in this example) and detailed quota statistics for
each MDT and OST, run:
$ lfs quota -u bob -v /mnt/testfs
To display general quota information for a specific project ("
1" in this example), run:
$ lfs quota -p 1 /mnt/testfs
To display general quota information for a specific group ("
eng" in this example), run:
$ lfs quota -g eng /mnt/testfs
To limit quota usage for a specific project ID on a specific
directory ("/mnt/testfs/dir" in this example), run:
$ lfs project -s -p 1 -r /mnt/testfs/dir $ lfs setquota -p 1 -b 307200 -B 309200 -i 10000 -I 11000 /mnt/testfs
Recursively list all descendants'(of the directory) project attribute on
directory ("/mnt/testfs/dir" in this example), run:
$ lfs project -r /mnt/testfs/dir
Please note that if it is desired to have
lfs quota -p show the space/inode usage under the
directory properly (much faster than du), then the
user/admin needs to use different project IDs for different directories.
To display block and inode grace times for user quotas, run:
$ lfs quota -t -u /mnt/testfs
To set user or group quotas for a specific ID ("bob" in this example), run:
$ lfs setquota -u bob -b 307200 -B 309200 -i 10000 -I 11000 /mnt/testfs
In this example, the quota for user "bob" is set to 300 MB (309200*1024) and the hard limit is 11,000 files. Therefore, the inode hard limit should be 11000.
The quota command displays the quota allocated and consumed by each
Lustre target. Using the previous
setquota example, running this
lfs quota command:
$ lfs quota -u bob -v /mnt/testfs
displays this command output:
Disk quotas for user bob (uid 6000): Filesystem kbytes quota limit grace files quota limit grace /mnt/testfs 0 30720 30920 - 0 10000 11000 - testfs-MDT0000_UUID 0 - 8192 - 0 - 2560 - testfs-OST0000_UUID 0 - 8192 - 0 - 0 - testfs-OST0001_UUID 0 - 8192 - 0 - 0 - Total allocated inode limit: 2560, total allocated block limit: 24576
Global quota limits are stored in dedicated index files (there is one
such index per quota type) on the quota master target (aka QMT). The QMT
runs on MDT0000 and exports the global indices via lctl
get_param. The global indices can thus be dumped via the
following command:
# lctl get_param qmt.testfs-QMT0000.*.glb-*
The format of global indexes depends on the OSD type. The ldiskfs OSD uses an IAM files while the ZFS OSD creates dedicated ZAPs.
Each slave also stores a copy of this global index locally. When the global index is modified on the master, a glimpse callback is issued on the global quota lock to notify all slaves that the global index has been modified. This glimpse callback includes information about the identifier subject to the change. If the global index on the QMT is modified while a slave is disconnected, the index version is used to determine whether the slave copy of the global index isn't up to date any more. If so, the slave fetches the whole index again and updates the local copy. The slave copy of the global index can also be accessed via the following command:
lctl get_param osd-*.*.quota_slave.limit*
The default quota is used to enforce the quota limits for any user, group, or project that do not have quotas set by administrator.
The default quota can be disabled by setting limits to
0.
lfs quota [-U|--default-usr|-G|--default-grp|-P|--default-prj]/mount_pointlfs setquota {-U|--default-usr|-G|--default-grp|-P|--default-prj} [-bblock-softlimit] \ [-Bblock_hardlimit] [-iinode_softlimit] [-Iinode_hardlimit]/mount_pointlfs setquota {-u|-g|-p}username|groupname--default/mount_point
To set the default user quota:
# lfs setquota -U -b 10G -B 11G -i 100K -I 105K /mnt/testfs
To set the default group quota:
# lfs setquota -G -b 10G -B 11G -i 100K -I 105K /mnt/testfs
To set the default project quota:
# lfs setquota -P -b 10G -B 11G -i 100K -I 105K /mnt/testfs
To disable the default user quota:
# lfs setquota -U -b 0 -B 0 -i 0 -I 0 /mnt/testfs
To disable the default group quota:
# lfs setquota -G -b 0 -B 0 -i 0 -I 0 /mnt/testfs
To disable the default project quota:
# lfs setquota -P -b 0 -B 0 -i 0 -I 0 /mnt/testfs
To set user 'bob' to use the default user quota:
# lfs setquota -u bob --default /mnt/testfs
To set group 'bob' to use the default group quota:
# lfs setquota -g bob --default /mnt/testfs
To set project 1000 to use the default project quota:
# lfs setquota -p 1000 --default /mnt/testfs
Note
If quota limits are set for some user, group or project, it will use
those specific quota limits instead of the default quota. Quota limits for
any user, group or project will use the default quota by setting its quota
limits with option '--default'.
In a Lustre file system, quota must be properly allocated or users may experience unnecessary failures. The file system block quota is divided up among the OSTs within the file system. Each OST requests an allocation which is increased up to the quota limit. The quota allocation is then quantized to reduce the number of quota-related request traffic.
The Lustre quota system distributes quotas from the Quota Master Target (aka QMT). Only one QMT instance is supported for now and only runs on the same node as MDT0000. All OSTs and MDTs set up a Quota Slave Device (aka QSD) which connects to the QMT to allocate/release quota space. The QSD is setup directly from the OSD layer.
To reduce quota requests, quota space is initially allocated to QSDs in very large chunks. How much unused quota space can be held by a target is controlled by the qunit size. When quota space for a given ID is close to exhaustion on the QMT, the qunit size is reduced and QSDs are notified of the new qunit size value via a glimpse callback. Slaves are then responsible for releasing quota space above the new qunit value. The qunit size isn't shrunk indefinitely and there is a minimal value of 1MB for blocks and 1,024 for inodes. This means that the quota space rebalancing process will stop when this minimum value is reached. As a result, quota exceeded can be returned while many slaves still have 1MB or 1,024 inodes of spare quota space.
If we look at the
setquota example again, running this
lfs quota command:
# lfs quota -u bob -v /mnt/testfs
displays this command output:
Disk quotas for user bob (uid 500): Filesystem kbytes quota limit grace files quota limit grace /mnt/testfs 30720* 30720 30920 6d23h56m44s 10101* 10000 11000 6d23h59m50s testfs-MDT0000_UUID 0 - 0 - 10101 - 10240 testfs-OST0000_UUID 0 - 1024 - - - - testfs-OST0001_UUID 30720* - 29896 - - - - Total allocated inode limit: 10240, total allocated block limit: 30920
The total quota limit of 30,920 is allocated to user bob, which is further distributed to two OSTs.
Values appended with '
*' show that the quota limit has been exceeded, causing
the following error when trying to write or create a file:
$ cp: writing `/mnt/testfs/foo`: Disk quota exceeded.
Note
It is very important to note that the block quota is consumed per OST and the inode quota per MDS. Therefore, when the quota is consumed on one OST (resp. MDT), the client may not be able to create files regardless of the quota available on other OSTs (resp. MDTs).
Setting the quota limit below the minimal qunit size may prevent the user/group from all file creation. It is thus recommended to use soft/hard limits which are a multiple of the number of OSTs * the minimal qunit size.
To determine the total number of inodes, use
lfs df -i(and also
lctl get_param *.*.filestotal). For more information on
using the
lfs df -i command and the command output, see
Section 19.8.1, “Checking File System Free Space”.
Unfortunately, the
statfs interface does not report the free inode count
directly, but instead reports the total inode and used inode counts. The
free inode count is calculated for
df from (total inodes - used inodes). It is not critical
to know the total inode count for a file system. Instead, you should know
(accurately), the free inode count and the used inode count for a file
system. The Lustre software manipulates the total inode count in order to
accurately report the other two values.
To use the project quota functionality introduced in Lustre 2.10, all Lustre servers and clients must be upgraded to Lustre release 2.10 or later for project quota to work correctly. Otherwise, project quota will be inaccessible on clients and not be accounted for on OSTs. Furthermore, the servers may be required to use a patched kernel, for more information see Section 25.2, “ Enabling Disk Quotas”.
df and lfs df
will return the amount of space available to that project rather than the
total filesystem space, if the project quota limit is smaller.
Only client need be upgraded to Lustre
release 2.14 or later to apply this new behavior.
In a Lustre file system, granted cache does not respect quota limits. In this situation, OSTs grant cache to a Lustre client to accelerate I/O. Granting cache causes writes to be successful in OSTs, even if they exceed the quota limits, and will overwrite them.
The sequence is:
A user writes files to the Lustre file system.
If the Lustre client has enough granted cache, then it returns 'success' to users and arranges the writes to the OSTs.
Because Lustre clients have delivered success to users, the OSTs cannot fail these writes.
Because of granted cache, writes always overwrite quota limitations.
For example, if you set a 400 GB quota on user A and use IOR to write for
user A from a bundle of clients, you will write much more data than 400 GB,
and cause an out-of-quota error (
EDQUOT).
Note
The effect of granted cache on quota limits can be mitigated, but not eradicated. Reduce the maximum amount of dirty data on the clients (minimal value is 1MB):
lctl set_param osc.*.max_dirty_mb=8
The Lustre software includes statistics that monitor quota activity, such as the kinds of quota RPCs sent during a specific period, the average time to complete the RPCs, etc. These statistics are useful to measure performance of a Lustre file system.
Each quota statistic consists of a quota event and
min_time,
max_time and
sum_time values for the event.
|
Quota Event |
Description |
|---|---|
|
sync_acq_req |
Quota slaves send a acquiring_quota request and wait for its return. |
|
sync_rel_req |
Quota slaves send a releasing_quota request and wait for its return. |
|
async_acq_req |
Quota slaves send an acquiring_quota request and do not wait for its return. |
|
async_rel_req |
Quota slaves send a releasing_quota request and do not wait for its return. |
|
wait_for_blk_quota (lquota_chkquota) |
Before data is written to OSTs, the OSTs check if the remaining block quota is sufficient. This is done in the lquota_chkquota function. |
|
wait_for_ino_quota (lquota_chkquota) |
Before files are created on the MDS, the MDS checks if the remaining inode quota is sufficient. This is done in the lquota_chkquota function. |
|
wait_for_blk_quota (lquota_pending_commit) |
After blocks are written to OSTs, relative quota information is updated. This is done in the lquota_pending_commit function. |
|
wait_for_ino_quota (lquota_pending_commit) |
After files are created, relative quota information is updated. This is done in the lquota_pending_commit function. |
|
wait_for_pending_blk_quota_req (qctxt_wait_pending_dqacq) |
On the MDS or OSTs, there is one thread sending a quota request for a specific UID/GID for block quota at any time. At that time, if other threads need to do this too, they should wait. This is done in the qctxt_wait_pending_dqacq function. |
|
wait_for_pending_ino_quota_req (qctxt_wait_pending_dqacq) |
On the MDS, there is one thread sending a quota request for a specific UID/GID for inode quota at any time. If other threads need to do this too, they should wait. This is done in the qctxt_wait_pending_dqacq function. |
|
nowait_for_pending_blk_quota_req (qctxt_wait_pending_dqacq) |
On the MDS or OSTs, there is one thread sending a quota request for a specific UID/GID for block quota at any time. When threads enter qctxt_wait_pending_dqacq, they do not need to wait. This is done in the qctxt_wait_pending_dqacq function. |
|
nowait_for_pending_ino_quota_req (qctxt_wait_pending_dqacq) |
On the MDS, there is one thread sending a quota request for a specific UID/GID for inode quota at any time. When threads enter qctxt_wait_pending_dqacq, they do not need to wait. This is done in the qctxt_wait_pending_dqacq function. |
|
quota_ctl |
The quota_ctl statistic is generated when lfs
|
|
adjust_qunit |
Each time qunit is adjusted, it is counted. |
Quota statistics are an important measure of the performance of a Lustre file system. Interpreting these statistics correctly can help you diagnose problems with quotas, and may indicate adjustments to improve system performance.
For example, if you run this command on the OSTs:
lctl get_param lquota.testfs-OST0000.stats
You will get a result similar to this:
snapshot_time 1219908615.506895 secs.usecs async_acq_req 1 samples [us] 32 32 32 async_rel_req 1 samples [us] 5 5 5 nowait_for_pending_blk_quota_req(qctxt_wait_pending_dqacq) 1 samples [us] 2\ 2 2 quota_ctl 4 samples [us] 80 3470 4293 adjust_qunit 1 samples [us] 70 70 70 ....
In the first line,
snapshot_time indicates when the statistics were taken.
The remaining lines list the quota events and their associated
data.
In the second line, the
async_acq_req event occurs one time. The
min_time,
max_time and
sum_time statistics for this event are 32, 32 and 32,
respectively. The unit is microseconds (μs).
In the fifth line, the quota_ctl event occurs four times. The
min_time,
max_time and
sum_time statistics for this event are 80, 3470 and
4293, respectively. The unit is microseconds (μs).
OST Pool Quotas feature gives an ability to limit user's (group's/project's)
disk usage at OST pool level. Each OST Pool Quota (PQ) maps directly to the
OST pool of the same name. Thus PQ could be tuned with standard
lctl pool_new/add/remove/erase commands. All PQ are subset of a
global pool that includes all OSTs and MDTs (DOM case).
It may be initially confusing to be prevented from using "all of" one quota
due to a different quota setting. In Lustre, a quota is a limit, not a right
to use an amount. You don't always get to use your quota - an OST may be out
of space, or some other quota is limiting. For example, if there is an inode
quota and a space quota, and you hit your inode limit while you still have
plenty of space, you can't use the space. For another example, quotas may
easily be over-allocated: everyone gets 10PB of quota, in a 15PB system.
That does not give them the right to use 10PB, it means they cannot use more
than 10PB. They may very well get ENOSPC long before that - but they will not
get EDQUOT. This behavior already exists in Lustre today, but pool quotas
increase the number of limits in play: user, group or project global space quota
and now all of those limits can also be defined for each pool. In all cases,
the net effect is that the actual amount of space you can use is limited to the
smallest (min) quota out of everything that is applicable.
See more details in
OST Pool Quotas HLD
From Quota Master point of view, "data" MDTs are regular members together with OSTs. However Pool Quotas support only OSTs as there is currently no mechanism to group MDTs in pools.
The same long option --pool is used to setup and report
Pool Quotas with lfs setquota and lfs setquota.
lfs setquota --pool
is used to set the block and soft usage limit for the user, group, or
project for the specified pool name.
pool_name
lfs quota --pool
shows the user, group, or project usage for the specified pool name.
pool_name
Both client and server should have at least Lustre 2.14 to support Pool Quotas.
Note
Pool Quotas may be able to work with older clients if server supports Pool Quotas. Pool quotas cannot be viewed or modified by older clients. Since the quota enforcement is done on the servers, only a single client is needed to configure the quotas. This could be done by mounting a client directly on the MDS if needed.
Let's imagine you need to setup quota usage for already existed OST pool
flash_pool:
# it is a limit for global pool. PQ don't work properly without that lfs setquota -uivan-B100T /mnt/testfs# set 1TiB block hard limit for ivan in a flash_pool lfs setquota -uivan--poolflash_pool-B1T /mnt/testfs
Note
System-side hard limit is required before setting Quota Pool limit. If you do not need to limit user at all OSTs and MDTs at system, only per pool, it is recommended to set some unrealistic big hard limit. Without a global limit in place the Quota Pool limit will not be enforced. No matter hard or soft global limit - at least one of them should be set.
# notify OSTs to enforce quota for ivan lfs setquota -uivan-B10T /mnt/testfs# soft limit 10MiB for ivan in a pool flash_pool lfs setquota -uivan--poolflash_pool-b1T /mnt/testfs# set block grace 600 s for all users at flash_pool lfs setquota -t -u --block-grace600--poolflash_pool /mnt/testfs
Table of Contents
This chapter describes how to bind Lustre to a Hierarchical Storage Management (HSM) solution.
The Lustre file system can bind to a Hierarchical Storage Management (HSM) solution using a specific set of functions. These functions enable connecting a Lustre file system to one or more external storage systems, typically HSMs. With a Lustre file system bound to a HSM solution, the Lustre file system acts as a high speed cache in front of these slower HSM storage systems.
The Lustre file system integration with HSM provides a mechanism for files to simultaneously exist in a HSM solution and have a metadata entry in the Lustre file system that can be examined. Reading, writing or truncating the file will trigger the file data to be fetched from the HSM storage back into the Lustre file system.
The process of copying a file into the HSM storage is known as archive. Once the archive is complete, the Lustre file data can be deleted (known as release.) The process of returning data from the HSM storage to the Lustre file system is called restore. The archive and restore operations require a Lustre file system component called an Agent.
An Agent is a specially designed Lustre client node that mounts the Lustre file system in question. On an Agent, a user space program called a copytool is run to coordinate the archive and restore of files between the Lustre file system and the HSM solution.
Requests to restore a given file are registered and dispatched by a facet on the MDT called the Coordinator.
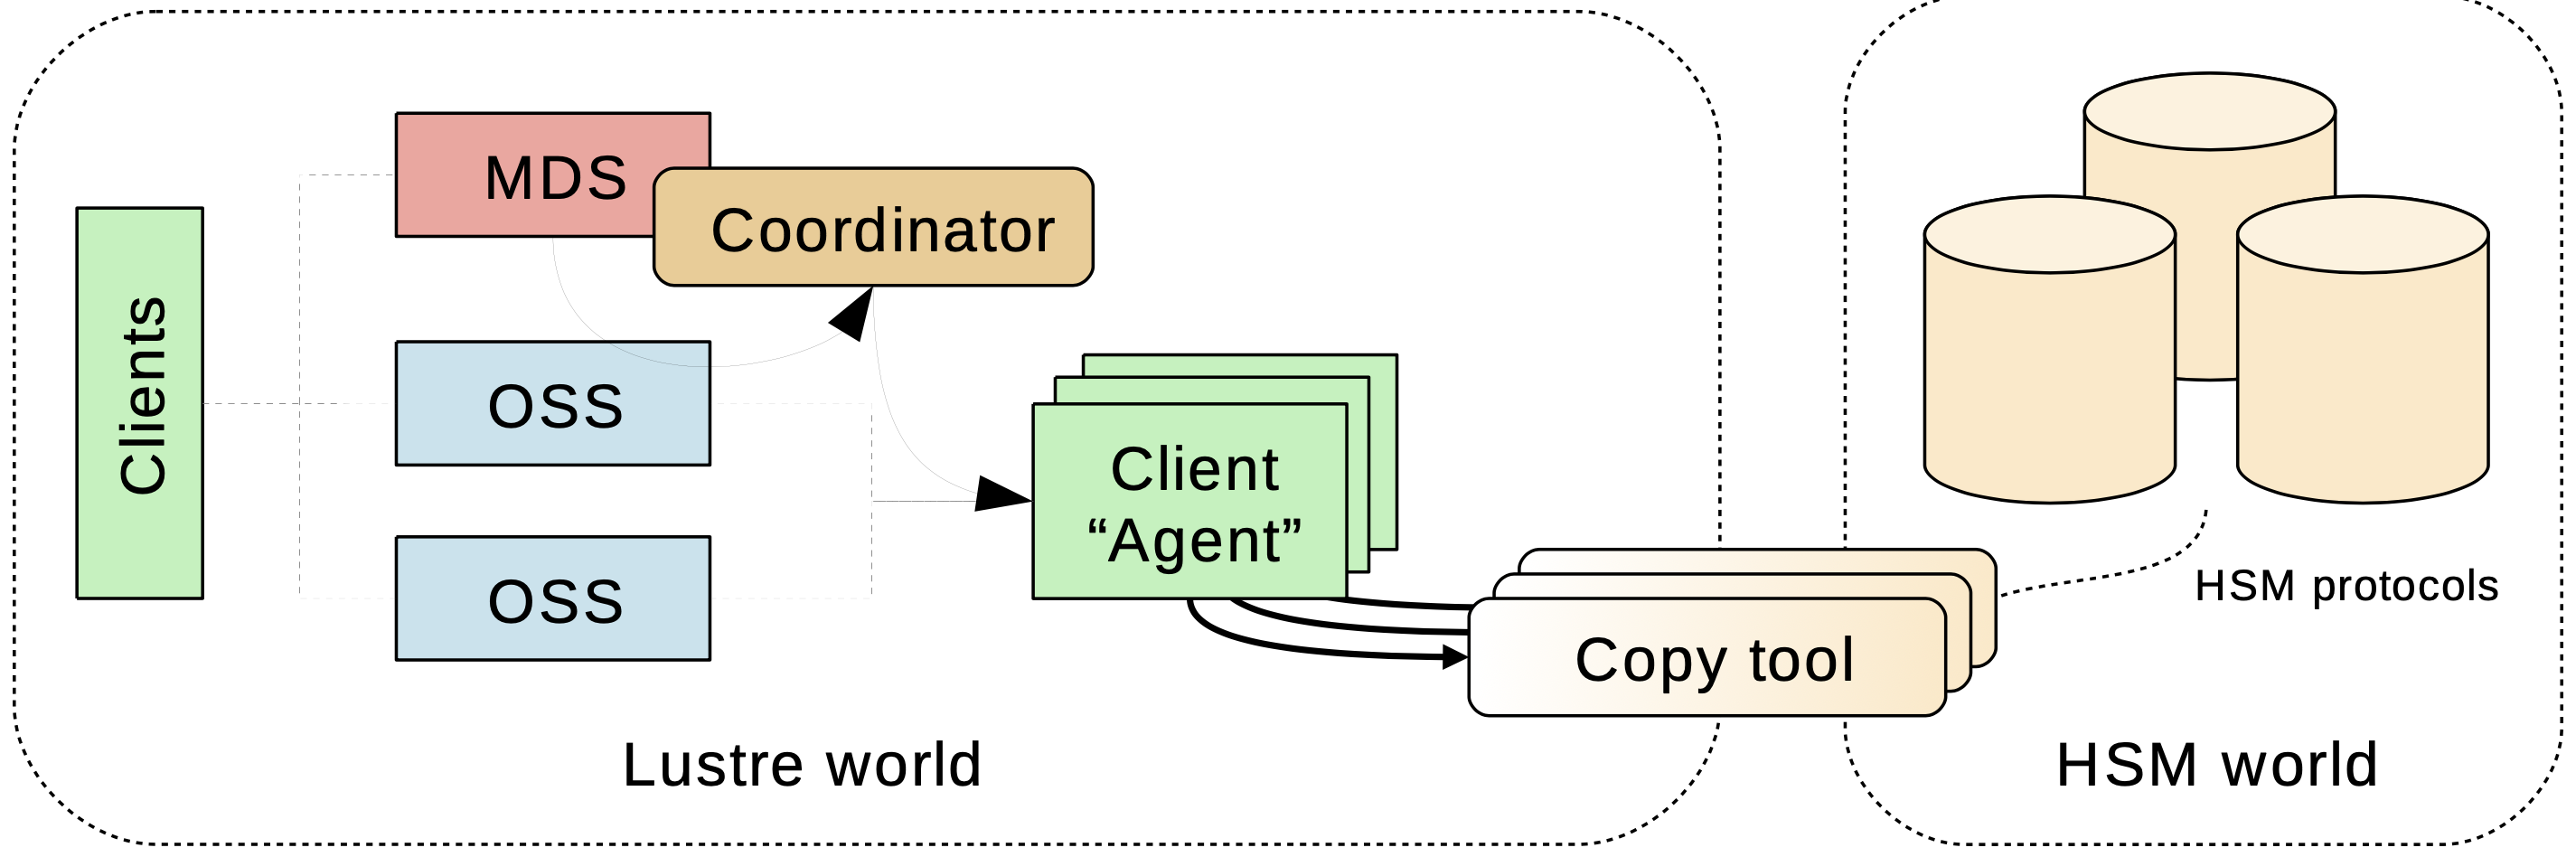
To setup a Lustre/HSM configuration you need:
a standard Lustre file system (version 2.5.0 and above)
a minimum of 2 clients, 1 used for your chosen computation task that generates useful data, and 1 used as an agent.
Multiple agents can be employed. All the agents need to share access to their backend storage. For the POSIX copytool, a POSIX namespace like NFS or another Lustre file system is suitable.
To bind a Lustre file system to a HSM system a coordinator must be activated on each of your filesystem MDTs. This can be achieved with the command:
$ lctl set_param mdt.$FSNAME-MDT0000.hsm_control=enabled
mdt.lustre-MDT0000.hsm_control=enabledTo verify that the coordinator is running correctly
$ lctl get_param mdt.$FSNAME-MDT0000.hsm_control
mdt.lustre-MDT0000.hsm_control=enabledOnce a coordinator is started, launch the copytool on each agent node to connect to your HSM storage. If your HSM storage has POSIX access this command will be of the form:
lhsmtool_posix --daemon --hsm-root$HSMPATH--archive=1$LUSTREPATH
The POSIX copytool must be stopped by sending it a TERM signal.
Agents are Lustre file system clients running copytool. copytool is a userspace daemon that transfers data between Lustre and a HSM solution. Because different HSM solutions use different APIs, copytools can typically only work with a specific HSM. Only one copytool can be run by an agent node.
The following rule applies regarding copytool instances: a Lustre file system only supports a single copytool process, per ARCHIVE ID (see below), per client node. Due to a Lustre software limitation, this constraint is irrespective of the number of Lustre file systems mounted by the Agent.
Bundled with Lustre tools, the POSIX copytool can work with any HSM or external storage that exports a POSIX API.
A Lustre file system can be bound to several different HSM solutions. Each bound HSM solution is identified by a number referred to as ARCHIVE ID. A unique value of ARCHIVE ID must be chosen for each bound HSM solution. ARCHIVE ID must be in the range 1 to 32.
A Lustre file system supports an unlimited number of copytool instances.
You need, at least, one copytool per ARCHIVE ID. When using the POSIX copytool,
this ID is defined using --archive switch.
For example: if a single Lustre file system is bound to two different HSMs (A and B,) ARCHIVE ID "1" can be chosen for HSM A and ARCHIVE ID "2" for HSM B. If you start 3 copytool instances for ARCHIVE ID 1, all of them will use Archive ID "1". The same rule applies for copytool instances dealing with the HSM B, using Archive ID "2".
When issuing HSM requests, you can use the --archive
switch to choose the backend you want to use.
In this example, file foo will be
archived into backend ARCHIVE ID "5":
$ lfs hsm_archive --archive=5 /mnt/lustre/foo
A default ARCHIVE ID can be defined which will be used when the --archive switch is not specified:
$ lctl set_param -P mdt.lustre-MDT0000.hsm.default_archive_id=5The ARCHIVE ID of archived files can be checked using lfs
hsm_state command:
$ lfs hsm_state /mnt/lustre/foo /mnt/lustre/foo: (0x00000009) exists archived, archive_id:5
A Lustre file system allocates a unique UUID per client mount point, for each filesystem. Only one copytool can be registered for each Lustre mount point. As a consequence, the UUID uniquely identifies a copytool, per filesystem.
The currently registered copytool instances (agents UUID) can be retrieved by running the following command, per MDT, on MDS nodes:
$ lctl get_param -n mdt.$FSNAME-MDT0000.hsm.agents
uuid=a19b2416-0930-fc1f-8c58-c985ba5127ad archive_id=1 requests=[current:0 ok:0 errors:0]The returned fields have the following meaning:
uuidthe client mount used by the corresponding copytool.archive_idcomma-separated list of ARCHIVE IDs accessible by this copytool.requestsvarious statistics on the number of requests processed by this copytool.
One or more copytool instances may experience conditions that cause them to become unresponsive. To avoid blocking access to the related files a timeout value is defined for request processing. A copytool must be able to fully complete a request within this time. The default is 3600 seconds.
$ lctl set_param -n mdt.lustre-MDT0000.hsm.active_request_timeout
Data management between a Lustre file system and HSM solutions is driven by requests. There are five types:
ARCHIVECopy data from a Lustre file system file into the HSM solution.RELEASERemove file data from the Lustre file system.RESTORECopy back data from the HSM solution into the corresponding Lustre file system file.REMOVEDelete the copy of the data from the HSM solution.CANCELCancel an in-progress or pending request.
Only the RELEASE is performed synchronously and
does not involve the coordinator. Other requests are handled by Coordinators.
Each MDT coordinator is resiliently managing them.
Requests are submitted using lfs command:
$ lfs hsm_archive [--archive=ID]FILE1[FILE2...] $ lfs hsm_releaseFILE1[FILE2...] $ lfs hsm_restoreFILE1[FILE2...] $ lfs hsm_removeFILE1[FILE2...]
Requests are sent to the default ARCHIVE ID unless an ARCHIVE ID is specified with the --archive option (See Section 26.3.1, “
Archive ID, multiple backends
”).
Released files are automatically restored when a process tries to read or modify them. The corresponding I/O will block waiting for the file to be restored. This is transparent to the process. For example, the following command automatically restores the file if released.
$ cat /mnt/lustre/released_fileThe list of registered requests and their status can be monitored, per MDT, with the following command:
$ lctl get_param -n mdt.lustre-MDT0000.hsm.actionsThe list of requests currently being processed by a copytool is available with:
$ lctl get_param -n mdt.lustre-MDT0000.hsm.active_requestsWhen files are archived or released, their state in the Lustre file system changes. This state can be read using the following lfs command:
$ lfs hsm_stateFILE1[FILE2...]
There is also a list of specific policy flags which could be set to have a per-file specific policy:
NOARCHIVEThis file will never be archived.NORELEASEThis file will never be released. This value cannot be set if the flag is currently set toRELEASEDDIRTYThis file has been modified since a copy of it was made in the HSM solution.DIRTYfiles should be archived again. TheDIRTYflag can only be set ifEXISTis set.
The following options can only be set by the root user.
LOSTThis file was previously archived but the copy was lost on the HSM solution for some reason in the backend (for example, by a corrupted tape), and could not be restored. If the file is not in theRELEASEstate it needs to be archived again. If the file is in theRELEASEstate, the file data is lost.
Some flags can be manually set or cleared using the following commands:
$ lfs hsm_set [FLAGS]FILE1[FILE2...] $ lfs hsm_clear [FLAGS]FILE1[FILE2...]
hsm_control controls coordinator activity and can also purge the action list.
$ lctl set_param mdt.$FSNAME-MDT0000.hsm_control=purgePossible values are:
enabledStart coordinator thread. Requests are dispatched on available copytool instances.disabledPause coordinator activity. No new request will be scheduled. No timeout will be handled. New requests will be registered but will be handled only when the coordinator is enabled again.shutdownStop coordinator thread. No request can be submitted.purgeClear all recorded requests. Do not change coordinator state.
max_requests is the maximum number of active
requests at the same time. This is a per coordinator value, and independent of
the number of agents.
For example, if 2 MDT and 4 agents are present, the agents will never have to handle more than 2 x max_requests.
$ lctl set_param mdt.$FSNAME-MDT0000.hsm.max_requests=10Change system behavior. Values can be added or removed by prefixing them with '+' or '-'.
$ lctl set_param mdt.$FSNAME-MDT0000.hsm.policy=+NRAPossible values are a combination of:
NRANo Retry Action. If a restore fails, do not reschedule it automatically.NBRNon Blocking Restore. Restore is triggered but does not block clients. Access to a released file returnsENODATA.
A changelog record type HSM was
added for Lustre file system logs that relate to HSM events.
16HSM 13:49:47.469433938 2013.10.01 0x280 t=[0x200000400:0x1:0x0]
Two items of information are available for each HSM record: the FID of the modified file and a bit mask. The bit mask codes the following information (low bits first):
Error code, if any (7 bits)
HSM event (3 bits)
HE_ARCHIVE = 0File has been archived.HE_RESTORE = 1File has been restored.HE_CANCEL = 2A request for this file has been canceled.HE_RELEASE = 3File has been released.HE_REMOVE = 4A remove request has been executed automatically.HE_STATE = 5File flags have changed.
HSM flags (3 bits)
CLF_HSM_DIRTY=0x1
In the above example, 0x280 means the error code is 0 and the event is HE_STATE.
When using liblustreapi, there is a list of helper functions to easily extract the different values from this bitmask, like: hsm_get_cl_event(), hsm_get_cl_flags(), and hsm_get_cl_error()
A Lustre file system does not have an internal component responsible for automatically scheduling archive requests and release requests under any conditions (like low space). Automatically scheduling archive operations is the role of the policy engine.
It is recommended that the Policy Engine run on a dedicated client, similar to an agent node, with a Lustre version 2.5+.
A policy engine is a userspace program using the Lustre file system HSM specific API to monitor the file system and schedule requests.
Robinhood is the recommended policy engine.
Robinhood is a Policy engine and reporting tool for large file
systems. It maintains a replicate of file system metadata in a database that
can be queried at will. Robinhood makes it possible to schedule mass action on
file system entries by defining attribute-based policies, provides fast find
and du enhanced clones, and provides administrators with an overall
view of file system content through a web interface and command line tools.
Robinhood can be used for various configurations. Robinhood is an external project, and further information can be found on the project website: https://sourceforge.net/apps/trac/robinhood/wiki/Doc.
Table of Contents
- 27.1. Introduction
- 27.2. Design
- 27.3. PCC Command Line Tools
- 27.3.1. Add a PCC backend on a client
- 27.3.2. Delete a PCC backend from a client
- 27.3.3. Remove all PCC backends on a client
- 27.3.4. List all PCC backends on a client
- 27.3.5. Attach given files into PCC
- 27.3.6. Attach given files into PCC by FID(s)
- 27.3.7. Detach given files from PCC
- 27.3.8. Detach given files from PCC by FID(s)
- 27.3.9. Display the PCC state for given files
- 27.4. PCC Configuration Example
This chapter describes Persistent Client Cache (PCC).
Flash-based SSDs help to (partly) close the ever-increasing performance gap between magnetic disks and CPUs. SSDs build a new level in the storage hierarchy, both in terms of price and performance. The large size of data sets stored in Lustre, ranging up to hundreds of PiB in the largest centers, makes it more cost-effective to store most of the data on HDDs and only an active subset of data on SSDs.
The PCC mechanism allows clients equipped with internal SSDs to deliver additional performance for both read and write intensive applications that have node-local I/O patterns without losing the benefits of the global Lustre namespace. PCC is combined with Lustre HSM and layout lock mechanisms to provide persistent caching services using the local SSD storage, while allowing migration of individual files between local and shared storage. This enables I/O intensive applications to read and write data on client nodes without losing the benefits of the global Lustre namespace.
The main advantages to use this cache on the Lustre clients is that the I/O stack is much simpler for the cached data, as there is no interference with I/Os from other clients, which enables performance optimizations. There are no special requirements on the hardware of the client nodes. Any Linux filesystem, such as ext4 on an NVMe device, can be used as PCC cache. Local file caching reduces the pressure on the object storage targets (OSTs), as small or random I/Os can be aggregated to large sequential I/Os and temporary files do not even need to be flushed to OSTs.
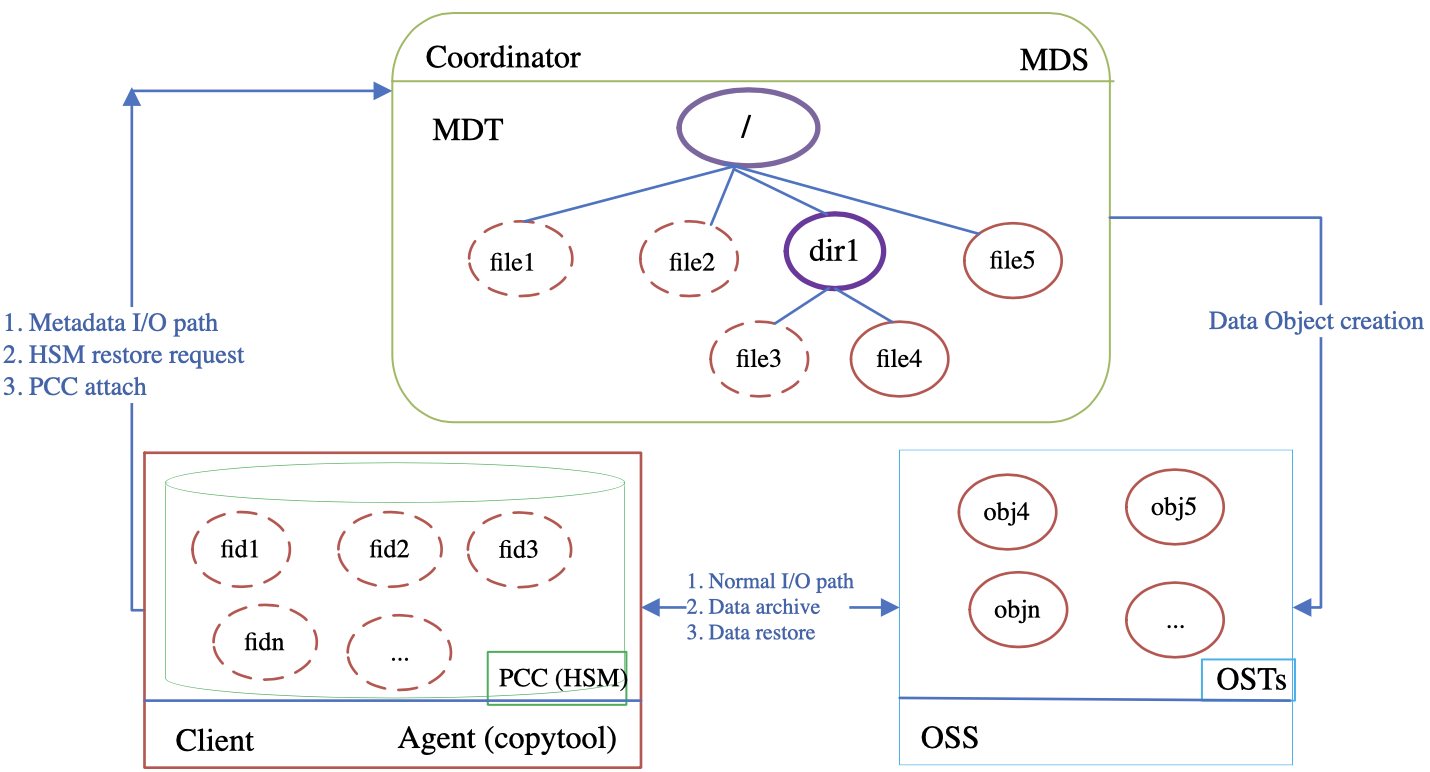
Lustre typically uses its integrated HSM mechanism to interface with larger and slower archival storage using tapes or other media. PCC-RW, on the contrary, is actually an HSM backend storage system which provides a group of high-speed local caches on Lustre clients. Figure 27.1, “Overview of PCC-RW Architecture” shows the PCC-RW architecture. Each client uses its own local storage, usually in the form of NVMe, formatted as a local file system for the local cache. Cached I/Os are directed to files in the local file system, while normal I/O are directed to OSTs.
PCC-RW uses Lustre's HSM mechanism for data synchronization. Each PCC node is actually an HSM agent and has a copy tool instance running on it. The Lustre HSM copytool is used to restore files from the local cache to Lustre OSTs. Any remote access for a PCC cached file from another Lustre client triggers this data synchronization. If a PCC client goes offline, the cached data becomes temporarily inaccessible to other clients. The data will be accessible again after the PCC client reboots, mounts the Lustre filesystem, and restarts the copytool.
Currently, PCC clients cache entire files on their local filesystems. A file has to be attached to PCC before I/O can be directed to a client cache. The Lustre layout lock feature is used to ensure that the caching services are consistent with the global file system state. The file data can be written/read directly to/from the local PCC cache after a successful attach operation. If the attach has not been successful, the client will simply fall back to the normal I/O path and direct I/Os to OSTs. PCC-RW cached files are automatically restored to the global filesystem when a process on another client tries to read or modify them. The corresponding I/O will be blocked, waiting for the released file to be restored. This is transparent to the application.
The revocation of the layout lock can automatically detach the file
from the PCC cache at any time. The PCC-RW cached file can be
manually detached by the lfs pcc detach command. After
the cached file is detached from the cache and restored to OSTs, it
will be removed from the PCC filesystem.
Failed PCC-RW operations usually return corresponding error codes. There is a special case when the space of the local PCC file system is exhausted. In this case, PCC-RW can fall back to the normal I/O path automatically since the capacity of the Lustre file system is much larger than the capacity of the PCC device.
PCC includes a rule-based, configurable caching infrastructure that enables it to achieve various objectives, such as customizing I/O caching and providing performance isolation and QoS guarantees.
For PCC-RW, when a file is being created, a rule-based policy is used to determine whether it will be cached. It supports rules for different users, groups, projects, or filenames extensions.
Rule-based PCC-RW caching of newly created files can determine which file can use a cache on PCC directly without administrator's intervention.
Lustre provides lfs and lctl
command line tools for users to interact with PCC feature.
Command:
client# lctl pcc addmountpointpccpath[--param|-pcfgparam]
The above command will add a PCC backend to the Lustre client.
| Option | Description |
|---|---|
| mountpoint |
The Lustre client mount point. |
| pccpath |
The directory path on local filesystem for PCC cache. The whole filesystem does not need to be exclusively dedicated to the PCC cache, but the directory should not be accessible to regular users. |
|
cfgparam |
A string in the form of name-value pairs to config the PCC backend such as read-write attach id (archive ID), and auto caching rule, etc. |
Note: when a client node has
more than one Lustre mount point or Lustre filesystem instance, the
parameter mountpoint makes sure that only
the PCC backend on specified Lustre filesystem instance or Lustre
mount point is configured. This Lustre mount point must be the same as
the HSM (lhsmtool_posix) configuration, if the PCC backend is used as
PCC-RW caching. Also, the parameter pccpath
should be the same as the HSM root parameter of the POSIX copytool
(lhsmtool_posix).
PCC-RW uses Lustre's HSM mechanism for data synchronization. Before using PCC-RW on a client, it is still necessary to setup HSM on the MDTs and the PCC client nodes.
First, a coordinator must be activated on each of the filesystem MDTs. This can be achieved with the command:
mds# lctl set_param mdt.$FSNAME-MDT0000.hsm_control=enabled
mdt.lustre-MDT0000.hsm_control=enabledNext, launch the copytool on each agent node (PCC client node) to connect to your HSM storage. This command will be of the form:
client# lhsmtool_posix --daemon --hsm-root$PCCPATH--archive=$ARCHIVE_ID$LUSTREPATH
Examples:
The following command adds a PCC backend on a client:
client# lctl pcc add /mnt/lustre /mnt/pcc --param "projid={500,1000}&fname={*.h5},uid={1001} rwid=2"The first substring of the config parameter is the auto-cache rule, where "&" represents the logical AND operator while "," represents the logical OR operator. The example rule means that new files are only auto cached if either of the following conditions are satisfied:
The project ID is either 500 or 1000 and the suffix of the file name is "h5";
The user ID is 1001;
The currently supported name-value pairs for PCC backend configuration are listing as follows:
rwidPCC-RW attach ID which is same as the archive ID of the copytool agent running on this PCC node.auto_attach"auto_attach=1"enables auto attach at the next open or during I/O. Enabling this option should cause automatic attaching of valid PCC-cached files which were detached due to the manuallfs pcc detachcommand or revocation of layout lock (i.e. LRU lock shrinking)."auto_attach=0"means that auto file attach is disabled and is the default mode.
Command:
lctl pcc del <mountpoint> <pccpath>
The above command will delete a PCC backend from a Lustre client.
| Option | Description |
|---|---|
| mountpoint |
The Lustre client mount point. |
| pccpath |
A PCC backend is specified by this path. Please refer to
|
Examples:
The following command will delete a PCC backend referenced by
"/mnt/pcc" on a client with the mount point
of "/mnt/lustre".
client# lctl pcc del /mnt/lustre /mnt/pcc
Command:
lctl pcc clear <mountpoint>
The above command will remove all PCC backends on a Lustre client.
| Option | Description |
|---|---|
| mountpoint |
The Lustre client mount point. |
Examples:
The following command will remove all PCC backends from a client
with the mount point of "/mnt/lustre".
client# lctl pcc clear /mnt/lustre
Command:
lctl pcc list <mountpoint>
The above command will list all PCC backends on a Lustre client.
| Option | Description |
|---|---|
| mountpoint |
The Lustre client mount point. |
Examples:
The following command will list all PCC backends on a client with
the mount point of "/mnt/lustre".
client# lctl pcc list /mnt/lustre
Command:
lfs pcc attach --id|-i <NUM> <file...>
The above command will attach the given files onto PCC.
| Option | Description |
|---|---|
| --id|-i <NUM> |
Attach ID to select which PCC backend to use. |
Examples:
The following command will attach the file referenced by
/mnt/lustre/test onto the PCC backend with
PCC-RW attach ID that equals 2.
client# lfs pcc attach -i 2 /mnt/lustre/test
Command:
lfs pcc attach_fid --id|-i <NUM> --mnt|-m <mountpoint> <fid...>
The above command will attach the given files referenced by their FIDs into PCC.
| Option | Description |
|---|---|
| --id|-i <NUM> |
Attach ID to select which PCC backend to use. |
| --mnt|-m <mountpoint> |
The Lustre mount point. |
Examples:
The following command will attach the file referenced by FID
0x200000401:0x1:0x0 onto the PCC backend
with PCC-RW attach ID that equals 2.
client# lfs pcc attach_fid -i 2 -m /mnt/lustre 0x200000401:0x1:0x0
Command:
lfs pcc detach [--keep|-k] <file...>
The above command will detach given files from PCC.
| Option | Description |
|---|---|
| --keep|-k |
By default, the |
Examples:
The following command will detach the file referenced by
/mnt/lustre/test from PCC permanently and
remove the corresponding cached file on PCC.
client# lfs pcc detach /mnt/lustre/test
The following command will detach the file referenced by
/mnt/lustre/test from PCC, but allow the file
to be attached automatically at the next open.
client# lfs pcc detach -k /mnt/lustre/test
Command:
lfs pcc detach_fid [--keep|-k] <mountpoint> <fid...>
The above command will detach the given files from PCC by FID(s).
| Option | Description |
|---|---|
| --keep|-k |
Please refer to the command |
Examples:
The following command will detach the file referenced by FID
0x200000401:0x1:0x0 from PCC permanently and
remove the corresponding cached file on PCC.
client# lfs pcc detach_fid /mnt/lustre 0x200000401:0x1:0x0
The following command will detach the file referenced by FID
0x200000401:0x1:0x0 from PCC, but allow the
file to be attached automatically at the next open.
client# lfs pcc detach_fid -k /mnt/lustre 0x200000401:0x1:0x0
Command:
lfs pcc state <file...>
The above command will display the PCC state for given files.
Examples:
The following command will display the PCC state of the file
referenced by /mnt/lustre/test.
client# lfs pcc state /mnt/lustre/test file: /mnt/lustre/test, type: readwrite, PCC file: /mnt/pcc/0004/0000/0bd1/0000/0002/0000/0x200000bd1:0x4:0x0, user number: 1, flags: 4
If the file "/mnt/lustre/test" is not cached on PCC, the output of its PCC state is as follow:
client# lfs pcc state /mnt/lustre/test file: /mnt/lustre/test, type: none
Setup HSM on MDT
mds# lctl set_param mdt.lustre-MDT0000.hsm_control=enabled
Setup PCC on the clients
client1# lhsmtool_posix --daemon --hsm-root /mnt/pcc --archive=1 /mnt/lustre < /dev/null > /tmp/copytool_log 2>&1 client1# lctl pcc add /mnt/lustre /mnt/pcc "projid={1000},uid={500} rwid=1"client2# lhsmtool_posix --daemon --hsm-root /mnt/pcc --archive=2 /mnt/lustre < /dev/null > /tmp/copytool_log 2>&1 client2# lctl pcc add /mnt/lustre /mnt/pcc "projid={1000}&gid={500} rwid=2"Execute PCC commands on the clients
client1# echo "QQQQQ" > /mnt/lustre/test client2# lfs pcc attach -i 2 /mnt/lustre/test client2# lfs pcc state /mnt/lustre/test file: /mnt/lustre/test, type: readwrite, PCC file: /mnt/pcc/0004/0000/0bd1/0000/0002/0000/0x200000bd1:0x4:0x0, user number: 1, flags: 6 client2# lfs pcc detach /mnt/lustre/test
Table of Contents
This chapter describes how to map UID and GIDs across a Lustre file system using the nodemap feature, and includes the following sections:
The nodemap feature allows UIDs and GIDs from remote systems to be mapped to local sets of UIDs and GIDs while retaining POSIX ownership, permissions and quota information. As a result, multiple sites with conflicting user and group identifiers can operate on a single Lustre file system without creating collisions in UID or GID space.
When the nodemap feature is enabled, client file system access to
a Lustre system is filtered through the nodemap identity mapping policy
engine. Lustre connectivity is governed by network identifiers, or
NIDs, such as
192.168.7.121@tcp. When an operation is made from a
NID, Lustre decides if that NID is part of a
nodemap, a policy group consisting of one or
more NID ranges. If no policy group exists for that NID, access is
squashed to user nobody by default. Each policy group
also has several properties, such as
trusted
and admin, which determine access conditions.
A collection of identity maps or
idmaps are kept for each policy group. These
idmaps determine how UIDs and GIDs on the client are translated into the
canonical user space of the local Lustre file system.
In order for nodemap to function properly, the MGS, MDS, and OSS systems must all have a version of Lustre which supports nodemap. Clients operate transparently and do not require special configuration or knowledge of the nodemap setup.
Note
A nodemap name has a maximum length of 16 characters, and can contain only alphanumeric characters and '_'.
NIDs can be described as either a singleton address or a range of
addresses. A single address is described in standard Lustre NID format,
such as 10.10.6.120@tcp. A range
is described using a dash to separate the range, for example,
192.168.20.[0-255]@tcp.
The range must be contiguous. The full LNet definition for a nidlist is as follows:
<nidlist> :== <nidrange> [ ' ' <nidrange> ]
<nidrange> :== <addrrange> '@' <net>
<addrrange> :== '*' |
<ipaddr_range> |
<numaddr_range>
<ipaddr_range> :==
<numaddr_range>.<numaddr_range>.<numaddr_range>.<numaddr_range>
<numaddr_range> :== <number> |
<expr_list>
<expr_list> :== '[' <range_expr> [ ',' <range_expr>] ']'
<range_expr> :== <number> |
<number> '-' <number> |
<number> '-' <number> '/' <number>
<net> :== <netname> | <netname><number>
<netname> :== "lo" | "tcp" | "o2ib" | "gni"
<number> :== <nonnegative decimal> | <hexadecimal>For proper operations, the Lustre file system
requires to have a privileged group that
covers all Lustre server nodes. So the very first step when working with
nodemaps is to create such a group with both properties
admin and trusted set. It is
recommended to give this group an explicit label such as
TrustedSystem
or some identifier that makes the association clear.
Let's consider a deployment where the server nodes are in the NID
range 192.168.0.[1-10]@tcp. Create the policy group,
add the NID range to that group, and set the properties accordingly using
the lctl command on the MGS:
mgs# lctl nodemap_addTrustedSystemsmgs# lctl nodemap_add_range --nameTrustedSystems--range 192.168.0.[1-10]@tcp mgs# lctl nodemap_modify --nameTrustedSystems--property admin --value 1 mgs# lctl nodemap_modify --nameTrustedSystems--property trusted --value 1
Deploy nodemap by first considering which users need to be mapped, and what sets of network addresses or ranges are involved. Issues of visibility between users must be examined as well.
Consider a deployment where researchers are working on data
relating to birds. The researchers use a computing system which mounts
the filesystem from a single IPv4 address, 192.168.0.100,
and sensors which mount the filesystem from an address range
192.168.0.[50-99]. Name this policy group
BirdResearchSite. Create the policy group and add the
NID ranges to that group on the MGS using the lctl command:
mgs# lctl nodemap_add BirdResearchSite
mgs# lctl nodemap_add_range --name BirdResearchSite --range 192.168.0.100@tcp
mgs# lctl nodemap_add_range --name BirdResearchSite --range 192.168.0.[50-99]@tcp
Later, additional sensors were added that use addresses in the range
192.168.10.[101-150] that increased the number of
nodes in the BirdResearchSite nodemap, but otherwise
are managed as part of the same nodemap.
mgs# lctl nodemap_add_range --name BirdResearchSite --range 192.168.0.[101-150]@tcp
Note
A NID cannot be in more than one policy group. Assign a NID to a new policy group by first removing it from the existing group.
The researchers use the following identifiers on their host system:
swan(UID 530) member of groupwetlands(GID 600)duck(UID 531) member of groupwetlands(GID 600)hawk(UID 532) member of groupraptor(GID 601)merlin(UID 533) member of groupraptor(GID 601)
Assign a set of six idmaps to this policy group, with four for UIDs,
and two for GIDs. Pick a starting point, e.g. UID 11000, with room for
additional UIDs and GIDs to be added as the configuration grows.
Use the lctl command to set up the idmaps:
mgs# lctl nodemap_add_idmap --nameBirdResearchSite--idtype uid --idmap530:11000mgs# lctl nodemap_add_idmap --nameBirdResearchSite--idtype uid --idmap531:11001mgs# lctl nodemap_add_idmap --nameBirdResearchSite--idtype uid --idmap532:11002mgs# lctl nodemap_add_idmap --nameBirdResearchSite--idtype uid --idmap533:11003mgs# lctl nodemap_add_idmap --nameBirdResearchSite--idtype gid --idmap600:11000mgs# lctl nodemap_add_idmap --nameBirdResearchSite--idtype gid --idmap601:11001
The parameter 530:11000 assigns a client UID,
for example UID 530, to a single canonical UID,
such as UID 11000. Each assignment is made individually. There is no
method to specify a range 530-533:11000-11003.
UID and GID idmaps are assigned separately. There is no implied
relationship between the two.
Files created on the Lustre file system from the
192.168.0.100@tcp NID using UID
duck and GID wetlands are stored
in the Lustre file system using the canonical identifiers, in this case
UID 11001 and GID 11000. A different NID, if not part of the same policy
group, sees its own view of the same file space.
Suppose a previously created project directory exists owned by UID
11002/GID 11001, with mode 770. When users hawk and
merlin at 192.168.0.100 place files named
hawk-file and merlin-file into the
directory, the contents from the 192.168.0.100 client appear as:
[merlin@192.168.0.100 projectsite]$ ls -la total 34520 drwxrwx--- 2 hawk raptor 4096 Jul 23 09:06 . drwxr-xr-x 3 nobody nobody 4096 Jul 23 09:02 .. -rw-r--r-- 1 hawk raptor 10240000 Jul 23 09:05 hawk-file -rw-r--r-- 1 merlin raptor 25100288 Jul 23 09:06 merlin-file
From a privileged view, the canonical owners are displayed:
[root@trustedSite projectsite]# ls -la total 34520 drwxrwx--- 2 11002 11001 4096 Jul 23 09:06 . drwxr-xr-x 3 root root 4096 Jul 23 09:02 .. -rw-r--r-- 1 11002 11001 10240000 Jul 23 09:05 hawk-file -rw-r--r-- 1 11003 11001 25100288 Jul 23 09:06 merlin-file
If UID 11002 or GID 11001 do not exist on the Lustre MDS or MGS,
create them in LDAP or other data sources, or trust clients by setting
identity_upcall to NONE. For more
information, see Section 41.1, “User/Group Upcall”.
Building a larger and more complex configuration is possible by
iterating through the lctl commands above. In
short:
Create a name for the policy group.
Create a set of NID ranges used by the group.
Define which UID and GID translations need to occur for the group.
Mapping offsets map all client ids to a new range specified by an
offset, such that fs_id = client_id + offset. The
nodemap_add_offset command defines a mapping offset for
a given nodemap and applies the offset to all UID, GID, and PROJID
types.
lctl nodemap add_offset --nameNAME--offsetOFFSET--limitFSID_COUNT
This command allows admins to create offset ranges for client
systems to avoid overlapping assignments in multi-tenant systems. The
FSID_COUNT specifies the number of IDs mapped by the
range, starting with the root(0) user/group/project ID
and extending through FSID_COUNT-1.
An offset range cannot overlap with another offset range. A
nodemap can only have one offset defined. To modify the offset already
defined, just assign a new value. Any existing files will not
automatically be remapped to the new OFFSET range. IDs
must be manually changed on all files for that nodemap with
chown(1) and lfs-project(1) on a
trusted client that has access to the unmapped, canonical file system IDs.
Therefore modifying a nodemap offset should be avoided if possible.
For example, to map the client UID, GID, and PROJID values from the range 0-199999 to the filesystem UID, GID, and PROJID values to the range 100000-299999:
mgs# lctl nodemap_add_offset --name remotesite --offset 100000 --limit 200000Once an offset is set on a nodemap, please make sure the explicit
mappings are defined so that they do not escape the offset range. This
means an explicit mapping should not map a client id to a file system id
greater than FSID_COUNT-1. Similarly, the
squash_uid, squash_gid and
squash_projid values should not be set to a value
greater than FSID_COUNT-1. Otherwise this would
produce file system ids outside of the offset range.
If not zero, the mapping offset is always applied as the last stage of the mapping process. Figure 28.1, “Flow chart: nodemap identity mapping” gives a simplified view of the identity mapping process that happens when nodemap is activated, to convert a client id to a file system canonical id.

To deactivate id mapping offset, use the
nodemap_del_offset command.
lctl nodemap del_offset --name NAMENote
As when changing the ID offset value, deleting the ID offset will not remap files created with the offset IDs. It is up to the storage administrator to delete or reset UID/GID/PROJID for files that were created with the mapped IDs. Generally, an ID offset should remain unchanged for the entire nodemap lifetime and not be deleted without a clear understanding of the operational impact.
It is possible to delete a NID range from a nodemap, any clients in this NID range will be moved to the default nodemap.
mgs# lctl nodemap_del_range --name BirdResearchSite --range 192.168.0.[101-150]@tcpWhen deleting a range from a nodemap it must be the same range that was declared when using nodemap_add_range. This means that it is not possible to remove a range inside of the initial values or a (partially) overlapping range. Also worth noting, if two different ranges are added that are adjacent, they are still treated as two independent ranges and must be each individually deleted.
When deleting a whole policy group all of the associated ID mappings, NID ranges, and other parameters will be removed, and existing clients will be moved to the default nodemap. The default nodemap cannot be deleted. The syntax is:
mgs# lctl nodemap_del BirdResearchSitePrivileged users access mapped systems with rights dependent on
certain properties, described below. By default, root access is squashed
to user nobody, which interferes with most
administrative actions.
For proper operations, the Lustre file system
requires a group that covers all Lustre
server nodes, with both properties admin and
trusted set. It is recommended to give this group an
explicit label such as TrustedSystems or some
identifier that makes the association clear.
Several properties exist, off by default, which change
client behavior: admin,
trusted, map_mode,
squash_uid, squash_gid,
squash_projid, deny_unknown,
audit_mode and forbid_encryption.
The property
admindefines whether root is squashed on the policy group. By default, it is squashed, unless this property is enabled. Coupled with thetrustedproperty, this will allow unmapped access for backup nodes, transfer points, or other administrative mount points.The
trustedproperty permits members of a policy group to see the file system's canonical identifiers. In the above example, UID 11002 and GID 11001 will be seen without translation. This can be utilized when local UID and GID sets already map directly to the specified users.- Introduced in Lustre 2.10
The
map_modeproperty lets control the way mapping is carried out. By default it is set toallwhich means the nodemap will map UIDs, GIDs, and PROJIDs. If set touid_onlyor justuid, only UIDs will be mapped. If set togid_onlyor justgid, only GIDs will be mapped. If set toprojid_onlyor justprojid, only PROJIDs will be mapped. If set toboth, both UIDs and GIDs will be mapped. Multiple values can be specified, comma separated. The properties
squash_uid,squash_gidandsquash_projiddefine the default UID, GID and PROJID respectively that users will be squashed to if unmapped, unless the deny_unknown flag is set, in which case access will still be denied.Note
The
squash_projidproperty was introduced in Lustre 2.15The property
deny_unknowndenies all access to users not mapped in a particular nodemap. This is useful if a site is concerned about unmapped users accessing the file system in order to satisfy security requirements.- Introduced in Lustre 2.11
The property
audit_modelets control which Lustre client nodes can trigger the recording of file system access events to the Changelogs. When this flag is set to 1, clients will be able to record file system access events to the Changelogs, if Changelogs are otherwise activated. When set to 0, events are not logged into the Changelogs, no matter if Changelogs are activated or not. By default, this flag is set to 1 in newly created nodemap entries. And it is also set to 1 in 'default' nodemap. - Introduced in Lustre 2.14
The property
forbid_encryptionprevents clients from using encryption. - Introduced in Lustre 2.16
The property
readonly_mountforces clients to a read-only mount if not specified explicitly. By default it is set to 0 which means clients are allowed to mount in read-write mode. Set it to 1 to force read-only mount. - Introduced in Lustre 2.16
The property
rbacdefines different Role-Based Admin Control mechanisms:byfid_ops, to allow operations by FID (e.g. 'lfs rmfid').chlg_ops, to allow access to Lustre Changelogs.dne_ops, to allow operations related to DNE (e.g. 'lfs mkdir').file_perms, to allow modifications of file permissions and owners.fscrypt_admin, to allow fscrypt related admin tasks (create or modify protectors/policies). Note that even without this role, it is still possible to lock or unlock encrypted directories, as these operations only need read access to fscrypt metadata.quota_ops, to allow quota modifications.
The default value for this property is
all, which means all roles are allowed. Multiple values among those listed above can be specified, comma separated. Apart from all, any role not explicitly specified is forbidden. And to forbid all roles, usenonevalue. - Introduced in Lustre 2.17
The property
deny_mountcontrols whether nodes assigned to the nodemap are allowed to mount new Lustre clients. By default this is allowed and the property is set to 0. Set it to 1 to prevent nodes from establishing new client mounts. Note that existing client mounts are not evicted and will continue to work until a remount is attempted.
Alter values to either true (1) or false (0) on the MGS:
mgs# lctl nodemap_modify --nameBirdAdminSite--property trusted --value 1 mgs# lctl nodemap_modify --nameBirdAdminSite--property admin --value 1 mgs# lctl nodemap_modify --nameBirdAdminSite--property deny_unknown --value 1
Change values during system downtime to minimize the chance of any ownership or permissions problems if the policy group is active. Although changes can be made live, client caching of data may interfere with modification as there are a few seconds of lead time before the change is distributed.
With both admin and trusted
properties set, the policy group has full access, as if nodemap was
turned off, to the Lustre file system. The administrative site for the
Lustre file system needs at least one group with both properties in
order to perform maintenance or to perform administrative tasks.
Warning
Lustre server nodes must be in a
policy group with both these properties set to 1. It is recommended to
use a policy group labeled TrustedSystems
or some identifier that makes the association clear.
If a policy group has the admin
property set, but does not have the property
trusted set, root is mapped directly to
root, any explicitly specified UID and GID idmaps are honored, and
other access is squashed. If root alters ownership to UIDs or GIDs
which are locally known from that host but not part of an idmap, root
effectively changes ownership of those files to the default
squashed UID and GID.
If trusted is set but admin
is not, the policy group has full access to the canonical UID and GID
sets of the Lustre file system, and root is squashed.
The deny_unknown property, once enabled, prevents unmapped users
from accessing the file system. Root access also is denied, if the
admin property is off, and root is not part of any
mapping.
To prevent a client from changing quota settings
for a project other than the one assigned to the fileset it is restricted
to, you should map the PROJID to itself, set map_mode
to projid, and then trusted to
0 and deny_unknown to 1. This way, only operations on
the designated PROJID will be allowed.
When nodemaps are modified, the change events are queued and distributed across the cluster. Under normal conditions, these changes can take around ten seconds to propagate. During this distribution window, file access could be made via the old or new nodemap settings. Therefore, it is recommended to save changes for a maintenance window or to deploy them while the mapped nodes are not actively writing to the file system.
The nodemap feature is simple to enable:
mgs# lctl nodemap_activate 1
Passing the parameter 0 instead of 1 disables the feature again. After deploying the feature, validate the mappings are intact before offering the file system to be mounted by clients.
So far, changes have been made on the MGS. Prior to
Lustre 2.9, changes must also be manually set on MDS systems as well.
Also, changes must be manually deployed to OSS servers if quota
is enforced, utilizing lctl set_param
instead of lctl. Prior to 2.9,
the configuration is not persistent, requiring a script
which generates the mapping to be saved and deployed after every Lustre
restart. As an example, use this style to deploy settings on the
OSS:
oss# lctl set_param nodemap.add_nodemap=SiteNameoss# lctl set_param nodemap.add_nodemap_range='SiteName 192.168.0.15@tcp' oss# lctl set_param nodemap.add_nodemap_idmap='SiteNameuid510:1700' oss# lctl set_param nodemap.add_nodemap_idmap='SiteNamegid612:1702'
In Lustre 2.9 and later, nodemap configuration is saved on the MGS and distributed automatically to MGS, MDS, and OSS nodes, a process which takes approximately ten seconds in normal circumstances.
There is a special nodemap called default. As the
name suggests, it is created by default and cannot be removed. It is like
a fallback nodemap, setting the behaviour for Lustre clients that do not
match any other nodemap.
Because of its special role, only some parameters can be set on the
default nodemap:
admintrustedsquash_uidsquash_gidfilesetaudit_mode
In particular, no UID/GID mapping can be defined on the
default nodemap.
Note
Be careful when altering the admin and
trusted properties of the default
nodemap, especially if your Lustre servers fall into this nodemap.
By using lctl nodemap_info all, existing nodemap
configuration is listed for easy export. This command acts as a shortcut
into the configuration interface for nodemap. On the Lustre MGS, the
nodemap.active parameter contains a 1
if nodemap is active on the system. Each policy group
creates a directory containing the following parameters:
adminandtrustedeach contain a1if the values are set, and0otherwise.idmapcontains a list of the idmaps for the policy group, whilerangescontains a list of NIDs for the group.squash_uidandsquash_giddetermine what UID and GID users are squashed to if needed.
The expected outputs for the BirdResearchSite in the example above are:
mgs# lctl get_param nodemap.BirdResearchSite.idmap
[
{ idtype: uid, client_id: 530, fs_id: 11000 },
{ idtype: uid, client_id: 531, fs_id: 11001 },
{ idtype: uid, client_id: 532, fs_id: 11002 },
{ idtype: uid, client_id: 533, fs_id: 11003 },
{ idtype: gid, client_id: 600, fs_id: 11000 },
{ idtype: gid, client_id: 601, fs_id: 11001 }
]
mgs# lctl get_param nodemap.BirdResearchSite.ranges
[
{ id: 11, start_nid: 192.168.0.100@tcp, end_nid: 192.168.0.100@tcp }
]Consistency issues may arise in a nodemap enabled configuration when Lustre clients mount from an unknown NID range, new UIDs and GIDs that were not part of a known map are added, or there are misconfigurations in the rules. Keep in mind the following when activating nodemap on a production system:
Creating new policy groups or idmaps on a production system is allowed, but reserve a maintenance window to alter the
trustedproperty to avoid metadata problems.To perform administrative tasks, access the Lustre file system via a policy group with
trustedandadminproperties set. This prevents the creation of orphaned and squashed files. Granting theadminproperty without thetrustedproperty is dangerous. The root user on the client may know of UIDs and GIDs that are not present in any idmap. If root alters ownership to those identifiers, the ownership is squashed as a result. For example, tar file extracts may be flipped from an expected UID such as UID 500 tonobody, normally UID 99.To map distinct UIDs at two or more sites onto a single UID or GID on the Lustre file system, create overlapping idmaps and place each site in its own policy group. Each distinct UID may have its own mapping onto the target UID or GID.
- Introduced in Lustre 2.8
In Lustre 2.8, changes must be manually kept in a script file to be re-applied after a Lustre reload, and changes must be made on each OSS, MDS, and MGS nodes, as there is no automatic synchronization between the nodes.
If
deny_unknownis in effect, it is possible for unmapped users to see dentries which were viewed by a mapped user. This is a result of client caching, and unmapped users will not be able to view any file contents.Nodemap activation status can be checked with
lctl nodemap_info, but extra validation is possible. One way of ensuring valid deployment on a production system is to create a fingerprint of known files with specific UIDs and GIDs mapped to a test client. After bringing the Lustre system online after maintenance, the test client can validate the UIDs and GIDs map correctly before the system is mounted in user space.
Table of Contents
This chapter describes how to configure Shared-Secret Key security and includes the following sections:
The SSK feature ensures integrity and data protection for Lustre PtlRPC traffic. Key files containing a shared secret and session-specific attributes are distributed to Lustre hosts. This authorizes Lustre hosts to mount the file system and optionally enables secure data transport, depending on which security flavor is configured. The administrator handles the generation, distribution, and installation of SSK key files, see Section 29.3.1, “Key File Management”.
SSK is implemented as a Generic Security Services (GSS) mechanism through Lustre's support of the GSS Application Program Interface (GSSAPI). The SSK GSS mechanism supports five flavors that offer varying levels of protection.
Flavors provided:
skn- SSK Null (Authentication)ska- SSK Authentication and Integrity for non-bulk RPCsski- SSK Authentication and Integrityskpi- SSK Authentication, Privacy, and Authenticationgssnull- Provides no protection. Used for testing purposes only
The table below describes the security characteristics of each flavor:
Table 29.1. SSK Security Flavor Protections
|
skn |
ska |
ski |
skpi | |
|---|---|---|---|---|
|
Required to mount file system |
Yes |
Yes |
Yes |
Yes |
|
Provides RPC Integrity |
No |
Yes |
Yes |
Yes |
|
Provides RPC Privacy |
No |
No |
No |
Yes |
|
Provides Bulk RPC Integrity |
No |
No |
Yes |
Yes |
|
Provides Bulk RPC Privacy |
No |
No |
No |
Yes |
Valid non-GSS flavors include:
null - Provides no protection. This is the
default flavor.
plain - Plaintext with a hash on each RPC.
Secure RPC configuration rules are written to the Lustre log
(llog) with the lctl command. Rules are processed
with the llog and dictate the security flavor that is used for a
particular Lustre network and direction.
Note
Rules take affect in a matter of seconds and impact both existing and new connections.
Rule format:
target.srpc.flavor.network[.direction]=flavor
target- This could be the file system name or a specific MDT/OST device name.network- LNet network name of the RPC initiator. For exampletcp1oro2ib0. This can also be the keyworddefaultthat applies to all networks otherwise specified.direction- Direction is optional. This could be one ofmdt2mdt,mdt2ost,cli2mdt, orcli2ost.
Note
To secure the connection to the MGS use the
mgssec=flavor
mount option. This is required because security rules are unknown to
the initiator until after the MGS connection has been established.
The examples below are for a test Lustre file system named testfs.
Rules can be defined and deleted in any order. The rule with the
greatest specificity for a given connection is applied. The
fsname.srpc.flavor.default
rule is the broadest rule as it applies to all non-MGS connections for
the file system in the absence of a more specific rule. You may tailor
SSK security to your needs by further specifying a specific
target, network, and/or
direction.
The following example illustrates an approach to configuring SSK security for an environment consisting of three LNet networks. The requirements for this example are:
All non-MGS connections must be authenticated.
PtlRPC traffic on LNet network
tcp0must be encrypted.LNet networks
tcp1ando2ib0are local physically secure networks that require high performance. Do not encrypt PtlRPC traffic on these networks.
Ensure that all non-MGS connections are authenticated and encrypted by default.
mgs# lctl conf_param testfs.srpc.flavor.default=skpi
Override the file system default security flavor on LNet networks
tcp1ando2ib0withska. Security flavorskaprovides authentication but without the performance impact of encryption and bulk RPC integrity.mgs# lctl conf_param testfs.srpc.flavor.tcp1=ska mgs# lctl conf_param testfs.srpc.flavor.o2ib0=ska
Note
Currently the "lctl set_param -P" format does
not work with sptlrpc.
To view the Secure RPC Config Rules, enter:
mgs# lctl get_param mgs.*.live.testfs ... Secure RPC Config Rules: testfs.srpc.flavor.tcp.cli2mdt=skpi testfs.srpc.flavor.tcp.cli2ost=skpi testfs.srpc.flavor.o2ib=ski ...
SSK key files are a collection of attributes formatted as fixed length values and stored in a file, which are distributed by the administrator to client and server nodes. Attributes include:
Version - Key file schema version number. Not user-defined.
Type - A mandatory attribute that denotes the Lustre role of the key file consumer. Valid key types are:
mgs - for MGS when the
mgssecmount.lustreoption is used.server - for MDS and OSS servers
client - for clients as well as servers who communicate with other servers in a client context (e.g. MDS communication with OSTs).
HMAC algorithm - The Keyed-Hash Message Authentication Code algorithm used for integrity. Valid algorithms are (Default: SHA256):
SHA256
SHA512
Cryptographic algorithm - Cipher for encryption. Valid algorithms are (Default: AES-256-CTR).
AES-256-CTR
Session security context expiration - Seconds before session contexts generated from key expire and are regenerated (Default: 604800 seconds (7 days)).
Shared key length - Shared key length in bits (Default: 256).
Prime length - Length of prime (p) in bits used for the Diffie-Hellman Key Exchange (DHKE). (Default: 2048). This is generated only for client keys and can take a while to generate. This value also sets the minimum prime length that servers and MGS will accept from a client. Clients attempting to connect with a prime length less than the minimum will be rejected. In this way servers can guarantee the minimum encryption level that will be permitted.
File system name - Lustre File system name for key.
MGS NIDs - Comma-separated list of MGS NIDs. Only required when
mgssecis used (Default: "").Nodemap name - Nodemap name for key (Default: "default"). See Section 29.5, “Role of Nodemap in SSK”
Shared key - Shared secret used by all SSK flavors to provide authentication.
Prime (p) - Prime used for the DHKE. This is only used for keys with
Type=client.
Note
Key files provide a means to authenticate Lustre connections; always store and transfer key files securely. Key files must not be world writable or they will fail to load.
The lgss_sk utility is used to write, modify,
and read SSK key files. lgss_sk can be used to load
key files singularly into the kernel keyring. lgss_sk
options include:
Table 29.2. lgss_sk Parameters
|
Parameter |
Value |
Description |
|---|---|---|
|
|
|
Install key from file into user's session keyring. Must be executed by root. |
|
|
|
Modify a file's key attributes |
|
|
|
Show file's key attributes |
|
|
|
Generate key file |
|
|
|
Cipher for encryption (Default: AES Counter mode) AES-256-CTR |
|
|
|
Hash algorithm for intregrity (Default: SHA256) SHA256 or SHA512 |
|
|
|
Seconds before contexts from key expire (Default: 604800 (7 days)) |
|
|
|
File system name for key |
|
|
|
Comma separated list of MGS NID(s). Only required when mgssec is used (Default: "") |
|
|
|
Nodemap name for key (Default: "default") |
|
|
|
Prime length (p) for DHKE in bits (Default: 2048) |
|
|
|
Key type (mgs, server, client) |
|
|
|
Shared key length in bits (Default: 256) |
|
|
|
Shared key random data source (Default: /dev/random) |
|
|
Increase verbosity for errors |
Key files are generated by the lgss_sk
utility. Parameters are specified on the command line followed by the
--write parameter and the filename to write
to. The lgss_sk utility will not overwrite files
so the filename must be unique. Mandatory parameters for generating
key files are --type, either
--fsname or --mgsnids, and
--write; all other parameters
are optional.
lgss_sk uses /dev/random
as the default entropy data source; you may override this with the
--data parameter. When no hardware random
number generator is available on the system where
lgss_sk is executing, you may need to press keys on
the keyboard or move the mouse (if directly attached to the system)
or cause disk IO (if system is remote), in order to generate entropy
for the shared key. It is possible to use
/dev/urandom for testing purposes but this may
provide less security in some cases.
Example:
To create a server type key file for the testfs Lustre file system for clients in the biology nodemap, enter:
server# lgss_sk -t server -f testfs -n biology \ -w testfs.server.biology.key
Like writing key files you modify them by specifying the paramaters on the command line that you want to change. Only key file attributes associated with the parameters provided are changed; all other attributes remain unchanged.
To modify a key file's Type to client and populate the Prime (p) key attribute, if it is missing, enter:
client# lgss_sk -t client -m testfs.client.biology.key
To add MGS NIDs 192.168.1.101@tcp,10.10.0.101@o2ib
to server key file testfs.server.biology.key and
client key file testfs.client.biology.key, enter
server# lgss_sk -g 192.168.1.101@tcp,10.10.0.101@o2ib \ -m testfs.server.biology.key client# lgss_sk -g 192.168.1.101@tcp,10.10.0.101@o2ib \ -m testfs.client.biology.key
To modify the testfs.server.biology.key on
the MGS to support MGS connections from biology
clients, modify the key file's Type to include
mgs in addition to server,
enter:
mgs# lgss_sk -t mgs,server -m testfs.server.biology.key
Read key files with the lgss_sk utility and
--read parameter. Read the keys modified in the
previous examples:
mgs# lgss_sk -r testfs.server.biology.key Version: 1 Type: mgs server HMAC alg: SHA256 Crypt alg: AES-256-CTR Ctx Expiration: 604800 seconds Shared keylen: 256 bits Prime length: 2048 bits File system: testfs MGS NIDs: 192.168.1.101@tcp 10.10.0.101@o2ib Nodemap name: biology Shared key: 0000: 84d2 561f 37b0 4a58 de62 8387 217d c30a ..V.7.JX.b..!}.. 0010: 1caa d39c b89f ee6c 2885 92e7 0765 c917 .......l(....e.. client# lgss_sk -r testfs.client.biology.key Version: 1 Type: client HMAC alg: SHA256 Crypt alg: AES-256-CTR Ctx Expiration: 604800 seconds Shared keylen: 256 bits Prime length: 2048 bits File system: testfs MGS NIDs: 192.168.1.101@tcp 10.10.0.101@o2ib Nodemap name: biology Shared key: 0000: 84d2 561f 37b0 4a58 de62 8387 217d c30a ..V.7.JX.b..!}.. 0010: 1caa d39c b89f ee6c 2885 92e7 0765 c917 .......l(....e.. Prime (p) : 0000: 8870 c3e3 09a5 7091 ae03 f877 f064 c7b5 .p....p....w.d.. 0010: 14d9 bc54 75f8 80d3 22f9 2640 0215 6404 ...Tu...".&@..d. 0020: 1c53 ba84 1267 bea2 fb05 37a4 ed2d 5d90 .S...g....7..-]. 0030: 84e3 1a67 67f0 47c7 0c68 5635 f50e 9cf0 ...gg.G..hV5.... 0040: e622 6f53 2627 6af6 9598 eeed 6290 9b1e ."oS&'j.....b... 0050: 2ec5 df04 884a ea12 9f24 cadc e4b6 e91d .....J...$...... 0060: 362f a239 0a6d 0141 b5e0 5c56 9145 6237 6/.9.m.A..\V.Eb7 0070: 59ed 3463 90d7 1cbe 28d5 a15d 30f7 528b Y.4c....(..]0.R. 0080: 76a3 2557 e585 a1be c741 2a81 0af0 2181 v.%W.....A*...!. 0090: 93cc a17a 7e27 6128 5ebd e0a4 3335 db63 ...z~'a(^...35.c 00a0: c086 8d0d 89c1 c203 3298 2336 59d8 d7e7 ........2.#6Y... 00b0: e52a b00c 088f 71c3 5109 ef14 3910 fcf6 .*....q.Q...9... 00c0: 0fa0 7db7 4637 bb95 75f4 eb59 b0cd 4077 ..}.F7..u..Y..@w 00d0: 8f6a 2ebd f815 a9eb 1b77 c197 5100 84c0 .j.......w..Q... 00e0: 3dc0 d75d 40b3 6be5 a843 751a b09c 1b20 =..]@.k..Cu.... 00f0: 8126 4817 e657 b004 06b6 86fb 0e08 6a53 .&H..W........jS
Key files can be loaded into the kernel keyring with the
lgss_sk utility or at mount time with the
skpath mount option. The skpath
method has the advantage that it accepts a directory path and loads
all key files within the directory into the keyring. The
lgss_sk utility loads a single key file into the
keyring with each invocation. Key files must not be world writable or
they will fail to load.
Third party tools can also load the keys if desired. The only caveat is that the key must be available when the request_key upcall to userspace is made and they use the correct key descriptions for a key so that it can be found during the upcall (see Key Descriptions).
Examples:
Load the testfs.server.biology.key key file
using lgss_sk,
enter:
server# lgss_sk -l testfs.server.biology.key
Use the skpath mount option to load all of
the key files in the /secure_directory directory
when mounting a storage target, enter:
server# mount -t lustre -o skpath=/secure_directory \ /storage/target /mount/point
Use the skpath mount option to load key files
into the keyring on a client, enter:
client# mount -t lustre -o skpath=/secure_directory \ mgsnode:/testfs /mnt/testfs
The Lustre GSS Keyring binary lgss_keyring is
used by SSK to handle the upcall from kernel space into user space via
request-key. The purpose of
lgss_keyring is to create a token that is passed as
part of the security context initialization RPC (SEC_CTX_INIT)
The Lustre GSS keyring types of flavors utilize the Linux kernel
keyring infrastructure to maintain keys as well as to perform the
upcall from kernel space to userspace for key
negotiation/establishment. The GSS keyring establishes a key type
(see request-key(8)) named lgssc
when the Lustre ptlrpc_gss kernel module is loaded.
When a security context must be established it creates a key and uses the
request-key binary in an upcall to establish the key.
This key will look for the configuration file in
/etc/request-key.d with the name
keytype.conf, for Lustre this is
lgssc.conf.
Each node participating in SSK Security must have a
/etc/request-key.d/lgssc.conf file that contains the
following single line:
create lgssc * * /usr/sbin/lgss_keyring %o %k %t %d %c %u %g %T %P %S
The request-key binary will call
lgss_keyring with the arguments following it with
their substituted values (see request-key.conf(5)).
Lustre servers do not use the Linux
request-key mechanism as clients do. Instead
servers run a daemon that uses a pipefs with the kernel to trigger
events based on read/write to a file descriptor. The server-side
binary is lsvcgssd. It can be executed in the
foreground or as a daemon. Below are the parameters for the
lsvcgssd binary which requires various security
flavors (gssnull, krb5, sk) to be enabled
explicitly. This ensures that only required functionality is
enabled.
Table 29.3. lsvcgssd Parameters
|
Parameter |
Description |
|---|---|
|
|
Run in foreground |
|
|
Do not establish Kerberos credentials |
|
|
Verbosity |
|
|
Service MDS |
|
|
Service OSS |
|
|
Service MGS |
|
|
Enable Kerberos support |
|
|
Enable Shared Key support |
|
|
Enable |
A SysV style init script is installed for starting and stopping
the lsvcgssd daemon. The init script checks the
LSVCGSSARGS variable in the
/etc/sysconfig/lsvcgss configuration file for
startup parameters.
Keys during the upcall on the client and handling of an RPC on the server are found by using a specific key description for each key in the kernel keyring.
For each MGS NID there must be a separate key loaded. The format of the key description should be:
Table 29.4. Key Descriptions
|
Type |
Key Description |
Example |
|---|---|---|
|
MGC |
lustre:MGC |
|
|
MDC/OSC/OSP/LWP |
lustre: |
|
|
MDT |
lustre: |
|
|
OST |
lustre: |
|
|
MGS |
lustre:MGS |
|
All keys for Lustre use the user type for
keys and are attached to the user's keyring.
This is not configurable.
Below is an example showing how to list the user's keyring, load
a key file, read the key, and clear the key from the kernel keyring.
client# keyctl show Session Keyring 17053352 --alswrv 0 0 keyring: _ses 773000099 --alswrv 0 65534 \_ keyring: _uid.0 client# lgss_sk -l /secure_directory/testfs.client.key client# keyctl show Session Keyring 17053352 --alswrv 0 0 keyring: _ses 773000099 --alswrv 0 65534 \_ keyring: _uid.0 1028795127 --alswrv 0 0 \_ user: lustre:testfs client# keyctl pipe 1028795127 | lgss_sk -r - Version: 1 Type: client HMAC alg: SHA256 Crypt alg: AES-256-CTR Ctx Expiration: 604800 seconds Shared keylen: 256 bits Prime length: 2048 bits File system: testfs MGS NIDs: Nodemap name: default Shared key: 0000: faaf 85da 93d0 6ffc f38c a5c6 f3a6 0408 ......o......... 0010: 1e94 9b69 cf82 d0b9 880b f173 c3ea 787a ...i.......s..xz Prime (p) : 0000: 9c12 ed95 7b9d 275a 229e 8083 9280 94a0 ....{.'Z"....... 0010: 8593 16b2 a537 aa6f 8b16 5210 3dd5 4c0c .....7.o..R.=.L. 0020: 6fae 2729 fcea 4979 9435 f989 5b6e 1b8a o.')..Iy.5..[n.. 0030: 5039 8db2 3a23 31f0 540c 33cb 3b8e 6136 P9..:#1.T.3.;.a6 0040: ac18 1eba f79f c8dd 883d b4d2 056c 0501 .........=...l.. 0050: ac17 a4ab 9027 4930 1d19 7850 2401 7ac4 .....'I0..xP$.z. 0060: 92b4 2151 8837 ba23 94cf 22af 72b3 e567 ..!Q.7.#..".r..g 0070: 30eb 0cd4 3525 8128 b0ff 935d 0ba3 0fc0 0...5%.(...].... 0080: 9afa 5da7 0329 3ce9 e636 8a7d c782 6203 ..]..)<..6.}..b. 0090: bb88 012e 61e7 5594 4512 4e37 e01d bdfc ....a.U.E.N7.... 00a0: cb1d 6bd2 6159 4c3a 1f4f 1167 0e26 9e5e ..k.aYL:.O.g.&.^ 00b0: 3cdc 4a93 63f6 24b1 e0f1 ed77 930b 9490 <.J.c.$....w.... 00c0: 25ef 4718 bff5 033e 11ba e769 4969 8a73 %.G....>...iIi.s 00d0: 9f5f b7bb 9fa0 7671 79a4 0d28 8a80 1ea1 ._....vqy..(.... 00e0: a4df 98d6 e20e fe10 8190 5680 0d95 7c83 ..........V...|. 00f0: 6e21 abb3 a303 ff55 0aa8 ad89 b8bf 7723 n!.....U......w# client# keyctl clear @u client# keyctl show Session Keyring 17053352 --alswrv 0 0 keyring: _ses 773000099 --alswrv 0 65534 \_ keyring: _uid.0
Lustre client and server support several debug levels, which can be seen below.
Debug levels:
0 - Error
1 - Warn
2 - Info
3 - Debug
4 - Trace
To set the debug level on the client use the Lustre parameter:
sptlrpc.gss.lgss_keyring.debug_level
For example to set the debug level to trace, enter:
client# lctl set_param sptlrpc.gss.lgss_keyring.debug_level=4
Server-side verbosity is increased by adding additional verbose
flags (-v) to the command line arguments for the
daemon. The following command runs the lsvcgssd
daemon in the foreground with debug verbosity supporting gssnull and
SSK
server# lsvcgssd -f -vvv -z -s
lgss_keyring is called as part of the
request-key upcall which has no standard output;
therefore logging is done through syslog. The server-side logging with
lsvcgssd is written to standard output when
executing in the foreground and to syslog in daemon mode.
The keys discussed above with lgss_sk and the
skpath mount options are not revoked. They are only
used to create valid contexts for client connections. Instead of
revoking them they can be invalidated in one of two ways.
Unloading the key from the user keyring on the server will cause new client connections to fail. If no longer necessary it can be deleted.
Changing the nodemap name for the clients on the servers. Since the nodemap is an integral part of the shared key context instantiation, renaming the nodemap a group of NIDs belongs to will prevent any new contexts.
There currently does not exist a mechanism to flush contexts from Lustre. Targets could be unmounted from the servers to purge contexts. Alternatively shorter context expiration could be used when the key is created so that contexts need to be refreshed more frequently than the default. 3600 seconds could be reasonable depending on the use case so that contexts will have to be renegotiated every hour.
SSK uses Nodemap (See Chapter 28, Mapping UIDs and GIDs with Nodemap) policy group names and their associated NID range(s) as a mechanism to prevent key file forgery, and to control the range of NIDs on which a given key file can be used.
Clients assume they are in the nodemap specified in the key file
they use. When clients instantiate security contexts an upcall is
triggered that specifies information about the context that triggers it.
From this context information request-key calls
lgss_keyring, which in turn looks up the key with
description lustre:fsname or
lustre:target_name for the MGC. Using
the key found in the user keyring matching the description, the nodemap
name is read from the key, hashed with SHA256, and sent to the server.
Servers look up the client's NID to determine which nodemap
the NID is associated with and sends the nodemap name to
lsvcgssd. The lsvcgssd daemon
verifies whether the HMAC equals the nodemap value sent by the client.
This prevents forgery and invalidates the key when a client's NID
is not associated with the nodemap name defined on the servers.
It is not required to activate the Nodemap feature in order for SSK to perform client NID to nodemap name lookups.
The examples in this section use 1 MGS/MDS (NID 172.16.0.1@tcp), 1 OSS (NID 172.16.0.3@tcp), and 2 clients. The Lustre file system name is testfs.
This example illustrates how to configure SSK to apply Privacy and
Integrity protections to client-to-server PtlRPC traffic on the
tcp network. Rules that specify a direction,
specifically cli2mdt and cli2ost,
are used. This permits server-to-server communications to continue using
null which is the default flavor
for all Lustre connections. This arrangement provides no server-to-server
protections, see Section 29.6.3, “Securing Server to Server Communications”.
Create secure directory for storing SSK key files.
mds# mkdir /secure_directory mds# chmod 600 /secure_directory oss# mkdir /secure_directory oss# chmod 600 /secure_directory cli1# mkdir /secure_directory cli1# chmod 600 /secure_directory cli2# mkdir /secure_directory cli2# chmod 600 /secure_directory
Generate a key file for the MDS and OSS servers. Run:
mds# lgss_sk -t server -f testfs -w \ /secure_directory/testfs.server.key
Securely copy the /secure_directory/testfs.server.key key file to the OSS.
mds# scp /secure_directory/testfs.server.key \ oss:/secure_directory/
Securely copy the
/secure_directory/testfs.server.keykey file to/secure_directory/testfs.client.keyon client1.mds# scp /secure_directory/testfs.server.key \ client1:/secure_directory/testfs.client.keyModify the key file type to
clienton client1. This operation also generates a prime number ofPrime lengthto populate thePrime (p)attribute. Run:client1# lgss_sk -t client \ -m /secure_directory/testfs.client.key
Create a
/etc/request-key.d/lgssc.conffile on all nodes that contains this line 'create lgssc * * /usr/sbin/lgss_keyring %o %k %t %d %c %u %g %T %P %S' without the single quotes. Run:mds# echo create lgssc \* \* /usr/sbin/lgss_keyring %o %k %t %d %c %u %g %T %P %S > /etc/request-key.d/lgssc.conf oss# echo create lgssc \* \* /usr/sbin/lgss_keyring %o %k %t %d %c %u %g %T %P %S > /etc/request-key.d/lgssc.conf client1# echo create lgssc \* \* /usr/sbin/lgss_keyring %o %k %t %d %c %u %g %T %P %S > /etc/request-key.d/lgssc.conf client2# echo create lgssc \* \* /usr/sbin/lgss_keyring %o %k %t %d %c %u %g %T %P %S > /etc/request-key.d/lgssc.conf
Configure the
lsvcgssdaemon on the MDS and OSS. Set theLSVCGSSDARGSvariable in/etc/sysconfig/lsvcgsson the MDS to "-s -m". On the OSS, set theLSVCGSSDARGSvariable in/etc/sysconfig/lsvcgssto "-s -o".Start the
lsvcgssddaemon on the MDS and OSS. Run:mds# systemctl start lsvcgss.service oss# systemctl start lsvcgss.service
Mount the MDT and OST with the
-o skpath=/secure_directorymount option. Theskpathoption loads all SSK key files found in the directory into the kernel keyring.Set client to MDT and client to OST security flavor to SSK Privacy and Integrity,
skpi:mds# lctl conf_param testfs.srpc.flavor.tcp.cli2mdt=skpi mds# lctl conf_param testfs.srpc.flavor.tcp.cli2ost=skpi
Mount the testfs file system on client1 and client2:
client1# mount -t lustre -o skpath=/secure_directory 172.16.0.1@tcp:/testfs /mnt/testfs client2# mount -t lustre -o skpath=/secure_directory 172.16.0.1@tcp:/testfs /mnt/testfs mount.lustre: mount 172.16.0.1@tcp:/testfs at /mnt/testfs failed: Connection refused
client2 failed to authenticate because it does not have a valid key file. Repeat steps 4 and 5, substitute client1 for client2, then mount the testfs file system on client2:
client2# mount -t lustre -o skpath=/secure_directory 172.16.0.1@tcp:/testfs /mnt/testfs
Verify that the
mdcandoscconnections are using the SSK mechanism and thatrpcandbulksecurity flavors areskpi. See Section 29.7, “Viewing Secure PtlRPC Contexts”.Notice the
mgcconnection to the MGS has no secure PtlRPC security context. This is becauseskpisecurity was only specified for client-to-MDT and client-to-OST connections in step 10. The following example details the steps necessary to secure the connection to the MGS.
This example builds on the previous example.
Enable
lsvcgssMGS service support on MGS. Edit/etc/sysconfig/lsvcgsson the MGS and add the (-g) parameter to theLSVCGSSDARGSvariable. Restart thelsvcgssservice.Add mgs key type and MGS NIDs to
/secure_directory/testfs.server.keyon MDS.mgs# lgss_sk -t mgs,server -g 172.16.0.1@tcp,172.16.0.2@tcp -m /secure_directory/testfs.server.key
Load the modified key file on the MGS. Run:
mgs# lgss_sk -l /secure_directory/testfs.server.key
Add MGS NIDs to
/secure_directory/testfs.client.keyon client, client1.client1# lgss_sk -g 172.16.0.1@tcp,172.16.0.2@tcp -m /secure_directory/testfs.client.key
Unmount the testfs file system on client1, then mount with the
mgssec=skpimount option:cli1# mount -t lustre -o mgssec=skpi,skpath=/secure_directory 172.16.0.1@tcp:/testfs /mnt/testfs
Verify that client1's MGC connection is using the SSK mechanism and
skpisecurity flavor. See Section 29.7, “Viewing Secure PtlRPC Contexts”.
This example illustrates how to configure SSK to apply
Integrity protection, ski flavor,
to MDT-to-OST PtlRPC traffic on the tcp network.
This example builds on the previous example.
Create a Nodemap policy group named
LustreServerson the MGS for the Lustre Servers, enter:mgs# lctl nodemap_add LustreServers
Add MDS and OSS NIDs to the LustreServers nodemap, enter:
mgs# lctl nodemap_add_range --name LustreServers --range 172.16.0.[1-3]@tcp
Create key file of type
mgs,serverfor use with nodes in the LustreServers Nodemap range.mds# lgss_sk -t mgs,server -f testfs -g \ 172.16.0.1@tcp,172.16.0.2@tcp -n LustreServers -w \ /secure_directory/testfs.LustreServers.key
Securely copy the
/secure_directory/testfs.LustreServers.keykey file to the OSS.mds# scp /secure_directory/testfs.LustreServers.key oss:/secure_directory/
On the MDS and OSS, copy
/secure_directory/testfs.LustreServers.keyto/secure_directory/testfs.LustreServers.client.key.On each server modify the key file type of
/secure_directory/testfs.LustreServers.client.keyto be of type client. This operation also generates a prime number of Prime length to populate the Prime (p) attribute. Run:mds# lgss_sk -t client -m \ /secure_directory/testfs.LustreServers.client.key oss# lgss_sk -t client -m \ /secure_directory/testfs.LustreServers.client.key
Load the
/secure_directory/testfs.LustreServers.keyand/secure_directory/testfs.LustreServers.client.keykey files into the keyring on the MDS and OSS, enter:mds# lgss_sk -l /secure_directory/testfs.LustreServers.key mds# lgss_sk -l /secure_directory/testfs.LustreServers.client.key oss# lgss_sk -l /secure_directory/testfs.LustreServers.key oss# lgss_sk -l /secure_directory/testfs.LustreServers.client.key
Set MDT to OST security flavor to SSK Integrity,
ski:mds# lctl conf_param testfs.srpc.flavor.tcp.mdt2ost=ski
Verify that the
oscandospconnections to the OST have a secureskisecurity context. See Section 29.7, “Viewing Secure PtlRPC Contexts”.
From the client (or servers which have mgc, osc, mdc contexts) you
can view info regarding all users' contexts and the flavor in use for
an import.
For user's contexts (srpc_context), SSK and gssnull only support
a single root UID so there should only be one context. The other file in
the import (srpc_info) has additional sptlrpc details. The
rpc and bulk flavors allow you to
verify which security flavor is in use.
client1# lctl get_param *.*.srpc_* mdc.testfs-MDT0000-mdc-ffff8800da9f0800.srpc_contexts= ffff8800da9600c0: uid 0, ref 2, expire 1478531769(+604695), fl uptodate,cached,, seq 7, win 2048, key 27a24430(ref 1), hdl 0xf2020f47cbffa93d:0xc23f4df4bcfb7be7, mech: sk mdc.testfs-MDT0000-mdc-ffff8800da9f0800.srpc_info= rpc flavor: skpi bulk flavor: skpi flags: rootonly,udesc, id: 3 refcount: 3 nctx: 1 gc internal 3600 gc next 3505 mgc.MGC172.16.0.1@tcp.srpc_contexts= ffff8800dbb09b40: uid 0, ref 2, expire 1478531769(+604695), fl uptodate,cached,, seq 18, win 2048, key 3e3f709f(ref 1), hdl 0xf2020f47cbffa93b:0xc23f4df4bcfb7be6, mech: sk mgc.MGC172.16.0.1@tcp.srpc_info= rpc flavor: skpi bulk flavor: skpi flags: -, id: 2 refcount: 3 nctx: 1 gc internal 3600 gc next 3505 osc.testfs-OST0000-osc-ffff8800da9f0800.srpc_contexts= ffff8800db9e5600: uid 0, ref 2, expire 1478531770(+604696), fl uptodate,cached,, seq 3, win 2048, key 3f7c1d70(ref 1), hdl 0xf93e61c64b6b415d:0xc23f4df4bcfb7bea, mech: sk osc.testfs-OST0000-osc-ffff8800da9f0800.srpc_info= rpc flavor: skpi bulk flavor: skpi flags: rootonly,bulk, id: 6 refcount: 3 nctx: 1 gc internal 3600 gc next 3505
Table of Contents
This chapter describes security features of the Lustre file system and includes the following sections:
An access control list (ACL), is a set of data that informs an operating system about permissions or access rights that each user or group has to specific system objects, such as directories or files. Each object has a unique security attribute that identifies users who have access to it. The ACL lists each object and user access privileges such as read, write or execute.
Implementing ACLs varies between operating systems. Systems that support the Portable Operating System Interface (POSIX) family of standards share a simple yet powerful file system permission model, which should be well-known to the Linux/UNIX administrator. ACLs add finer-grained permissions to this model, allowing for more complicated permission schemes. For a detailed explanation of ACLs on a Linux operating system, refer to the SUSE Labs article Posix Access Control Lists on Linux.
We have implemented ACLs according to this model. The Lustre software works with the standard Linux ACL tools, setfacl, getfacl, and the historical chacl, normally installed with the ACL package.
Note
ACL support is a system-range feature, meaning that all clients have ACL enabled or not. You cannot specify which clients should enable ACL.
POSIX Access Control Lists (ACLs) can be used with the Lustre software. An ACL consists of file entries representing permissions based on standard POSIX file system object permissions that define three classes of user (owner, group and other). Each class is associated with a set of permissions [read (r), write (w) and execute (x)].
Owner class permissions define access privileges of the file owner.
Group class permissions define access privileges of the owning group.
Other class permissions define access privileges of all users not in the owner or group class.
The ls -l command displays the owner, group, and
other class permissions in the first column of its output (for example,
-rw-r- -- for a regular file with read and write
access for the owner class, read access for the group class, and no
access for others).
Minimal ACLs have three entries. Extended ACLs have more than the three entries. Extended ACLs also contain a mask entry and may contain any number of named user and named group entries.
To check ACLs on the MDS, check that the acl
connect flag is listed (default since Lustre 1.8):
# lctl get_param -n mdc.home-MDT0000-mdc-*.connect_flags | grep acl
ACLs are enabled by default on a Lustre file system, and are
controlled on a system-wide basis; either all clients enable ACLs or
none do. Activating ACLs is controlled by MDS mount options
acl/noacl to enable or disable
ACLs, respectively. You do not need to change the client
configuration, and the acl string will not appear
in the client mount options in /etc/mtab.
If ACLs are not enabled on the MDS, then any attempts to reference
an ACL on a client return an Operation not supported
error.
These examples are taken directly from the POSIX paper referenced above. ACLs on a Lustre file system work exactly like ACLs on any Linux file system. They are manipulated with the standard tools in the standard manner. Below, we create a directory and allow a specific user access.
[phil@client lustre]$ umask 027 [phil@client lustre]$ mkdir rain [phil@client lustre]$ ls -ld rain drwxr-x--- 2 phil dev 4096 Feb 20 06:50 rain [phil@client lustre]$ getfacl rain # file: rain # owner: phil # group: dev user::rwx group::r-x other::--- [phil@client lustre]$ setfacl -m user:chirag:rwx rain [phil@client lustre]$ ls -ld rain drwxrwx---+ 2 phil dev 4096 Feb 20 06:50 rain [phil@client lustre]$ getfacl --omit-header rain user::rwx user:chirag:rwx group::r-x mask::rwx other::---
Root squash is a security feature which restricts super-user access rights to a Lustre file system. Without the root squash feature enabled, Lustre file system users on untrusted clients could access or modify files owned by root on the file system, including deleting them. Using the root squash feature restricts file access/modifications as the root user. Note, however, that this does not prevent users from accessing files owned by other users.
The root squash feature works by re-mapping the user ID (UID) and
group ID (GID) of the root user to a UID and GID specified by the system
administrator. The preferred way to configure root squash is via nodemaps
and the admin property. Nodemaps allow root squash on a
per-client basis. With UID maps, the clients can even have a local root
UID without actually having root access to the filesystem itself.
Please refer to explanations about the admin
property in the chapter dedicated to Nodemaps, in
Section 28.3.1, “Managing the Properties”.
Namespace isolation is the Lustre implementation of the generic concept of multi-tenancy, which aims at providing separated namespaces from a single filesystem. Lustre namespace isolation enables different populations of users on the same file system beyond normal Unix permissions/ACLs, even when users on the clients may have root access. Those tenants share the same file system, but they are isolated from each other, i.e., they cannot access or even see each other's files, and they are not aware that they are sharing common file system resources.
Lustre namespace isolation leverages the Fileset feature (Section 44.16.3, “Fileset Feature”) to restrict clients to subdirectories of the filesystem rather than the root directory. To achieve namespace isolation, the subdirectory mount, which presents to tenants only their own fileset, has to be imposed to the clients. To that extent, we make use of the nodemap feature (Chapter 28, Mapping UIDs and GIDs with Nodemap). We group all clients used by a tenant under a common nodemap entry, and we assign to this nodemap entry the fileset to which the tenant is restricted.
Enforcing multi-tenancy on Lustre relies on the ability to properly identify the client nodes used by a tenant, and trust those identities. This can be achieved by having physical hardware and/or network security, so that client nodes have well-known NIDs. It is also possible to make use of strong authentication with Kerberos or Shared-Secret Key (see Chapter 29, Configuring Shared-Secret Key (SSK) Security). Kerberos prevents NID spoofing, as every client needs its own credentials, based on its NID, in order to connect to the servers. Shared-Secret Key also prevents tenant impersonation, because keys can be linked to a specific nodemap. See Section 29.5, “Role of Nodemap in SSK” for detailed explanations.
Namespace isolation on Lustre can be achieved by setting one
fileset property (or multiple filesets with Lustre
2.17 or later) on a nodemap entry.
All clients belonging to this nodemap entry will automatically mount
this (primary) fileset instead of the root directory. For example:
mgs# lctl nodemap_set_fileset --name tenant1 --fileset '/dir1'
So all clients matching the tenant1 nodemap are
presented the fileset /dir1 when
mounting. This means these clients are doing an implicit subdirectory
mount on the subdirectory /dir1.
Note
If subdirectory defined as fileset does not exist on the filesystem, it will prevent any client belonging to the nodemap from mounting Lustre.
To delete the fileset parameter, just set it to an empty string:
mgs# lctl nodemap_set_fileset --name tenant1 --fileset ''
Using lctl nodemap_set_fileset automatically
distributes the fileset to all servers and makes isolation permanent.
As of Lustre 2.18, lctl
nodemap_set_fileset is deprecated in favor of
lctl nodemap_fileset_{add,del,modify}.
Note that lctl nodemap_set_fileset can only set the
primary fileset and cannot set it as read-only.
Note
Before Lustre 2.17, making isolation
permanent requires running lctl set_param -P on the
MGS node:
mgs# lctl set_param nodemap.tenant1.fileset=/dir1
mgs# lctl set_param -P nodemap.tenant1.fileset=/dir1
This stores the fileset parameter in the Lustre config logs, allowing
the servers to retrieve this information after a restart.
As of Lustre 2.17, this command is
deprecated and discouraged and only lctl
nodemap_set_fileset should be used.
Previously, nodemaps supported a single fileset per nodemap. As of Lustre 2.17, it is possible to define multiple filesets per nodemap. The previous single fileset is called a primary fileset, offering similar behavior and acting as the default subdirectory when clients (associated with the nodemap) mount the filesystem. Additional alternate filesets can be defined, which offer improved flexibility and allow clients to mount additional subdirectories of the filesystem.
Each nodemap supports a single primary fileset and up to 255 alternate
filesets.
It is possible to only define alternate filesets without a primary
fileset.
In this case, any subdirectory must be explicitly set at client mount
time.
Therefore, alternate filesets never enforce a default subdirectory
mountpoint for clients.
Each fileset can further be set as read-only, preventing clients from mounting
the subdirectory with write access, i.e., the clients implicitly mount
the filesystem in mode=ro if the read-only fileset
applies to the current mount subdirectory.
Similar to other nodemap commands, multiple fileset commands must be run on the MGS. The nodemap configuration is then asychonously propagated to the other server targets and persisted.
The following commands are used to manage multiple filesets on a
nodemap.
Please refer to the respective man page of each command for more
details and examples.
A fileset is added to the nodemap with the lctl
nodemap_fileset_add command:
lctl nodemap_fileset_add --name NODEMAP_NAME --fileset SUBDIRECTORY [--alt] [--ro]
--namespecifies the nodemap that this fileset should be associated with (mandatory).--filesetspecifies the subdirectory to restrict the clients to. The fileset must begin with '/' (mandatory).--altspecifies that the fileset is an alternate fileset. If not specified, the fileset is the primary fileset. Multiple primary filesets and duplicate fileset definitions across fileset types are not allowed.--rospecifies that the fileset is read-only. If not specified, the fileset is read-write.
A fileset is deleted from the nodemap with the lctl
nodemap_fileset_del command:
lctl nodemap_fileset_del --name NODEMAP_NAME [--all] [--fileset SUBDIRECTORY]
--namespecifies the nodemap that one or all fileset should be deleted from (mandatory).--allspecifies that all filesets should be deleted from the nodemap. This option cannot be used with--fileset.--filesetspecifies the fileset to delete from the nodemap. This option cannot be used with--all. Either--allor--filesetmust be specified.
Filesets can be updated in-place with the lctl
nodemap_fileset_modify command:
lctl nodemap_fileset_modify --name NODEMAP_NAME --fileset SUBDIRECTORY \ [--rename|-r NEW_SUBDIRECTORY] [--primary|-p] [--alt|-a] [--rw] [--ro]
--namespecifies the nodemap containing the fileset to modify (mandatory).--filesetspecifies the path of the fileset to modify (mandatory).--renamechanges the fileset's path to the specified new subdirectory. The new path must begin with a slash ('/') and cannot yet exist as a fileset of that type on the same nodemap.--primaryconverts the fileset to a primary fileset. The flag has no effect if the fileset is already primary. Note that--primarycan only convert an alternate fileset to primary if there is currently no primary fileset set on the nodemap. This option cannot be used with--alt.--altconverts the fileset to an alternate fileset. The flag has no effect if the fileset is already alternate. This option cannot be used with--primary.--rwsets the fileset to read-write access mode. The flag has no effect if the fileset is already set to read-write. This option cannot be used with--ro.--rosets the fileset to read-only access mode. The flag has no effect if the fileset is already set to read-only. This option cannot be used with--rw.
Filesets can be used to provide namespace isolation within the Lustre filesystem by explicitly restricting clients of a nodemap to specific subdirectories when mounting the client. The restriction depends on whether the fileset is designated as primary, alternate, or read-only. On mounting the Lustre client, the following rules apply:
If the nodemap is inactive or no filesets are defined, no subdirectory restrictions are applied.
If the primary fileset is set and no subdirectory is presented when mounting the Lustre client, the primary fileset's subdirectory is used as the filesystem root directory.
If any defined fileset (primary or alternate) matches the presented mounted subdirectory exactly or as a prefix, the subdirectory mount is used as the filesystem root directory.
If the fileset matches in 3, the presented mounting subdirectory is appended to the fileset's subdirectory.
If alternate filesets are defined but no primary fileset is set, only 3 applies.
SELinux provides a mechanism in Linux for supporting Mandatory Access Control (MAC) policies. When a MAC policy is enforced, the operating system's (OS) kernel defines application rights, firewalling applications from compromising the entire system. Regular users do not have the ability to override the policy.
One purpose of SELinux is to protect the OS from privilege escalation. To that extent, SELinux defines confined and unconfined domains for processes and users. Each process, user, file is assigned a security context, and rules define the allowed operations by processes and users on files.
Another purpose of SELinux can be to protect data sensitivity, thanks to Multi-Level Security (MLS). MLS works on top of SELinux, by defining the concept of security levels in addition to domains. Each process, user and file is assigned a security level, and the model states that processes and users can read the same or lower security level, but can only write to their own or higher security level.
From a file system perspective, the security context of files must be
stored permanently. Lustre makes use of the
security.selinux extended attributes on files to hold
this information. Lustre supports SELinux on the client side. All you have
to do to have MAC and MLS on Lustre is to enforce the appropriate SELinux
policy (as provided by the Linux distribution) on all Lustre clients. No
SELinux is required on Lustre servers.
Because Lustre is a distributed file system, the specificity when using MLS is that Lustre really needs to make sure data is always accessed by nodes with the SELinux MLS policy properly enforced. Otherwise, data is not protected. This means Lustre has to check that SELinux is properly enforced on client side, with the right, unaltered policy. And if SELinux is not enforced as expected on a client, the server denies its access to Lustre.
A string that represents the SELinux Status info will be used by
servers as a reference, to check if clients are enforcing SELinux
properly. This reference string can be obtained on a client node known
to enforce the right SELinux policy, by calling the
l_getsepol command line utility:
client# l_getsepol SELinux status info: 1:mls:31:40afb76d077c441b69af58cccaaa2ca63641ed6e21b0a887dc21a684f508b78f
The string describing the SELinux policy has the following syntax:
mode:name:version:hash
where:
modeis a digit telling if SELinux is in Permissive mode (0) or Enforcing mode (1)nameis the name of the SELinux policyversionis the version of the SELinux policyhashis the computed hash of the binary representation of the policy, as exported in /etc/selinux/name/policy/policy.version
SELinux policy check can be enforced by setting the
sepol parameter on a nodemap entry. All clients
belonging to this nodemap entry must enforce the SELinux policy
described by this parameter, otherwise they are denied access to the
Lustre file system. For example:
mgs# lctl nodemap_set_sepol --name restricted
--sepol '1:mls:31:40afb76d077c441b69af58cccaaa2ca63641ed6e21b0a887dc21a684f508b78f'So all clients matching the restricted nodemap
must enforce the SELinux policy which description matches
1:mls:31:40afb76d077c441b69af58cccaaa2ca63641ed6e21b0a887dc21a684f508b78f.
If not, they will get Permission Denied when trying to mount or access
files on the Lustre file system.
To delete the sepol parameter, just set it to an
empty string:
mgs# lctl nodemap_set_sepol --name restricted --sepol ''
See Chapter 28, Mapping UIDs and GIDs with Nodemap for more details about the Nodemap feature.
In order to make SELinux Policy check permanent, the sepol parameter
on the nodemap has to be set with lctl set_param with
the -P option.
mgs# lctl set_param nodemap.restricted.sepol=1:mls:31:40afb76d077c441b69af58cccaaa2ca63641ed6e21b0a887dc21a684f508b78f mgs# lctl set_param -P nodemap.restricted.sepol=1:mls:31:40afb76d077c441b69af58cccaaa2ca63641ed6e21b0a887dc21a684f508b78f
This way the sepol parameter will be stored in the Lustre config logs, letting the servers retrieve the information after a restart.
In order for Lustre clients to send their SELinux status
information, in case SELinux is enabled locally, the
send_sepol ptlrpc kernel module's parameter has to be
set to a non-zero value. send_sepol accepts various
values:
0: do not send SELinux policy info;
-1: fetch SELinux policy info for every request;
N > 0: only fetch SELinux policy info every N seconds. Use
N = 2^31-1to have SELinux policy info fetched only at mount time.
Clients that are part of a nodemap on which
sepol is defined must send SELinux status info.
And the SELinux policy they enforce must match the representation
stored into the nodemap. Otherwise they will be denied access to the
Lustre file system.
The purpose that client-side encryption wants to serve is to be able to provide a special directory for each user, to safely store sensitive files. The goals are to protect data in transit between clients and servers, and protect data at rest.
This feature is implemented directly at the Lustre client level.
Lustre client-side encryption relies on kernel fscrypt.
fscrypt is a library which filesystems can hook into to
support transparent encryption of files and directories. As a consequence,
the key points described below are extracted from
fscrypt documentation.
For full details, please refer to documentation available with the
Lustre sources, under the
Documentation/client_side_encryption directory.
Note
The client-side encryption feature is available natively on Lustre clients running a Linux distribution with at least kernel 5.4. It is also available thanks to an additional kernel library provided by Lustre, on clients that run a Linux distribution with basic support for encryption, including:
CentOS/RHEL 8.1 and later;
Ubuntu 18.04 and later;
SLES 15 SP2 and later.
Only Lustre clients need access to encryption master keys. Keys are added to the filesystem-level encryption keyring on the Lustre client.
With the key
With the encryption key, encrypted regular files, directories, and symlinks behave very similarly to their unencrypted counterparts --- after all, the encryption is intended to be transparent. However, astute users may notice some differences in behavior:
Unencrypted files, or files encrypted with a different encryption policy (i.e. different key, modes, or flags), cannot be renamed or linked into an encrypted directory. However, encrypted files can be renamed within an encrypted directory, or into an unencrypted directory.
Note
"moving" an unencrypted file into an encrypted directory, e.g. with the
mvprogram, is implemented in userspace by a copy followed by a delete. Be aware the original unencrypted data may remain recoverable from free space on the disk; it is best to keep all files encrypted from the very beginning.On Lustre, Direct I/O is supported for encrypted files.
The
fallocate()operationsFALLOC_FL_COLLAPSE_RANGE,FALLOC_FL_INSERT_RANGE, andFALLOC_FL_ZERO_RANGEare not supported on encrypted files and will fail withEOPNOTSUPP.DAX (Direct Access) is not supported on encrypted files.
- Introduced in Lustre 2.15
The st_size of an encrypted symlink will not necessarily give the length of the symlink target as required by POSIX. It will actually give the length of the ciphertext, which will be slightly longer than the plaintext due to NUL-padding and an extra 2-byte overhead.
- Introduced in Lustre 2.15
The maximum length of an encrypted symlink is 2 bytes shorter than the maximum length of an unencrypted symlink.
mmapis supported. This is possible because the pagecache for an encrypted file contains the plaintext, not the ciphertext.
Without the key
Some filesystem operations may be performed on encrypted regular files, directories, and symlinks even before their encryption key has been added, or after their encryption key has been removed:
File metadata may be read, e.g. using
stat().- Introduced in Lustre 2.15
Directories may be listed, in which case the filenames will be listed in an encoded form derived from their ciphertext. The algorithm is subject to change but it is guaranteed that the presented filenames will be no longer than NAME_MAX bytes, will not contain the
/or\0characters, and will uniquely identify directory entries. The.and..directory entries are special. They are always present and are not encrypted or encoded. Files may be deleted. That is, nondirectory files may be deleted with
unlink()as usual, and empty directories may be deleted withrmdir()as usual. Therefore,rmandrm -rwill work as expected.Symlink targets may be read and followed, but they will be presented in encrypted form, similar to filenames in directories. Hence, they are unlikely to point to anywhere useful.
Without the key, regular files cannot be opened or truncated. Attempts to do so will fail with
ENOKEY. This implies that any regular file operations that require a file descriptor, such asread(),write(),mmap(),fallocate(), andioctl(), are also forbidden.Also without the key, files of any type (including directories) cannot be created or linked into an encrypted directory, nor can a name in an encrypted directory be the source or target of a rename, nor can an
O_TMPFILEtemporary file be created in an encrypted directory. All such operations will fail withENOKEY.It is not currently possible to backup and restore encrypted files without the encryption key. This would require special APIs which have not yet been implemented.
Encryption policy enforcement
After an encryption policy has been set on a directory, all regular files, directories, and symbolic links created in that directory (recursively) will inherit that encryption policy. Special files --- that is, named pipes, device nodes, and UNIX domain sockets --- will not be encrypted.
Except for those special files, it is forbidden to have unencrypted files, or files encrypted with a different encryption policy, in an encrypted directory tree.
Each encrypted directory tree is protected by a master key.
To "unlock" an encrypted directory tree, userspace must provide the appropriate master key. There can be any number of master keys, each of which protects any number of directory trees on any number of filesystems.
fscrypt allows one encryption mode to be
specified for file contents and one encryption mode to be specified for
filenames. Different directory trees are permitted to use different
encryption modes. Currently, the following pairs of encryption modes are
supported:
AES-256-XTS for contents and AES-256-CTS-CBC for filenames
AES-128-CBC for contents and AES-128-CTS-CBC for filenames
If unsure, you should use the (AES-256-XTS, AES-256-CTS-CBC) pair.
Warning
In Lustre 2.14, client-side encryption only supports content encryption, and not filename encryption. As a consequence, only content encryption mode will be taken into account, and filename encryption mode will be ignored to leave filenames in clear text.
Warning
When Lustre client is built against the
embedded kernel library instead of the in-kernel fscrypt, the ability to
encrypt file and directory names is governed by new llite parameter named
enable_filename_encryption, introduced in 2.15, and
set to 0 by default.
When this parameter is 0, new empty directories configured as encrypted
use content encryption only, and not name encryption. This mode is
inherited for all subdirectories and files.
When enable_filename_encryption parameter is set to 1,
new empty directories configured as encrypted use full encryption
capabilities by encrypting file content and also file and directory
names. This mode is inherited for all subdirectories and files.
To set the enable_filename_encryption parameter
globally for all clients, one can do on the MGS:
mgs# lctl set_param -P llite.*.enable_filename_encryption=1
Be aware that the enable_filename_encryption tuning
parameter is not available when Lustre client is built against in-kernel
fscrypt. Indeed, the in-kernel fscrypt library always encrypts file name
along with file content.
Also note that new files and directories under a parent encrypted directory created with Lustre 2.14 will not have their names encrypted. Also, because files created with Lustre 2.14 did not have their names encrypted, they will remain so after upgrade to 2.15. To benefit from name encryption for an old directory previously created with Lustre 2.14, you need to do the following after upgrade to 2.15 is complete:
create a new encrypted directory. This can use an already existing protector.
unlock the old encrypted directory.
copy all files and directories recursively from the old encrypted directory to the newly created encrypted directory. Note that this operation will re-encrypt all files contents in addition to names.
remove the old encrypted directory.
Offline attacks
For the Lustre case, block devices are Lustre targets attached to the Lustre servers. Manipulating the filesystem offline means accessing the filesystem on these targets while Lustre is offline.
Provided that a strong encryption key is chosen,
fscryptprotects the confidentiality of file contents in the event of a single point-in-time permanent offline compromise of the block device content. Lustre client-side encryption does not protect the confidentiality of metadata, e.g. file names, file sizes, file permissions, file timestamps, and extended attributes. Also, the existence and location of holes (unallocated blocks which logically contain all zeroes) in files is not protected.Online attacks
On Lustre client
After an encryption key has been added,
fscryptdoes not hide the plaintext file contents or filenames from other users on the same node. Instead, existing access control mechanisms such as file mode bits, POSIX ACLs, LSMs, or namespaces should be used for this purpose.For the Lustre case, it means plaintext file contents or filenames are not hidden from other users on the same Lustre client.
An attacker who compromises the system enough to read from arbitrary memory, e.g. by exploiting a kernel security vulnerability, can compromise all encryption keys that are currently in use. However,
fscryptallows encryption keys to be removed from the kernel, which may protect them from later compromise. Key removal can be carried out by non-root users. In more detail, the key removal will wipe the master encryption key from kernel memory. Moreover, it will try to evict all cached inodes which had been "unlocked" using the key, thereby wiping their per-file keys and making them once again appear "locked", i.e. in ciphertext or encrypted form.On Lustre server
An attacker on a Lustre server who compromises the system enough to read arbitrary memory, e.g. by exploiting a kernel security vulnerability, cannot compromise Lustre files content. Indeed, encryption keys are not forwarded to the Lustre servers, and servers do not carry out decryption or encryption. Moreover, bulk RPCs received by servers contain encrypted data, which is written as-is to the underlying filesystem.
By default, Lustre client-side encryption is enabled, letting users define encryption policies on a per-directory basis.
Note
Administrators can decide to prevent a Lustre client
mount-point from using encryption by specifying the
noencrypt client mount option. This can be also
enforced from server side thanks to the
forbid_encryption property on nodemaps. See
Section 28.3, “Altering Properties” for how to manage nodemaps.
fscrypt userspace tool can be used to manage
encryption policies. See https://github.com/google/fscrypt for
comprehensive explanations. Below are examples on how to use this tool
with Lustre. If not told otherwise, commands must be run on Lustre
client side.
Two preliminary steps are required before actually deciding which directories to encrypt, and this is the only functionality which requires root privileges. Administrator has to run:
# fscrypt setup Customizing passphrase hashing difficulty for this system... Created global config file at "/etc/fscrypt.conf". Metadata directories created at "/.fscrypt".
This first command has to be run on all clients that want to use encryption, as it sets up global fscrypt parameters outside of Lustre.
# fscrypt setup /mnt/lustre Metadata directories created at "/mnt/lustre/.fscrypt"
This second command has to be run on just one Lustre client.
Note
The file
/etc/fscrypt.confcan be edited. It is strongly recommended to setpolicy_versionto 2, so thatfscryptwipes files from memory when the encryption key is removed.Now a regular user is able to select a directory to encrypt:
$ fscrypt encrypt /mnt/lustre/vault The following protector sources are available: 1 - Your login passphrase (pam_passphrase) 2 - A custom passphrase (custom_passphrase) 3 - A raw 256-bit key (raw_key) Enter the source number for the new protector [2 - custom_passphrase]: 2 Enter a name for the new protector: shield Enter custom passphrase for protector "shield": Confirm passphrase: "/mnt/lustre/vault" is now encrypted, unlocked, and ready for use.
Starting from here, all files and directories created under
/mnt/lustre/vaultwill be encrypted, according to the policy defined at the previsous step.Note
The encryption policy is inherited by all subdirectories. It is not possible to change the policy for a subdirectory.
Another user can decide to encrypt a different directory with its own protector:
$ fscrypt encrypt /mnt/lustre/private Should we create a new protector? [y/N] Y The following protector sources are available: 1 - Your login passphrase (pam_passphrase) 2 - A custom passphrase (custom_passphrase) 3 - A raw 256-bit key (raw_key) Enter the source number for the new protector [2 - custom_passphrase]: 2 Enter a name for the new protector: armor Enter custom passphrase for protector "armor": Confirm passphrase: "/mnt/lustre/private" is now encrypted, unlocked, and ready for use.
Users can decide to lock an encrypted directory at any time:
$ fscrypt lock /mnt/lustre/vault "/mnt/lustre/vault" is now locked.
This action prevents access to encrypted content, and by removing the key from memory, it also wipes files from memory if they are not still open.
Users regain access to the encrypted directory with the command:
$ fscrypt unlock /mnt/lustre/vault Enter custom passphrase for protector "shield": "/mnt/lustre/vault" is now unlocked and ready for use.
Actually,
fscryptdoes not give direct access to master keys, but to protectors that are used to encrypt them. This mechanism gives the ability to change a passphrase:$ fscrypt status /mnt/lustre lustre filesystem "/mnt/lustre" has 2 protectors and 2 policies PROTECTOR LINKED DESCRIPTION deacab807bf0e788 No custom protector "shield" e691ae7a1990fc2a No custom protector "armor" POLICY UNLOCKED PROTECTORS 52b2b5aff0e59d8e0d58f962e715862e No deacab807bf0e788 374e8944e4294b527e50363d86fc9411 No e691ae7a1990fc2a $ fscrypt metadata change-passphrase --protector=/mnt/lustre:deacab807bf0e788 Enter old custom passphrase for protector "shield": Enter new custom passphrase for protector "shield": Confirm passphrase: Passphrase for protector deacab807bf0e788 successfully changed.
It makes also possible to have multiple protectors for the same policy. This is really useful when several users share an encrypted directory, because it avoids the need to share any secret between them.
$ fscrypt status /mnt/lustre/vault "/mnt/lustre/vault" is encrypted with fscrypt. Policy: 52b2b5aff0e59d8e0d58f962e715862e Options: padding:32 contents:AES_256_XTS filenames:AES_256_CTS policy_version:2 Unlocked: No Protected with 1 protector: PROTECTOR LINKED DESCRIPTION deacab807bf0e788 No custom protector "shield" $ fscrypt metadata create protector /mnt/lustre Create new protector on "/mnt/lustre" [Y/n] Y The following protector sources are available: 1 - Your login passphrase (pam_passphrase) 2 - A custom passphrase (custom_passphrase) 3 - A raw 256-bit key (raw_key) Enter the source number for the new protector [2 - custom_passphrase]: 2 Enter a name for the new protector: bunker Enter custom passphrase for protector "bunker": Confirm passphrase: Protector f3cc1b5cf9b8f41c created on filesystem "/mnt/lustre". $ fscrypt metadata add-protector-to-policy --protector=/mnt/lustre:f3cc1b5cf9b8f41c --policy=/mnt/lustre:52b2b5aff0e59d8e0d58f962e715862e WARNING: All files using this policy will be accessible with this protector!! Protect policy 52b2b5aff0e59d8e0d58f962e715862e with protector f3cc1b5cf9b8f41c? [Y/n] Y Enter custom passphrase for protector "bunker": Enter custom passphrase for protector "shield": Protector f3cc1b5cf9b8f41c now protecting policy 52b2b5aff0e59d8e0d58f962e715862e. $ fscrypt status /mnt/lustre/vault "/mnt/lustre/vault" is encrypted with fscrypt. Policy: 52b2b5aff0e59d8e0d58f962e715862e Options: padding:32 contents:AES_256_XTS filenames:AES_256_CTS policy_version:2 Unlocked: No Protected with 2 protectors: PROTECTOR LINKED DESCRIPTION deacab807bf0e788 No custom protector "shield" f3cc1b5cf9b8f41c No custom protector "bunker"
This chapter describes how to use Kerberos with Lustre.
Kerberos is a mechanism for authenticating all entities (such as users and servers) on an "unsafe" network. Each of these entities, known as "principals", negotiate a runtime key with the Kerberos server. This key enables principals to verify that messages from the Kerberos server are authentic. By trusting the Kerberos server, users and services can authenticate one another.
Setting up Lustre with Kerberos can provide advanced security protections for the Lustre network. Broadly, Kerberos offers three types of benefit:
Allows Lustre connection peers (MDS, OSS and clients) to authenticate one another.
Protects the integrity of PTLRPC messages from being modified during network transfer.
Protects the privacy of the PTLRPC message from being eavesdropped during network transfer.
Kerberos uses the "kernel keyring" client upcall mechanism.
A security flavor is a string to describe what kind authentication and data transformation be performed upon a PTLRPC connection. It covers both RPC message and BULK data.
The supported flavors are described in following table:
| Base Flavor | Authentication | RPC Message Protection | Bulk Data Protection | Notes |
|---|---|---|---|---|
| null | N/A | N/A | N/A | |
| krb5n | GSS/Kerberos5 | null | checksum | No protection of RPC message, checksum protection of bulk data, light performance overhead. |
| krb5a | GSS/Kerberos5 | partial integrity (krb5) | checksum | Only header of RPC message is integrity protected, and checksum protection of bulk data, more performance overhead compare to krb5n. |
| krb5i | GSS/Kerberos5 | integrity (krb5) | integrity (krb5) | transformation algorithm is determined by actual Kerberos algorithms enforced by KDC and principals; heavy performance penalty. |
| krb5p | GSS/Kerberos5 | privacy (krb5) | privacy (krb5) | transformation privacy protection algorithm is determined by actual Kerberos algorithms enforced by KDC and principals; the heaviest performance penalty. |
We only support MIT Kerberos 5, from version 1.3.
For environmental requirements in general, and clock synchronization in particular, please refer to section Section 8.1.2, “Environmental Requirements”.
Configure client nodes:
For each client node, create a
lustre_rootprincipal and generate keytab.kadmin> addprinc -randkey lustre_root/client_host.domain@REALM
kadmin> ktadd lustre_root/client_host.domain@REALM
Install the keytab on the client node.
Configure MGS nodes:
For each MGS node, create a
lustre_mgsprincipal and generate keytab.kadmin> addprinc -randkey lustre_mgs/mgs_host.domain@REALM
kadmin> ktadd lustre_mds/mgs_host.domain@REALM
Install the keytab on the MGS nodes.
Configure MDS nodes:
For each MDS node, create a
lustre_mdsprincipal and generate keytab.kadmin> addprinc -randkey lustre_mds/mds_host.domain@REALM
kadmin> ktadd lustre_mds/mds_host.domain@REALM
Install the keytab on the MDS nodes.
Configure OSS nodes:
For each OSS node, create a
lustre_ossprincipal and generate keytab.kadmin> addprinc -randkey lustre_oss/oss_host.domain@REALM
kadmin> ktadd lustre_oss/oss_host.domain@REALM
Install the keytab on the client node.
Note
The host.domain should be the FQDN in your network, otherwise server might not recognize any GSS request.
As an alternative for the client keytab, if you want to save the trouble of assigning unique keytab for each client node, you can create a general lustre_root principal and its keytab, and install the same keytab on as many client nodes as you want. Be aware that in this way one compromised client means all clients are insecure.
kadmin> addprinc -randkey lustre_root@REALM
kadmin> ktadd lustre_root@REALM
Lustre support following enctypes for MIT Kerberos 5 version 1.3 or higher:
aes128-cts
aes256-cts
On networks for which name resolution to IP address is possible, like TCP or InfiniBand, the names used in the principals must be the ones that resolve to the IP addresses used by the Lustre NIDs.
If you are using a network which is
NOT TCP or InfiniBand (e.g.
PTL4LND), you need to have a /etc/lustre/nid2hostname
script on each node, which purpose is
to translate NID into hostname.
Following is a possible example for PTL4LND:
#!/bin/bash
set -x
# convert a NID for a LND to a hostname
# called with thre arguments: lnd netid nid
# $lnd is the string "PTL4LND", etc.
# $netid is the network identifier in hex string format
# $nid is the NID in hex format
# output the corresponding hostname,
# or error message leaded by a '@' for error logging.
lnd=$1
netid=$2
# convert hex NID number to decimal
nid=$((0x$3))
case $lnd in
PTL4LND) # simply add 'node' at the beginning
echo "node$nid"
;;
*)
echo "@unknown LND: $lnd"
;;
esacEvery node should have following packages installed:
krb5-workstation
krb5-libs
keyutils
keyutils-libs
On the node used to build Lustre with GSS support, following packages should be installed:
krb5-devel
keyutils-libs-devel
Make sure to start the daemon process
lsvcgssd on each server node (MGS, MDS and OSS)
before starting Lustre. The command syntax is:
lsvcgssd [-f] [-v] [-g] [-m] [-o] -k
-f: run in foreground, instead of as daemon
-v: increase verbosity by 1. For example, to set the verbose level to 3, run 'lsvcgssd -vvv'. Verbose logging can help you make sure Kerberos is set up correctly.
-g: service MGS
-m: service MDS
-o: service OSS
-k: enable kerberos support
Security flavors can be set by defining sptlrpc rules on the MGS.
These rules are persistent, and are in the form:
<spec>=<flavor>
To add a rule:
mgs> lctl conf_param <spec>=<flavor>
If there is an existing rule on <spec>, it will be overwritten.
To delete a rule:
mgs> lctl conf_param -d <spec>
To list existing rules:
msg> lctl get_param mgs.MGS.live.<fs-name> | grep "srpc.flavor"
Note
If nothing is specified, by default all RPC connections will use
nullflavor, which means no security.After you change a rule, it usually takes a few minutes to apply the new rule to all nodes, depending on global system load.
Before you change a rule, make sure affected nodes are ready for the new security flavor. E.g. if you change flavor from
nulltokrb5pbut GSS/Kerberos environment is not properly configured on affected nodes, those nodes might be evicted because they cannot communicate with each other.
The general syntax is:
<target>.srpc.flavor.<network>[.<direction>]=flavor
<target>can be filesystem name, or specific MDT/OST device name. For exampletestfs,testfs-MDT0000,testfs-OST0001.<network>is the LNet network name, for exampletcp0,o2ib0, ordefaultto not filter on LNet network.<direction>can be one of cli2mdt, cli2ost, mdt2mdt, mdt2ost. Direction is optional.
Examples:
Apply
krb5ion ALL connections for file systemtestfs:
mgs> lctl conf_param testfs.srpc.flavor.default=krb5i
Nodes in network
tcp0usekrb5p; all other nodes usenull.
mgs> lctl conf_param testfs.srpc.flavor.tcp0=krb5p mgs> lctl conf_param testfs.srpc.flavor.default=null
Nodes in network
tcp0usekrb5p; nodes ino2ib0usekrb5n; among other nodes, clients usekrb5ito MDT/OST, MDTs usenullto other MDTs, MDTs usekrb5ato OSTs.
mgs> lctl conf_param testfs.srpc.flavor.tcp0=krb5p mgs> lctl conf_param testfs.srpc.flavor.o2ib0=krb5n mgs> lctl conf_param testfs.srpc.flavor.default.cli2mdt=krb5i mgs> lctl conf_param testfs.srpc.flavor.default.cli2ost=krb5i mgs> lctl conf_param testfs.srpc.flavor.default.mdt2mdt=null mgs> lctl conf_param testfs.srpc.flavor.default.mdt2ost=krb5a
On client nodes, non-root users need to issue
kinit before accessing Lustre, just like other
Kerberized applications.
Required by kerberos, the user's principal (
username@REALM) should be added to the KDC.Client and MDT nodes should have the same user database used for name and uid/gid translation.
Regular users can destroy the established security contexts before logging out, by issuing:
lfs flushctx -k -r <mount point>
Here -k is to destroy the on-disk Kerberos
credential cache, similar to kdestroy, and
-r is to reap the revoked keys from the keyring
when flushing the GSS context. Otherwise it only destroys established
contexts in kernel memory.
Each node can specify which flavor to use to connect to the MGS, by
using the mgssec=flavor mount option.
Once a flavor is chosen, it cannot be changed until re-mount.
Because a Lustre node only has one connection to the MGS, if there is more than one target or client on the node, they necessarily use the same security flavor to the MGS, being the one enforced when the first connection to the MGS was established.
By default, the MGS accepts RPCs with any flavor. But it is possible to
configure the MGS to only accept a given flavor. The syntax is identical
to what is explained in paragraph
Section 30.6.7.3, “Rules Syntax & Examples”,
but with special target _mgs:
mgs> lctl conf_param _mgs.srpc.flavor.<network>=<flavor>
Table of Contents
This chapter describes the ZFS Snapshot feature support in Lustre and contains following sections:
Snapshots provide fast recovery of files from a previously created checkpoint without recourse to an offline backup or remote replica. Snapshots also provide a means to version-control storage, and can be used to recover lost files or previous versions of files.
Filesystem snapshots are intended to be mounted on user-accessible nodes, such as login nodes, so that users can restore files (e.g. after accidental delete or overwrite) without administrator intervention. It would be possible to mount the snapshot filesystem(s) via automount when users access them, rather than mounting all snapshots, to reduce overhead on login nodes when the snapshots are not in use.
Recovery of lost files from a snapshot is usually considerably faster than from any offline backup or remote replica. However, note that snapshots do not improve storage reliability and are just as exposed to hardware failure as any other storage volume.
All Lustre server targets must be ZFS file systems running Lustre version 2.10 or later. In addition, the MGS must be able to communicate via ssh or another remote access protocol, without password authentication, to all other servers.
The feature is enabled by default and cannot be disabled. The
management of snapshots is done through lctl
commands on the MGS.
Lustre snapshot is based on Copy-On-Write; the snapshot and file system may share a single copy of the data until a file is changed on the file system. The snapshot will prevent the space of deleted or overwritten files from being released until the snapshot(s) referencing those files is deleted. The file system administrator needs to establish a snapshot create/backup/remove policy according to their system's actual size and usage.
The snapshot tool loads system configuration from the
/etc/ldev.conf file on the MGS and calls related
ZFS commands to maintian the Lustre snapshot pieces on all targets
(MGS/MDT/OST). Please note that the /etc/ldev.conf
file is used for other purposes as well.
The format of the file is:
<host> foreign/- <label> <device> [journal-path]/- [raidtab]
The format of <label> is:
fsname-<role><index> or <role><index>
The format of <device> is:
[md|zfs:][pool_dir/]<pool>/<filesystem>
Snapshot only uses the fields <host>, <label> and <device>.
Example 1:
mgs# cat /etc/ldev.conf host-mdt1 - myfs-MDT0000 zfs:/tmp/myfs-mdt1/mdt1 host-mdt2 - myfs-MDT0001 zfs:myfs-mdt2/mdt2 host-ost1 - OST0000 zfs:/tmp/myfs-ost1/ost1 host-ost2 - OST0001 zfs:myfs-ost2/ost2
Example 2:
For the given mounted MGS/OST on single node: singlenode# mount | grep "lustre-[m|o]" lustre-mdt1/mdt1 on /mnt/lustre-mds1 type lustre (rw,svname=lustre-MDT0000,mgs,osd=osd-zfs) lustre-ost1/ost1 on /mnt/lustre-ost1 type lustre (rw,svname=lustre-OST0000, mgsnode=x.x.x.x@tcp, osd=osd-zfs) The corresponding /etc/ldev.conf would be singlenode# cat /etc/ldev.conf centos79z1 - lustre-MDT0000 zfs:/tmp/lustre-mdt1/mdt1 - - centos79z1 - lustre-OST0000 zfs:/tmp/lustre-ost1/ost1 - - Where:
|
Fields |
Description |
|---|---|
| centos79z1 | Hostname |
| - | Not Used |
| lustre-OST0000 | Device label |
| zfs:/tmp/lustre-ost1/ost1 | Device Name |
| - | Not Used |
| - | Not Used |
The configuration file is edited manually.
Once the configuration file is updated to reflect the current file system setup, you are ready to create a file system snapshot.
To create a snapshot of an existing Lustre file system, run the
following lctl command on the MGS:
lctl snapshot_create [-b | --barrier [on | off]] [-c | --comment comment] -F | --fsname fsname> [-h | --help] -n | --name ssname> [-r | --rsh remote_shell][-t | --timeout timeout]
|
Option |
Description |
|---|---|
|
|
set write barrier before creating snapshot. The default value is 'on'. |
|
|
a description for the purpose of the snapshot |
|
|
the filesystem name |
|
|
help information |
|
|
the name of the snapshot |
|
|
the remote shell used for communication with remote target. The default value is 'ssh' |
|
|
the lifetime (seconds) for write barrier. The default value is 30 seconds |
To delete an existing snapshot, run the following
lctl command on the MGS:
lctl snapshot_destroy [-f | --force] <-F | --fsname fsname> <-n | --name ssname> [-r | --rsh remote_shell]
|
Option |
Description |
|---|---|
|
|
destroy the snapshot by force |
|
|
the filesystem name |
|
|
help information |
|
|
the name of the snapshot |
|
|
the remote shell used for communication with remote target. The default value is 'ssh' |
Snapshots are treated as separate file systems and can be mounted on
Lustre clients. The snapshot file system must be mounted as a
read-only file system with the -o ro option.
If the mount command does not include the read-only
option, the mount will fail.
Note
Before a snapshot can be mounted on the client, the snapshot
must first be mounted on the servers using the lctl
utility.
To mount a snapshot on the server, run the following lctl command on the MGS:
lctl snapshot_mount <-F | --fsname fsname> [-h | --help] <-n | --name ssname> [-r | --rsh remote_shell]
|
Option |
Description |
|---|---|
|
|
the filesystem name |
|
|
help information |
|
|
the name of the snapshot |
|
|
the remote shell used for communication with remote target. The default value is 'ssh' |
After the successful mounting of the snapshot on the server, clients
can now mount the snapshot as a read-only filesystem. For example, to
mount a snapshot named snapshot_20170602 for a
filesystem named myfs, the following mount
command would be used:
mgs# lctl snapshot_mount -F myfs -n snapshot_20170602
After mounting on the server, use
lctl snapshot_list to get the fsname for the snapshot
itself as follows:
ss_fsname=$(lctl snapshot_list -F myfs -n snapshot_20170602 |
awk '/^snapshot_fsname/ { print $2 }')Finally, mount the snapshot on the client:
mount -t lustre -o ro $MGS_nid:/$ss_fsname $local_mount_point
To unmount a snapshot from the servers, first unmount the snapshot
file system from all clients, using the standard umount
command on each client. For example, to unmount the snapshot file system
named snapshot_20170602 run the following
command on each client that has it mounted:
client# umount $local_mount_point
After all clients have unmounted the snapshot file system, run the
following lctlcommand on a server node where the
snapshot is mounted:
lctl snapshot_umount [-F | --fsname fsname] [-h | --help] <-n | -- name ssname> [-r | --rsh remote_shell]
|
Option |
Description |
|---|---|
|
|
the filesystem name |
|
|
help information |
|
|
the name of the snapshot |
|
|
the remote shell used for communication with remote target. The default value is 'ssh' |
For example:
lctl snapshot_umount -F myfs -n snapshot_20170602
To list the available snapshots for a given file system, use the
following lctl command on the MGS:
lctl snapshot_list [-d | --detail] <-F | --fsname fsname> [-h | -- help] [-n | --name ssname] [-r | --rsh remote_shell]
|
Option |
Description |
|---|---|
|
|
list every piece for the specified snapshot |
|
|
the filesystem name |
|
|
help information |
|
|
the snapshot's name. If the snapshot name is not supplied, all snapshots for this file system will be displayed |
|
|
the remote shell used for communication with remote target. The default value is 'ssh' |
Currently, Lustre snapshot has five user visible attributes; snapshot name, snapshot comment, create time, modification time, and snapshot file system name. Among them, the former two attributes can be modified. Renaming follows the general ZFS snapshot name rules, such as the maximum length is 256 bytes, cannot conflict with the reserved names, and so on.
To modify a snapshot's attributes, use the following
lctl command on the MGS:
lctl snapshot_modify [-c | --comment comment] <-F | --fsname fsname> [-h | --help] <-n | --name ssname> [-N | --new new_ssname] [-r | --rsh remote_shell]
|
Option |
Description |
|---|---|
|
|
update the snapshot's comment |
|
|
the filesystem name |
|
|
help information |
|
|
the snapshot's name |
|
|
rename the snapshot's name as
|
|
|
the remote shell used for communication with remote target. The default value is 'ssh' |
Snapshots are non-atomic across multiple MDTs and OSTs, which means that if there is activity on the file system while a snapshot is being taken, there may be user-visible namespace inconsistencies with files created or destroyed in the interval between the MDT and OST snapshots. In order to create a consistent snapshot of the file system, we are able to set a global write barrier, or "freeze" the system. Once set, all metadata modifications will be blocked until the write barrier is actively removed ("thawed") or expired. The user can set a timeout parameter on a global barrier or the barrier can be explicitly removed. The default timeout period is 30 seconds.
It is important to note that snapshots are usable without the global barrier. Only files that are currently being modified by clients (write, create, unlink) may be inconsistent as noted above if the barrier is not used. Other files not curently being modified would be usable even without the barrier.
The snapshot create command will call the write barrier internally
when requested using the -b option to
lctl snapshot_create. So, explicit use of the barrier
is not required when using snapshots but included here as an option to
quiet the file system before a snapshot is created.
To impose a global write barrier, run the
lctl barrier_freeze command on the MGS:
lctl barrier_freeze <fsname> [timeout (in seconds)] where timeout default is 30.
For example, to freeze the filesystem
testfs for 15 seconds:
mgs# lctl barrier_freeze testfs 15
If the command is successful, there will be no output from the command. Otherwise, an error message will be printed.
To remove a global write barrier, run the
lctl barrier_thaw command on the MGS:
lctl barrier_thaw <fsname>
For example, to thaw the write barrier for the filesystem
testfs:
mgs# lctl barrier_thaw testfs
If the command is successful, there will be no output from the command. Otherwise, an error message will be printed.
To see how much time is left on a global write barrier, run the
lctl barrier_stat command on the MGS:
# lctl barrier_stat <fsname>
For example, to stat the write barrier for the filesystem
testfs:
mgs# lctl barrier_stat testfs The barrier for testfs is in 'frozen' The barrier will be expired after 7 seconds
If the command is successful, a status from the table below will be printed. Otherwise, an error message will be printed.
The possible status and related meanings for the write barrier are as follows:
Table 31.1. Write Barrier Status
|
Status |
Meaning |
|---|---|
|
|
barrier has never been set on the system |
|
|
In the first stage of setting the write barrier |
|
|
the second stage of setting the write barrier |
|
|
the write barrier has been set successfully |
|
|
In thawing the write barrier |
|
|
The write barrier has been thawed |
|
|
Failed to set write barrier |
|
|
The write barrier is expired |
|
|
In scanning the MDTs status, see the command
|
|
|
Other cases |
If the barrier is in freezing_p1,
freezing_p2 or frozen status,
then the remaining lifetime will be returned also.
To rescan a global write barrier to check which MDTs are
active, run lctl barrier_rescanon the MGS
(with a default TIMEOUT_SEC of 30s):
lctl barrier_rescanFSNAME[TIMEOUT_SEC]
For example, to rescan the barrier for filesystem
testfs:
mgs# lctl barrier_rescan testfs 1 of 4 MDT(s) in the filesystem testfs are inactive
If the command is successful, the number of MDTs that are unavailable against the total MDTs will be reported. Otherwise, an error message will be printed.
A log of all snapshot activity can be found in the following file:
/var/log/lsnapshot.log. This file contains information
on when a snapshot was created, an attribute was changed, when it was
mounted, and other snapshot information.
The following is a sample /var/log/lsnapshot
file:
Mon Mar 21 19:43:06 2016 (15826:jt_snapshot_create:1138:scratch:ssh): Create snapshot lss_0_0 successfully with comment <(null)>, barrier <enable>, timeout <30> Mon Mar 21 19:43:11 2016(13030:jt_snapshot_create:1138:scratch:ssh): Create snapshot lss_0_1 successfully with comment <(null)>, barrier <disable>, timeout <-1> Mon Mar 21 19:44:38 2016 (17161:jt_snapshot_mount:2013:scratch:ssh): The snapshot lss_1a_0 is mounted Mon Mar 21 19:44:46 2016 (17662:jt_snapshot_umount:2167:scratch:ssh): the snapshot lss_1a_0 have been umounted Mon Mar 21 19:47:12 2016 (20897:jt_snapshot_destroy:1312:scratch:ssh): Destroy snapshot lss_2_0 successfully with force <disable>
A snapshot is independent from the original file system that it is
derived from and is treated as a new file system name that can be mounted
by Lustre client nodes. The file system name is part of the configuration
log names and exists in configuration log entries. Two commands exist to
manipulate configuration logs: lctl fork_lcfg and
lctl erase_lcfg.
The snapshot commands will use configuration log functionality internally when needed. So, use of the barrier is not required to use snapshots but included here as an option. The following configuration log commands are independent of snapshots and can be used independent of snapshot use.
To fork a configuration log, run the following
lctl command on the MGS:
lctl fork_lcfg
Usage: fork_lcfg <fsname> <newname>
To erase a configuration log, run the following
lctl command on the MGS:
lctl erase_lcfg
Usage: erase_lcfg <fsname>
Part IV describes tools and procedures used to tune a Lustre file system for optimum performance. You will find information in this section about:
Table of Contents
- 32. Testing Lustre Network Performance (LNet Self-Test)
- 33. Benchmarking Lustre File System Performance (Lustre I/O Kit)
- 34. Tuning a Lustre File System
- 34.1. Optimizing the Number of Service Threads
- 34.2. Binding MDS Service Thread to CPU Partitions
- 34.3. Tuning LNet Parameters
- 34.4. libcfs Tuning
- 34.5. LND Tuning
- 34.6. Network Request Scheduler (NRS) Tuning
- 34.7. Lockless I/O Tunables
- 34.8. Server-Side Advice and Hinting L 2.9
- 34.9. Large Bulk IO (16MB RPC) L 2.9
- 34.10. Improving Lustre I/O Performance for Small Files
- 34.11. Understanding Why Write Performance is Better Than Read Performance
Table of Contents
This chapter describes the LNet self-test, which is used by site administrators to confirm that Lustre Networking (LNet) has been properly installed and configured, and that underlying network software and hardware are performing according to expectations. The chapter includes:
LNet self-test is a kernel module that runs over LNet and the Lustre network drivers (LNDs). It is designed to:
Test the connection ability of the Lustre network
Run regression tests of the Lustre network
Test performance of the Lustre network
After you have obtained performance results for your Lustre network, refer to Chapter 34, Tuning a Lustre File System for information about parameters that can be used to tune LNet for optimum performance.
Note
Apart from the performance impact, LNet self-test is invisible to the Lustre file system.
An LNet self-test cluster includes two types of nodes:
Console node - A node used to control and monitor an LNet self-test cluster. The console node serves as the user interface of the LNet self-test system and can be any node in the test cluster. All self-test commands are entered from the console node. From the console node, a user can control and monitor the status of the entire LNet self-test cluster (session). The console node is exclusive in that a user cannot control two different sessions from one console node.
Test nodes - The nodes on which the tests are run. Test nodes are controlled by the user from the console node; the user does not need to log into them directly.
LNet self-test has two user utilities:
lst- The user interface for the self-test console (run on the console node). It provides a list of commands to control the entire test system, including commands to create a session, create test groups, etc.lstclient- The userspace LNet self-test program (run on a test node). Thelstclientutility is linked with userspace LNDs and LNet. This utility is not needed if only kernel space LNet and LNDs are used.
Note
Test nodes can be in either kernel or userspace. A console node can invite a kernel test node to join the session by running lst add_group NID, but the console node cannot actively add a userspace test node to the session. A console node can passively accept a test node to the session while the test node is running lstclient to connect to the console node.
To run LNet self-test, these modules must be loaded on both console nodes and test nodes:
libcfsnetlnet_selftestklnds: A kernel Lustre network driver (LND) (i.e,ksocklnd,ko2iblnd...) as needed by your network configuration.
To load the required modules, run:
modprobe lnet_selftest
This command recursively loads the modules on which LNet self-test depends.
Note
While the console node and test nodes require all the prerequisite modules to be loaded, userspace test nodes do not require these modules.
This section describes how to create and run an LNet self-test. The examples shown are for a test that simulates the traffic pattern of a set of Lustre servers on a TCP network accessed by Lustre clients on an InfiniBand network connected via LNet routers. In this example, half the clients are reading and half the clients are writing.
A session is a set of processes that run on a test node. Only one session can be run at a time on a test node to ensure that the session has exclusive use of the node. The console node is used to create, change or destroy a session (new_session, end_session, show_session). For more about session parameters, see Section 32.3.1, “Session Commands”.
Almost all operations should be performed within the context of a session. From the console node, a user can only operate nodes in his own session. If a session ends, the session context in all test nodes is stopped.
The following commands set the LST_SESSION environment variable to identify the session on the console node and create a session called read_write:
export LST_SESSION=$$ lst new_session read_write
A group is a named collection of nodes. Any number of groups can exist in a single LNet self-test session. Group membership is not restricted in that a test node can be included in any number of groups.
Each node in a group has a rank, determined by the order in which it was added to the group. The rank is used to establish test traffic patterns.
A user can only control nodes in his/her session. To allocate nodes to the session, the user needs to add nodes to a group (of the session). All nodes in a group can be referenced by the group name. A node can be allocated to multiple groups of a session.
In the following example, three groups are established on a console node:
lst add_group servers 192.168.10.[8,10,12-16]@tcp lst add_group readers 192.168.1.[1-253/2]@o2ib lst add_group writers 192.168.1.[2-254/2]@o2ib
These three groups include:
Nodes that will function as 'servers' to be accessed by 'clients' during the LNet self-test session
Nodes that will function as 'clients' that will simulate reading data from the 'servers'
Nodes that will function as 'clients' that will simulate writing data to the 'servers'
Note
A console node can associate kernel space test nodes with the session by running lst add_group , but a userspace test node cannot be actively added to the session. A console node can passively "accept" a test node to associate with a test session while the test node running NIDslstclient connects to the console node, i.e: lstclient --sesid ).CONSOLE_NID --group NAME
A test generates a network load between two groups of nodes, a
source group identified using the --from parameter and a target group
identified using the --to parameter. When a test is running, each node in
the --from simulates a client by sending
requests to nodes in the group--to , which are
simulating a set of servers, and then receives responses in return. This activity is
designed to mimic Lustre file system RPC traffic.group
A batch is a collection of tests that are started and stopped together and run in parallel. A test must always be run as part of a batch, even if it is just a single test. Users can only run or stop a test batch, not individual tests.
Tests in a batch are non-destructive to the file system, and can be run in a normal Lustre file system environment (provided the performance impact is acceptable).
A simple batch might contain a single test, for example, to determine whether the network bandwidth presents an I/O bottleneck. In this example, the --to could be comprised of Lustre OSSs and group--from the compute nodes. A second test could be added to perform pings from a login node to the MDS to see how checkpointing affects the groupls -l process.
Two types of tests are available:
ping- Apinggenerates a short request message, which results in a short response. Pings are useful to determine latency and small message overhead and to simulate Lustre metadata traffic.brw- In abrw('bulk read write') test, data is transferred from the target to the source (brwread) or data is transferred from the source to the target (brwwrite). The size of the bulk transfer is set using thesizeparameter. A brw test is useful to determine network bandwidth and to simulate Lustre I/O traffic.
In the example below, a batch is created called bulk_rw. Then two brw tests are added. In the first test, 1M of data is sent from the servers to the clients as a simulated read operation with a simple data validation check. In the second test, 4K of data is sent from the clients to the servers as a simulated write operation with a full data validation check.
lst add_batch bulk_rw lst add_test --batch bulk_rw --from readers --to servers \ brw read check=simple size=1M lst add_test --batch bulk_rw --from writers --to servers \ brw write check=full size=4K
The traffic pattern and test intensity is determined by several properties such as test type, distribution of test nodes, concurrency of test, and RDMA operation type. For more details, see Section 32.3.3, “Batch and Test Commands”.
This sample LNet self-test script simulates the traffic pattern of a set of Lustre servers on a TCP network, accessed by Lustre clients on an InfiniBand network (connected via LNet routers). In this example, half the clients are reading and half the clients are writing.
Run this script on the console node:
#!/bin/bash export LST_SESSION=$$ lst new_session read/write lst add_group servers 192.168.10.[8,10,12-16]@tcp lst add_group readers 192.168.1.[1-253/2]@o2ib lst add_group writers 192.168.1.[2-254/2]@o2ib lst add_batch bulk_rw lst add_test --batch bulk_rw --from readers --to servers \ brw read check=simple size=1M lst add_test --batch bulk_rw --from writers --to servers \ brw write check=full size=4K # start running lst run bulk_rw # display server stats for 30 seconds lst stat servers & sleep 30; kill $! # tear down lst end_session
Note
This script can be easily adapted to pass the group NIDs by shell variables or command line arguments (making it good for general-purpose use).
The LNet self-test (lst) utility is used to issue LNet self-test commands. The lst utility takes a number of command line arguments. The first argument is the command name and subsequent arguments are command-specific.
This section describes lst session commands.
LST_FEATURES
The lst utility uses the LST_FEATURES environmental variable to determine what optional features should be enabled. All features are disabled by default. The supported values for LST_FEATURES are:
1- Enable the Variable Page Size feature for LNet Selftest.
Example:
export LST_FEATURES=1
LST_SESSION
The lst utility uses the LST_SESSION environmental variable to identify the session locally on the self-test console node. This should be a numeric value that uniquely identifies all session processes on the node. It is convenient to set this to the process ID of the shell both for interactive use and in shell scripts. Almost all lst commands require LST_SESSION to be set.
Example:
export LST_SESSION=$$
new_session [--timeout
SECONDS] [--force] SESSNAME
Creates a new session session named SESSNAME.
|
Parameter |
Description |
|---|---|
|
|
Console timeout value of the session. The session ends automatically if it remains idle (i.e., no commands are issued) for this period. |
|
|
Ends conflicting sessions. This determines who 'wins' when one session conflicts with another. For example, if there is already an active session on this node, then the attempt to create a new session fails unless the |
|
|
A human-readable string to print when listing sessions or reporting session conflicts. |
Example:
$ lst new_session --force read_write
end_session
Stops all operations and tests in the current session and clears the session's status.
$ lst end_session
show_session
Shows the session information. This command prints information about the current session. It does not require LST_SESSION to be defined in the process environment.
$ lst show_session
This section describes lst group commands.
add_group name NIDS [NIDs...]
Creates the group and adds a list of test nodes to the group.
|
Parameter |
Description |
|---|---|
|
|
Name of the group. |
|
|
A string that may be expanded to include one or more LNet NIDs. |
Example:
$ lst add_group servers 192.168.10.[35,40-45]@tcp $ lst add_group clients 192.168.1.[10-100]@tcp 192.168.[2,4].\ [10-20]@tcp
update_group name [--refresh] [--clean status] [--remove NIDs]
Updates the state of nodes in a group or adjusts a group's membership. This command is useful if some nodes have crashed and should be excluded from the group.
|
Parameter |
Description | |
|---|---|---|
|
|
Refreshes the state of all inactive nodes in the group. | |
|
|
Removes nodes with a specified status from the group. Status may be: | |
|
|
active |
The node is in the current session. |
|
|
busy |
The node is now owned by another session. |
|
|
down |
The node has been marked down. |
|
|
unknown |
The node's status has yet to be determined. |
|
|
invalid |
Any state but active. |
|
|
Removes specified nodes from the group. | |
Example:
$ lst update_group clients --refresh $ lst update_group clients --clean busy $ lst update_group clients --clean invalid // \ invalid == busy || down || unknown $ lst update_group clients --remove \192.168.1.[10-20]@tcp
list_group [name] [--active] [--busy] [--down] [--unknown] [--all]
Prints information about a group or lists all groups in the current session if no group is specified.
|
Parameter |
Description |
|---|---|
|
|
The name of the group. |
|
|
Lists the active nodes. |
|
|
Lists the busy nodes. |
--down
|
Lists the down nodes. |
--unknown
|
Lists unknown nodes. |
--all
|
Lists all nodes. |
Example:
$ lst list_group 1) clients 2) servers Total 2 groups $ lst list_group clients ACTIVE BUSY DOWN UNKNOWN TOTAL 3 1 2 0 6 $ lst list_group clients --all 192.168.1.10@tcp Active 192.168.1.11@tcp Active 192.168.1.12@tcp Busy 192.168.1.13@tcp Active 192.168.1.14@tcp DOWN 192.168.1.15@tcp DOWN Total 6 nodes $ lst list_group clients --busy 192.168.1.12@tcp Busy Total 1 node
del_group name
Removes a group from the session. If the group is referred to by any test, then the operation fails. If nodes in the group are referred to only by this group, then they are kicked out from the current session; otherwise, they are still in the current session.
$ lst del_group clients
lstclient --sesid NID --group name [--server_mode]
Use lstclient to run the userland self-test client. The lstclient command should be executed after creating a session on the console. There are only two mandatory options for lstclient:
|
Parameter |
Description |
|---|---|
--sesid
|
The first console's NID. |
--group
|
The test group to join. |
--server_mode
|
When included, forces LNet to behave as a server, such as starting an acceptor if the underlying NID needs it or using privileged ports. Only root is allowed to use the |
Example:
Console $ lst new_session testsession Client1 $ lstclient --sesid 192.168.1.52@tcp --group clients
Example:
Client1 $ lstclient --sesid 192.168.1.52@tcp |--group clients --server_mode
This section describes lst batch and test commands.
add_batch name
A default batch test set named batch is created when the session is started. You can specify a batch name by using add_batch:
$ lst add_batch bulkperf
Creates a batch test called bulkperf.
add_test --batchbatchname[--looploop_count] [--concurrencyactive_count] [--distributesource_count:sink_count] \ --fromgroup--togroupbrw|pingtest_options
Adds a test to a batch. The parameters are described below.
|
Parameter |
Description | |
|---|---|---|
|
|
Names a group of tests for later execution. | |
--loop
|
Number of times to run the test. | |
--concurrency
|
The number of requests that are active at one time. | |
--distribute
|
Determines the ratio of client nodes to server nodes for the specified test. This allows you to specify a wide range of topologies, including one-to-one and all-to-all. Distribution divides the source group into subsets, which are paired with equivalent subsets from the target group so only nodes in matching subsets communicate. | |
--from
|
The source group (test client). | |
--to
|
The target group (test server). | |
ping
|
Sends a small request message, resulting in a small
reply message. For more details, see
Section 32.2.3, “Defining and Running the Tests”.
| |
brw
|
Sends a small request message followed by a bulk data transfer, resulting in a small reply message. Section 32.2.3, “Defining and Running the Tests”. Options are: | |
|
|
read | write
|
Read or write. The default is read. |
size=
|
I/O size in bytes, kilobytes, or Megabytes (i.e., | |
check=full|simple
|
A data validation check (checksum of data). The default is that no check is done. | |
Examples showing use of the distribute parameter:
Clients: (C1, C2, C3, C4, C5, C6) Server: (S1, S2, S3) --distribute 1:1 (C1->S1), (C2->S2), (C3->S3), (C4->S1), (C5->S2), \(C6->S3) /* -> means test conversation */ --distribute 2:1 (C1,C2->S1), (C3,C4->S2), (C5,C6->S3) --distribute 3:1 (C1,C2,C3->S1), (C4,C5,C6->S2), (NULL->S3) --distribute 3:2 (C1,C2,C3->S1,S2), (C4,C5,C6->S3,S1) --distribute 4:1 (C1,C2,C3,C4->S1), (C5,C6->S2), (NULL->S3) --distribute 4:2 (C1,C2,C3,C4->S1,S2), (C5, C6->S3, S1) --distribute 6:3 (C1,C2,C3,C4,C5,C6->S1,S2,S3)
The setting --distribute 1:1 is the default setting where each source node communicates with one target node.
When the setting --distribute 1: (where nn
Note that if there are more source nodes than target nodes, some source nodes may share the same target nodes. Also, if there are more target nodes than source nodes, some higher-ranked target nodes will be idle.
Example showing a brw test:
$ lst add_group clients 192.168.1.[10-17]@tcp $ lst add_group servers 192.168.10.[100-103]@tcp $ lst add_batch bulkperf $ lst add_test --batch bulkperf --loop 100 --concurrency 4 \ --distribute 4:2 --from clients brw WRITE size=16K
In the example above, a batch test called bulkperf that will do a 16 kbyte bulk write request. In this test, two groups of four clients (sources) write to each of four servers (targets) as shown below:
192.168.1.[10-13]will write to192.168.10.[100,101]192.168.1.[14-17]will write to192.168.10.[102,103]
list_batch [
name] [--test index] [--active] [--invalid] [--server|client]
Lists batches in the current session or lists client and server nodes in a batch or a test.
|
Parameter |
Description | |
|---|---|---|
--test
|
Lists tests in a batch. If no option is used, all tests in the batch are listed. If one of these options are used, only specified tests in the batch are listed: | |
|
|
|
Lists only active batch tests. |
|
|
|
Lists only invalid batch tests. |
|
|
server | client
|
Lists client and server nodes in a batch test. |
Example:
$ lst list_batchbulkperf $ lst list_batch bulkperf Batch: bulkperf Tests: 1 State: Idle ACTIVE BUSY DOWN UNKNOWN TOTAL client 8 0 0 0 8 server 4 0 0 0 4 Test 1(brw) (loop: 100, concurrency: 4) ACTIVE BUSY DOWN UNKNOWN TOTAL client 8 0 0 0 8 server 4 0 0 0 4 $ lst list_batch bulkperf --server --active 192.168.10.100@tcp Active 192.168.10.101@tcp Active 192.168.10.102@tcp Active 192.168.10.103@tcp Active
run
name
Runs the batch.
$ lst run bulkperf
stop
name
Stops the batch.
$ lst stop bulkperf
query
name
[--test index]
[--timeout seconds]
[--loop loopcount]
[--delay seconds]
[--all]
Queries the batch status.
|
Parameter |
Description |
|---|---|
--test
|
Only queries the specified test. The test index starts from 1. |
--timeout
|
The timeout value to wait for RPC. The default is 5 seconds. |
--loop
|
The loop count of the query. |
--delay
|
The interval of each query. The default is 5 seconds. |
--all
|
The list status of all nodes in a batch or a test. |
Example:
$ lst run bulkperf $ lst query bulkperf --loop 5 --delay 3 Batch is running Batch is running Batch is running Batch is running Batch is running $ lst query bulkperf --all 192.168.1.10@tcp Running 192.168.1.11@tcp Running 192.168.1.12@tcp Running 192.168.1.13@tcp Running 192.168.1.14@tcp Running 192.168.1.15@tcp Running 192.168.1.16@tcp Running 192.168.1.17@tcp Running $ lst stop bulkperf $ lst query bulkperf Batch is idle
This section describes other lst commands.
ping [-session] [--group name]
[--nodes NIDs]
[--batch name]
[--server]
[--timeout seconds]
Sends a 'hello' query to the nodes.
|
Parameter |
Description |
|---|---|
--session
|
Pings all nodes in the current session. |
--group
|
Pings all nodes in a specified group. |
--nodes
|
Pings all specified nodes. |
--batch
|
Pings all client nodes in a batch. |
--server
|
Sends RPC to all server nodes instead of client nodes. This option is only used with |
--timeout
|
The RPC timeout value. |
Example:
# lst ping 192.168.10.[15-20]@tcp 192.168.1.15@tcp Active [session: liang id: 192.168.1.3@tcp] 192.168.1.16@tcp Active [session: liang id: 192.168.1.3@tcp] 192.168.1.17@tcp Active [session: liang id: 192.168.1.3@tcp] 192.168.1.18@tcp Busy [session: Isaac id: 192.168.10.10@tcp] 192.168.1.19@tcp Down [session: <NULL> id: LNET_NID_ANY] 192.168.1.20@tcp Down [session: <NULL> id: LNET_NID_ANY]
stat [--bw] [--rate] [--read] [--write] [--max] [--min] [--avg] " "
[--timeout seconds]
[--delay seconds]
group|NIDs
[group|NIDs]
The collection performance and RPC statistics of one or more nodes.
|
Parameter |
Description |
|---|---|
--bw
|
Displays the bandwidth of the specified group/nodes. |
--rate
|
Displays the rate of RPCs of the specified group/nodes. |
--read
|
Displays the read statistics of the specified group/nodes. |
--write
|
Displays the write statistics of the specified group/nodes. |
--max
|
Displays the maximum value of the statistics. |
--min
|
Displays the minimum value of the statistics. |
--avg
|
Displays the average of the statistics. |
--timeout
|
The timeout of the statistics RPC. The default is 5 seconds. |
--delay
|
The interval of the statistics (in seconds). |
Example:
$ lst run bulkperf $ lst stat clients [LNet Rates of clients] [W] Avg: 1108 RPC/s Min: 1060 RPC/s Max: 1155 RPC/s [R] Avg: 2215 RPC/s Min: 2121 RPC/s Max: 2310 RPC/s [LNet Bandwidth of clients] [W] Avg: 16.60 MB/s Min: 16.10 MB/s Max: 17.1 MB/s [R] Avg: 40.49 MB/s Min: 40.30 MB/s Max: 40.68 MB/s
Specifying a group name (
group
$ lst stat servers
where servers is the name of a test group created by lst add_group
Specifying a NIDNIDs
$ lst stat 192.168.0.[1-100/2]@tcp
Only LNet performance statistics are available. By default, all statistics information is displayed. Users can specify additional information with these options.
show_error [--session] [group|NIDs]...
Lists the number of failed RPCs on test nodes.
|
Parameter |
Description |
|---|---|
--session
|
Lists errors in the current test session. With this option, historical RPC errors are not listed. |
Example:
$ lst show_error client sclients 12345-192.168.1.15@tcp: [Session: 1 brw errors, 0 ping errors] \ [RPC: 20 errors, 0 dropped, 12345-192.168.1.16@tcp: [Session: 0 brw errors, 0 ping errors] \ [RPC: 1 errors, 0 dropped, Total 2 error nodes in clients $ lst show_error --session clients clients 12345-192.168.1.15@tcp: [Session: 1 brw errors, 0 ping errors] Total 1 error nodes in clients
Table of Contents
This chapter describes the Lustre I/O kit, a collection of I/O benchmarking tools for a Lustre cluster. It includes:
The tools in the Lustre I/O Kit are used to benchmark Lustre file system hardware and validate that it is working as expected before you install the Lustre software. It can also be used to to validate the performance of the various hardware and software layers in the cluster and also to find and troubleshoot I/O issues.
Typically, performance is measured starting with single raw devices and then proceeding to groups of devices. Once raw performance has been established, other software layers are then added incrementally and tested.
The I/O kit contains three tests, each of which tests a progressively higher layer in the Lustre software stack:
sgpdd-survey- Measure basic 'bare metal' performance of devices while bypassing the kernel block device layers, buffer cache, and file system.obdfilter-survey- Measure the performance of one or more OSTs directly on the OSS node or alternately over the network from a Lustre client.ost-survey- Performs I/O against OSTs individually to allow performance comparisons to detect if an OST is performing sub-optimally due to hardware issues.
Typically with these tests, a Lustre file system should deliver 85-90% of the raw device performance.
The following prerequisites must be met to use the tests in the Lustre I/O kit:
Password-free remote access to nodes in the system (provided by
sshorrsh).LNet self-test completed to test that Lustre networking has been properly installed and configured. See Chapter 32, Testing Lustre Network Performance (LNet Self-Test).
Lustre file system software installed.
sg3_utilspackage providing thesgp_ddtool (sg3_utilsis a separate RPM package available online using YUM).
Download the Lustre I/O kit (lustre-iokit)from:
The sgpdd-survey tool is used to test bare metal
I/O performance of the raw hardware, while bypassing as much of the kernel
as possible. This survey may be used to characterize the performance of a
SCSI device by simulating an OST serving multiple stripe files. The data
gathered by this survey can help set expectations for the performance of a
Lustre OST using this device.
The script uses sgp_dd to carry out raw sequential
disk I/O. It runs with variable numbers of sgp_dd threads
to show how performance varies with different request queue depths.
The script spawns variable numbers of sgp_dd
instances, each reading or writing a separate area of the disk to
demonstrate performance variance within a number of concurrent stripe files.
Several tips and insights for disk performance measurement are described below. Some of this information is specific to RAID arrays and/or the Linux RAID implementation.
Performance is limited by the slowest disk.
Before creating a RAID array, benchmark all disks individually. We have frequently encountered situations where drive performance was not consistent for all devices in the array. Replace any disks that are significantly slower than the rest.
Disks and arrays are very sensitive to request size.
To identify the optimal request size for a given disk, benchmark the disk with different record sizes ranging from 4 KB to 1 to 2 MB.
Caution
The sgpdd-survey script overwrites the device
being tested, which results in the
LOSS OF ALL DATA on that device. Exercise caution
when selecting the device to be tested.
Note
Array performance with all LUNs loaded does not always match the performance of a single LUN when tested in isolation.
Prerequisites:
sgp_ddtool in thesg3_utilspackageLustre software is NOT required
The device(s) being tested must meet one of these two requirements:
If the device is a SCSI device, it must appear in the output of
sg_map(make sure the kernel modulesgis loaded).If the device is a raw device, it must appear in the output of
raw -qa.
Raw and SCSI devices cannot be mixed in the test specification.
Note
If you need to create raw devices to use the
sgpdd-survey tool, note that raw device 0 cannot be
used due to a bug in certain versions of the "raw" utility
(including the version shipped with Red Hat Enterprise Linux 4U4.)
To get large I/O transfers (1 MB) to disk, it may be necessary to tune several kernel parameters as specified:
/sys/block/sdN/queue/max_sectors_kb = 4096 /sys/block/sdN/queue/max_phys_segments = 256 /proc/scsi/sg/allow_dio = 1 /sys/module/ib_srp/parameters/srp_sg_tablesize = 255 /sys/block/sdN/queue/scheduler
Note
Recommended schedulers are deadline and noop. The scheduler is set by default to deadline, unless it has already been set to noop.
The sgpdd-survey script must be customized for
the particular device being tested and for the location where the script
saves its working and result files (by specifying the
${rslt} variable). Customization variables are
described at the beginning of the script.
When the sgpdd-survey script runs, it creates a
number of working files and a pair of result files. The names of all the
files created start with the prefix defined in the variable
${rslt}. (The default value is /tmp.
) The files include:
File containing standard output data (same as
stdout)rslt_date_time.summaryTemporary (tmp) files
rslt_date_time_*Collected tmp files for post-mortem
rslt_date_time.detail
The stdout and the .summary
file will contain lines like this:
total_size 8388608K rsz 1024 thr 1 crg 1 180.45 MB/s 1 x 180.50 \
= 180.50 MB/sEach line corresponds to a run of the test. Each test run will have a different number of threads, record size, or number of regions.
total_size- Size of file being tested in KBs (8 GB in above example).rsz- Record size in KBs (1 MB in above example).thr- Number of threads generating I/O (1 thread in above example).crg- Current regions, the number of disjoint areas on the disk to which I/O is being sent (1 region in above example, indicating that no seeking is done).MB/s- Aggregate bandwidth measured by dividing the total amount of data by the elapsed time (180.45 MB/s in the above example).MB/s- The remaining numbers show the number of regions X performance of the slowest disk as a sanity check on the aggregate bandwidth.
If there are so many threads that the sgp_dd
script is unlikely to be able to allocate I/O buffers, then
ENOMEM is printed in place of the aggregate bandwidth
result.
If one or more sgp_dd instances do not
successfully report a bandwidth number, then FAILED
is printed in place of the aggregate bandwidth result.
The obdfilter-survey script generates sequential
I/O from varying numbers of threads and objects (files) to simulate the I/O
patterns of a Lustre client.
The obdfilter-survey script can be run directly on
the OSS node to measure the OST storage performance without any intervening
network, or it can be run remotely on a Lustre client to measure the OST
performance including network overhead.
The obdfilter-survey is used to characterize the
performance of the following:
Local file system - In this mode, the
obdfilter-surveyscript exercises one or more instances of the obdfilter directly. The script may run on one or more OSS nodes, for example, when the OSSs are all attached to the same multi-ported disk subsystem.Run the script using the
case=diskparameter to run the test against all the local OSTs. The script automatically detects all local OSTs and includes them in the survey.To run the test against only specific OSTs, run the script using the
targets=parameterto list the OSTs to be tested explicitly. If some OSTs are on remote nodes, specify their hostnames in addition to the OST name (for example,oss2:lustre-OST0004).All
obdfilterinstances are driven directly. The script automatically loads theobdechomodule (if required) and creates one instance ofecho_clientfor eachobdfilterinstance in order to generate I/O requests directly to the OST.For more details, see Section 33.3.1, “ Testing Local Disk Performance”.
Network - In this mode, the Lustre client generates I/O requests over the network but these requests are not sent to the OST file system. The OSS node runs the obdecho server to receive the requests but discards them before they are sent to the disk.
Pass the parameters
case=networkandtargets=to the script. For each network case, the script does the required setup.hostname|IP_of_serverFor more details, see Section 33.3.2, “ Testing Network Performance”
Remote file system over the network - In this mode the
obdfilter-surveyscript generates I/O from a Lustre client to a remote OSS to write the data to the file system.To run the test against all the local OSCs, pass the parameter
case=netdiskto the script. Alternately you can pass the target= parameter with one or more OSC devices (e.g.,lustre-OST0000-osc-ffff88007754bc00) against which the tests are to be run.For more details, see Section 33.3.3, “ Testing Remote Disk Performance”.
Caution
The obdfilter-survey script is potentially
destructive and there is a small risk data may be lost. To reduce this
risk, obdfilter-survey should not be run on devices
that contain data that needs to be preserved. Thus, the best time to run
obdfilter-survey is before the Lustre file system is
put into production. The reason obdfilter-survey may be
safe to run on a production file system is because it creates objects with
object sequence 2. Normal file system objects are typically created with
object sequence 0.
Note
If the obdfilter-survey test is terminated before
it completes, some small amount of space is leaked. you can either ignore
it or reformat the file system.
Note
The obdfilter-survey script is
NOT scalable beyond tens of OSTs since it is only
intended to measure the I/O performance of individual storage subsystems,
not the scalability of the entire system.
Note
The obdfilter-survey script must be customized,
depending on the components under test and where the script's working
files should be kept. Customization variables are described at the
beginning of the obdfilter-survey script. In
particular, pay attention to the listed maximum values listed for each
parameter in the script.
The obdfilter-survey script can be run
automatically or manually against a local disk. This script profiles the
overall throughput of storage hardware, including the file system and RAID
layers managing the storage, by sending workloads to the OSTs that vary in
thread count, object count, and I/O size.
When the obdfilter-survey script is run, it
provides information about the performance abilities of the storage
hardware and shows the saturation points.
The plot-obdfilter script generates from the
output of the obdfilter-survey a CSV file and
parameters for importing into a spreadsheet or gnuplot to visualize the
data.
To run the obdfilter-survey script, create a
standard Lustre file system configuration; no special setup is needed.
To perform an automatic run:
Start the Lustre OSTs.
The Lustre OSTs should be mounted on the OSS node(s) to be tested. The Lustre client is not required to be mounted at this time.
Verify that the obdecho module is loaded. Run:
modprobe obdecho
Run the
obdfilter-surveyscript with the parametercase=disk.For example, to run a local test with up to two objects (nobjhi), up to two threads (thrhi), and 1024 MB transfer size (size):
$ nobjhi=2 thrhi=2 size=1024 case=disk sh obdfilter-survey
Performance measurements for write, rewrite, read etc are provided below:
# example output Fri Sep 25 11:14:03 EDT 2015 Obdfilter-survey for case=disk from hds1fnb6123 ost 10 sz 167772160K rsz 1024K obj 10 thr 10 write 10982.73 [ 601.97,2912.91] rewrite 15696.54 [1160.92,3450.85] read 12358.60 [ 938.96,2634.87] ...
The file
./lustre-iokit/obdfilter-survey/README.obdfilter-surveyprovides an explaination for the output as follows:ost 10 is the total number of OSTs under test. sz 167772160K is the total amount of data read or written (in bytes). rsz 1024K is the record size (size of each echo_client I/O, in bytes). obj 10 is the total number of objects over all OSTs thr 10 is the total number of threads over all OSTs and objects write is the test name. If more tests have been specified they all appear on the same line. 10982.73 is the aggregate bandwidth over all OSTs measured by dividing the total number of MB by the elapsed time. [601.97,2912.91] are the minimum and maximum instantaneous bandwidths seen on any individual OST. Note that although the numbers of threads and objects are specifed per-OST in the customization section of the script, results are reported aggregated over all OSTs.
To perform a manual run:
Start the Lustre OSTs.
The Lustre OSTs should be mounted on the OSS node(s) to be tested. The Lustre client is not required to be mounted at this time.
Verify that the
obdechomodule is loaded. Run:modprobe obdecho
Determine the OST names.
On the OSS nodes to be tested, run the
lctl dlcommand. The OST device names are listed in the fourth column of the output. For example:$ lctl dl |grep obdfilter 0 UP obdfilter lustre-OST0001 lustre-OST0001_UUID 1159 2 UP obdfilter lustre-OST0002 lustre-OST0002_UUID 1159 ...
List all OSTs you want to test.
Use the
targets=parameterto list the OSTs separated by spaces. List the individual OSTs by name using the formatfsname-OSTnumberlustre-OST0001). You do not have to specify an MDS or LOV.Run the
obdfilter-surveyscript with thetargets=parameter.For example, to run a local test with up to two objects (
nobjhi), up to two threads (thrhi), and 1024 Mb (size) transfer size:$ nobjhi=2 thrhi=2 size=1024 targets="lustre-OST0001 \ lustre-OST0002" sh obdfilter-survey
The obdfilter-survey script can only be run
automatically against a network; no manual test is provided.
To run the network test, a specific Lustre file system setup is needed. Make sure that these configuration requirements have been met.
To perform an automatic run:
Start the Lustre OSTs.
The Lustre OSTs should be mounted on the OSS node(s) to be tested. The Lustre client is not required to be mounted at this time.
Verify that the
obdechomodule is loaded. Run:modprobe obdecho
Start
lctland check the device list, which must be empty. Run:lctl dl
Run the
obdfilter-surveyscript with the parameterscase=networkandtargets=. For example:hostname|ip_of_server$ nobjhi=2 thrhi=2 size=1024 targets="oss0 oss1" \ case=network sh obdfilter-surveyOn the server side, view the statistics at:
lctl get_param obdecho.
echo_srv.statswhere
echo_srvobdechoserver created by the script.
The obdfilter-survey script can be run
automatically or manually against a network disk. To run the network disk
test, start with a standard Lustre configuration. No special setup is
needed.
To perform an automatic run:
Start the Lustre OSTs.
The Lustre OSTs should be mounted on the OSS node(s) to be tested. The Lustre client is not required to be mounted at this time.
Verify that the
obdechomodule is loaded. Run:modprobe obdecho
Run the
obdfilter-surveyscript with the parametercase=netdisk. For example:$ nobjhi=2 thrhi=2 size=1024 case=netdisk sh obdfilter-survey
To perform a manual run:
Start the Lustre OSTs.
The Lustre OSTs should be mounted on the OSS node(s) to be tested. The Lustre client is not required to be mounted at this time.
Verify that the
obdechomodule is loaded. Run:modprobe obdecho
Determine the OSC names.
On the OSS nodes to be tested, run the
lctl dlcommand. The OSC device names are listed in the fourth column of the output. For example:$ lctl dl |grep obdfilter 3 UP osc lustre-OST0000-osc-ffff88007754bc00 \ 54b91eab-0ea9-1516-b571-5e6df349592e 5 4 UP osc lustre-OST0001-osc-ffff88007754bc00 \ 54b91eab-0ea9-1516-b571-5e6df349592e 5 ...List all OSCs you want to test.
Use the
targets=parameterto list the OSCs separated by spaces. List the individual OSCs by name separated by spaces using the formatfsname-OST_name-osc-instancelustre-OST0000-osc-ffff88007754bc00). You do not have to specify an MDS or LOV.Run the
obdfilter-surveyscript with thetargets=andosccase=netdisk.An example of a local test run with up to two objects (
nobjhi), up to two threads (thrhi), and 1024 Mb (size) transfer size is shown below:$ nobjhi=2 thrhi=2 size=1024 \ targets="lustre-OST0000-osc-ffff88007754bc00 \ lustre-OST0001-osc-ffff88007754bc00" sh obdfilter-survey
When the obdfilter-survey script runs, it creates
a number of working files and a pair of result files. All files start with
the prefix defined in the variable ${rslt}.
|
File |
Description |
|---|---|
|
|
Same as stdout |
|
|
Per-host test script files |
|
|
Per-OST result files |
|
|
Collected result files for post-mortem |
The obdfilter-survey script iterates over the
given number of threads and objects performing the specified tests and
checks that all test processes have completed successfully.
Note
The obdfilter-survey script may not clean up
properly if it is aborted or if it encounters an unrecoverable error. In
this case, a manual cleanup may be required, possibly including killing
any running instances of lctl (local or remote),
removing echo_client instances created by the script
and unloading obdecho.
The .summary file and stdout
of the obdfilter-survey script contain lines like:
ost 8 sz 67108864K rsz 1024 obj 8 thr 8 write 613.54 [ 64.00, 82.00]
Where:
|
Parameter and value |
Description |
|---|---|
|
ost 8 |
Total number of OSTs being tested. |
|
sz 67108864K |
Total amount of data read or written (in KB). |
|
rsz 1024 |
Record size (size of each echo_client I/O, in KB). |
|
obj 8 |
Total number of objects over all OSTs. |
|
thr 8 |
Total number of threads over all OSTs and objects. |
|
write |
Test name. If more tests have been specified, they all appear on the same line. |
|
613.54 |
Aggregate bandwidth over all OSTs (measured by dividing the total number of MB by the elapsed time). |
|
[64, 82.00] |
Minimum and maximum instantaneous bandwidths on an individual OST. |
Note
Although the numbers of threads and objects are specified per-OST in the customization section of the script, the reported results are aggregated over all OSTs.
It is useful to import the obdfilter-survey
script summary data (it is fixed width) into Excel (or any graphing
package) and graph the bandwidth versus the number of threads for
varying numbers of concurrent regions. This shows how the OSS performs
for a given number of concurrently-accessed objects (files) with varying
numbers of I/Os in flight.
It is also useful to monitor and record average disk I/O sizes
during each test using the 'disk io size' histogram in the
file lctl get_param obdfilter.*.brw_stats
(see Section 39.3.5, “Monitoring the OST Block I/O Stream” for details). These
numbers help identify problems in the system when full-sized I/Os are
not submitted to the underlying disk. This may be caused by problems in
the device driver or Linux block layer.
The plot-obdfilter script included in the I/O
toolkit is an example of processing output files to a .csv format and
plotting a graph using gnuplot.
The ost-survey tool is a shell script that uses
lfs setstripe to perform I/O against a single OST. The
script writes a file (currently using dd) to each OST
in the Lustre file system, and compares read and write speeds. The
ost-survey tool is used to detect anomalies between
otherwise identical disk subsystems.
Note
We have frequently discovered wide performance variations across all LUNs in a cluster. This may be caused by faulty disks, RAID parity reconstruction during the test, or faulty network hardware.
To run the ost-survey script, supply a file size
(in KB) and the Lustre file system mount point. For example, run:
$ ./ost-survey.sh -s 10 /mnt/lustre
Typical output is:
Number of Active OST devices : 4 Worst Read OST indx: 2 speed: 2835.272725 Best Read OST indx: 3 speed: 2872.889668 Read Average: 2852.508999 +/- 16.444792 MB/s Worst Write OST indx: 3 speed: 17.705545 Best Write OST indx: 2 speed: 128.172576 Write Average: 95.437735 +/- 45.518117 MB/s Ost# Read(MB/s) Write(MB/s) Read-time Write-time ---------------------------------------------------- 0 2837.440 126.918 0.035 0.788 1 2864.433 108.954 0.035 0.918 2 2835.273 128.173 0.035 0.780 3 2872.890 17.706 0.035 5.648
The mds-survey script tests the local
metadata performance using the echo_client to
drive the MDD layer of the MDS stack.
It can be used with the following classes of operations:
Open-create/mkdir/createLookup/getattr/setxattrDelete/destroyUnlink/rmdir
These operations will be run by a variable number of concurrent threads and will test with the number of directories specified by the user. The run can be executed such that all threads operate in a single directory (dir_count=1) or in private/unique directory (dir_count=x thrlo=x thrhi=x).
The mdd instance is driven directly. The script automatically loads the obdecho module if required and creates instance of echo_client.
This script can also create OST objects by providing stripe_count greater than zero.
To perform a run:
Start the Lustre MDT.
The Lustre MDT should be mounted on the MDS node to be tested.
Start the Lustre OSTs (optional, only required when test with OST objects)
The Lustre OSTs should be mounted on the OSS node(s).
Run the
mds-surveyscript as explain belowThe script must be customized according to the components under test and where it should keep its working files. Customization variables are described as followed:
thrlo- threads to start testing. skipped if less thandir_countthrhi- maximum number of threads to testtargets- MDT instancefile_count- number of files per thread to testdir_count- total number of directories to test. Must be less than or equal tothrhistripe_count- number stripe on OST objectstests_str- test operations. Must have at least "create" and "destroy"start_number- base number for each thread to prevent name collisionslayer- MDS stack's layer to be tested
Run without OST objects creation:
Setup the Lustre MDS without OST mounted. Then invoke the
mds-surveyscript$ thrhi=64 file_count=200000 sh mds-survey
Run with OST objects creation:
Setup the Lustre MDS with at least one OST mounted. Then invoke the
mds-surveyscript withstripe_countparameter$ thrhi=64 file_count=200000 stripe_count=2 sh mds-survey
Note: a specific MDT instance can be specified using targets variable.
$ targets=lustre-MDT0000 thrhi=64 file_count=200000 stripe_count=2 sh mds-survey
When the mds-survey script runs, it creates a
number of working files and a pair of result files. All files start with
the prefix defined in the variable ${rslt}.
|
File |
Description |
|---|---|
|
|
Same as stdout |
|
|
Per-host test script files |
|
|
Per-mdt result files |
|
|
Collected result files for post-mortem |
The mds-survey script iterates over the given
number of threads performing the specified tests and checks that all test
processes have completed successfully.
Note
The mds-survey script may not clean up properly
if it is aborted or if it encounters an unrecoverable error. In this
case, a manual cleanup may be required, possibly including killing any
running instances of lctl, removing
echo_client instances created by the script and
unloading obdecho.
The .summary file and stdout
of the mds-survey script contain lines like:
mdt 1 file 100000 dir 4 thr 4 create 5652.05 [ 999.01,46940.48] destroy 5797.79 [ 0.00,52951.55]
Where:
|
Parameter and value |
Description |
|---|---|
|
mdt 1 |
Total number of MDT under test |
|
file 100000 |
Total number of files per thread to operate |
|
dir 4 |
Total number of directories to operate |
|
thr 4 |
Total number of threads operate over all directories |
|
create, destroy |
Tests name. More tests will be displayed on the same line. |
|
565.05 |
Aggregate operations over MDT measured by dividing the total number of operations by the elapsed time. |
|
[999.01,46940.48] |
Minimum and maximum instantaneous operation seen on any individual MDT |
Note
If script output has "ERROR", this usually means there is issue during the run such as running out of space on the MDT and/or OST. More detailed debug information is available in the ${rslt}.detail file
Table of Contents
- 34.1. Optimizing the Number of Service Threads
- 34.2. Binding MDS Service Thread to CPU Partitions
- 34.3. Tuning LNet Parameters
- 34.4. libcfs Tuning
- 34.5. LND Tuning
- 34.6. Network Request Scheduler (NRS) Tuning
- 34.7. Lockless I/O Tunables
- 34.8. Server-Side Advice and Hinting L 2.9
- 34.9. Large Bulk IO (16MB RPC) L 2.9
- 34.10. Improving Lustre I/O Performance for Small Files
- 34.11. Understanding Why Write Performance is Better Than Read Performance
This chapter contains information about tuning a Lustre file system for better performance.
Note
Many options in the Lustre software are set by means of kernel module
parameters. These parameters are contained in the
/etc/modprobe.d/lustre.conf file.
An OSS can have a minimum of two service threads and a maximum of 512 service threads. The number of service threads is a function of how much RAM and how many CPUs are on each OSS node (1 thread / 128MB * num_cpus). If the load on the OSS node is high, new service threads will be started in order to process more requests concurrently, up to 4x the initial number of threads (subject to the maximum of 512). For a 2GB 2-CPU system, the default thread count is 32 and the maximum thread count is 128.
Increasing the size of the thread pool may help when:
Several OSTs are exported from a single OSS
Back-end storage is running synchronously
I/O completions take excessive time due to slow storage
Decreasing the size of the thread pool may help if:
Clients are overwhelming the storage capacity
There are lots of "slow I/O" or similar messages
Increasing the number of I/O threads allows the kernel and storage to aggregate many writes together for more efficient disk I/O. The OSS thread pool is shared--each thread allocates approximately 1.5 MB (maximum RPC size + 0.5 MB) for internal I/O buffers.
It is very important to consider memory consumption when increasing the thread pool size. Drives are only able to sustain a certain amount of parallel I/O activity before performance is degraded, due to the high number of seeks and the OST threads just waiting for I/O. In this situation, it may be advisable to decrease the load by decreasing the number of OST threads.
Determining the optimum number of OSS threads is a process of trial and error, and varies for each particular configuration. Variables include the number of OSTs on each OSS, number and speed of disks, RAID configuration, and available RAM. You may want to start with a number of OST threads equal to the number of actual disk spindles on the node. If you use RAID, subtract any dead spindles not used for actual data (e.g., 1 of N of spindles for RAID5, 2 of N spindles for RAID6), and monitor the performance of clients during usual workloads. If performance is degraded, increase the thread count and see how that works until performance is degraded again or you reach satisfactory performance.
Note
If there are too many threads, the latency for individual I/O requests can become very high and should be avoided. Set the desired maximum thread count permanently using the method described above.
The
oss_num_threads parameter enables the number of OST
service threads to be specified at module load time on the OSS
nodes:
options ost oss_num_threads={N}
After startup, the minimum and maximum number of OSS thread counts
can be set via the
{service}.thread_{min,max,started} tunable. To change
the tunable at runtime, run:
lctl {get,set}_param {service}.thread_{min,max,started}
This works in a similar fashion to binding of threads on MDS. MDS thread tuning is covered in Section 34.2, “ Binding MDS Service Thread to CPU Partitions”.
oss_cpts=[EXPRESSION]binds the default OSS service on CPTs defined by[EXPRESSION].oss_io_cpts=[EXPRESSION]binds the IO OSS service on CPTs defined by[EXPRESSION].
For further details, see Section 39.9, “Setting MDS and OSS Thread Counts”.
The
mds_num_threads parameter enables the number of MDS
service threads to be specified at module load time on the MDS
node:
options mds mds_num_threads={N}After startup, the minimum and maximum number of MDS thread counts
can be set via the
{service}.thread_{min,max,started} tunable. To change
the tunable at runtime, run:
lctl {get,set}_param {service}.thread_{min,max,started}
For details, see Section 39.9, “Setting MDS and OSS Thread Counts”.
The number of MDS service threads started depends on system size
and the load on the server, and has a default maximum of 64. The
maximum potential number of threads (MDS_MAX_THREADS)
is 1024.
Note
The OSS and MDS start two threads per service per CPT at mount
time, and dynamically increase the number of running service threads in
response to server load. Setting the *_num_threads
module parameter starts the specified number of threads for that
service immediately and disables automatic thread creation behavior.
Parameters are available to provide administrators control over the number of service threads.
mds_rdpg_num_threadscontrols the number of threads in providing the read page service. The read page service handles file close and readdir operations.
With the Node Affinity (Node affinity) feature, MDS threads can be bound to particular CPU partitions (CPTs) to improve CPU cache usage and memory locality. Default values for CPT counts and CPU core bindings are selected automatically to provide good overall performance for a given CPU count. However, an administrator can deviate from these setting if they choose. For details on specifying the mapping of CPU cores to CPTs see Section 34.4, “ libcfs Tuning”.
mds_num_cpts=[EXPRESSION]binds the default MDS service threads to CPTs defined byEXPRESSION. For examplemds_num_cpts=[0-3]will bind the MDS service threads toCPT[0,1,2,3].mds_rdpg_num_cpts=[EXPRESSION]binds the read page service threads to CPTs defined byEXPRESSION. The read page service handles file close and readdir requests. For examplemds_rdpg_num_cpts=[4]will bind the read page threads toCPT4.
Parameters must be set before module load in the file
/etc/modprobe.d/lustre.conf. For example:
This section describes LNet tunables, the use of which may be necessary on some systems to improve performance. To test the performance of your Lustre network, see Chapter 32, Testing Lustre Network Performance (LNet Self-Test).
The kernel allocates buffers for sending and receiving messages on a network.
ksocklnd has separate parameters for the transmit and
receive buffers.
options ksocklnd tx_buffer_size=0 rx_buffer_size=0
If these parameters are left at the default value (0), the system automatically tunes the transmit and receive buffer size. In almost every case, this default produces the best performance. Do not attempt to tune these parameters unless you are a network expert.
The hardware interrupts that are generated by network adapters may
be handled by any CPU in the system. In some cases, we would like network
traffic to remain local to a single CPU to help keep the processor cache
warm and minimize the impact of context switches. This is helpful when an
SMP system has more than one network interface and ideal when the number
of interfaces equals the number of CPUs. To enable the
enable_irq_affinity parameter, enter:
options ksocklnd enable_irq_affinity=1
In other cases, if you have an SMP platform with a single fast interface such as 10 Gb Ethernet and more than two CPUs, you may see performance improve by turning this parameter off.
options ksocklnd enable_irq_affinity=0
By default, this parameter is off. As always, you should test the performance to compare the impact of changing this parameter.
Lustre allows enhanced network interface control. This means that an administrator can bind an interface to one or more CPU partitions. Bindings are specified as options to the LNet modules. For more information on specifying module options, see Section 43.1, “ Introduction”
For example,
o2ib0(ib0)[0,1] will ensure that all messages for
o2ib0 will be handled by LND threads executing on
CPT0 and
CPT1. An additional example might be:
tcp1(eth0)[0]. Messages for
tcp1 are handled by threads on
CPT0.
Network interface (NI) credits are shared across all CPU partitions
(CPT). For example, if a machine has four CPTs and the number of NI
credits is 512, then each partition has 128 credits. If a large number of
CPTs exist on the system, LNet checks and validates the NI credits for
each CPT to ensure each CPT has a workable number of credits. For
example, if a machine has 16 CPTs and the number of NI credits is 256,
then each partition only has 16 credits. 16 NI credits is low and could
negatively impact performance. As a result, LNet automatically adjusts
the credits to 8*
peer_credits(
peer_credits is 8 by default), so each partition has 64
credits.
Increasing the number of
credits/
peer_credits can improve the performance of high
latency networks (at the cost of consuming more memory) by enabling LNet
to send more inflight messages to a specific network/peer and keep the
pipeline saturated.
An administrator can modify the NI credit count using
ksoclnd or
ko2iblnd. In the example below, 256 credits are
applied to TCP connections.
ksocklnd credits=256
Applying 256 credits to IB connections can be achieved with:
ko2iblnd credits=256
Note
LNet may revalidate the NI credits, so the administrator's request may not persist.
When a node is set up as an LNet router, three pools of buffers are allocated: tiny, small and large. These pools are allocated per CPU partition and are used to buffer messages that arrive at the router to be forwarded to the next hop. The three different buffer sizes accommodate different size messages.
If a message arrives that can fit in a tiny buffer then a tiny buffer is used, if a message does not fit in a tiny buffer, but fits in a small buffer, then a small buffer is used. Finally if a message does not fit in either a tiny buffer or a small buffer, a large buffer is used.
Router buffers are shared by all CPU partitions. For a machine with a large number of CPTs, the router buffer number may need to be specified manually for best performance. A low number of router buffers risks starving the CPU partitions of resources.
tiny_router_buffers: Zero payload buffers used for signals and acknowledgements.small_router_buffers: 4 KB payload buffers for small messageslarge_router_buffers: 1 MB maximum payload buffers, corresponding to the recommended RPC size of 1 MB.
The default setting for router buffers typically results in
acceptable performance. LNet automatically sets a default value to reduce
the likelihood of resource starvation. The size of a router buffer can be
modified as shown in the example below. In this example, the size of the
large buffer is modified using the
large_router_buffers parameter.
lnet large_router_buffers=8192
Note
LNet may revalidate the router buffer setting, so the administrator's request may not persist.
Portal round-robin defines the policy LNet applies to deliver events and messages to the upper layers. The upper layers are PLRPC service or LNet selftest.
If portal round-robin is disabled, LNet will deliver messages to CPTs based on a hash of the source NID. Hence, all messages from a specific peer will be handled by the same CPT. This can reduce data traffic between CPUs. However, for some workloads, this behavior may result in poorly balancing loads across the CPU.
If portal round-robin is enabled, LNet will round-robin incoming events across all CPTs. This may balance load better across the CPU but can incur a cross CPU overhead.
The current policy can be changed by an administrator with
lctl set_param portal_rotor=value.
There are four options for
:value
OFFDisable portal round-robin on all incoming requests.
ONEnable portal round-robin on all incoming requests.
RR_RTEnable portal round-robin only for routed messages.
HASH_RTRouted messages will be delivered to the upper layer by hash of source NID (instead of NID of router.) This is the default value.
Two options are available to help determine peer health:
peer_timeout- The timeout (in seconds) before an aliveness query is sent to a peer. For example, ifpeer_timeoutis set to180sec, an aliveness query is sent to the peer every 180 seconds. This feature only takes effect if the node is configured as an LNet router.In a routed environment, the
peer_timeoutfeature should always be on (set to a value in seconds) on routers. If the router checker has been enabled, the feature should be turned off by setting it to 0 on clients and servers.For a non-routed scenario, enabling the
peer_timeoutoption provides health information such as whether a peer is alive or not. For example, a client is able to determine if an MGS or OST is up when it sends it a message. If a response is received, the peer is alive; otherwise a timeout occurs when the request is made.In general,
peer_timeoutshould be set to no less than the LND timeout setting. For more information about LND timeouts, see Section 39.5.2, “Setting Static Timeouts”.When the
o2iblnd(IB) driver is used,peer_timeoutshould be at least twice the value of theko2iblndkeepalive option. for more information about keepalive options, see Section 43.2.2, “SOCKLNDKernel TCP/IP LND”.avoid_asym_router_failure- When set to 1, this parameter adds the additional requirement that for a route to be considered up the gateway of the route must have at least one NI up on the remote network of the route. This new requirement applies only to routes that are single-hop, which means that either the route's hop value is explicitly set to 1, or that it can be inferred that the route is single-hop. The default setting is 1.The inference of a single-hop routes works as follows: If the router checker is running on a node, the node will periodically ping all of its gateways, which are routers on the same lnet that are listed in the node's routes. The gateways' responses will include the status of all their network interfaces (NIs). If a node
Ahas a routeRthrough gatewayBto networkC, and nodeAsees that routerBhas at least one NI that connects directly to networkC(in a ping response fromB), nodeAwill infer thatRis a single-hop route. This aspect of single-hop is independent of the hop value of the route. For more information about the LNet routes parameter, see Section 9.5, “Setting the LNet Module routes Parameter”It is recommended to specify
hop=1when creating a single-hop route when this feature is enabled. When a route truly has only 1 hop, it is still recommended to explicitly set hop=1 because the single-hop inference mechanism will fail in cases where NIs fail to ever come up at all. This is because for the route inference to work, the NIs must at least come up or the gateway won't even mention them in the ping response, so the node won't see any mention of the remote net of the route in the gateway's NIs, and will mistakenly consider the route to be multi-hop, andavoid_asym_router_failurewill then have no effect unless hop=1 is set explicitly when the route is created.In the following examples, nodes running lnet are circles, networks are squares, and NIs are lines labeled by their NIDs. There is a client
Cand a routerX.Chas routes to networkso2ib0ando2ib1withXas the gateway. If an NI is red with it's name crossed out,Cconsiders it to be down, otherwiseCconsiders it to be up.In the above figure, one of two NIs that connect to
o2ib0is up, so the route too2ib0is considered up.In the above figure, zero NIs that connect to
o2ib0are up, so the route too2ib0is down.In the above figure, zero NIs that connect to
o2ib1are up, so the route too2ib1is down.Compare Figures 34.3 and 34.4. In 34.4,
X4@o2ib1never came up (rather than coming up and then going down). Consequently,Xdid not listX4@o2ib1in its ping response, soCcannot infer thatXshould be directly connected too2ib1. IfChas a route too2ib1throughX, and the hop count is not set to 1 by the sysadmin, LNet assumes thatXhas a route too2ib1through some remote router node, such asY. The gray part of Figure 34.4 shows the sort of configuration that LNet incorrectly assumes in this situation. Therefore,Cwill try to send messages foro2ib1throughX, where they will be dropped. If the sysadmin explicitly setshop=1for the route too2ib1(onC), LNet will know that ifXdoes not report an NI ono2ib1, that the route should be marked as down.


The following router checker parameters must be set to the maximum value of the corresponding setting for this option on any client or server:
dead_router_check_intervallive_router_check_intervalrouter_ping_timeout
For example, the
dead_router_check_interval parameter on any router must
be MAX.
Lustre allows binding service threads via CPU Partition Tables (CPTs). This allows the system administrator to fine-tune on which CPU cores the Lustre service threads are run, for both OSS and MDS services, as well as on the client.
CPTs are useful to reserve some cores on the OSS or MDS nodes for system functions such as system monitoring, HA heartbeat, or similar tasks. On the client it may be useful to restrict Lustre RPC service threads to a small subset of cores so that they do not interfere with computation, or because these cores are directly attached to the network interfaces.
By default, the Lustre software will automatically generate CPU
partitions (CPT) based on the number of CPUs in the system.
The CPT count can be explicitly set on the libcfs module using
cpu_npartitions=.
The value of NUMBERcpu_npartitions must be an integer between
1 and the number of online CPUs.
In Lustre 2.9 and later the default is to use one CPT per NUMA node. In earlier versions of Lustre, by default there was a single CPT if the online CPU core count was four or fewer, and additional CPTs would be created depending on the number of CPU cores, typically with 4-8 cores per CPT.
Tip
Setting cpu_npartitions=1 will disable most
of the SMP Node Affinity functionality.
CPU partitions can be described using string pattern notation.
If cpu_pattern=N is used, then there will be one
CPT for each NUMA node in the system, with each CPT mapping all of
the CPU cores for that NUMA node.
It is also possible to explicitly specify the mapping between CPU cores and CPTs, for example:
cpu_pattern="0[2,4,6] 1[3,5,7]Create two CPTs, CPT0 contains cores 2, 4, and 6, while CPT1 contains cores 3, 5, 7. CPU cores 0 and 1 will not be used by Lustre service threads, and could be used for node services such as system monitoring, HA heartbeat threads, etc. The binding of non-Lustre services to those CPU cores may be done in userspace using
numactl(8)or other application-specific methods, but is beyond the scope of this document.cpu_pattern="N 0[0-3] 1[4-7]Create two CPTs, with CPT0 containing all CPUs in NUMA node[0-3], while CPT1 contains all CPUs in NUMA node [4-7].
The current configuration of the CPU partition can be read via
lctl get_parm cpu_partition_table. For example,
a simple 4-core system has a single CPT with all four CPU cores:
$ lctl get_param cpu_partition_table cpu_partition_table=0 : 0 1 2 3
while a larger NUMA system with four 12-core CPUs may have four CPTs:
$ lctl get_param cpu_partition_table cpu_partition_table= 0 : 0 1 2 3 4 5 6 7 8 9 10 11 1 : 12 13 14 15 16 17 18 19 20 21 22 23 2 : 24 25 26 27 28 29 30 31 32 33 34 35 3 : 36 37 38 39 40 41 42 43 44 45 46 47
LND tuning allows the number of threads per CPU partition to be
specified. An administrator can set the threads for both
ko2iblnd and
ksocklnd using the
nscheds parameter. This adjusts the number of threads for
each partition, not the overall number of threads on the LND.
Note
The default number of threads for
ko2iblnd and
ksocklnd are automatically set and are chosen to
work well across a number of typical scenarios, for systems with both
high and low core counts.
The following table outlines the ko2iblnd module parameters to be used for tuning:
|
Module Parameter |
Default Value |
Description |
|---|---|---|
|
|
|
Service number (within RDMA_PS_TCP). |
|
|
|
Set non-zero to enable message (not RDMA) checksums. |
|
|
|
Timeout in seconds. |
|
|
|
Number of threads in each scheduler pool (per CPT). Value of zero means we derive the number from the number of cores. |
|
|
|
Introduced in 2.10. Number of connections to each peer. Messages are sent round-robin over the connection pool. Provides significant improvement with OmniPath. |
|
|
|
Number of message descriptors allocated for each pool at startup. Grows at runtime. Shared by all CPTs. |
|
|
|
Number of concurrent sends on network. |
|
|
|
Number of concurrent sends to 1 peer. Related/limited by IB queue size. |
|
|
|
When eagerly to return credits. |
|
|
|
Number per-peer router buffer credits. |
|
|
|
Seconds without aliveness news to declare peer dead (less than or equal to 0 to disable). |
|
|
|
IPoIB interface name. |
|
|
|
Retransmissions when no ACK received. |
|
|
|
RNR retransmissions. |
|
|
|
Idle time in seconds before sending a keepalive. |
|
|
|
IB MTU 256/512/1024/2048/4096. |
|
|
|
Send work-queue sizing. If zero, derived from
|
|
|
|
Number of fragments reserved for connection. If zero, use global memory region (found to be security issue). If non-zero, use FMR or FastReg for memory registration. Value needs to agree between both peers of connection. |
|
|
|
Size of fmr pool on each CPT (>= ntx / 4). Grows at runtime. |
|
|
|
Number dirty FMRs that triggers pool flush. |
|
|
|
Non-zero to enable FMR caching. |
|
|
|
HCA failover for bonding (0 OFF, 1 ON, other values reserved). |
|
|
|
Require privileged port when accepting connection. |
|
|
|
Use privileged port when initiating connection. |
|
|
|
Introduced in 2.10. Number scatter/gather element groups per work request. Used to deal with fragmentations which can consume double the number of work requests. |
The Network Request Scheduler (NRS) allows the administrator to influence the order in which RPCs are handled at servers, on a per-PTLRPC service basis, by providing different policies that can be activated and tuned in order to influence the RPC ordering. The aim of this is to provide for better performance, and possibly discrete performance characteristics using future policies.
The NRS policy state of a PTLRPC service can be read and set via the
{service}.nrs_policies tunable. To read a PTLRPC
service's NRS policy state, run:
lctl get_param {service}.nrs_policies
For example, to read the NRS policy state of the
ost_io service, run:
$ lctl get_param ost.OSS.ost_io.nrs_policies
ost.OSS.ost_io.nrs_policies=
regular_requests:
- name: fifo
state: started
fallback: yes
queued: 0
active: 0
- name: crrn
state: stopped
fallback: no
queued: 0
active: 0
- name: orr
state: stopped
fallback: no
queued: 0
active: 0
- name: trr
state: started
fallback: no
queued: 2420
active: 268
- name: tbf
state: stopped
fallback: no
queued: 0
active: 0
- name: delay
state: stopped
fallback: no
queued: 0
active: 0
high_priority_requests:
- name: fifo
state: started
fallback: yes
queued: 0
active: 0
- name: crrn
state: stopped
fallback: no
queued: 0
active: 0
- name: orr
state: stopped
fallback: no
queued: 0
active: 0
- name: trr
state: stopped
fallback: no
queued: 0
active: 0
- name: tbf
state: stopped
fallback: no
queued: 0
active: 0
- name: delay
state: stopped
fallback: no
queued: 0
active: 0
NRS policy state is shown in either one or two sections, depending on
the PTLRPC service being queried. The first section is named
regular_requests and is available for all PTLRPC
services, optionally followed by a second section which is named
high_priority_requests. This is because some PTLRPC
services are able to treat some types of RPCs as higher priority ones, such
that they are handled by the server with higher priority compared to other,
regular RPC traffic. For PTLRPC services that do not support high-priority
RPCs, you will only see the
regular_requests section.
There is a separate instance of each NRS policy on each PTLRPC service for handling regular and high-priority RPCs (if the service supports high-priority RPCs). For each policy instance, the following fields are shown:
|
Field |
Description |
|---|---|
|
|
The name of the policy. |
|
|
The state of the policy; this can be any of
|
|
|
Whether the policy is acting as a fallback policy or not. A
fallback policy is used to handle RPCs that other enabled
policies fail to handle, or do not support the handling of. The
possible values are
|
|
|
The number of RPCs that the policy has waiting to be serviced. |
|
|
The number of RPCs that the policy is currently handling. |
To enable an NRS policy on a PTLRPC service run:
lctl set_param {service}.nrs_policies=
policy_name
This will enable the policy
policy_namefor both regular and high-priority
RPCs (if the PLRPC service supports high-priority RPCs) on the given
service. For example, to enable the CRR-N NRS policy for the ldlm_cbd
service, run:
$ lctl set_param ldlm.services.ldlm_cbd.nrs_policies=crrn
ldlm.services.ldlm_cbd.nrs_policies=crrn
For PTLRPC services that support high-priority RPCs, you can also
supply an optional
reg|hptoken, in order to enable an NRS policy
for handling only regular or high-priority RPCs on a given PTLRPC service,
by running:
lctl set_param {service}.nrs_policies="
policy_name
reg|hp"
For example, to enable the TRR policy for handling only regular, but
not high-priority RPCs on the
ost_io service, run:
$ lctl set_param ost.OSS.ost_io.nrs_policies="trr reg"
ost.OSS.ost_io.nrs_policies="trr reg"
Note
When enabling an NRS policy, the policy name must be given in lower-case characters, otherwise the operation will fail with an error message.
The first in, first out (FIFO) policy handles RPCs in a service in the same order as they arrive from the LNet layer, so no special processing takes place to modify the RPC handling stream. FIFO is the default policy for all types of RPCs on all PTLRPC services, and is always enabled irrespective of the state of other policies, so that it can be used as a backup policy, in case a more elaborate policy that has been enabled fails to handle an RPC, or does not support handling a given type of RPC.
The FIFO policy has no tunables that adjust its behaviour.
The client round-robin over NIDs (CRR-N) policy performs batched round-robin scheduling of all types of RPCs, with each batch consisting of RPCs originating from the same client node, as identified by its NID. CRR-N aims to provide for better resource utilization across the cluster, and to help shorten completion times of jobs in some cases, by distributing available bandwidth more evenly across all clients.
The CRR-N policy can be enabled on all types of PTLRPC services, and has the following tunable that can be used to adjust its behavior:
{service}.nrs_crrn_quantumThe
{service}.nrs_crrn_quantumtunable determines the maximum allowed size of each batch of RPCs; the unit of measure is in number of RPCs. To read the maximum allowed batch size of a CRR-N policy, run:lctl get_param {service}.nrs_crrn_quantumFor example, to read the maximum allowed batch size of a CRR-N policy on the ost_io service, run:
$ lctl get_param ost.OSS.ost_io.nrs_crrn_quantum ost.OSS.ost_io.nrs_crrn_quantum=reg_quantum:16 hp_quantum:8You can see that there is a separate maximum allowed batch size value for regular (
reg_quantum) and high-priority (hp_quantum) RPCs (if the PTLRPC service supports high-priority RPCs).To set the maximum allowed batch size of a CRR-N policy on a given service, run:
lctl set_param {service}.nrs_crrn_quantum=1-65535This will set the maximum allowed batch size on a given service, for both regular and high-priority RPCs (if the PLRPC service supports high-priority RPCs), to the indicated value.
For example, to set the maximum allowed batch size on the ldlm_canceld service to 16 RPCs, run:
$ lctl set_param ldlm.services.ldlm_canceld.nrs_crrn_quantum=16 ldlm.services.ldlm_canceld.nrs_crrn_quantum=16For PTLRPC services that support high-priority RPCs, you can also specify a different maximum allowed batch size for regular and high-priority RPCs, by running:
$ lctl set_param {service}.nrs_crrn_quantum=reg_quantum|hp_quantum:1-65535"For example, to set the maximum allowed batch size on the ldlm_canceld service, for high-priority RPCs to 32, run:
$ lctl set_param ldlm.services.ldlm_canceld.nrs_crrn_quantum="hp_quantum:32" ldlm.services.ldlm_canceld.nrs_crrn_quantum=hp_quantum:32By using the last method, you can also set the maximum regular and high-priority RPC batch sizes to different values, in a single command invocation.
The object-based round-robin (ORR) policy performs batched round-robin scheduling of bulk read write (brw) RPCs, with each batch consisting of RPCs that pertain to the same backend-file system object, as identified by its OST FID.
The ORR policy is only available for use on the ost_io service. The RPC batches it forms can potentially consist of mixed bulk read and bulk write RPCs. The RPCs in each batch are ordered in an ascending manner, based on either the file offsets, or the physical disk offsets of each RPC (only applicable to bulk read RPCs).
The aim of the ORR policy is to provide for increased bulk read throughput in some cases, by ordering bulk read RPCs (and potentially bulk write RPCs), and thus minimizing costly disk seek operations. Performance may also benefit from any resulting improvement in resource utilization, or by taking advantage of better locality of reference between RPCs.
The ORR policy has the following tunables that can be used to adjust its behaviour:
ost.OSS.ost_io.nrs_orr_quantumThe
ost.OSS.ost_io.nrs_orr_quantumtunable determines the maximum allowed size of each batch of RPCs; the unit of measure is in number of RPCs. To read the maximum allowed batch size of the ORR policy, run:$ lctl get_param ost.OSS.ost_io.nrs_orr_quantum ost.OSS.ost_io.nrs_orr_quantum=reg_quantum:256 hp_quantum:16You can see that there is a separate maximum allowed batch size value for regular (
reg_quantum) and high-priority (hp_quantum) RPCs (if the PTLRPC service supports high-priority RPCs).To set the maximum allowed batch size for the ORR policy, run:
$ lctl set_param ost.OSS.ost_io.nrs_orr_quantum=
1-65535This will set the maximum allowed batch size for both regular and high-priority RPCs, to the indicated value.
You can also specify a different maximum allowed batch size for regular and high-priority RPCs, by running:
$ lctl set_param ost.OSS.ost_io.nrs_orr_quantum=
reg_quantum|hp_quantum:1-65535For example, to set the maximum allowed batch size for regular RPCs to 128, run:
$ lctl set_param ost.OSS.ost_io.nrs_orr_quantum=reg_quantum:128 ost.OSS.ost_io.nrs_orr_quantum=reg_quantum:128By using the last method, you can also set the maximum regular and high-priority RPC batch sizes to different values, in a single command invocation.
ost.OSS.ost_io.nrs_orr_offset_typeThe
ost.OSS.ost_io.nrs_orr_offset_typetunable determines whether the ORR policy orders RPCs within each batch based on logical file offsets or physical disk offsets. To read the offset type value for the ORR policy, run:$ lctl get_param ost.OSS.ost_io.nrs_orr_offset_type ost.OSS.ost_io.nrs_orr_offset_type=reg_offset_type:physical hp_offset_type:logicalYou can see that there is a separate offset type value for regular (
reg_offset_type) and high-priority (hp_offset_type) RPCs.To set the ordering type for the ORR policy, run:
$ lctl set_param ost.OSS.ost_io.nrs_orr_offset_type=
physical|logicalThis will set the offset type for both regular and high-priority RPCs, to the indicated value.
You can also specify a different offset type for regular and high-priority RPCs, by running:
$ lctl set_param ost.OSS.ost_io.nrs_orr_offset_type=
reg_offset_type|hp_offset_type:physical|logicalFor example, to set the offset type for high-priority RPCs to physical disk offsets, run:
$ lctl set_param ost.OSS.ost_io.nrs_orr_offset_type=hp_offset_type:physical ost.OSS.ost_io.nrs_orr_offset_type=hp_offset_type:physical
By using the last method, you can also set offset type for regular and high-priority RPCs to different values, in a single command invocation.
Note
Irrespective of the value of this tunable, only logical offsets can, and are used for ordering bulk write RPCs.
ost.OSS.ost_io.nrs_orr_supportedThe
ost.OSS.ost_io.nrs_orr_supportedtunable determines the type of RPCs that the ORR policy will handle. To read the types of supported RPCs by the ORR policy, run:$ lctl get_param ost.OSS.ost_io.nrs_orr_supported ost.OSS.ost_io.nrs_orr_supported=reg_supported:reads hp_supported=reads_and_writesYou can see that there is a separate supported 'RPC types' value for regular (
reg_supported) and high-priority (hp_supported) RPCs.To set the supported RPC types for the ORR policy, run:
$ lctl set_param ost.OSS.ost_io.nrs_orr_supported=
reads|writes|reads_and_writesThis will set the supported RPC types for both regular and high-priority RPCs, to the indicated value.
You can also specify a different supported 'RPC types' value for regular and high-priority RPCs, by running:
$ lctl set_param ost.OSS.ost_io.nrs_orr_supported=
reg_supported|hp_supported:reads|writes|reads_and_writesFor example, to set the supported RPC types to bulk read and bulk write RPCs for regular requests, run:
$ lctl set_param ost.OSS.ost_io.nrs_orr_supported=reg_supported:reads_and_writes ost.OSS.ost_io.nrs_orr_supported=reg_supported:reads_and_writesBy using the last method, you can also set the supported RPC types for regular and high-priority RPC to different values, in a single command invocation.
The target-based round-robin (TRR) policy performs batched round-robin scheduling of brw RPCs, with each batch consisting of RPCs that pertain to the same OST, as identified by its OST index.
The TRR policy is identical to the object-based round-robin (ORR) policy, apart from using the brw RPC's target OST index instead of the backend-fs object's OST FID, for determining the RPC scheduling order. The goals of TRR are effectively the same as for ORR, and it uses the following tunables to adjust its behaviour:
ost.OSS.ost_io.nrs_trr_quantumThe purpose of this tunable is exactly the same as for the
ost.OSS.ost_io.nrs_orr_quantumtunable for the ORR policy, and you can use it in exactly the same way.ost.OSS.ost_io.nrs_trr_offset_typeThe purpose of this tunable is exactly the same as for the
ost.OSS.ost_io.nrs_orr_offset_typetunable for the ORR policy, and you can use it in exactly the same way.ost.OSS.ost_io.nrs_trr_supportedThe purpose of this tunable is exactly the same as for the
ost.OSS.ost_io.nrs_orr_supportedtunable for the ORR policy, and you can use it in exactly the sme way.
The TBF (Token Bucket Filter) is a Lustre NRS policy which enables Lustre services to enforce the RPC rate limit on clients/jobs for QoS (Quality of Service) purposes.
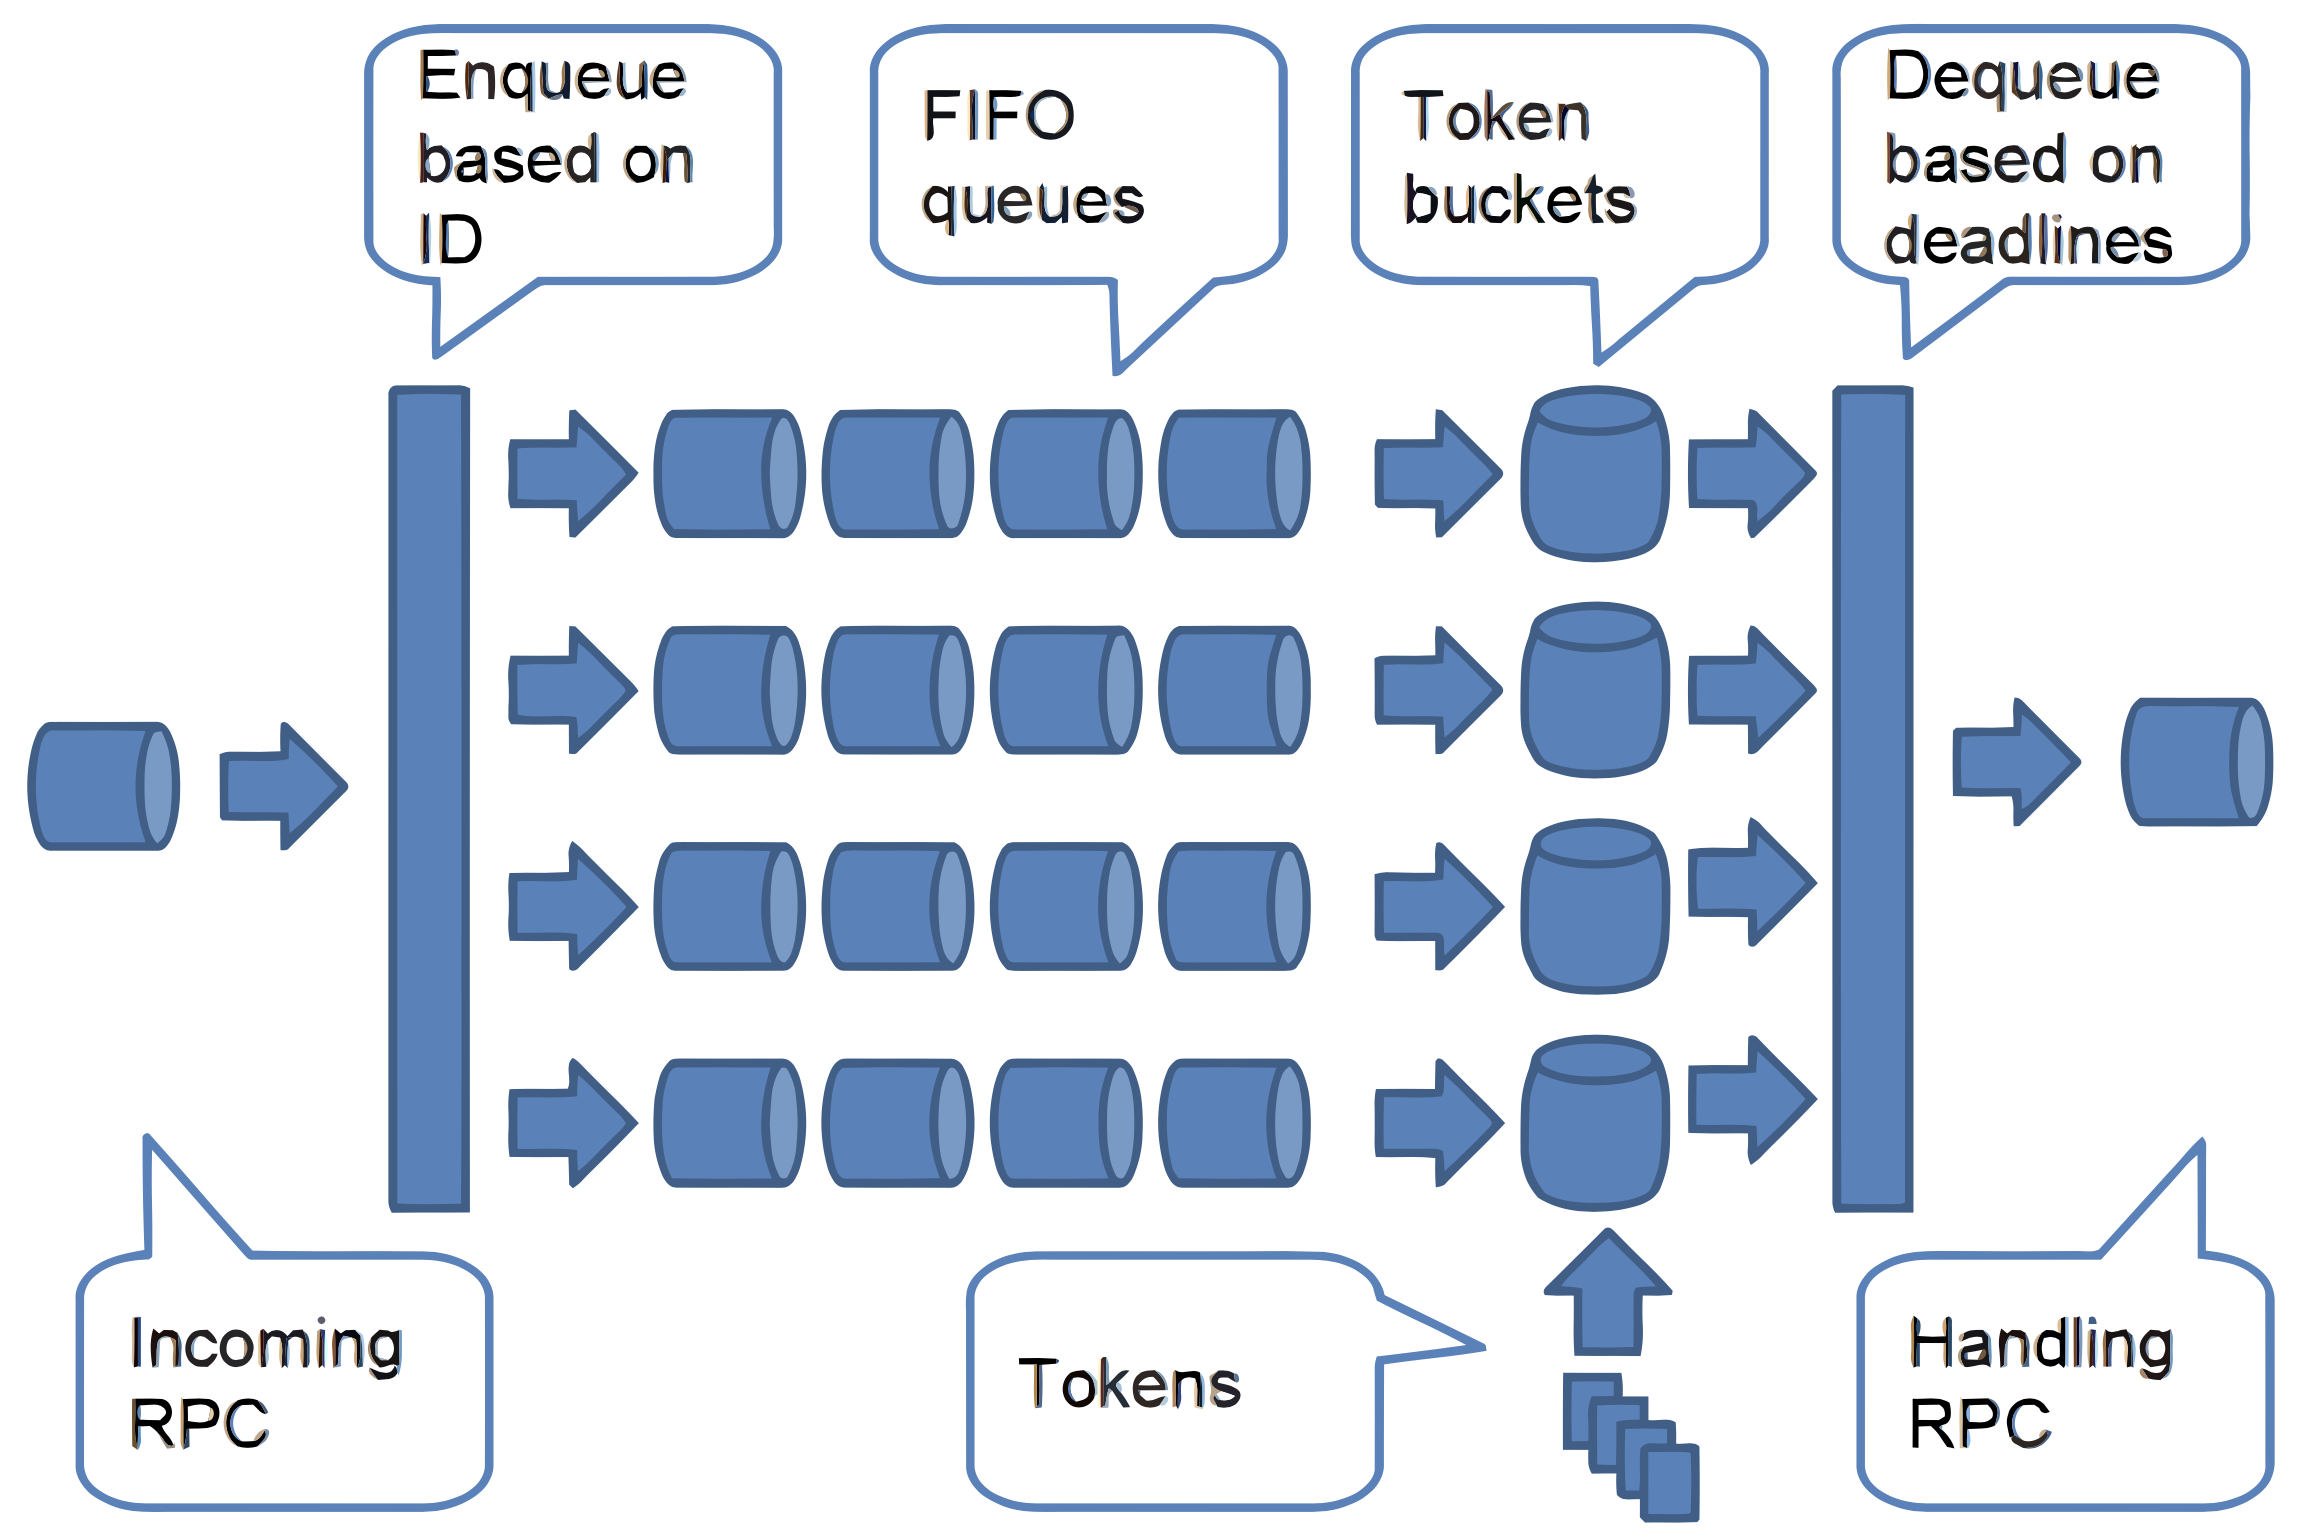
When a RPC request arrives, TBF policy puts it to a waiting queue according to its classification. The classification of RPC requests is based on either NID or JobID of the RPC according to the configure of TBF. TBF policy maintains multiple queues in the system, one queue for each category in the classification of RPC requests. The requests waits for tokens in the FIFO queue before they have been handled so as to keep the RPC rates under the limits.
When Lustre services are too busy to handle all of the requests in time, all of the specified rates of the queues will not be satisfied. Nothing bad will happen except some of the RPC rates are slower than configured. In this case, the queue with higher rate will have an advantage over the queues with lower rates, but none of them will be starved.
To manage the RPC rate of queues, we don't need to set the rate of each queue manually. Instead, we define rules which TBF policy matches to determine RPC rate limits. All of the defined rules are organized as an ordered list. Whenever a queue is newly created, it goes though the rule list and takes the first matched rule as its rule, so that the queue knows its RPC token rate. A rule can be added to or removed from the list at run time. Whenever the list of rules is changed, the queues will update their matched rules.
Command:
lctl set_param ost.OSS.ost_io.nrs_policies="tbf <policy>"
For now, the RPCs can be classified into the different types according to their NID, JOBID, OPCode and UID/GID. When enabling TBF policy, you can specify one of the types, or just use "tbf" to enable all of them to do a fine-grained RPC requests classification.
Example:
$ lctl set_param ost.OSS.ost_io.nrs_policies="tbf" $ lctl set_param ost.OSS.ost_io.nrs_policies="tbf nid" $ lctl set_param ost.OSS.ost_io.nrs_policies="tbf jobid" $ lctl set_param ost.OSS.ost_io.nrs_policies="tbf opcode" $ lctl set_param ost.OSS.ost_io.nrs_policies="tbf uid" $ lctl set_param ost.OSS.ost_io.nrs_policies="tbf gid"
The TBF rule is defined in the parameter
ost.OSS.ost_io.nrs_tbf_rule.
Command:
lctl set_param x.x.x.nrs_tbf_rule= "[reg|hp] startrule_namearguments..."
'rule_name' is a string up to 15
characters which identifies the TBF policy rule's name. Alphanumeric
characters and underscores are accepted (e.g: "test_rule_A1").
'arguments' is a string to specify the
detailed rule according to the different types.
Next, the different types of TBF policies will be described.
NID based TBF policy
Command:
lctl set_param x.x.x.nrs_tbf_rule= "[reg|hp] start
rule_namenid={nidlist} rate=rate"'
nidlist' uses the same format as configuring LNET route. 'rate' is the (upper limit) RPC rate of the rule.Example:
$ lctl set_param ost.OSS.ost_io.nrs_tbf_rule=\ "start other_clients nid={192.168.*.*@tcp} rate=50" $ lctl set_param ost.OSS.ost_io.nrs_tbf_rule=\ "start computes nid={192.168.1.[2-128]@tcp} rate=500" $ lctl set_param ost.OSS.ost_io.nrs_tbf_rule=\ "start loginnode nid={192.168.1.1@tcp} rate=100"In this example, the rate of processing RPC requests from compute nodes is at most 5x as fast as those from login nodes. The output of
ost.OSS.ost_io.nrs_tbf_ruleis like:lctl get_param ost.OSS.ost_io.nrs_tbf_rule ost.OSS.ost_io.nrs_tbf_rule= regular_requests: CPT 0: loginnode {192.168.1.1@tcp} 100, ref 0 computes {192.168.1.[2-128]@tcp} 500, ref 0 other_clients {192.168.*.*@tcp} 50, ref 0 default {*} 10000, ref 0 high_priority_requests: CPT 0: loginnode {192.168.1.1@tcp} 100, ref 0 computes {192.168.1.[2-128]@tcp} 500, ref 0 other_clients {192.168.*.*@tcp} 50, ref 0 default {*} 10000, ref 0Also, the rule can be written in
regandhpformats:$ lctl set_param ost.OSS.ost_io.nrs_tbf_rule=\ "reg start loginnode nid={192.168.1.1@tcp} rate=100" $ lctl set_param ost.OSS.ost_io.nrs_tbf_rule=\ "hp start loginnode nid={192.168.1.1@tcp} rate=100"JobID based TBF policy
For the JobID, please see Section 12.2, “ Lustre Jobstats” for more details.
Command:
lctl set_param x.x.x.nrs_tbf_rule= "[reg|hp] start
rule_namejobid={jobid_list} rate=rate"Wildcard is supported in {
jobid_list}.Example:
$ lctl set_param ost.OSS.ost_io.nrs_tbf_rule=\ "start iozone_user jobid={iozone.500} rate=100" $ lctl set_param ost.OSS.ost_io.nrs_tbf_rule=\ "start dd_user jobid={dd.*} rate=50" $ lctl set_param ost.OSS.ost_io.nrs_tbf_rule=\ "start user1 jobid={*.600} rate=10" $ lctl set_param ost.OSS.ost_io.nrs_tbf_rule=\ "start user2 jobid={io*.10* *.500} rate=200"Also, the rule can be written in
regandhpformats:$ lctl set_param ost.OSS.ost_io.nrs_tbf_rule=\ "hp start iozone_user1 jobid={iozone.500} rate=100" $ lctl set_param ost.OSS.ost_io.nrs_tbf_rule=\ "reg start iozone_user1 jobid={iozone.500} rate=100"Opcode based TBF policy
Command:
$ lctl set_param x.x.x.nrs_tbf_rule= "[reg|hp] start
rule_nameopcode={opcode_list} rate=rate"Example:
$ lctl set_param ost.OSS.ost_io.nrs_tbf_rule=\ "start user1 opcode={ost_read} rate=100" $ lctl set_param ost.OSS.ost_io.nrs_tbf_rule=\ "start iozone_user1 opcode={ost_read ost_write} rate=200"Also, the rule can be written in
regandhpformats:$ lctl set_param ost.OSS.ost_io.nrs_tbf_rule=\ "hp start iozone_user1 opcode={ost_read} rate=100" $ lctl set_param ost.OSS.ost_io.nrs_tbf_rule=\ "reg start iozone_user1 opcode={ost_read} rate=100"UID/GID based TBF policy
Command:
$ lctl set_param ost.OSS.*.nrs_tbf_rule=\ "[reg][hp] start
rule_nameuid={uid} rate=rate" $ lctl set_param ost.OSS.*.nrs_tbf_rule=\ "[reg][hp] startrule_namegid={gid} rate=rate"Exapmle:
Limit the rate of RPC requests of the uid 500
$ lctl set_param ost.OSS.*.nrs_tbf_rule=\ "start tbf_name uid={500} rate=100"Limit the rate of RPC requests of the gid 500
$ lctl set_param ost.OSS.*.nrs_tbf_rule=\ "start tbf_name gid={500} rate=100"Also, you can use the following rule to control all reqs to mds:
Start the tbf uid QoS on MDS:
$ lctl set_param mds.MDS.*.nrs_policies="tbf uid"
Limit the rate of RPC requests of the uid 500
$ lctl set_param mds.MDS.*.nrs_tbf_rule=\ "start tbf_name uid={500} rate=100"Policy combination
To support TBF rules with complex expressions of conditions, TBF classifier is extented to classify RPC in a more fine-grained way. This feature supports logical conditional conjunction and disjunction operations among different types. In the rule: "&" represents the conditional conjunction and "," represents the conditional disjunction.
Example:
$ lctl set_param ost.OSS.ost_io.nrs_tbf_rule=\ "start comp_rule opcode={ost_write}&jobid={dd.0},\ nid={192.168.1.[1-128]@tcp 0@lo} rate=100"In this example, those RPCs whose
opcodeis ost_write andjobidis dd.0, ornidsatisfies the condition of {192.168.1.[1-128]@tcp 0@lo} will be processed at the rate of 100 req/sec. The output ofost.OSS.ost_io.nrs_tbf_ruleis like:$ lctl get_param ost.OSS.ost_io.nrs_tbf_rule ost.OSS.ost_io.nrs_tbf_rule= regular_requests: CPT 0: comp_rule opcode={ost_write}&jobid={dd.0},nid={192.168.1.[1-128]@tcp 0@lo} 100, ref 0 default * 10000, ref 0 CPT 1: comp_rule opcode={ost_write}&jobid={dd.0},nid={192.168.1.[1-128]@tcp 0@lo} 100, ref 0 default * 10000, ref 0 high_priority_requests: CPT 0: comp_rule opcode={ost_write}&jobid={dd.0},nid={192.168.1.[1-128]@tcp 0@lo} 100, ref 0 default * 10000, ref 0 CPT 1: comp_rule opcode={ost_write}&jobid={dd.0},nid={192.168.1.[1-128]@tcp 0@lo} 100, ref 0 default * 10000, ref 0Example:
$ lctl set_param ost.OSS.*.nrs_tbf_rule=\ "start tbf_name uid={500}&gid={500} rate=100"In this example, those RPC requests whose uid is 500 and gid is 500 will be processed at the rate of 100 req/sec.
Command:
lctl set_param x.x.x.nrs_tbf_rule= "[reg|hp] changerule_namerate=rate"
Example:
$ lctl set_param ost.OSS.ost_io.nrs_tbf_rule=\ "change loginnode rate=200" $ lctl set_param ost.OSS.ost_io.nrs_tbf_rule=\ "reg change loginnode rate=200" $ lctl set_param ost.OSS.ost_io.nrs_tbf_rule=\ "hp change loginnode rate=200"
Command:
lctl set_param x.x.x.nrs_tbf_rule="[reg|hp] stop
rule_name"Example:
$ lctl set_param ost.OSS.ost_io.nrs_tbf_rule="stop loginnode" $ lctl set_param ost.OSS.ost_io.nrs_tbf_rule="reg stop loginnode" $ lctl set_param ost.OSS.ost_io.nrs_tbf_rule="hp stop loginnode"
To support more flexible rule conditions, the following options are added.
Reordering of TBF rules
By default, a newly started rule is prior to the old ones, but by specifying the argument '
rank=' when inserting a new rule with "start" command, the rank of the rule can be changed. Also, it can be changed by "change" command.Command:
lctl set_param ost.OSS.ost_io.nrs_tbf_rule= "start
rule_namearguments... rank=obj_rule_name" lctl set_param ost.OSS.ost_io.nrs_tbf_rule= "changerule_namerate=raterank=obj_rule_name"By specifying the existing rule '
obj_rule_name', the new rule 'rule_name' will be moved to the front of 'obj_rule_name'.Example:
$ lctl set_param ost.OSS.ost_io.nrs_tbf_rule=\ "start computes nid={192.168.1.[2-128]@tcp} rate=500" $ lctl set_param ost.OSS.ost_io.nrs_tbf_rule=\ "start user1 jobid={iozone.500 dd.500} rate=100" $ lctl set_param ost.OSS.ost_io.nrs_tbf_rule=\ "start iozone_user1 opcode={ost_read ost_write} rate=200 rank=computes"In this example, rule "iozone_user1" is added to the front of rule "computes". We can see the order by the following command:
$ lctl get_param ost.OSS.ost_io.nrs_tbf_rule ost.OSS.ost_io.nrs_tbf_rule= regular_requests: CPT 0: user1 jobid={iozone.500 dd.500} 100, ref 0 iozone_user1 opcode={ost_read ost_write} 200, ref 0 computes nid={192.168.1.[2-128]@tcp} 500, ref 0 default * 10000, ref 0 CPT 1: user1 jobid={iozone.500 dd.500} 100, ref 0 iozone_user1 opcode={ost_read ost_write} 200, ref 0 computes nid={192.168.1.[2-128]@tcp} 500, ref 0 default * 10000, ref 0 high_priority_requests: CPT 0: user1 jobid={iozone.500 dd.500} 100, ref 0 iozone_user1 opcode={ost_read ost_write} 200, ref 0 computes nid={192.168.1.[2-128]@tcp} 500, ref 0 default * 10000, ref 0 CPT 1: user1 jobid={iozone.500 dd.500} 100, ref 0 iozone_user1 opcode={ost_read ost_write} 200, ref 0 computes nid={192.168.1.[2-128]@tcp} 500, ref 0 default * 10000, ref 0TBF realtime policies under congestion
During TBF evaluation, we find that when the sum of I/O bandwidth requirements for all classes exceeds the system capacity, the classes with the same rate limits get less bandwidth than if preconfigured evenly. The reason for this is the heavy load on a congested server will result in some missed deadlines for some classes. The number of the calculated tokens may be larger than 1 during dequeuing. In the original implementation, all classes are equally handled to simply discard exceeding tokens.
Thus, a Hard Token Compensation (HTC) strategy has been implemented. A class can be configured with the HTC feature by the rule it matches. This feature means that requests in this kind of class queues have high real-time requirements and that the bandwidth assignment must be satisfied as good as possible. When deadline misses happen, the class keeps the deadline unchanged and the time residue(the remainder of elapsed time divided by 1/r) is compensated to the next round. This ensures that the next idle I/O thread will always select this class to serve until all accumulated exceeding tokens are handled or there are no pending requests in the class queue.
Command:
A new command format is added to enable the realtime feature for a rule:
lctl set_param x.x.x.nrs_tbf_rule=\ "start
rule_namearguments... realtime=1Example:
$ lctl set_param ost.OSS.ost_io.nrs_tbf_rule= "start realjob jobid={dd.0} rate=100 realtime=1This example rule means the RPC requests whose JobID is dd.0 will be processed at the rate of 100req/sec in realtime.
The NRS Delay policy seeks to perturb the timing of request processing at the PtlRPC layer, with the goal of simulating high server load, and finding and exposing timing related problems. When this policy is active, upon arrival of a request the policy will calculate an offset, within a defined, user-configurable range, from the request arrival time, to determine a time after which the request should be handled. The request is then stored using the cfs_binheap implementation, which sorts the request according to the assigned start time. Requests are removed from the binheap for handling once their start time has been passed.
The Delay policy can be enabled on all types of PtlRPC services, and has the following tunables that can be used to adjust its behavior:
{service}.nrs_delay_minThe
{service}.nrs_delay_mintunable controls the minimum amount of time, in seconds, that a request will be delayed by this policy. The default is 5 seconds. To read this value run:lctl get_param {service}.nrs_delay_minFor example, to read the minimum delay set on the ost_io service, run:
$ lctl get_param ost.OSS.ost_io.nrs_delay_min ost.OSS.ost_io.nrs_delay_min=reg_delay_min:5 hp_delay_min:5
To set the minimum delay in RPC processing, run:
lctl set_param {service}.nrs_delay_min=0-65535This will set the minimum delay time on a given service, for both regular and high-priority RPCs (if the PtlRPC service supports high-priority RPCs), to the indicated value.
For example, to set the minimum delay time on the ost_io service to 10, run:
$ lctl set_param ost.OSS.ost_io.nrs_delay_min=10 ost.OSS.ost_io.nrs_delay_min=10
For PtlRPC services that support high-priority RPCs, to set a different minimum delay time for regular and high-priority RPCs, run:
lctl set_param {service}.nrs_delay_min=reg_delay_min|hp_delay_min:0-65535For example, to set the minimum delay time on the ost_io service for high-priority RPCs to 3, run:
$ lctl set_param ost.OSS.ost_io.nrs_delay_min=hp_delay_min:3 ost.OSS.ost_io.nrs_delay_min=hp_delay_min:3
Note, in all cases the minimum delay time cannot exceed the maximum delay time.
{service}.nrs_delay_maxThe
{service}.nrs_delay_maxtunable controls the maximum amount of time, in seconds, that a request will be delayed by this policy. The default is 300 seconds. To read this value run:lctl get_param {service}.nrs_delay_maxFor example, to read the maximum delay set on the ost_io service, run:
$ lctl get_param ost.OSS.ost_io.nrs_delay_max ost.OSS.ost_io.nrs_delay_max=reg_delay_max:300 hp_delay_max:300
To set the maximum delay in RPC processing, run:
lctl set_param {service}.nrs_delay_max=0-65535This will set the maximum delay time on a given service, for both regular and high-priority RPCs (if the PtlRPC service supports high-priority RPCs), to the indicated value.
For example, to set the maximum delay time on the ost_io service to 60, run:
$ lctl set_param ost.OSS.ost_io.nrs_delay_max=60 ost.OSS.ost_io.nrs_delay_max=60
For PtlRPC services that support high-priority RPCs, to set a different maximum delay time for regular and high-priority RPCs, run:
lctl set_param {service}.nrs_delay_max=reg_delay_max|hp_delay_max:0-65535For example, to set the maximum delay time on the ost_io service for high-priority RPCs to 30, run:
$ lctl set_param ost.OSS.ost_io.nrs_delay_max=hp_delay_max:30 ost.OSS.ost_io.nrs_delay_max=hp_delay_max:30
Note, in all cases the maximum delay time cannot be less than the minimum delay time.
{service}.nrs_delay_pctThe
{service}.nrs_delay_pcttunable controls the percentage of requests that will be delayed by this policy. The default is 100. Note, when a request is not selected for handling by the delay policy due to this variable then the request will be handled by whatever fallback policy is defined for that service. If no other fallback policy is defined then the request will be handled by the FIFO policy. To read this value run:lctl get_param {service}.nrs_delay_pctFor example, to read the percentage of requests being delayed on the ost_io service, run:
$ lctl get_param ost.OSS.ost_io.nrs_delay_pct ost.OSS.ost_io.nrs_delay_pct=reg_delay_pct:100 hp_delay_pct:100
To set the percentage of delayed requests, run:
lctl set_param {service}.nrs_delay_pct=0-100This will set the percentage of requests delayed on a given service, for both regular and high-priority RPCs (if the PtlRPC service supports high-priority RPCs), to the indicated value.
For example, to set the percentage of delayed requests on the ost_io service to 50, run:
$ lctl set_param ost.OSS.ost_io.nrs_delay_pct=50 ost.OSS.ost_io.nrs_delay_pct=50
For PtlRPC services that support high-priority RPCs, to set a different delay percentage for regular and high-priority RPCs, run:
lctl set_param {service}.nrs_delay_pct=reg_delay_pct|hp_delay_pct:0-100For example, to set the percentage of delayed requests on the ost_io service for high-priority RPCs to 5, run:
$ lctl set_param ost.OSS.ost_io.nrs_delay_pct=hp_delay_pct:5 ost.OSS.ost_io.nrs_delay_pct=hp_delay_pct:5
The lockless I/O tunable feature allows servers to ask clients to do lockless I/O (the server does the locking on behalf of clients) for contended files to avoid lock ping-pong.
The lockless I/O patch introduces these tunables:
OST-side:
ldlm.namespaces.filter-
fsname-*.contended_locks- If the number of lock conflicts in the scan of granted and waiting queues at contended_locks is exceeded, the resource is considered to be contended.contention_seconds- The resource keeps itself in a contended state as set in the parameter.max_nolock_bytes- Server-side locking set only for requests less than the blocks set in themax_nolock_bytesparameter. If this tunable is set to zero (0), it disables server-side locking for read/write requests.Client-side:
llite.
fsname-*contention_seconds-lliteinode remembers its contended state for the time specified in this parameter.Client-side statistics:
The
llite.parameter has several entries for lockless I/O statistics.fsname-*.statslockless_read_bytesandlockless_write_bytes- To count the total bytes read or written, the client makes its own decisions based on the request size. The client does not communicate with the server if the request size is smaller than themin_nolock_size, without acquiring locks by the client.
Use the lfs ladvise command to give file access
advices or hints to servers.
lfs ladvise [--advice|-a ADVICE ] [--background|-b]
[--start|-s START[kMGT]]
{[--end|-e END[kMGT]] | [--length|-l LENGTH[kMGT]]}
file ...
|
Option |
Description |
|---|---|
|
|
Give advice or hint of type
|
|
|
Enable the advices to be sent and handled asynchronously. |
|
|
File range starts from |
|
|
File range ends at (not including)
|
|
|
File range has length of |
|
|
Lockahead request mode |
Typically, lfs ladvise forwards the advice to
Lustre servers without guaranteeing when and what servers will react to
the advice. Actions may or may not triggered when the advices are
recieved, depending on the type of the advice, as well as the real-time
decision of the affected server-side components.
A typical usage of ladvise is to enable applications and users with external knowledge to intervene in server-side cache management. For example, if a bunch of different clients are doing small random reads of a file, prefetching pages into OSS cache with big linear reads before the random IO is a net benefit. Fetching that data into each client cache with fadvise() may not be, due to much more data being sent to the client.
ladvise lockahead is different in that it attempts to
control LDLM locking behavior by explicitly requesting LDLM locks in
advance of use. This does not directly affect caching behavior, instead
it is used in special cases to avoid pathological results (lock exchange)
from the normal LDLM locking behavior.
Note that the noexpand advice works on a specific
file descriptor, so using it via lfs has no effect. It must be used
on a particular file descriptor which is used for i/o to have any effect.
The main difference between the Linux fadvise()
system call and lfs ladvise is that
fadvise() is only a client side mechanism that does
not pass the advice to the filesystem, while ladvise
can send advices or hints to the Lustre server side.
The following example gives the OST(s) holding the first 1GB of
/mnt/lustre/file1a hint that the first 1GB of the
file will be read soon.
client1$ lfs ladvise -a willread -s 0 -e 1048576000 /mnt/lustre/file1
The following example gives the OST(s) holding the first 1GB of
/mnt/lustre/file1 a hint that the first 1GB of file
will not be read in the near future, thus the OST(s) could clear the
cache of the file in the memory.
client1$ lfs ladvise -a dontneed -s 0 -e 1048576000 /mnt/lustre/file1
The following example requests an LDLM read lock on the first
1 MiB of /mnt/lustre/file1. This will attempt to
request a lock from the OST holding that region of the file.
client1$ lfs ladvise -a lockahead -m READ -s 0 -e 1M /mnt/lustre/file1
The following example requests an LDLM write lock on
[3 MiB, 10 MiB] of /mnt/lustre/file1. This will
attempt to request a lock from the OST holding that region of the
file.
client1$ lfs ladvise -a lockahead -m WRITE -s 3M -e 10M /mnt/lustre/file1
Beginning with Lustre 2.9, Lustre is extended to support RPCs up to 16MB in size. By enabling a larger RPC size, fewer RPCs will be required to transfer the same amount of data between clients and servers. With a larger RPC size, the OSS can submit more data to the underlying disks at once, therefore it can produce larger disk I/Os to fully utilize the increasing bandwidth of disks.
At client connection time, clients will negotiate with servers what the maximum RPC size it is possible to use, but the client can always send RPCs smaller than this maximum.
The parameter brw_size is used on the OST
to tell the client the maximum (preferred) IO size. All clients that
talk to this target should never send an RPC greater than this size.
Clients can individually set a smaller RPC size limit via the
osc.*.max_pages_per_rpc tunable.
Note
The smallest brw_size that can be set for
ZFS OSTs is the recordsize of that dataset. This
ensures that the client can always write a full ZFS file block if it
has enough dirty data, and does not otherwise force it to do read-
modify-write operations for every RPC.
In order to enable a larger RPC size,
brw_size must be changed to an IO size value up to
16MB. To temporarily change brw_size, the
following command should be run on the OSS:
oss# lctl set_param obdfilter.fsname-OST*.brw_size=16To persistently change brw_size, the
following command should be run:
oss# lctl set_param -P obdfilter.fsname-OST*.brw_size=16When a client connects to an OST target, it will fetch
brw_size from the target and pick the maximum value
of brw_size and its local setting for
max_pages_per_rpc as the actual RPC size.
Therefore, the max_pages_per_rpc on the client side
would have to be set to 16M, or 4096 if the PAGESIZE is 4KB, to enable
a 16MB RPC. To temporarily make the change, the following command
should be run on the client to set
max_pages_per_rpc:
client$ lctl set_param osc.fsname-OST*.max_pages_per_rpc=16MTo persistently make this change, the following command should be run:
client$ lctl set_param -P obdfilter.fsname-OST*.osc.max_pages_per_rpc=16MCaution
The brw_size of an OST can be
changed on the fly. However, clients have to be remounted to
renegotiate the new maximum RPC size.
An environment where an application writes small file chunks from many clients to a single file can result in poor I/O performance. To improve the performance of the Lustre file system with small files:
Have the application aggregate writes some amount before submitting them to the Lustre file system. By default, the Lustre software enforces POSIX coherency semantics, so it results in lock ping-pong between client nodes if they are all writing to the same file at one time.
Using MPI-IO Collective Write functionality in the Lustre ADIO driver is one way to achieve this in a straight forward manner if the application is already using MPI-IO.
Have the application do 4kB
O_DIRECTsized I/O to the file and disable locking on the output file. This avoids partial-page IO submissions and, by disabling locking, you avoid contention between clients.Have the application write contiguous data.
Add more disks or use SSD disks for the OSTs. This dramatically improves the IOPS rate. Consider creating larger OSTs rather than many smaller OSTs due to less overhead (journal, connections, etc).
Use RAID-1+0 OSTs instead of RAID-5/6. There is RAID parity overhead for writing small chunks of data to disk.
Typically, the performance of write operations on a Lustre cluster is better than read operations. When doing writes, all clients are sending write RPCs asynchronously. The RPCs are allocated, and written to disk in the order they arrive. In many cases, this allows the back-end storage to aggregate writes efficiently.
In the case of read operations, the reads from clients may come in a different order and need a lot of seeking to get read from the disk. This noticeably hampers the read throughput.
Currently, there is no readahead on the OSTs themselves, though the clients do readahead. If there are lots of clients doing reads it would not be possible to do any readahead in any case because of memory consumption (consider that even a single RPC (1 MB) readahead for 1000 clients would consume 1 GB of RAM).
For file systems that use socklnd (TCP, Ethernet) as interconnect, there is also additional CPU overhead because the client cannot receive data without copying it from the network buffers. In the write case, the client CAN send data without the additional data copy. This means that the client is more likely to become CPU-bound during reads than writes.
Part V provides information about troubleshooting a Lustre file system. You will find information in this section about:
Table of Contents
- 35. Lustre File System Troubleshooting
- 35.1. Lustre Error Messages
- 35.2. Reporting a Lustre File System Bug
- 35.3. Common Lustre File System Problems
- 35.3.1. OST Object is Missing or Damaged
- 35.3.2. OSTs Become Read-Only
- 35.3.3. Identifying a Missing OST
- 35.3.4. Fixing a Bad LAST_ID on an OST
- 35.3.5. Handling/Debugging "
Bind: Address already in use" Error - 35.3.6. Handling/Debugging Error "- 28"
- 35.3.7. Triggering Watchdog for PID NNN
- 35.3.8. Handling Timeouts on Initial Lustre File System Setup
- 35.3.9. Handling/Debugging "LustreError: xxx went back in time"
- 35.3.10. Lustre Error: "
Slow Start_Page_Write" - 35.3.11. Drawbacks in Doing Multi-client O_APPEND Writes
- 35.3.12. Slowdown Occurs During Lustre File System Startup
- 35.3.13. Log Message
'Out of Memory' on OST - 35.3.14. Setting SCSI I/O Sizes
- 36. Troubleshooting Recovery
- 37. Debugging a Lustre File System
- 37.1. Diagnostic and Debugging Tools
- 37.2. Lustre Debugging Procedures
- 37.2.1. Understanding the Lustre Debug Messaging Format
- 37.2.2. Using the lctl Tool to View Debug Messages
- 37.2.3. Dumping the Buffer to a File (
debug_daemon) - 37.2.4. Controlling Information Written to the Kernel Debug Log
- 37.2.5. Troubleshooting with
strace - 37.2.6. Looking at Disk Content
- 37.2.7. Finding the Lustre UUID of an OST
- 37.2.8. Printing Debug Messages to the Console
- 37.2.9. Tracing Lock Traffic
- 37.2.10. Controlling Console Message Rate Limiting
- 37.3. Lustre Debugging for Developers
Table of Contents
- 35.1. Lustre Error Messages
- 35.2. Reporting a Lustre File System Bug
- 35.3. Common Lustre File System Problems
- 35.3.1. OST Object is Missing or Damaged
- 35.3.2. OSTs Become Read-Only
- 35.3.3. Identifying a Missing OST
- 35.3.4. Fixing a Bad LAST_ID on an OST
- 35.3.5. Handling/Debugging "
Bind: Address already in use" Error - 35.3.6. Handling/Debugging Error "- 28"
- 35.3.7. Triggering Watchdog for PID NNN
- 35.3.8. Handling Timeouts on Initial Lustre File System Setup
- 35.3.9. Handling/Debugging "LustreError: xxx went back in time"
- 35.3.10. Lustre Error: "
Slow Start_Page_Write" - 35.3.11. Drawbacks in Doing Multi-client O_APPEND Writes
- 35.3.12. Slowdown Occurs During Lustre File System Startup
- 35.3.13. Log Message
'Out of Memory' on OST - 35.3.14. Setting SCSI I/O Sizes
This chapter provides information about troubleshooting a Lustre file system, submitting a bug to the Jira bug tracking system, and Lustre file system performance tips. It includes the following sections:
Several resources are available to help troubleshoot an issue in a Lustre file system. This section describes error numbers, error messages and logs.
Error numbers are generated by the Linux operating system and are located in
/usr/include/asm-generic/errno.h. The Lustre software does not use all
of the available Linux error numbers. The exact meaning of an error number depends on where
it is used. Here is a summary of the basic errors that Lustre file system users may
encounter.
|
Error Number |
Error Name |
Description |
|---|---|---|
|
-1 |
-EPERM
|
Permission is denied. |
| -2 |
-ENOENT
|
The requested file or directory does not exist. |
|
-4 |
-EINTR
|
The operation was interrupted (usually CTRL-C or a killing process). |
|
-5 |
-EIO
|
The operation failed with a read or write error. |
|
-19 |
-ENODEV
|
No such device is available. The server stopped or failed over. |
|
-22 |
-EINVAL
|
The parameter contains an invalid value. |
|
-28 |
-ENOSPC
|
The file system is out-of-space or out of inodes. Use |
|
-30 |
-EROFS
|
The file system is read-only, likely due to a detected error. |
|
-43 |
-EIDRM
|
The UID/GID does not match any known UID/GID on the MDS. Update etc/hosts and etc/group on the MDS to add the missing user or group. |
|
-107 |
-ENOTCONN
|
The client is not connected to this server. |
|
-110 |
-ETIMEDOUT
|
The operation took too long and timed out. |
|
-122 |
-EDQUOT
|
The operation exceeded the user disk quota and was aborted. |
As Lustre software code runs on the kernel, single-digit error codes display to the
application; these error codes are an indication of the problem. Refer to the kernel console
log (dmesg) for all recent kernel messages from that node. On the node,
/var/log/messages holds a log of all messages for at least the past
day.
The error message initiates with "LustreError" in the console log and provides a short description of:
What the problem is
Which process ID had trouble
Which server node it was communicating with, and so on.
Lustre logs are dumped to the pathname stored in the parameter
lnet.debug_path.
Collect the first group of messages related to a problem, and any messages that precede "LBUG" or "assertion failure" errors. Messages that mention server nodes (OST or MDS) are specific to that server; you must collect similar messages from the relevant server console logs.
Another Lustre debug log holds information for a short period of time for action by the Lustre software, which, in turn, depends on the processes on the Lustre node. Use the following command to extract debug logs on each of the nodes, run
$ lctl dk filenameNote
LBUG freezes the thread to allow capture of the panic stack. A system reboot is needed to clear the thread.
If you cannot resolve a problem by troubleshooting your Lustre file system, other options are:
Post a question to the lustre-discuss email list or search the archives for information about your issue.
Submit a ticket to the Jira * bug tracking and project management tool used for the Lustre project. If you are a first-time user, you'll need to open an account by clicking on Sign up on the Welcome page.
To submit a Jira ticket, follow these steps:
To avoid filing a duplicate ticket, search for existing tickets for your issue. For search tips, see Section 35.2.1, “Searching Jira*for Duplicate Tickets”.
To create a ticket, click +Create Issue in the upper right corner. Create a separate ticket for each issue you wish to submit.
In the form displayed, enter the following information:
Project - Select Lustre or Lustre Documentation or an appropriate project.
Issue type - Select Bug.
Summary - Enter a short description of the issue. Use terms that would be useful for someone searching for a similar issue. A LustreError or ASSERT/panic message often makes a good summary.
Affects version(s) - Select your Lustre release.
Environment - Enter your kernel with version number.
Description - Include a detailed description of visible symptoms and, if possible, how the problem is produced. Other useful information may include the behavior you expect to see and what you have tried so far to diagnose the problem.
Attachments - Attach log sources such as Lustre debug log dumps (see Section 37.1, “ Diagnostic and Debugging Tools”), syslogs, or console logs. Note: Lustre debug logs must be processed using
lctl dfprior to attaching to a Jira ticket. For more information, see Section 37.2.2, “Using the lctl Tool to View Debug Messages”.
Other fields in the form are used for project tracking and are irrelevant to reporting an issue. You can leave these in their default state.
Before submitting a ticket, always search the Jira bug tracker for an existing ticket for your issue. This avoids duplicating effort and may immediately provide you with a solution to your problem.
To do a search in the Jira bug tracker, select the Issues tab and click on New filter. Use the filters provided to select criteria for your search. To search for specific text, enter the text in the "Contains text" field and click the magnifying glass icon.
When searching for text such as an ASSERTION or LustreError message, you can remove NIDs, pointers, and other installation-specific and possibly version-specific text from your search string such as line numbers by following the example below.
Original error message:
"(filter_io_26.c:
791:filter_commitrw_write())
ASSERTION(oti->oti_transno<=obd->obd_last_committed) failed:
oti_transno 752
last_committed 750
"
Optimized search string
filter_commitrw_write ASSERTION oti_transno
obd_last_committed failed:
This section describes how to address common issues encountered with a Lustre file system.
If the OSS fails to find an object or finds a damaged object, this message appears:
OST object missing or damaged (OST "ost1", object 98148, error -2)
If the reported error is -2 (-ENOENT, or
"No such file or directory"), then the object is no longer
present on the OST, even though a file on the MDT is referencing it.
This can occur either because the MDT and OST are out of sync, or
because an OST object was corrupted and deleted by e2fsck.
If you have recovered the file system from a disk failure by using e2fsck, then unrecoverable objects may have been deleted or moved to /lost+found in the underlying OST filesystem. Because files on the MDT still reference these objects, attempts to access them produce this error.
If you have restored the filesystem from a backup of the raw MDT or OST partition, then the restored partition is very likely to be out of sync with the rest of your cluster. No matter which server partition you restored from backup, files on the MDT may reference objects which no longer exist (or did not exist when the backup was taken); accessing those files produces this error.
If neither of those descriptions is applicable to your situation, then it is possible that you have discovered a programming error that allowed the servers to get out of sync. Please submit a Jira ticket (see Section 35.2, “Reporting a Lustre File System Bug”).
If the reported error is anything else (such as -5,
"I/O error"), it likely indicates a storage
device failure. The low-level file system returns this error if it is
unable to read from the storage device.
Suggested Action
If the reported error is -2, you can consider checking in
lost+found/ on your raw OST device, to see if the
missing object is there. However, it is likely that this object is
lost forever, and that the file that references the object is now
partially or completely lost. Restore this file from backup, or
salvage what you can using dd conv=noerrorand
delete it using the unlink command.
If the reported error is anything else, then you should immediately inspect this server for storage problems.
If the SCSI devices are inaccessible to the Lustre file system
at the block device level, then ldiskfs remounts
the device read-only to prevent file system corruption. This is a normal
behavior. The status in the parameter health_check
also shows "not healthy" on the affected nodes.
To determine what caused the "not healthy" condition:
Examine the consoles of all servers for any error indications
Examine the syslogs of all servers for any LustreErrors or
LBUGCheck the health of your system hardware and network. (Are the disks working as expected, is the network dropping packets?)
Consider what was happening on the cluster at the time. Does this relate to a specific user workload or a system load condition? Is the condition reproducible? Does it happen at a specific time (day, week or month)?
To recover from this problem, you must restart Lustre services using these file systems. There is no other way to know that the I/O made it to disk, and the state of the cache may be inconsistent with what is on disk.
If an OST is missing for any reason, you may need to know what files are affected. Although an OST is missing, the files system should be operational. From any mounted client node, generate a list of files that reside on the affected OST. It is advisable to mark the missing OST as 'unavailable' so clients and the MDS do not time out trying to contact it.
Generate a list of devices and determine the OST's device number. Run:
$ lctl dl
The lctl dl command output lists the device name and number, along with the device UUID and the number of references on the device.
Deactivate the OST (on the OSS at the MDS). Run:
$ lctl --device
lustre_device_numberdeactivateThe OST device number or device name is generated by the lctl dl command.
The
deactivatecommand prevents clients from creating new objects on the specified OST, although you can still access the OST for reading.Note
If the OST later becomes available it needs to be reactivated, run:
# lctl --device
lustre_device_numberactivateDetermine all files that are striped over the missing OST, run:
# lfs find -O {OST_UUID} /mountpointThis returns a simple list of filenames from the affected file system.
If necessary, you can read the valid parts of a striped file, run:
# dd if=filename of=new_filename bs=4k conv=sync,noerror
You can delete these files with the
unlinkcommand.# unlink filename {filename ...}Note
When you run the
unlinkcommand, it may return an error that the file could not be found, but the file on the MDS has been permanently removed.
If the file system cannot be mounted, currently there is no way that parses metadata directly from an MDS. If the bad OST does not start, options to mount the file system are to provide a loop device OST in its place or replace it with a newly-formatted OST. In that case, the missing objects are created and are read as zero-filled.
Each OST contains a LAST_ID file, which holds
the last object (pre-)created by the MDS
[2].
The MDT contains a lov_objid file, with values
that represent the last object the MDS has allocated to a file.
During normal operation, the MDT keeps pre-created (but unused)
objects on the OST, and normally LAST_ID should be
larger than lov_objid. Any small difference in the
values is a result of objects being precreated on the OST to improve
MDS file creation performance. These precreated objects are not yet
allocated to a file, since they are of zero length (empty).
However, in the case where lov_objid is
larger than LAST_ID, it indicates the MDS has
allocated objects to files that do not exist on the OST. Conversely,
if lov_objid is significantly less than
LAST_ID (by at least 20,000 objects) it indicates
the OST previously allocated objects at the request of the MDS (which
likely contain data) but it doesn't know about them.
Since Lustre 2.5 the MDS and OSS will resync the
lov_objid and LAST_ID files
automatically if they become out of sync. This may result in some
space on the OSTs becoming unavailable until LFSCK is next run, but
avoids issues with mounting the filesystem.
Since Lustre 2.6 the LFSCK will repair the
LAST_ID file on the OST automatically based on
the objects that exist on the OST, in case it was corrupted.
In situations where there is on-disk corruption of the OST, for
example caused by the disk write cache being lost, or if the OST
was restored from an old backup or reformatted, the
LAST_ID value may become inconsistent and result
in a message similar to:
"myth-OST0002: Too many FIDs to precreate, OST replaced or reformatted: LFSCK will clean up"
A related situation may happen if there is a significant discrepancy between the record of previously-created objects on the OST and the previously-allocated objects on the MDT, for example if the MDT has been corrupted, or restored from backup, which would cause significant data loss if left unchecked. This produces a message like:
"myth-OST0002: too large difference between MDS LAST_ID [0x1000200000000:0x100048:0x0] (1048648) and OST LAST_ID [0x1000200000000:0x2232123:0x0] (35856675), trust the OST"
In such cases, the MDS will advance the lov_objid
value to match that of the OST to avoid deleting existing objects,
which may contain data. Files on the MDT that reference these objects
will not be lost. Any unreferenced OST objects will be attached to
the .lustre/lost+found directory the next time
LFSCK layout check is run.
During startup, the Lustre software may report a bind: Address already in
use error and reject to start the operation. This is caused by a portmap service
(often NFS locking) that starts before the Lustre file system and binds to the default port
988. You must have port 988 open from firewall or IP tables for incoming connections on the
client, OSS, and MDS nodes. LNet will create three outgoing connections on available,
reserved ports to each client-server pair, starting with 1023, 1022 and 1021.
Unfortunately, you cannot set sunprc to avoid port 988. If you receive this error, do the following:
Start the Lustre file system before starting any service that uses sunrpc.
Use a port other than 988 for the Lustre file system. This is configured in
/etc/modprobe.d/lustre.confas an option to the LNet module. For example:options lnet accept_port=988
Add modprobe ptlrpc to your system startup scripts before the service that uses sunrpc. This causes the Lustre file system to bind to port 988 and sunrpc to select a different port.
Note
You can also use the sysctl command to mitigate the NFS client from grabbing the Lustre service port. However, this is a partial workaround as other user-space RPC servers still have the ability to grab the port.
A Linux error -28 (ENOSPC) that occurs during
a write or sync operation indicates that an existing file residing
on an OST could not be rewritten or updated because the OST was full,
or nearly full. To verify if this is the case, run on a client:
client$ lfs df -h
UUID bytes Used Available Use% Mounted on
myth-MDT0000_UUID 12.9G 1.5G 10.6G 12% /myth[MDT:0]
myth-OST0000_UUID 3.6T 3.1T 388.9G 89% /myth[OST:0]
myth-OST0001_UUID 3.6T 3.6T 64.0K 100% /myth[OST:1]
myth-OST0002_UUID 3.6T 3.1T 394.6G 89% /myth[OST:2]
myth-OST0003_UUID 5.4T 5.0T 267.8G 95% /myth[OST:3]
myth-OST0004_UUID 5.4T 2.9T 2.2T 57% /myth[OST:4]
filesystem_summary: 21.6T 17.8T 3.2T 85% /myth
To address this issue, you can expand the disk space on the OST,
or use the lfs_migrate command to migrate (move)
files to a less full OST. For details on both of these options
see Section 14.8, “
Adding a New OST to a Lustre File System”
In some cases, there may be processes holding files open that are consuming a significant amount of space (e.g. runaway process writing lots of data to an open file that has been deleted). It is possible to get a list of all open file handles in the filesystem from the MDS:
mds# lctl get_param mdt.*.exports.*.open_files
mdt.myth-MDT0000.exports.192.168.20.159@tcp.open_files=
[0x200003ab4:0x435:0x0]
[0x20001e863:0x1c1:0x0]
[0x20001e863:0x1c2:0x0]
:
:
These file handles can be converted into pathnames on any client via
the lfs fid2path command (as root):
client# lfs fid2path /myth [0x200003ab4:0x435:0x0] [0x20001e863:0x1c1:0x0] [0x20001e863:0x1c2:0x0]
lfs fid2path: cannot find '[0x200003ab4:0x435:0x0]': No such file or directory
/myth/tmp/4M
/myth/tmp/1G
:
:
In some cases, if the file has been deleted from the filesystem,
fid2path will return an error that the file is
not found. You can use the client NID
(192.168.20.159@tcp in the above example) to
determine which node the file is open on, and lsof
to find and kill the process that is holding the file open:
# lsof /myth COMMAND PID USER FD TYPE DEVICE SIZE/OFF NODE NAME logger 13806 mythtv 0r REG 35,632494 1901048576384 144115440203858997 /myth/logs/job.1283929.log (deleted)
A Linux error -28 (ENOSPC) that occurs when
a new file is being created may indicate that the MDT has run out
of inodes and needs to be made larger. Newly created files are not
written to full OSTs, while existing files continue to reside on
the OST where they were initially created. To view inode information
on the MDT, run on a client:
lfs df -i
UUID Inodes IUsed IFree IUse% Mounted on
myth-MDT0000_UUID 1910263 1910263 0 100% /myth[MDT:0]
myth-OST0000_UUID 947456 360059 587397 89% /myth[OST:0]
myth-OST0001_UUID 948864 233748 715116 91% /myth[OST:1]
myth-OST0002_UUID 947456 549961 397495 89% /myth[OST:2]
myth-OST0003_UUID 1426144 477595 948549 95% /myth[OST:3]
myth-OST0004_UUID 1426080 465248 1420832 57% /myth[OST:4]
filesystem_summary: 1910263 1910263 0 100% /myth
Typically, the Lustre software reports this error to your
application. If the application is checking the return code from
its function calls, then it decodes it into a textual error message
such as No space left on device. The numeric
error message may also appear in the system log.
For more information about the lfs df command,
see Section 19.8.1, “Checking File System Free Space”.
You can also use the lctl get_param command to
monitor the space and object usage on the OSTs and MDTs from any
client:
lctl get_param {osc,mdc}.*.{kbytes,files}{free,avail,total}
Note
You can find other numeric error codes along with a short name
and text description in /usr/include/asm/errno.h.
In some cases, a server node triggers a watchdog timer and this causes a process stack to be dumped to the console along with a Lustre kernel debug log being dumped into /tmp (by default). The presence of a watchdog timer does NOT mean that the thread OOPSed, but rather that it is taking longer time than expected to complete a given operation. In some cases, this situation is expected.
For example, if a RAID rebuild is really slowing down I/O on an OST, it might trigger watchdog timers to trip. But another message follows shortly thereafter, indicating that the thread in question has completed processing (after some number of seconds). Generally, this indicates a transient problem. In other cases, it may legitimately signal that a thread is stuck because of a software error (lock inversion, for example).
Lustre: 0:0:(watchdog.c:122:lcw_cb())
The above message indicates that the watchdog is active for pid 933:
It was inactive for 100000ms:
Lustre: 0:0:(linux-debug.c:132:portals_debug_dumpstack())
Showing stack for process:
933 ll_ost_25 D F896071A 0 933 1 934 932 (L-TLB) f6d87c60 00000046 00000000 f896071a f8def7cc 00002710 00001822 2da48cae 0008cf1a f6d7c220 f6d7c3d0 f6d86000 f3529648 f6d87cc4 f3529640 f8961d3d 00000010 f6d87c9c ca65a13c 00001fff 00000001 00000001 00000000 00000001
Call trace:
filter_do_bio+0x3dd/0xb90 [obdfilter] default_wake_function+0x0/0x20 filter_direct_io+0x2fb/0x990 [obdfilter] filter_preprw_read+0x5c5/0xe00 [obdfilter] lustre_swab_niobuf_remote+0x0/0x30 [ptlrpc] ost_brw_read+0x18df/0x2400 [ost] ost_handle+0x14c2/0x42d0 [ost] ptlrpc_server_handle_request+0x870/0x10b0 [ptlrpc] ptlrpc_main+0x42e/0x7c0 [ptlrpc]
If you come across timeouts or hangs on the initial setup of your Lustre file system,
verify that name resolution for servers and clients is working correctly. Some distributions
configure /etc/hosts so the name of the local machine (as reported by the
'hostname' command) is mapped to local host (127.0.0.1) instead of a proper IP
address.
This might produce this error:
LustreError:(ldlm_handle_cancel()) received cancel for unknown lock cookie 0xe74021a4b41b954e from nid 0x7f000001 (0:127.0.0.1)
Each time the MDS or OSS modifies the state of the MDT or OST disk
filesystem for a client, it records a per-target increasing transaction
number for the operation and returns it to the client along with the
reply to that operation. Periodically, when the server commits these
transactions to disk, the last_committed transaction
number is returned to the client to allow it to discard pending operations
from memory, as they will no longer be needed for recovery in case of
server failure.
In some cases error messages similar to the following have been observed after a server was restarted or failed over:
LustreError: 3769:0:(import.c:517:ptlrpc_connect_interpret())
testfs-ost12_UUID went back in time (transno 831 was previously committed,
server now claims 791)!
This situation arises when:
You are using a disk device that claims to have data written to disk before it actually does, as in case of a device with a large cache. If that disk device crashes or loses power in a way that causes the loss of the cache, there can be a loss of transactions that you believe are committed. This is a very serious event, and you should run e2fsck against that storage before restarting the Lustre file system.
As required by the Lustre software, the shared storage used for failover is completely cache-coherent. This ensures that if one server takes over for another, it sees the most up-to-date and accurate copy of the data. In case of the failover of the server, if the shared storage does not provide cache coherency between all of its ports, then the Lustre software can produce an error.
If you know the exact reason for the error, then it is safe to proceed with no further action. If you do not know the reason, then this is a serious issue and you should explore it with your disk vendor.
If the error occurs during failover, examine your disk cache settings. If it occurs after a restart without failover, try to determine how the disk can report that a write succeeded, then lose the Data Device corruption or Disk Errors.
The slow start_page_write message appears when the operation takes an extremely long time to allocate a batch of memory pages. Use these pages to receive network traffic first, and then write to disk.
It is possible to do multi-client O_APPEND writes to a single file, but there are few drawbacks that may make this a sub-optimal solution. These drawbacks are:
Each client needs to take an
EOFlock on all the OSTs, as it is difficult to know which OST holds the end of the file until you check all the OSTs. As all the clients are using the sameO_APPEND, there is significant locking overhead.The second client cannot get all locks until the end of the writing of the first client, as the taking serializes all writes from the clients.
To avoid deadlocks, the taking of these locks occurs in a known, consistent order. As a client cannot know which OST holds the next piece of the file until the client has locks on all OSTS, there is a need of these locks in case of a striped file.
When a Lustre file system starts, it needs to read in data from the disk. For the very first mdsrate run after the reboot, the MDS needs to wait on all the OSTs for object pre-creation. This causes a slowdown to occur when the file system starts up.
After the file system has been running for some time, it contains more data in cache and hence, the variability caused by reading critical metadata from disk is mostly eliminated. The file system now reads data from the cache.
When planning the hardware for an OSS node, consider the memory usage of several components in the Lustre file system. If insufficient memory is available, an 'out of memory' message can be logged.
During normal operation, several conditions indicate insufficient RAM on a server node:
kernel "
Out of memory" and/or "oom-killer" messagesLustre "
kmalloc of 'mmm' (NNNN bytes) failed..." messagesLustre or kernel stack traces showing processes stuck in "
try_to_free_pages"
For information on determining the MDS memory and OSS memory requirements, see Section 5.5, “Determining Memory Requirements”.
Some SCSI drivers default to a maximum I/O size that is too small for good Lustre file system performance. we have fixed quite a few drivers, but you may still find that some drivers give unsatisfactory performance with the Lustre file system. As the default value is hard-coded, you need to recompile the drivers to change their default. On the other hand, some drivers may have a wrong default set.
If you suspect bad I/O performance and an analysis of Lustre file system statistics
indicates that I/O is not 1 MB, check
/sys/block/. If
the device/queue/max_sectors_kbmax_sectors_kb value is less than 1024, set it to at least 1024 to
improve performance. If changing max_sectors_kb does not change the I/O
size as reported by the Lustre software, you may want to examine the SCSI driver
code.
[2] The contents of the LAST_ID
file must be accurate regarding the actual objects that exist
on the OST.
Table of Contents
This chapter describes what to do if something goes wrong during recovery. It describes:
When an OSS, MDS, or MGS server crash occurs, it is not necessary to
run e2fsck on the file system.
ldiskfs journaling ensures that the file system remains
consistent over a system crash. The backing file systems are never accessed
directly from the client, so client crashes are not relevant for server
file system consistency.
The only time it is REQUIRED that
e2fsck be run on a device is when an event causes
problems that ldiskfs journaling is unable to handle, such as a hardware
device failure or I/O error. If the ldiskfs kernel code detects corruption
on the disk, it mounts the file system as read-only to prevent further
corruption, but still allows read access to the device. This appears as
error "-30" (
EROFS) in the syslogs on the server, e.g.:
Dec 29 14:11:32 mookie kernel: LDISKFS-fs error (device sdz):
ldiskfs_lookup: unlinked inode 5384166 in dir #145170469
Dec 29 14:11:32 mookie kernel: Remounting filesystem read-only In such a situation, it is normally required that e2fsck only be run on the bad device before placing the device back into service.
In the vast majority of cases, the Lustre software can cope with any inconsistencies found on the disk and between other devices in the file system.
For problem analysis, it is strongly recommended that
e2fsck be run under a logger, like
script, to record all
of the output and changes that are made to the file system in case this
information is needed later.
If time permits, it is also a good idea to first run
e2fsck in non-fixing mode (-n option) to assess the type
and extent of damage to the file system. The drawback is that in this mode,
e2fsck does not recover the file system journal, so there
may appear to be file system corruption when none really exists.
To address concern about whether corruption is real or only due to
the journal not being replayed, you can briefly mount and unmount the
ldiskfs file system directly on the node with the Lustre
file system stopped, using a command similar to:
mount -t ldiskfs /dev/{ostdev} /mnt/ost; umount /mnt/ostThis causes the journal to be recovered.
The
e2fsck utility works well when fixing file system
corruption (better than similar file system recovery tools and a primary
reason why
ldiskfs was chosen over other file systems). However, it
is often useful to identify the type of damage that has occurred so an
ldiskfs expert can make intelligent decisions about what
needs fixing, in place of
e2fsck.
root# {stop lustre services for this device, if running}
root# script /tmp/e2fsck.sda
Script started, file is /tmp/e2fsck.sda
root# mount -t ldiskfs /dev/sda /mnt/ost
root# umount /mnt/ost
root# e2fsck -fn /dev/sda # don't fix file system, just check for corruption
:
[e2fsck output]
:
root# e2fsck -fp /dev/sda # fix errors with prudent answers (usually yes)In cases where an ldiskfs MDT or OST becomes corrupt, you need to run
e2fsck to ensure local filesystem consistency, then use
LFSCK to run a distributed check on the file system to
resolve any inconsistencies between the MDTs and OSTs, or among MDTs.
Stop the Lustre file system.
Run
e2fsck -fon the individual MDT/OST that had problems to fix any local file system damage.We recommend running
e2fsckunder script, to create a log of changes made to the file system in case it is needed later. Aftere2fsckis run, bring up the file system, if necessary, to reduce the outage window.
The simplest problem to resolve is that of orphaned objects. When
the LFSCK layout check is run, these objects are linked to new files and
put into
.lustre/lost+found/MDT
in the Lustre file system
(where MDTxxxx is the index of the MDT on which the orphan was found),
where they can be examined and saved or deleted as necessary.xxxx
With Lustre version 2.7 and later, LFSCK will identify and process orphan objects found on MDTs as well.
One problem encountered in a Lustre file system environment is when an OST becomes unavailable due to a network partition, OSS node crash, etc. When this happens, the OST's clients pause and wait for the OST to become available again, either on the primary OSS or a failover OSS. When the OST comes back online, the Lustre file system starts a recovery process to enable clients to reconnect to the OST. Lustre servers put a limit on the time they will wait in recovery for clients to reconnect.
During recovery, clients reconnect and replay their requests serially, in the same order they were done originally. Until a client receives a confirmation that a given transaction has been written to stable storage, the client holds on to the transaction, in case it needs to be replayed. Periodically, a progress message prints to the log, stating how_many/expected clients have reconnected. If the recovery is aborted, this log shows how many clients managed to reconnect. When all clients have completed recovery, or if the recovery timeout is reached, the recovery period ends and the OST resumes normal request processing.
If some clients fail to replay their requests during the recovery period, this will not stop the recovery from completing. You may have a situation where the OST recovers, but some clients are not able to participate in recovery (e.g. network problems or client failure), so they are evicted and their requests are not replayed. This would result in any operations on the evicted clients failing, including in-progress writes, which would cause cached writes to be lost. This is a normal outcome; the recovery cannot wait indefinitely, or the file system would be hung any time a client failed. The lost transactions are an unfortunate result of the recovery process.
Note
The failure of client recovery does not indicate or lead to filesystem corruption. This is a normal event that is handled by the MDT and OST, and should not result in any inconsistencies between servers.
Note
The version-based recovery (VBR) feature enables a failed client to be ''skipped'', so remaining clients can replay their requests, resulting in a more successful recovery from a downed OST. For more information about the VBR feature, see Chapter 38, Lustre File System Recovery(Version-based Recovery).
LFSCK is an administrative tool for checking and repair of the attributes specific to a mounted Lustre file system. It is similar in concept to an offline fsck repair tool for a local filesystem, but LFSCK is implemented to run as part of the Lustre file system while the file system is mounted and in use. This allows consistency checking and repair of Lustre-specific metadata without unnecessary downtime, and can be run on the largest Lustre file systems with minimal impact to normal operations.
LFSCK can verify and repair the Object Index (OI) table that is used internally to map Lustre File Identifiers (FIDs) to MDT internal ldiskfs inode numbers, in an internal table called the OI Table. An OI Scrub traverses the OI table and makes corrections where necessary. An OI Scrub is required after restoring from a file-level MDT backup ( Section 18.2, “ Backing Up and Restoring an MDT or OST (ldiskfs Device Level)”), or in case the OI Table is otherwise corrupted. Later phases of LFSCK will add further checks to the Lustre distributed file system state. LFSCK namespace scanning can verify and repair the directory FID-in-dirent and LinkEA consistency.
In Lustre software release 2.6, LFSCK layout scanning can verify and repair MDT-OST file layout inconsistencies. File layout inconsistencies between MDT-objects and OST-objects that are checked and corrected include dangling reference, unreferenced OST-objects, mismatched references and multiple references.
In Lustre software release 2.7, LFSCK layout scanning is enhanced to support verify and repair inconsistencies between multiple MDTs.
Control and monitoring of LFSCK is through LFSCK and the
lctl get_param command. LFSCK supports three types
of interface: switch interface, status interface, and adjustment interface.
These interfaces are detailed below.
LFSCK can be started after the MDT is mounted using the
lctl lfsck_start command.
lctl lfsck_start <-M | --device[MDT,OST]_device> \ [-A | --all] \ [-c | --create_ostobjon | off] \ [-C | --create_mdtobjon | off] \ [-d | --delay_create_ostobjon | off] \ [-e | --error{continue | abort}] \ [-h | --help] \ [-n | --dryrunon | off] \ [-o | --orphan] \ [-r | --reset] \ [-s | --speedops_per_sec_limit] \ [-t | --typecheck_type[,check_type...]] \ [-w | --window_sizesize]
The various
lfsck_start options are listed and described below.
For a complete list of available options, type
lctl lfsck_start -h.
|
Option |
Description |
|---|---|
|
|
The MDT or OST target to start LFSCK on. |
|
|
Introduced in Lustre 2.6
Start LFSCK on all targets on all servers simultaneously. By default, both layout and namespace consistency checking and repair are started. |
|
|
Introduced in Lustre 2.6
Create the lost OST-object for
dangling LOV EA,
|
|
|
Introduced in Lustre 2.7
Create the lost MDT-object for
dangling name entry,
|
|
|
Introduced in Lustre 2.9
Delay creating the lost OST-object for dangling LOV EA
until the orphan OST-objects are handled.
|
|
|
Error handle,
|
|
|
Operating help information. |
|
|
Perform a trial without making any changes.
|
|
|
Introduced in Lustre 2.6
Repair orphan OST-objects for layout LFSCK. |
|
|
Reset the start position for the object iteration to the beginning for the specified MDT. By default the iterator will resume scanning from the last checkpoint (saved periodically by LFSCK) provided it is available. |
|
|
Set the upper speed limit of LFSCK processing in objects per second. If it is not specified, the saved value (when resuming from checkpoint) or default value of 0 (0 = run as fast as possible) is used. Speed can be adjusted while LFSCK is running with the adjustment interface. |
|
|
The type of checking/repairing that should be performed. The new LFSCK framework provides a single interface for a variety of system consistency checking/repairing operations including: Without a specified option, the LFSCK component(s) which ran last time and did not finish or the component(s) corresponding to some known system inconsistency, will be started. Anytime the LFSCK is triggered, the OI scrub will run automatically, so there is no need to specify OI_scrub in that case.
Introduced in Lustre 2.7
Lustre-2.7 enhances namespace consistency verification under DNE mode. Introduced in Lustre 2.6
|
|
|
Introduced in Lustre 2.6
The window size for the async request pipeline. The LFSCK async request pipeline's input/output may have quite different processing speeds, and there may be too many requests in the pipeline as to cause abnormal memory/network pressure. If not specified, then the default window size for the async request pipeline is 1024. |
The various
lfsck_stop options are listed and described below.
For a complete list of available options, type
lctl lfsck_stop -h.
|
Option |
Description |
|---|---|
|
|
The MDT or OST target to stop LFSCK on. |
|
|
Stop LFSCK on all targets on all servers simultaneously. |
|
|
Operating help information. |
Check the LFSCK global status via a single
lctl lfsck_query command on the MDS.
lctl lfsck_query <-M | --deviceMDT_device> \ [-h | --help] \ [-t | --typelfsck_type[,lfsck_type...]] \ [-w | --wait]
The various
lfsck_query options are listed and described below.
For a complete list of available options, type
lctl lfsck_query -h.
|
Option |
Description |
|---|---|
|
|
The device to query for LFSCK status. |
|
|
Operating help information. |
|
|
The LFSCK type(s) that should be queried, including: layout, namespace. |
|
|
will wait if the LFSCK is in scanning. |
For each LFSCK component there is a dedicated procfs interface
to trace the corresponding LFSCK component status. For OI Scrub, the
interface is the OSD layer procfs interface, named
oi_scrub. To display OI Scrub status, the standard
lctl get_param command is used as shown in the
usage below.
|
Information |
Detail |
|---|---|
|
General Information |
|
|
Statistics |
|
The
namespace component is responsible for checks
described in Section 36.4, “
Checking the file system with LFSCK”. The
procfs interface for this component is in the
MDD layer, named
lfsck_namespace. To show the status of this
component,
lctl get_param should be used as described in the
usage below.
The LFSCK namespace status output refers to phase 1 and phase 2. Phase 1 is when the LFSCK main engine, which runs on each MDT, linearly scans its local device, guaranteeing that all local objects are checked. However, there are certain cases in which LFSCK cannot know whether an object is consistent or cannot repair an inconsistency until the phase 1 scanning is completed. During phase 2 of the namespace check, objects with multiple hard-links, objects with remote parents, and other objects which couldn't be verified during phase 1 will be checked.
|
Information |
Detail |
|---|---|
|
General Information |
|
|
Statistics |
|
The
layout component is responsible for checking and
repairing MDT-OST inconsistency. The
procfs interface for this component is in the MDD
layer, named
lfsck_layout, and in the OBD layer, named
lfsck_layout. To show the status of this component
lctl get_param should be used as described in the
usage below.
The LFSCK layout status output refers to phase 1 and phase 2. Phase 1 is when the LFSCK main engine, which runs on each MDT/OST, linearly scans its local device, guaranteeing that all local objects are checked. During phase 1 of layout LFSCK, the OST-objects which are not referenced by any MDT-object are recorded in a bitmap. During phase 2 of the layout check, the OST-objects in the bitmap will be re-scanned to check whether they are really orphan objects.
lctl get_param -n mdd.FSNAME-MDT_target.lfsck_layout lctl get_param -n obdfilter.FSNAME-OST_target.lfsck_layout
|
Information |
Detail |
|---|---|
|
General Information |
|
|
Statistics |
|
The LFSCK upper speed limit can be changed using
lctl set_param as shown in the usage below.
lctl set_param mdd.${FSNAME}-${MDT_target}.lfsck_speed_limit=
N
lctl set_param obdfilter.${FSNAME}-${OST_target}.lfsck_speed_limit=
NThe
auto_scrub parameter controls whether OI scrub will
be triggered when an inconsistency is detected during OI lookup. It
can be set as described in the usage and values sections
below.
There is also a
noscrub mount option (see
Section 44.13, “
mount.lustre”) which
can be used to disable automatic OI scrub upon detection of a
file-level backup at mount time. If the
noscrub mount option is specified,
auto_scrub will also be disabled, so OI scrub will
not be triggered when an OI inconsistency is detected. Auto scrub can
be renabled after the mount using the command shown in the usage.
Manually starting LFSCK after mounting provides finer control over
the starting conditions.
lctl set_param osd_ldiskfs.${FSNAME}-${MDT_target}.auto_scrub=Nwhere
Nis an integer as described below.
Note
Lustre software 2.5 and later supports
-P option that makes the
set_param permanent.
Table of Contents
- 37.1. Diagnostic and Debugging Tools
- 37.2. Lustre Debugging Procedures
- 37.2.1. Understanding the Lustre Debug Messaging Format
- 37.2.2. Using the lctl Tool to View Debug Messages
- 37.2.3. Dumping the Buffer to a File (
debug_daemon) - 37.2.4. Controlling Information Written to the Kernel Debug Log
- 37.2.5. Troubleshooting with
strace - 37.2.6. Looking at Disk Content
- 37.2.7. Finding the Lustre UUID of an OST
- 37.2.8. Printing Debug Messages to the Console
- 37.2.9. Tracing Lock Traffic
- 37.2.10. Controlling Console Message Rate Limiting
- 37.3. Lustre Debugging for Developers
This chapter describes tips and information to debug a Lustre file system, and includes the following sections:
A variety of diagnostic and analysis tools are available to debug issues with the Lustre software. Some of these are provided in Linux distributions, while others have been developed and are made available by the Lustre project.
The following in-kernel debug mechanisms are incorporated into the Lustre software:
Debug logs - A circular debug buffer to which Lustre internal debug messages are written (in contrast to error messages, which are printed to the syslog or console). Entries in the Lustre debug log are controlled by a mask set by
lctl set_param debug=. The log size defaults to 5 MB per CPU but can be increased as a busy system will quickly overwrite 5 MB. When the buffer fills, the oldest log records are discarded.masklctl get_param debug- This shows the current debug mask used to delimit the debugging information written out to the kernel debug logs.lctl debug_kernel- Dump the Lustre kernel debug log to the specified file as ASCII text for further debugging and analysis.filelctl set_param debug_mb=- This sets the maximum size of the in-kernel Lustre debug buffer, in units of MiB.sizeDebug daemon - The debug daemon controls the continuous logging of debug messages to a log file in userspace.
The following tools are also provided with the Lustre software:
lctl- This tool is used with the debug_kernel option to manually dump the Lustre debugging log or post-process debugging logs that are dumped automatically. For more information about the lctl tool, see Section 37.2.2, “Using the lctl Tool to View Debug Messages” and Section 44.2, “ lctl”.Lustre subsystem asserts - A panic-style assertion (LBUG) in the kernel causes the Lustre file system to dump the debug log to the file
/tmp/lustre-log.where it can be retrieved after a reboot. For more information, see Section 35.1.2, “Viewing Error Messages”.timestamplfslfs”.
The tools described in this section are provided in the Linux kernel or are available at an external website. For information about using some of these tools for Lustre debugging, see Section 37.2, “Lustre Debugging Procedures” and Section 37.3, “Lustre Debugging for Developers”.
Some general debugging tools provided as a part of the standard Linux distribution are:
strace. This tool allows a system call to be traced./var/log/messages.syslogdprints fatal or serious messages at this log.Crash dumps . On crash-dump enabled kernels, sysrq c produces a crash dump. The Lustre software enhances this crash dump with a log dump (the last 64 KB of the log) to the console.
debugfs. Interactive file system debugger.
The following logging and data collection tools can be used to collect information for debugging Lustre kernel issues:
kdump. A Linux kernel crash utility useful for debugging a system running Red Hat Enterprise Linux. For more information aboutkdump, see the Red Hat knowledge base article How to troubleshoot kernel crashes, hangs, or reboots with kdump on Red Hat Enterprise Linux. To downloadkdump, install the RPM package viayum install kexec-tools.netconsole. Enables kernel-level network logging over UDP. A system requires (SysRq) allows users to collect relevant data throughnetconsole.wireshark. A network packet inspection tool that allows debugging of information that was sent between the various Lustre nodes. This tool is built on top oftcpdumpand can read packet dumps generated by it. There are plug-ins available to dissassemble the LNet and Lustre protocols. They are included withwiresharksince version 2.6.0. See also the Wireshark Website for more details.
The tools described in this section may be useful for debugging a Lustre file system in a development environment.
Of general interest is:
leak_finder.pl
A virtual machine is often used to create an isolated development and test environment. Some commonly-used virtual machines are:
VirtualBox Open Source Edition. Provides enterprise-class virtualization capability for all major platforms and is available free at https://www.virtualbox.org/wiki/Downloads.
VMware Server. Virtualization platform available as free introductory software at https://my.vmware.com/web/vmware/downloads/.
Xen. A para-virtualized environment with virtualization capabilities similar to VMware Server and Virtual Box. However, Xen allows the use of modified kernels to provide near-native performance and the ability to emulate shared storage. For more information, go to https://xen.org/.
A variety of debuggers and analysis tools are available including:
kgdb. The Linux Kernel Source Level Debugger kgdb is used in conjunction with the GNU Debuggergdbfor debugging the Linux kernel. For more information about usingkgdbwithgdb, see Chapter 6. Running Programs Under gdb in the Red Hat Linux 4 Debugging with GDB guide.crash. Used to analyze saved crash dump data when a system had panicked or locked up or appears unresponsive. For more information about using crash to analyze a crash dump, see:Overview on how to use crash by the author: White Paper: Red Hat Crash Utility
The procedures below may be useful to administrators or developers debugging a Lustre files system.
Lustre debug messages are categorized by originating subsystem, message type, and location in the source code. For a list of subsystems and message types, see Section 44.2, “ lctl”.
Note
For a current list of subsystems and debug message types, see
libcfs/include/libcfs/libcfs_debug.h in the Lustre software
tree
The elements of a Lustre debug message are described in Section 37.2.1.2, “Format of Lustre Debug Messages” Format of Lustre Debug Messages.
Each Lustre debug message has the tag of the subsystem it originated in, the message type, and the location in the source code. The subsystems and debug types used are as follows:
Standard Subsystems:
mdc, mds, osc, ost, obdclass, obdfilter, llite, ptlrpc, portals, lnd, ldlm, lov
Debug Types:
Types
Description
trace
Function entry/exit markers
dlmtrace
Distributed locking-related information
inode
super
malloc
Memory allocation or free information
cache
Cache-related information
info
Non-critical general information
dentry
kernel namespace cache handling
mmap
Memory-mapped IO interface
page
Page cache and bulk data transfers
info
Miscellaneous informational messages
net
LNet network related debugging
console
Significant system events, printed to console
warning
Significant but non-fatal exceptions, printed to console
error
Critical error messages, printed to console
neterror
Significant LNet error messages
emerg
Fatal system errors, printed to console
config
Configuration and setup, enabled by default
ha
Failover and recovery-related information, enabled by default
hsm
Hierarchical space management/tiering
ioctl
IOCTL-related information, enabled by default
layout
File layout handling (PFL, FLR, DoM)
lfsck
Filesystem consistency checking, enabled by default
other
Miscellaneious other debug messages
quota
Space accounting and management
reada
Client readahead management
rpctrace
Remote request/reply tracing and debugging
sec
Security, Kerberos, Shared Secret Key handling
snapshot
Filesystem snapshot management
vfstrace
Kernel VFS interface operations
The Lustre software uses the CDEBUG() and
CERROR() macros to print the debug or error messages. To print the
message, the CDEBUG() macro uses the function
libcfs_debug_msg() (libcfs/libcfs/tracefile.c).
The message format is described below, along with an example.
|
Description |
Parameter |
|---|---|
|
subsystem |
800000 |
|
debug mask |
000010 |
|
smp_processor_id |
0 |
|
seconds.microseconds |
1081880847.677302 |
|
stack size |
1204 |
|
pid |
2973 |
|
host pid (UML only) or zero |
31070 |
|
(file:line #:function_name()) |
(obd_mount.c:2089:lustre_fill_super()) |
|
debug message |
kmalloced '*obj': 24 at a375571c (tot 17447717) |
Lustre debug messages are maintained in a buffer, with the maximum buffer size specified (in MBs) by the debug_mb parameter (lctl get_param debug_mb). The buffer is circular, so debug messages are kept until the allocated buffer limit is reached, and then the first messages are overwritten.
The lctl tool allows debug messages to be
filtered based on subsystems and message types to extract information
useful for troubleshooting from a kernel debug log. For a command
reference, see Section 44.2, “
lctl”.
You can use lctl to:
Obtain a list of all the types and subsystems:
lctl > debug_list
subsystems|types
Filter the debug log:
lctl > filter
subsystem_name|debug_type
Note
When lctl filters, it removes unwanted lines from the displayed output. This does not affect the contents of the debug log in the kernel's memory. As a result, you can print the log many times with different filtering levels without worrying about losing data.
Show debug messages belonging to certain subsystem or type:
lctl > show
subsystem_name|debug_typedebug_kernelpulls the data from the kernel logs, filters it appropriately, and displays or saves it as per the specified optionslctl > debug_kernel [
output filename]If the debugging is being done on User Mode Linux (UML), it might be useful to save the logs on the host machine so that they can be used at a later time.
Filter a log on disk, if you already have a debug log saved to disk (likely from a crash):
lctl > debug_file
input_file[output_file]During the debug session, you can add markers or breaks to the log for any reason:
lctl > mark [marker text]
The marker text defaults to the current date and time in the debug log (similar to the example shown below):
DEBUG MARKER: Tue Mar 5 16:06:44 EST 2002
Completely flush the kernel debug buffer:
lctl > clear
Note
Debug messages displayed with lctl are also subject to the kernel debug masks; the filters are additive.
Below is a sample run using the lctl command.
bash-2.04# ./lctl lctl > debug_kernel /tmp/lustre_logs/log_all Debug log: 324 lines, 324 kept, 0 dropped. lctl > filter trace Disabling output of type "trace" lctl > debug_kernel /tmp/lustre_logs/log_notrace Debug log: 324 lines, 282 kept, 42 dropped. lctl > show trace Enabling output of type "trace" lctl > filter portals Disabling output from subsystem "portals" lctl > debug_kernel /tmp/lustre_logs/log_noportals Debug log: 324 lines, 258 kept, 66 dropped.
The lctl debug_daemon command is used to continuously dump the debug_kernel buffer to a user-specified file. This functionality uses a kernel thread to continuously dump the messages from the kernel debug log, so that much larger debug logs can be saved over a longer time than would fit in the kernel ringbuffer.
The debug_daemon is highly dependent on file system write speed. File system write operations may not be fast enough to flush out all of the debug_buffer if the Lustre file system is under heavy system load and continues to log debug messages to the debug_buffer. The debug_daemon will write the message DEBUG MARKER: Trace buffer full into the debug_buffer to indicate the debug_buffer contents are overlapping before the debug_daemon flushes data to a file.
Users can use the lctl debug_daemon command to start or stop the Lustre daemon from dumping the debug_buffer to a file.
To initiate the debug_daemon to start dumping the debug_buffer into a file, run as the root user:
lctl debug_daemon startfilename[megabytes]
The debug log will be written to the specified filename from the kernel. The file will be limited to the optionally specified number of megabytes.
The daemon wraps around and dumps data to the beginning of the file when the output file size is over the limit of the user-specified file size. To decode the dumped file to ASCII and sort the log entries by time, run:
lctl debug_filefilename>newfile
The output is internally sorted by the lctl command.
To stop the debug_daemon operation and flush the file output, run:
lctl debug_daemon stop
Otherwise, debug_daemon is shut down as part of the Lustre file system shutdown process. Users can restart debug_daemon by using start command after each stop command issued.
This is an example using debug_daemon with the interactive mode of lctl to dump debug logs to a 40 MB file.
lctl
lctl > debug_daemon start /var/log/lustre.40.bin 40
run filesystem operations to debuglctl > debug_daemon stop
lctl > debug_file /var/log/lustre.bin /var/log/lustre.log
To start another daemon with an unlimited file size, run:
lctl > debug_daemon start /var/log/lustre.bin
The text message *** End of debug_daemon trace log *** appears at the end of each output file.
The lctl set_param subsystem_debug= and subsystem_masklctl set_param debug= are used to determine which information is written to the debug log. The subsystem_debug mask determines the information written to the log based on the functional area of the code (such as lnet, osc, or ldlm). The debug mask controls information based on the message type (such as info, error, trace, or malloc). For a complete list of possible debug masks use the debug_masklctl debug_list types command.
To turn off Lustre debugging completely:
lctl set_param debug=0
To turn on full Lustre debugging:
lctl set_param debug=-1
To list all possible debug masks:
lctl debug_list types
To log only messages related to network communications:
lctl set_param debug=net
To turn on logging of messages related to network communications and existing debug flags:
lctl set_param debug=+net
To turn off network logging with changing existing flags:
lctl set_param debug=-net
The various options available to print to kernel debug logs are listed in libcfs/include/libcfs/libcfs.h
The strace utility provided with the Linux distribution enables system calls to be traced by intercepting all the system calls made by a process and recording the system call name, arguments, and return values.
To invoke strace on a program, enter:
$ straceprogram[arguments]
Sometimes, a system call may fork child processes. In this situation, use the -f option of strace to trace the child processes:
$ strace -fprogram[arguments]
To redirect the strace output to a file, enter:
$ strace -ofilenameprogram[arguments]
Use the -ff option, along with -o, to save the trace output in filename.pid, where pid is the process ID of the process being traced. Use the -ttt option to timestamp all lines in the strace output, so they can be correlated to operations in the lustre kernel debug log.
In a Lustre file system, the inodes on the metadata server contain extended attributes
(EAs) that store information about file striping. EAs contain a list of all object IDs and
their locations (that is, the OST that stores them). The lfs tool can be
used to obtain this information for a given file using the getstripe
subcommand. Use a corresponding lfs setstripe command to specify striping
attributes for a new file or directory.
The lfs getstripe command takes a Lustre filename as input and lists
all the objects that form a part of this file. To obtain this information for the file
/mnt/testfs/frog in a Lustre file system, run:
$ lfs getstripe /mnt/testfs/frog
lmm_stripe_count: 2
lmm_stripe_size: 1048576
lmm_pattern: 1
lmm_layout_gen: 0
lmm_stripe_offset: 2
obdidx objid objid group
2 818855 0xc7ea7 0
0 873123 0xd52a3 0
The debugfs tool is provided in the
e2fsprogs package. It can be used for interactive
debugging of an ldiskfs file system. The
debugfs tool can either be used to check status or
modify information in the file system. In a Lustre file system, all
objects that belong to a file are stored in an underlying
ldiskfs file system on the OSTs. The file system
uses the object IDs as the file names. Once the object IDs are known,
use the debugfs tool to obtain the attributes of
all objects from different OSTs.
A sample run for the /mnt/testfs/frog file used
in the above example is shown here:
$ debugfs -c -R "stat O/0/d$((818855 % 32))/818855" /dev/vgmyth/lvmythost2
debugfs 1.41.90.wc3 (28-May-2011)
/dev/vgmyth/lvmythost2: catastrophic mode - not reading inode or group bitmaps
Inode: 227649 Type: regular Mode: 0666 Flags: 0x80000
Generation: 1375019198 Version: 0x0000002f:0000728f
User: 1000 Group: 1000 Size: 2800
File ACL: 0 Directory ACL: 0
Links: 1 Blockcount: 8
Fragment: Address: 0 Number: 0 Size: 0
ctime: 0x4e177fe5:00000000 -- Fri Jul 8 16:08:37 2011
atime: 0x4d2e2397:00000000 -- Wed Jan 12 14:56:39 2011
mtime: 0x4e177fe5:00000000 -- Fri Jul 8 16:08:37 2011
crtime: 0x4c3b5820:a364117c -- Mon Jul 12 12:00:00 2010
Size of extra inode fields: 28
Extended attributes stored in inode body:
fid = "08 80 24 00 00 00 00 00 28 8a e7 fc 00 00 00 00 a7 7e 0c 00 00 00 00 00
00 00 00 00 00 00 00 00 " (32)
fid: objid=818855 seq=0 parent=[0x248008:0xfce78a28:0x0] stripe=0
EXTENTS:
(0):63331288
To determine the Lustre UUID of an OST disk (for example, if you mix up the cables on your OST devices or the SCSI bus numbering suddenly changes and the SCSI devices get new names), it is possible to extract this from the last_rcvd file using debugfs:
debugfs -c -R "dump last_rcvd /tmp/last_rcvd" /dev/sdc
strings /tmp/last_rcvd | head -1
myth-OST0004_UUID
It is also possible (and easier) to extract this from the file system label using the
dumpe2fs command:
dumpe2fs -h /dev/sdc | grep volume
dumpe2fs 1.41.90.wc3 (28-May-2011)
Filesystem volume name: myth-OST0004
The debugfs and dumpe2fs commands are well documented in the debugfs(8) and dumpe2fs(8) manual pages.
To dump debug messages to the console (/var/log/messages), set the corresponding debug mask in the printk flag:
lctl set_param printk=-1
This slows down the system dramatically. It is also possible to selectively enable or disable this capability for particular flags using:lctl set_param printk=+vfstrace and lctl set_param printk=-vfstrace .
It is possible to disable warning, error, and console messages, though it is strongly recommended to have something like lctl debug_daemon running to capture this data to a local file system for failure detection purposes.
The Lustre software provides a specific debug type category for tracing lock traffic. Use:
lctl> filter all_types
lctl> show dlmtrace
lctl> debug_kernel [filename] Some console messages which are printed by Lustre are rate limited. When such messages are printed, they may be followed by a message saying "Skipped N previous similar message(s)," where N is the number of messages skipped. This rate limiting can be completely disabled by a libcfs module parameter called libcfs_console_ratelimit. To disable console message rate limiting, add this line to /etc/modprobe.d/lustre.conf and then reload Lustre modules.
options libcfs libcfs_console_ratelimit=0
It is also possible to set the minimum and maximum delays between rate-limited console messages using the module parameters libcfs_console_max_delay and libcfs_console_min_delay. Set these in /etc/modprobe.d/lustre.conf and then reload Lustre modules. Additional information on libcfs module parameters is available via modinfo:
modinfo libcfs
The procedures in this section may be useful to developers debugging Lustre source code.
The debugging infrastructure provides a number of macros that can be used in Lustre source code to aid in debugging or reporting serious errors.
To use these macros, you will need to set the DEBUG_SUBSYSTEM variable at the top of the file as shown below:
#define DEBUG_SUBSYSTEM S_PORTALS
A list of available macros with descriptions is provided in the table below.
|
Macro |
Description |
|---|---|
|
|
A panic-style assertion in the kernel which causes the Lustre file system to
dump its circular log to the |
|
|
Validates a given expression as true, otherwise calls LBUG(). The failed expression is printed on the console, although the values that make up the expression are not printed. |
|
|
Similar to |
|
|
The basic, most commonly used debug macro that takes just one more argument than standard
|
|
|
Behaves similarly to
|
|
|
Internally using
|
|
|
Behaves similarly to |
|
|
Behaves similarly to |
|
|
Prints information about the given
|
|
|
Add messages to the entry of a function to aid in call tracing (takes no arguments). When using these macros, cover all exit conditions with a single |
|
|
Mark the exit of a function, to match |
|
|
Mark when code jumps via |
|
|
Mark the exit of a function, to match |
|
|
Used when tracing LDLM locking operations. These macros build a thin trace that shows the locking requests on a node, and can also be linked across the client and server node using the printed lock handles. |
|
|
Allows insertion of failure points into the Lustre source code. This is useful
to generate regression tests that can hit a very specific sequence of events. This
works in conjunction with " |
|
|
Similar to |
|
|
Similar to |
|
|
A flag set on a |
|
|
A flag set on a |
|
|
A flag set on a |
|
|
A flag set on |
Each service maintains a request history, which can be useful for first occurrence troubleshooting.
ptlrpc is an RPC protocol layered on LNet that deals with stateful servers and has semantics and built-in support for recovery.
The ptlrpc request history works as follows:
request_in_callback()adds the new request to the service's request history.When a request buffer becomes idle, it is added to the service's request buffer history list.
Buffers are culled from the service request buffer history if it has grown above
req_buffer_history_maxand its reqs are removed from the service request history.
Request history is accessed and controlled using the following parameters for each service:
req_buffer_history_lenNumber of request buffers currently in the history
req_buffer_history_maxMaximum number of request buffers to keep
req_historyThe request history
Requests in the history include "live" requests that are currently being handled. Each line in req_history looks like:
sequence:target_NID:client_NID:cliet_xid:request_length:rpc_phaseservice_specific_data
|
Parameter |
Description |
|---|---|
|
|
Request sequence number |
|
|
Destination |
|
|
Client |
|
|
|
|
|
Size of the request message |
|
|
|
|
|
Service-specific request printout. Currently, the only service that does this is the OST (which prints the opcode if the message has been unpacked successfully |
Memory leaks can occur in code when memory has been allocated and then not freed once it is no longer required. The leak_finder.pl program provides a way to find memory leaks.
Before running this program, you must turn on debugging to collect all malloc and free entries. Run:
lctl set_param debug=+malloc
Then complete the following steps:
Dump the log into a user-specified log file using lctl (see Section 37.2.2, “Using the lctl Tool to View Debug Messages”).
Run the leak finder on the newly-created log dump:
perl leak_finder.pl
ascii-logname
The output is:
malloced 8bytes at a3116744 (called pathcopy) (lprocfs_status.c:lprocfs_add_vars:80) freed 8bytes at a3116744 (called pathcopy) (lprocfs_status.c:lprocfs_add_vars:80)
The tool displays the following output to show the leaks found:
Leak:32bytes allocated at a23a8fc(service.c:ptlrpc_init_svc:144,debug file line 241)
Part VI includes reference information about Lustre file system user utilities, configuration files and module parameters, programming interfaces, system configuration utilities, and system limits. You will find information in this section about:
Table of Contents
- 38. Lustre File System Recovery
- 39. Lustre Parameters
- 39.1. Introduction to Lustre Parameters
- 39.2. Tuning Multi-Block Allocation (mballoc)
- 39.3. Monitoring Lustre File System I/O
- 39.4. Tuning Lustre File System I/O
- 39.5. Configuring Timeouts in a Lustre File System
- 39.6. Monitoring LNet
- 39.7. Allocating Free Space on OSTs
- 39.8. Configuring Locking
- 39.9. Setting MDS and OSS Thread Counts
- 39.10. Enabling and Interpreting Debugging Logs
- 40. User Utilities
- 41. Programming Interfaces
- 42. Setting Lustre Properties in a C Program (
llapi) - 43. Configuration Files and Module Parameters
- 44. System Configuration Utilities
- 44.1. l_getidentity
- 44.2. lctl
- 44.3. ll_decode_filter_fid
- 44.4. llobdstat
- 44.5. llog_reader
- 44.6. llstat
- 44.7. llverdev
- 44.8. lshowmount
- 44.9. lst
- 44.10. lustre_rmmod.sh
- 44.11. lustre_rsync
- 44.12. mkfs.lustre
- 44.13. mount.lustre
- 44.14. routerstat
- 44.15. tunefs.lustre
- 44.16. Additional System Configuration Utilities
- 45. LNet Configuration C-API
- 45.1. General API Information
- 45.2. The LNet Configuration C-API
- 45.2.1. Configuring LNet
- 45.2.2. Enabling and Disabling Routing
- 45.2.3. Adding Routes
- 45.2.4. Deleting Routes
- 45.2.5. Showing Routes
- 45.2.6. Adding a Network Interface
- 45.2.7. Deleting a Network Interface
- 45.2.8. Showing Network Interfaces
- 45.2.9. Adjusting Router Buffer Pools
- 45.2.10. Showing Routing information
- 45.2.11. Showing LNet Traffic Statistics
- 45.2.12. Adding/Deleting/Showing Parameters through a YAML Block
- 45.2.13. Adding a route code example
Table of Contents
This chapter describes how recovery is implemented in a Lustre file system and includes the following sections:
The recovery feature provided in the Lustre software is responsible for dealing with node or network failure and returning the cluster to a consistent, performant state. Because the Lustre software allows servers to perform asynchronous update operations to the on-disk file system (i.e., the server can reply without waiting for the update to synchronously commit to disk), the clients may have state in memory that is newer than what the server can recover from disk after a crash.
A handful of different types of failures can cause recovery to occur:
Client (compute node) failure
MDS failure (and failover)
OST failure (and failover)
Transient network partition
For Lustre, all Lustre file system failure and recovery operations are based on the concept of connection failure; all imports or exports associated with a given connection are considered to fail if any of them fail. The Section 38.6, “Imperative Recovery” feature allows the MGS to actively inform clients when a target restarts after a failure, failover, or other interruption to speed up recovery.
For information on Lustre file system recovery, see Section 38.2, “Metadata Replay”. For information on recovering from a corrupt file system, see Section 38.5, “Commit on Share”. For information on resolving orphaned objects, a common issue after recovery, see Section 36.2.1, “ Working with Orphaned Objects”. For information on imperative recovery see Section 38.6, “Imperative Recovery”
Recovery from client failure in a Lustre file system is based on lock revocation and other resources, so surviving clients can continue their work uninterrupted. If a client fails to timely respond to a blocking lock callback from the Distributed Lock Manager (DLM) or fails to communicate with the server in a long period of time (i.e., no pings), the client is forcibly removed from the cluster (evicted). This enables other clients to acquire locks blocked by the dead client's locks, and also frees resources (file handles, export data) associated with that client. Note that this scenario can be caused by a network partition, as well as an actual client node system failure. Section 38.1.5, “Network Partition” describes this case in more detail.
If a client is not behaving properly from the server's point of view, it will be evicted. This ensures that the whole file system can continue to function in the presence of failed or misbehaving clients. An evicted client must invalidate all locks, which in turn, results in all cached inodes becoming invalidated and all cached data being flushed.
Reasons why a client might be evicted:
Failure to respond to a server request in a timely manner
Blocking lock callback (i.e., client holds lock that another client/server wants)
Lock completion callback (i.e., client is granted lock previously held by another client)
Lock glimpse callback (i.e., client is asked for size of object by another client)
Server shutdown notification (with simplified interoperability)
Failure to ping the server in a timely manner, unless the server is receiving no RPC traffic at all (which may indicate a network partition).
Highly-available (HA) Lustre file system operation requires that the metadata server have a peer configured for failover, including the use of a shared storage device for the MDT backing file system. The actual mechanism for detecting peer failure, power off (STONITH) of the failed peer (to prevent it from continuing to modify the shared disk), and takeover of the Lustre MDS service on the backup node depends on external HA software such as Heartbeat. It is also possible to have MDS recovery with a single MDS node. In this case, recovery will take as long as is needed for the single MDS to be restarted.
When Section 38.6, “Imperative Recovery” is enabled, clients are notified of an MDS restart (either the backup or a restored primary). Clients always may detect an MDS failure either by timeouts of in-flight requests or idle-time ping messages. In either case the clients then connect to the new backup MDS and use the Metadata Replay protocol. Metadata Replay is responsible for ensuring that the backup MDS re-acquires state resulting from transactions whose effects were made visible to clients, but which were not committed to the disk.
The reconnection to a new (or restarted) MDS is managed by the file system configuration loaded by the client when the file system is first mounted. If a failover MDS has been configured (using the --failnode= option to mkfs.lustre or tunefs.lustre), the client tries to reconnect to both the primary and backup MDS until one of them responds that the failed MDT is again available. At that point, the client begins recovery. For more information, see Section 38.2, “Metadata Replay”.
Transaction numbers are used to ensure that operations are replayed in the order they were originally performed, so that they are guaranteed to succeed and present the same file system state as before the failure. In addition, clients inform the new server of their existing lock state (including locks that have not yet been granted). All metadata and lock replay must complete before new, non-recovery operations are permitted. In addition, only clients that were connected at the time of MDS failure are permitted to reconnect during the recovery window, to avoid the introduction of state changes that might conflict with what is being replayed by previously-connected clients.
If multiple MDTs are in use, active-active failover is possible (e.g. two MDS nodes, each actively serving one or more different MDTs for the same filesystem). See Section 3.2.2, “ MDT Failover Configuration (Active/Active)” for more information.
When an OST fails or has communication problems with the client, the default action is that the corresponding OSC enters recovery, and I/O requests going to that OST are blocked waiting for OST recovery or failover. It is possible to administratively mark the OSC as inactive on the client, in which case file operations that involve the failed OST will return an IO error (-EIO). Otherwise, the application waits until the OST has recovered or the client process is interrupted (e.g. ,with CTRL-C).
The MDS (via the LOV) detects that an OST is unavailable and skips it when assigning objects to new files. When the OST is restarted or re-establishes communication with the MDS, the MDS and OST automatically perform orphan recovery to destroy any objects that belong to files that were deleted while the OST was unavailable. For more information, see Chapter 36, Troubleshooting Recovery (Working with Orphaned Objects).
While the OSC to OST operation recovery protocol is the same as that between the MDC and MDT using the Metadata Replay protocol, typically the OST commits bulk write operations to disk synchronously and each reply indicates that the request is already committed and the data does not need to be saved for recovery. In some cases, the OST replies to the client before the operation is committed to disk (e.g. truncate, destroy, setattr, and I/O operations in newer releases of the Lustre software), and normal replay and resend handling is done, including resending of the bulk writes. In this case, the client keeps a copy of the data available in memory until the server indicates that the write has committed to disk.
To force an OST recovery, unmount the OST and then mount it again. If the OST was connected to clients before it failed, then a recovery process starts after the remount, enabling clients to reconnect to the OST and replay transactions in their queue. When the OST is in recovery mode, all new client connections are refused until the recovery finishes. The recovery is complete when either all previously-connected clients reconnect and their transactions are replayed or a client connection attempt times out. If a connection attempt times out, then all clients waiting to reconnect (and their transactions) are lost.
Note
If you know an OST will not recover a previously-connected client (if, for example, the client has crashed), you can manually abort the recovery using this command:
oss# lctl --device lustre_device_number abort_recoveryTo determine an OST's device number and device name, run the lctl dl command. Sample lctl dl command output is shown below:
7 UP obdfilter ddn_data-OST0009 ddn_data-OST0009_UUID 1159
In this example, 7 is the OST device number. The device name is ddn_data-OST0009. In most instances, the device name can be used in place of the device number.
Network failures may be transient. To avoid invoking recovery, the client tries, initially, to re-send any timed out request to the server. If the resend also fails, the client tries to re-establish a connection to the server. Clients can detect harmless partition upon reconnect if the server has not had any reason to evict the client.
If a request was processed by the server, but the reply was dropped (i.e., did not arrive back at the client), the server must reconstruct the reply when the client resends the request, rather than performing the same request twice.
In the case of failed recovery, a client is evicted by the server and must reconnect after having flushed its saved state related to that server, as described in Section 38.1.2, “Client Eviction”, above. Failed recovery might occur for a number of reasons, including:
Failure of recovery
Recovery fails if the operations of one client directly depend on the operations of another client that failed to participate in recovery. Otherwise, Version Based Recovery (VBR) allows recovery to proceed for all of the connected clients, and only missing clients are evicted.
Manual abort of recovery
Manual eviction by the administrator
Highly available Lustre file system operation requires that the MDS have a peer configured for failover, including the use of a shared storage device for the MDS backing file system. When a client detects an MDS failure, it connects to the new MDS and uses the metadata replay protocol to replay its requests.
Metadata replay ensures that the failover MDS re-accumulates state resulting from transactions whose effects were made visible to clients, but which were not committed to the disk.
Each request sent by the client contains an XID number, which is a client-unique, monotonically increasing 64-bit integer. The initial value of the XID is chosen so that it is highly unlikely that the same client node reconnecting to the same server after a reboot would have the same XID sequence. The XID is used by the client to order all of the requests that it sends, until such a time that the request is assigned a transaction number. The XID is also used in Reply Reconstruction to uniquely identify per-client requests at the server.
Each client request processed by the server that involves any state change (metadata update, file open, write, etc., depending on server type) is assigned a transaction number by the server that is a target-unique, monotonically increasing, server-wide 64-bit integer. The transaction number for each file system-modifying request is sent back to the client along with the reply to that client request. The transaction numbers allow the client and server to unambiguously order every modification to the file system in case recovery is needed.
Each reply sent to a client (regardless of request type) also contains the last
committed transaction number that indicates the highest transaction number committed to the
file system. The ldiskfs and ZFS backing file systems that the Lustre software
uses enforces the requirement that any earlier disk operation will always be committed to
disk before a later disk operation, so the last committed transaction number also reports
that any requests with a lower transaction number have been committed to disk.
Lustre file system recovery can be separated into two distinct types of operations: replay and resend.
Replay operations are those for which the client received a reply from the server that the operation had been successfully completed. These operations need to be redone in exactly the same manner after a server restart as had been reported before the server failed. Replay can only happen if the server failed; otherwise it will not have lost any state in memory.
Resend operations are those for which the client never received a reply, so their final state is unknown to the client. The client sends unanswered requests to the server again in XID order, and again awaits a reply for each one. In some cases, resent requests have been handled and committed to disk by the server (possibly also having dependent operations committed), in which case, the server performs reply reconstruction for the lost reply. In other cases, the server did not receive the lost request at all and processing proceeds as with any normal request. These are what happen in the case of a network interruption. It is also possible that the server received the request, but was unable to reply or commit it to disk before failure.
All file system-modifying requests have the potential to be required for server state recovery (replay) in case of a server failure. Replies that have an assigned transaction number that is higher than the last committed transaction number received in any reply from each server are preserved for later replay in a per-server replay list. As each reply is received from the server, it is checked to see if it has a higher last committed transaction number than the previous highest last committed number. Most requests that now have a lower transaction number can safely be removed from the replay list. One exception to this rule is for open requests, which need to be saved for replay until the file is closed so that the MDS can properly reference count open-unlinked files.
A server enters recovery if it was not shut down cleanly. If, upon startup, if any client entries are in the last_rcvd file for any previously connected clients, the server enters recovery mode and waits for these previously-connected clients to reconnect and begin replaying or resending their requests. This allows the server to recreate state that was exposed to clients (a request that completed successfully) but was not committed to disk before failure.
In the absence of any client connection attempts, the server waits indefinitely for the clients to reconnect. This is intended to handle the case where the server has a network problem and clients are unable to reconnect and/or if the server needs to be restarted repeatedly to resolve some problem with hardware or software. Once the server detects client connection attempts - either new clients or previously-connected clients - a recovery timer starts and forces recovery to finish in a finite time regardless of whether the previously-connected clients are available or not.
If no client entries are present in the last_rcvd file, or if the administrator manually aborts recovery, the server does not wait for client reconnection and proceeds to allow all clients to connect.
As clients connect, the server gathers information from each one to determine how long the recovery needs to take. Each client reports its connection UUID, and the server does a lookup for this UUID in the last_rcvd file to determine if this client was previously connected. If not, the client is refused connection and it will retry until recovery is completed. Each client reports its last seen transaction, so the server knows when all transactions have been replayed. The client also reports the amount of time that it was previously waiting for request completion so that the server can estimate how long some clients might need to detect the server failure and reconnect.
If the client times out during replay, it attempts to reconnect. If the client is unable to reconnect, REPLAY fails and it returns to DISCON state. It is possible that clients will timeout frequently during REPLAY, so reconnection should not delay an already slow process more than necessary. We can mitigate this by increasing the timeout during replay.
If a client was previously connected, it gets a response from the server telling it that the server is in recovery and what the last committed transaction number on disk is. The client can then iterate through its replay list and use this last committed transaction number to prune any previously-committed requests. It replays any newer requests to the server in transaction number order, one at a time, waiting for a reply from the server before replaying the next request.
Open requests that are on the replay list may have a transaction number lower than the server's last committed transaction number. The server processes those open requests immediately. The server then processes replayed requests from all of the clients in transaction number order, starting at the last committed transaction number to ensure that the state is updated on disk in exactly the same manner as it was before the crash. As each replayed request is processed, the last committed transaction is incremented. If the server receives a replay request from a client that is higher than the current last committed transaction, that request is put aside until other clients provide the intervening transactions. In this manner, the server replays requests in the same sequence as they were previously executed on the server until either all clients are out of requests to replay or there is a gap in a sequence.
In some cases, a gap may occur in the reply sequence. This might be caused by lost replies, where the request was processed and committed to disk but the reply was not received by the client. It can also be caused by clients missing from recovery due to partial network failure or client death.
In the case where all clients have reconnected, but there is a gap in the replay sequence the only possibility is that some requests were processed by the server but the reply was lost. Since the client must still have these requests in its resend list, they are processed after recovery is finished.
In the case where all clients have not reconnected, it is likely that the failed clients had requests that will no longer be replayed. The VBR feature is used to determine if a request following a transaction gap is safe to be replayed. Each item in the file system (MDS inode or OST object) stores on disk the number of the last transaction in which it was modified. Each reply from the server contains the previous version number of the objects that it affects. During VBR replay, the server matches the previous version numbers in the resend request against the current version number. If the versions match, the request is the next one that affects the object and can be safely replayed. For more information, see Section 38.4, “Version-based Recovery”.
If all requests were replayed successfully and all clients reconnected, clients then do lock replay locks -- that is, every client sends information about every lock it holds from this server and its state (whenever it was granted or not, what mode, what properties and so on), and then recovery completes successfully. Currently, the Lustre software does not do lock verification and just trusts clients to present an accurate lock state. This does not impart any security concerns since Lustre software release 1.x clients are trusted for other information (e.g. user ID) during normal operation also.
After all of the saved requests and locks have been replayed, the client sends an MDS_GETSTATUS request with last-replay flag set. The reply to that request is held back until all clients have completed replay (sent the same flagged getstatus request), so that clients don't send non-recovery requests before recovery is complete.
Once all of the previously-shared state has been recovered on the server (the target file system is up-to-date with client cache and the server has recreated locks representing the locks held by the client), the client can resend any requests that did not receive an earlier reply. This processing is done like normal request processing, and, in some cases, the server may do reply reconstruction.
When a reply is dropped, the MDS needs to be able to reconstruct the reply when the original request is re-sent. This must be done without repeating any non-idempotent operations, while preserving the integrity of the locking system. In the event of MDS failover, the information used to reconstruct the reply must be serialized on the disk in transactions that are joined or nested with those operating on the disk.
For the majority of requests, it is sufficient for the server to store three pieces of data in the last_rcvd file:
XID of the request
Resulting transno (if any)
Result code (
req->rq_status)
For open requests, the "disposition" of the open must also be stored.
An open reply consists of up to three pieces of information (in addition to the contents of the "request log"):
File handle
Lock handle
mds_bodywith information about the file created (forO_CREAT)
The disposition, status and request data (re-sent intact by the client) are sufficient to determine which type of lock handle was granted, whether an open file handle was created, and which resource should be described in the mds_body.
The file handle can be found in the XID of the request and the list of per-export open file handles. The file handle contains the resource/FID.
The lock handle can be found by walking the list of granted locks for the resource looking for one with the appropriate remote file handle (present in the re-sent request). Verify that the lock has the right mode (determined by performing the disposition/request/status analysis above) and is granted to the proper client.
Since Lustre 2.8, the MDS is able to save several reply data per client. The reply data are stored in the reply_data internal file of the MDT. Additionally to the XID of the request, the transaction number, the result code and the open "disposition", the reply data contains a generation number that identifies the client thanks to the content of the last_rcvd file.
The Version-based Recovery (VBR) feature improves Lustre file system reliability in cases where client requests (RPCs) fail to replay during recovery [3].
In pre-VBR releases of the Lustre software, if the MGS or an OST went down and then recovered, a recovery process was triggered in which clients attempted to replay their requests. Clients were only allowed to replay RPCs in serial order. If a particular client could not replay its requests, then those requests were lost as well as the requests of clients later in the sequence. The ''downstream'' clients never got to replay their requests because of the wait on the earlier client's RPCs. Eventually, the recovery period would time out (so the component could accept new requests), leaving some number of clients evicted and their requests and data lost.
With VBR, the recovery mechanism does not result in the loss of clients or their data, because changes in inode versions are tracked, and more clients are able to reintegrate into the cluster. With VBR, inode tracking looks like this:
Each inode[4] stores a version, that is, the number of the last transaction (transno) in which the inode was changed.
When an inode is about to be changed, a pre-operation version of the inode is saved in the client's data.
The client keeps the pre-operation inode version and the post-operation version (transaction number) for replay, and sends them in the event of a server failure.
If the pre-operation version matches, then the request is replayed. The post-operation version is assigned on all inodes modified in the request.
Note
An RPC can contain up to four pre-operation versions, because several inodes can be involved in an operation. In the case of a ''rename'' operation, four different inodes can be modified.
During normal operation, the server:
Updates the versions of all inodes involved in a given operation
Returns the old and new inode versions to the client with the reply
When the recovery mechanism is underway, VBR follows these steps:
VBR only allows clients to replay transactions if the affected inodes have the same version as during the original execution of the transactions, even if there is gap in transactions due to a missed client.
The server attempts to execute every transaction that the client offers, even if it encounters a re-integration failure.
When the replay is complete, the client and server check if a replay failed on any transaction because of inode version mismatch. If the versions match, the client gets a successful re-integration message. If the versions do not match, then the client is evicted.
VBR recovery is fully transparent to users. It may lead to slightly longer recovery times if the cluster loses several clients during server recovery.
The VBR feature is built into the Lustre file system recovery functionality. It cannot be disabled. These are some VBR messages that may be displayed:
DEBUG_REQ(D_WARNING, req, "Version mismatch during replay\n");
This message indicates why the client was evicted. No action is needed.
CWARN("%s: version recovery fails, reconnecting\n");This message indicates why the recovery failed. No action is needed.
The commit-on-share (COS) feature makes Lustre file system recovery more reliable by preventing missing clients from causing cascading evictions of other clients. With COS enabled, if some Lustre clients miss the recovery window after a reboot or a server failure, the remaining clients are not evicted.
Note
The commit-on-share feature is enabled, by default.
To illustrate how COS works, let's first look at the old recovery scenario. After a service restart, the MDS would boot and enter recovery mode. Clients began reconnecting and replaying their uncommitted transactions. Clients could replay transactions independently as long as their transactions did not depend on each other (one client's transactions did not depend on a different client's transactions). The MDS is able to determine whether one transaction is dependent on another transaction via the Section 38.4, “Version-based Recovery” feature.
If there was a dependency between client transactions (for example, creating and deleting the same file), and one or more clients did not reconnect in time, then some clients may have been evicted because their transactions depended on transactions from the missing clients. Evictions of those clients caused more clients to be evicted and so on, resulting in "cascading" client evictions.
COS addresses the problem of cascading evictions by eliminating dependent transactions between clients. It ensures that one transaction is committed to disk if another client performs a transaction dependent on the first one. With no dependent, uncommitted transactions to apply, the clients replay their requests independently without the risk of being evicted.
Commit on Share can be enabled or disabled using the mdt.commit_on_sharing tunable (0/1). This tunable can be set when the MDS is created (mkfs.lustre) or when the Lustre file system is active, using the lctl set/get_param or lctl conf_param commands.
To set a default value for COS (disable/enable) when the file system is created, use:
--param mdt.commit_on_sharing=0/1
To disable or enable COS when the file system is running, use:
lctl set_param mdt.*.commit_on_sharing=0/1
Note
Enabling COS may cause the MDS to do a large number of synchronous disk operations, hurting performance. Placing the ldiskfs journal on a low-latency external device may improve file system performance.
Large-scale Lustre filesystems will experience server hardware failures over their lifetime, and it is important that servers can recover in a timely manner after such failures. High Availability software can move storage targets over to a backup server automatically. Clients can detect the server failure by RPC timeouts, which must be scaled with system size to prevent false diagnosis of server death in cases of heavy load. The purpose of imperative recovery is to reduce the recovery window by actively informing clients of server failure. The resulting reduction in the recovery window will minimize target downtime and therefore increase overall system availability.
Imperative Recovery does not remove previous recovery mechanisms, and client timeout-based recovery actions can occur in a cluster when IR is enabled as each client can still independently disconnect and reconnect from a target. In case of a mix of IR and non-IR clients connecting to an OST or MDT, the server cannot reduce its recovery timeout window, because it cannot be sure that all clients have been notified of the server restart in a timely manner. Even in such mixed environments the time to complete recovery may be reduced, since IR-enabled clients will still be notified to reconnect to the server promptly and allow recovery to complete as soon as the last non-IR client detects the server failure.
The MGS now holds additional information about Lustre targets, in the form of a Target Status Table. Whenever a target registers with the MGS, there is a corresponding entry in this table identifying the target. This entry includes NID information, and state/version information for the target. When a client mounts the file system, it caches a locked copy of this table, in the form of a Lustre configuration log. When a target restart occurs, the MGS revokes the client lock, forcing all clients to reload the table. Any new targets will have an updated version number, the client detects this and reconnects to the restarted target. Since successful IR notification of server restart depends on all clients being registered with the MGS, and there is no other node to notify clients in case of MGS restart, the MGS will disable IR for a period when it first starts. This interval is configurable, as shown in Section 38.6.2, “Tuning Imperative Recovery”
Because of the increased importance of the MGS in recovery, it is strongly recommended that the MGS node be separate from the MDS. If the MGS is co-located on the MDS node, then in case of MDS/MGS failure there will be no IR notification for the MDS restart, and clients will always use timeout-based recovery for the MDS. IR notification would still be used in the case of OSS failure and recovery.
Unfortunately, it is impossible for the MGS to know how many clients have been successfully notified or whether a specific client has received the restarting target information. The only thing the MGS can do is tell the target that, for example, all clients are imperative recovery-capable, so it is not necessary to wait as long for all clients to reconnect. For this reason, we still require a timeout policy on the target side, but this timeout value can be much shorter than normal recovery.
Imperative recovery has a default parameter set which means it can work without any extra configuration. However, the default parameter set only fits a generic configuration. The following sections discuss the configuration items for imperative recovery.
ir_factor is used to control each target's
recovery window. If imperative recovery is enabled,
the recovery timeout window on the restarting target is calculated by:
new timeout = recovery_time * ir_factor / 10
ir_factor must be a value in range of [1, 10].
The default value of ir_factor is 5.
The following example will set imperative recovery timeout to 80%
of normal recovery timeout on the target testfs-OST0000:
lctl conf_param obdfilter.testfs-OST0000.ir_factor=8
Note
If this value is too small for the system, clients may be unnecessarily evicted
You can read the current value of the parameter in the standard manner with lctl get_param:
# lctl get_param obdfilter.testfs-OST0000.ir_factor # obdfilter.testfs-OST0000.ir_factor=8
Imperative recovery can be disabled manually by a mount option. For example, imperative recovery can be disabled on an OST by:
# mount -t lustre -onoir /dev/sda /mnt/ost1
Imperative recovery can also be disabled on the client side with the same mount option:
# mount -t lustre -onoir mymgsnid@tcp:/testfs /mnt/testfs
Note
When a single client is deactivated in this manner, the MGS will deactivate imperative recovery for the whole cluster. IR-enabled clients will still get notification of target restart, but targets will not be allowed to shorten the recovery window.
You can also disable imperative recovery globally on the MGS
by writing state=disabled to the parameter:
# lctl set_param mgs.MGS.live.testfs="state=disabled"
The above command will disable imperative recovery for file system named testfs
You can get the imperative recovery state from the MGS. Let us take an example and explain states of imperative recovery:
[mgs]$ lctl get_param mgs.MGS.live.testfs
...
imperative_recovery_state:
state: full
nonir_clients: 0
nidtbl_version: 242
notify_duration_total: 0.470000
notify_duation_max: 0.041000
notify_count: 38
|
Item |
Meaning |
|---|---|
|
|
|
|
|
Number of non-IR capable clients in the system. |
|
|
Version number of the target status table. Client version must match MGS. |
|
|
[Seconds.microseconds] Total time spent by MGS notifying clients |
|
|
[Seconds.microseconds] Maximum notification time for the MGS to notify a single IR client. |
|
|
Number of MGS restarts - to obtain average notification time, divide |
A 'client' in IR means a Lustre client or a MDT. You can get the IR state on any node which running client or MDT, those nodes will always have an MGC running. An example from a client:
[client]$ lctl get_param mgc.*.ir_state
mgc.MGC192.168.127.6@tcp.ir_state=
imperative_recovery: ON
client_state:
- { client: testfs-client, nidtbl_version: 242 }
An example from a MDT:
mgc.MGC192.168.127.6@tcp.ir_state=
imperative_recovery: ON
client_state:
- { client: testfs-MDT0000, nidtbl_version: 242 }
|
Item |
Meaning |
|---|---|
|
|
|
|
|
The name of the client |
|
|
Version number of the target status table. Client version must match MGS. |
The Target Instance number is used to determine if a client is connecting to the latest instance of a target. We use the lowest 32 bit of mount count as target instance number. For an OST you can get the target instance number of testfs-OST0001 in this way (the command is run from an OSS login prompt):
$ lctl get_param obdfilter.testfs-OST0001*.instance obdfilter.testfs-OST0001.instance=5
From a client, query the relevant OSC:
$ lctl get_param osc.testfs-OST0001-osc-*.import |grep instance
instance: 5
We used to build the MGS and MDT0000 on the same target to save a server node. However, to make IR work efficiently, we strongly recommend running the MGS node on a separate node for any significant Lustre file system installation. There are three main advantages of doing this:
Be able to notify clients when MDT0000 recovered.
Improved load balance. The load on the MDS may be very high which may make the MGS unable to notify the clients in time.
Robustness. The MGS code is simpler and much smaller compared to the MDS code. This means the chance of an MGS downtime due to a software bug is very low.
On clusters with large numbers of clients and OSTs,
OBD_PING messages may impose significant performance
overheads. There is an option to suppress pings, allowing ping overheads
to be considerably reduced. Before turning on this option, administrators
should consider the following requirements and understand the trade-offs
involved:
When suppressing pings, a server cannot detect client deaths, since clients do not send pings that are only to keep their connections alive. Therefore, a mechanism external to the Lustre file system shall be set up to notify Lustre targets of client deaths in a timely manner, so that stale connections do not exist for too long and lock callbacks to dead clients do not always have to wait for timeouts.
Without pings, a client has to rely on Imperative Recovery to notify it of target failures, in order to join recoveries in time. This dictates that the client shall eargerly keep its MGS connection alive. Thus, a highly available standalone MGS is recommended and, on the other hand, MGS pings are always sent regardless of how the option is set.
If a client has uncommitted requests to a target and it is not sending any new requests on the connection, it will still ping that target even when pings should be suppressed. This is because the client needs to query the target's last committed transaction numbers in order to free up local uncommitted requests (and possibly other resources associated). However, these pings shall stop as soon as all the uncommitted requests have been freed or new requests need to be sent, rendering the pings unnecessary.
The new option that controls whether pings are suppressed is implemented as the ptlrpc kernel module parameter "suppress_pings". Setting it to "1" on a server turns on ping suppressing for all targets on that server, while leaving it with the default value "0" gives previous pinging behavior. The parameter is ignored on clients and the MGS. While the parameter is recommended to be set persistently via the modprobe.conf(5) mechanism, it also accept online changes through sysfs. Note that an online change only affects connections established later; existing connections' pinging behaviors stay the same.
The required external client death notification shall write UUIDs
of dead clients into targets' evict_client procfs
entries in order to remove stale clients from recovery.
A client UUID can be obtained from their uuid
procfs entry and that UUID can be used to evict the client, like:
client$ lctl get_param llite.testfs-*.uuid llite.testfs-ffff991ae1992000.uuid=dd599d28-0a85-a9e4-82cd-dc6357a42c77 oss# lctl set_param obdfilter.testfs-*.evict_client=dd599d28-0a85-a9e4-82cd-dc6357a42c77 mds# lctl set_param mdt.testfs-*.evict_client=dd599d28-0a85-a9e4-82cd-dc6357a42c77
[3] There are two scenarios under which client RPCs are not replayed: (1) Non-functioning or isolated clients do not reconnect, and they cannot replay their RPCs, causing a gap in the replay sequence. These clients get errors and are evicted. (2) Functioning clients connect, but they cannot replay some or all of their RPCs that occurred after the gap caused by the non-functioning/isolated clients. These clients get errors (caused by the failed clients). With VBR, these requests have a better chance to replay because the "gaps" are only related to specific files that the missing client(s) changed.
[4] Usually, there are two inodes, a parent and a child.
Table of Contents
- 39.1. Introduction to Lustre Parameters
- 39.2. Tuning Multi-Block Allocation (mballoc)
- 39.3. Monitoring Lustre File System I/O
- 39.4. Tuning Lustre File System I/O
- 39.5. Configuring Timeouts in a Lustre File System
- 39.6. Monitoring LNet
- 39.7. Allocating Free Space on OSTs
- 39.8. Configuring Locking
- 39.9. Setting MDS and OSS Thread Counts
- 39.10. Enabling and Interpreting Debugging Logs
There are many parameters for Lustre that can tune client and server performance, change behavior of the system, and report statistics about various subsystems. This chapter describes the various parameters and tunables that are useful for optimizing and monitoring aspects of a Lustre file system. It includes these sections:
Lustre parameters and statistics files provide an interface to internal data structures in the kernel that enables monitoring and tuning of many aspects of Lustre file system and application performance. These data structures include settings and metrics for components such as memory, networking, file systems, and kernel housekeeping routines, which are available throughout the hierarchical file layout.
Typically, metrics are accessed via lctl get_param
files and settings are changed by via lctl set_param.
They allow getting and setting multiple parameters with a single command,
through the use of wildcards in one or more part of the parameter name.
While each of these parameters maps to files in /proc
and /sys directly, the location of these parameters may
change between Lustre releases, so it is recommended to always use
lctl to access the parameters from userspace scripts.
Some data is server-only, some data is client-only, and some data is
exported from the client to the server and is thus duplicated in both
locations.
Note
In the examples in this chapter, # indicates
a command is entered as root. Lustre servers are named according to the
convention fsname-MDT|OSTnumber." and "/".
It is also possible to use brace {}expansion
to specify a list of parameter names efficiently.
Some examples are shown below:
To list available OST targets on a Lustre client:
# lctl list_param -F osc.* osc.testfs-OST0000-osc-ffff881071d5cc00/ osc.testfs-OST0001-osc-ffff881071d5cc00/ osc.testfs-OST0002-osc-ffff881071d5cc00/ osc.testfs-OST0003-osc-ffff881071d5cc00/ osc.testfs-OST0004-osc-ffff881071d5cc00/ osc.testfs-OST0005-osc-ffff881071d5cc00/ osc.testfs-OST0006-osc-ffff881071d5cc00/ osc.testfs-OST0007-osc-ffff881071d5cc00/ osc.testfs-OST0008-osc-ffff881071d5cc00/
In this example, information about OST connections available on a client is displayed (indicated by "osc"). Each of these connections may have numerous sub-parameters as well.
To see multiple levels of parameters, use multiple wildcards:
# lctl list_param osc.*.* osc.testfs-OST0000-osc-ffff881071d5cc00.active osc.testfs-OST0000-osc-ffff881071d5cc00.blocksize osc.testfs-OST0000-osc-ffff881071d5cc00.checksum_type osc.testfs-OST0000-osc-ffff881071d5cc00.checksums osc.testfs-OST0000-osc-ffff881071d5cc00.connect_flags osc.testfs-OST0000-osc-ffff881071d5cc00.contention_seconds osc.testfs-OST0000-osc-ffff881071d5cc00.cur_dirty_bytes ... osc.testfs-OST0000-osc-ffff881071d5cc00.rpc_stats
To see a specific subset of parameters, use braces, like:
# lctl list_param osc.*.{checksum,connect}* osc.testfs-OST0000-osc-ffff881071d5cc00.checksum_type osc.testfs-OST0000-osc-ffff881071d5cc00.checksums osc.testfs-OST0000-osc-ffff881071d5cc00.connect_flags
To view a specific file, use
lctl get_param:# lctl get_param osc.lustre-OST0000*.rpc_stats
For more information about using lctl, see Section 13.12.3, “Setting Parameters with
lctl”.
Data can also be viewed using the cat command
with the full path to the file. The form of the cat
command is similar to that of the lctl get_param
command with some differences. Unfortunately, as the Linux kernel has
changed over the years, the location of statistics and parameter files
has also changed, which means that the Lustre parameter files may be
located in either the /proc directory, in the
/sys directory, and/or in the
/sys/kernel/debug directory, depending on the kernel
version and the Lustre version being used. The lctl
command insulates scripts from these changes and is preferred over direct
file access, unless as part of a high-performance monitoring system.
Note
Starting in Lustre 2.12, there is
lctl get_param and lctl set_param
command can provide tab completion when using an
interactive shell with bash-completion installed.
This simplifies the use of get_param significantly,
since it provides an interactive list of available parameters.
The llstat utility can be used to monitor some
Lustre file system I/O activity over a specified time period. For more
details, see
Section 44.6, “
llstat”
Some data is imported from attached clients and is available in a
directory called exports located in the corresponding
per-service directory on a Lustre server. For example:
oss:/root# lctl list_param obdfilter.testfs-OST0000.exports.* # hash ldlm_stats stats uuid
Several parameter files on the MGS list existing
Lustre file systems and file system servers. The examples below are for
a Lustre file system called
testfs with one MDT and three OSTs.
To view all known Lustre file systems, enter:
mgs# lctl get_param mgs.*.filesystems testfs
To view the names of the servers in a file system in which least one server is running, enter:
lctl get_param mgs.*.live.
<filesystem name>For example:
mgs# lctl get_param mgs.*.live.testfs fsname: testfs flags: 0x20 gen: 45 testfs-MDT0000 testfs-OST0000 testfs-OST0001 testfs-OST0002 Secure RPC Config Rules: imperative_recovery_state: state: startup nonir_clients: 0 nidtbl_version: 6 notify_duration_total: 0.001000 notify_duation_max: 0.001000 notify_count: 4To list all configured devices on the local node, enter:
# lctl device_list 0 UP mgs MGS MGS 11 1 UP mgc MGC192.168.10.34@tcp 1f45bb57-d9be-2ddb-c0b0-5431a49226705 2 UP mdt MDS MDS_uuid 3 3 UP lov testfs-mdtlov testfs-mdtlov_UUID 4 4 UP mds testfs-MDT0000 testfs-MDT0000_UUID 7 5 UP osc testfs-OST0000-osc testfs-mdtlov_UUID 5 6 UP osc testfs-OST0001-osc testfs-mdtlov_UUID 5 7 UP lov testfs-clilov-ce63ca00 08ac6584-6c4a-3536-2c6d-b36cf9cbdaa04 8 UP mdc testfs-MDT0000-mdc-ce63ca00 08ac6584-6c4a-3536-2c6d-b36cf9cbdaa05 9 UP osc testfs-OST0000-osc-ce63ca00 08ac6584-6c4a-3536-2c6d-b36cf9cbdaa05 10 UP osc testfs-OST0001-osc-ce63ca00 08ac6584-6c4a-3536-2c6d-b36cf9cbdaa05
The information provided on each line includes:
- Device number
- Device status (UP, INactive, or STopping)
- Device name
- Device UUID
- Reference count (how many users this device has)
To display the name of any server, view the device label:
mds# e2label /dev/sda testfs-MDT0000
Capabilities supported by mballoc include:
Pre-allocation for single files to help to reduce fragmentation.
Pre-allocation for a group of files to enable packing of small files into large, contiguous chunks.
Stream allocation to help decrease the seek rate.
The following mballoc tunables are available:
|
Field |
Description |
|---|---|
|
|
Maximum number of free chunks that |
|
|
Minimum number of free chunks that |
|
|
For requests equal to 2^N, where N >= |
|
|
Requests are handled differently based on size:
In general, small requests are combined to create larger requests, which are then placed close to one another to minimize the number of seeks required to access the data. |
|
| |
|
|
A table of values used to preallocate space when a new request is received. By default, the table looks like this: prealloc_table 4 8 16 32 64 128 256 512 1024 2048 When a new request is received, space is preallocated at the next higher increment specified in the table. For example, for requests of less than 4 file system blocks, 4 blocks of space are preallocated; for requests between 4 and 8, 8 blocks are preallocated; and so forth Although customized values can be entered in the table, the performance of
general usage file systems will not typically be improved by modifying the table (in
fact, in ext4 systems, the table values are fixed). However, for some specialized
workloads, tuning the |
|
|
The amount of space (in kilobytes) preallocated for groups of small requests. |
Buddy group cache information found in
/sys/fs/ldiskfs/ may
be useful for assessing on-disk fragmentation. For
example:disk_device/mb_groups
cat /proc/fs/ldiskfs/loop0/mb_groups
#group: free free frags first pa [ 2^0 2^1 2^2 2^3 2^4 2^5 2^6 2^7 2^8 2^9
2^10 2^11 2^12 2^13]
#0 : 2936 2936 1 42 0 [ 0 0 0 1 1 1 1 2 0 1
2 0 0 0 ]In this example, the columns show:
#group number
Available blocks in the group
Blocks free on a disk
Number of free fragments
First free block in the group
Number of preallocated chunks (not blocks)
A series of available chunks of different sizes
A number of system utilities are provided to enable collection of data related to I/O activity in a Lustre file system. In general, the data collected describes:
Data transfer rates and throughput of inputs and outputs external to the Lustre file system, such as network requests or disk I/O operations performed
Data about the throughput or transfer rates of internal Lustre file system data, such as locks or allocations.
Note
It is highly recommended that you complete baseline testing for your Lustre file system to determine normal I/O activity for your hardware, network, and system workloads. Baseline data will allow you to easily determine when performance becomes degraded in your system. Two particularly useful baseline statistics are:
brw_stats- Histogram data characterizing I/O requests to the OSTs. For more details, see Section 39.3.5, “Monitoring the OST Block I/O Stream”.rpc_stats- Histogram data showing information about RPCs made by clients. For more details, see Section 39.3.1, “Monitoring the Client RPC Stream”.
The rpc_stats file contains histogram data showing information about
remote procedure calls (RPCs) that have been made since this file was last cleared. The
histogram data can be cleared by writing any value into the rpc_stats
file.
Example:
# lctl get_param osc.testfs-OST0000-osc-ffff810058d2f800.rpc_stats
snapshot_time: 1372786692.389858 (secs.usecs)
read RPCs in flight: 0
write RPCs in flight: 1
dio read RPCs in flight: 0
dio write RPCs in flight: 0
pending write pages: 256
pending read pages: 0
read write
pages per rpc rpcs % cum % | rpcs % cum %
1: 0 0 0 | 0 0 0
2: 0 0 0 | 1 0 0
4: 0 0 0 | 0 0 0
8: 0 0 0 | 0 0 0
16: 0 0 0 | 0 0 0
32: 0 0 0 | 2 0 0
64: 0 0 0 | 2 0 0
128: 0 0 0 | 5 0 0
256: 850 100 100 | 18346 99 100
read write
rpcs in flight rpcs % cum % | rpcs % cum %
0: 691 81 81 | 1740 9 9
1: 48 5 86 | 938 5 14
2: 29 3 90 | 1059 5 20
3: 17 2 92 | 1052 5 26
4: 13 1 93 | 920 5 31
5: 12 1 95 | 425 2 33
6: 10 1 96 | 389 2 35
7: 30 3 100 | 11373 61 97
8: 0 0 100 | 460 2 100
read write
offset rpcs % cum % | rpcs % cum %
0: 850 100 100 | 18347 99 99
1: 0 0 100 | 0 0 99
2: 0 0 100 | 0 0 99
4: 0 0 100 | 0 0 99
8: 0 0 100 | 0 0 99
16: 0 0 100 | 1 0 99
32: 0 0 100 | 1 0 99
64: 0 0 100 | 3 0 99
128: 0 0 100 | 4 0 100
The header information includes:
snapshot_time- UNIX epoch instant the file was read.read RPCs in flight- Number of read RPCs issued by the OSC, but not complete at the time of the snapshot. This value should always be less than or equal tomax_rpcs_in_flight.write RPCs in flight- Number of write RPCs issued by the OSC, but not complete at the time of the snapshot. This value should always be less than or equal tomax_rpcs_in_flight.dio read RPCs in flight- Direct I/O (as opposed to block I/O) read RPCs issued but not completed at the time of the snapshot.dio write RPCs in flight- Direct I/O (as opposed to block I/O) write RPCs issued but not completed at the time of the snapshot.pending write pages- Number of pending write pages that have been queued for I/O in the OSC.pending read pages- Number of pending read pages that have been queued for I/O in the OSC.
The tabular data is described in the table below. Each row in the table shows the number
of reads or writes (ios) occurring for the statistic, the relative
percentage (%) of total reads or writes, and the cumulative percentage
(cum %) to that point in the table for the statistic.
|
Field |
Description |
|---|---|
|
pages per RPC |
Shows cumulative RPC reads and writes organized according to the number of
pages in the RPC. A single page RPC increments the |
|
RPCs in flight |
Shows the number of RPCs that are pending when an RPC is sent. When the first
RPC is sent, the |
|
offset |
The page index of the first page read from or written to the object by the RPC. |
Analysis:
This table provides a way to visualize the concurrency of the RPC stream. Ideally, you
will see a large clump around the max_rpcs_in_flight value, which shows
that the network is being kept busy.
For information about optimizing the client I/O RPC stream, see Section 39.4.1, “Tuning the Client I/O RPC Stream”.
The stats file maintains statistics accumulate during typical
operation of a client across the VFS interface of the Lustre file system. Only non-zero
parameters are displayed in the file.
Client statistics are enabled by default.
Note
Statistics for all mounted file systems can be discovered by entering:
lctl get_param llite.*.stats
Example:
client# lctl get_param llite.*.stats snapshot_time 1308343279.169704 secs.usecs dirty_pages_hits 14819716 samples [regs] dirty_pages_misses 81473472 samples [regs] read_bytes 36502963 samples [bytes] 1 26843582 55488794 write_bytes 22985001 samples [bytes] 0 125912 3379002 brw_read 2279 samples [pages] 1 1 2270 ioctl 186749 samples [regs] open 3304805 samples [regs] close 3331323 samples [regs] seek 48222475 samples [regs] fsync 963 samples [regs] truncate 9073 samples [regs] setxattr 19059 samples [regs] getxattr 61169 samples [regs]
The statistics can be cleared by echoing an empty string into the
stats file or by using the command:
lctl set_param llite.*.stats=0
The statistics displayed are described in the table below.
|
Entry |
Description |
|---|---|
|
|
UNIX epoch instant the stats file was read. |
|
|
The number of write operations that have been satisfied by the dirty page cache. See Section 39.4.1, “Tuning the Client I/O RPC Stream” for more information about dirty cache behavior in a Lustre file system. |
|
|
The number of write operations that were not satisfied by the dirty page cache. |
|
|
The number of read operations that have occurred. Three additional parameters are displayed:
|
|
|
The number of write operations that have occurred. Three additional parameters are displayed:
|
|
|
The number of pages that have been read. Three additional parameters are displayed:
|
|
|
The number of combined file and directory |
|
|
The number of open operations that have succeeded. |
|
|
The number of close operations that have succeeded. |
|
|
The number of times |
|
|
The number of times |
|
|
The total number of calls to both locked and lockless
|
|
|
The number of times extended attributes have been set. |
|
|
The number of times value(s) of extended attributes have been fetched. |
Analysis:
Information is provided about the amount and type of I/O activity is taking place on the client.
When the offset_stats parameter is set, statistics are maintained for
occurrences of a series of read or write calls from a process that did not access the next
sequential location. The OFFSET field is reset to 0 (zero) whenever a
different file is read or written.
Note
By default, statistics are not collected in the offset_stats,
extents_stats, and extents_stats_per_process files
to reduce monitoring overhead when this information is not needed. The collection of
statistics in all three of these files is activated by writing
anything, except for 0 (zero) and "disable", into any one of the
files.
Example:
# lctl get_param llite.testfs-f57dee0.offset_stats
snapshot_time: 1155748884.591028 (secs.usecs)
RANGE RANGE SMALLEST LARGEST
R/W PID START END EXTENT EXTENT OFFSET
R 8385 0 128 128 128 0
R 8385 0 224 224 224 -128
W 8385 0 250 50 100 0
W 8385 100 1110 10 500 -150
W 8384 0 5233 5233 5233 0
R 8385 500 600 100 100 -610In this example, snapshot_time is the UNIX epoch instant the file was
read. The tabular data is described in the table below.
The offset_stats file can be cleared by
entering:
lctl set_param llite.*.offset_stats=0
|
Field |
Description |
|---|---|
|
R/W |
Indicates if the non-sequential call was a read or write |
|
PID |
Process ID of the process that made the read/write call. |
|
RANGE START/RANGE END |
Range in which the read/write calls were sequential. |
|
SMALLEST EXTENT |
Smallest single read/write in the corresponding range (in bytes). |
|
LARGEST EXTENT |
Largest single read/write in the corresponding range (in bytes). |
|
OFFSET |
Difference between the previous range end and the current range start. |
Analysis:
This data provides an indication of how contiguous or fragmented the data is. For
example, the fourth entry in the example above shows the writes for this RPC were sequential
in the range 100 to 1110 with the minimum write 10 bytes and the maximum write 500 bytes.
The range started with an offset of -150 from the RANGE END of the
previous entry in the example.
For in-depth troubleshooting, client read-write extent statistics can be accessed to obtain more detail about read/write I/O extents for the file system or for a particular process.
Note
By default, statistics are not collected in the offset_stats,
extents_stats, and extents_stats_per_process files
to reduce monitoring overhead when this information is not needed. The collection of
statistics in all three of these files is activated by writing
anything, except for 0 (zero) and "disable", into any one of the
files.
The extents_stats histogram in the
llite directory shows the statistics for the sizes
of the read/write I/O extents. This file does not maintain the per
process statistics.
Example:
# lctl get_param llite.testfs-*.extents_stats
snapshot_time: 1213828728.348516 (secs.usecs)
read | write
extents calls % cum% | calls % cum%
0K - 4K : 0 0 0 | 2 2 2
4K - 8K : 0 0 0 | 0 0 2
8K - 16K : 0 0 0 | 0 0 2
16K - 32K : 0 0 0 | 20 23 26
32K - 64K : 0 0 0 | 0 0 26
64K - 128K : 0 0 0 | 51 60 86
128K - 256K : 0 0 0 | 0 0 86
256K - 512K : 0 0 0 | 0 0 86
512K - 1024K : 0 0 0 | 0 0 86
1M - 2M : 0 0 0 | 11 13 100In this example, snapshot_time is the UNIX epoch instant the file
was read. The table shows cumulative extents organized according to size with statistics
provided separately for reads and writes. Each row in the table shows the number of RPCs
for reads and writes respectively (calls), the relative percentage of
total calls (%), and the cumulative percentage to
that point in the table of calls (cum %).
The file can be cleared by issuing the following command:
# lctl set_param llite.testfs-*.extents_stats=1
The extents_stats_per_process file maintains the I/O extent size
statistics on a per-process basis.
Example:
# lctl get_param llite.testfs-*.extents_stats_per_process
snapshot_time: 1213828762.204440 (secs.usecs)
read | write
extents calls % cum% | calls % cum%
PID: 11488
0K - 4K : 0 0 0 | 0 0 0
4K - 8K : 0 0 0 | 0 0 0
8K - 16K : 0 0 0 | 0 0 0
16K - 32K : 0 0 0 | 0 0 0
32K - 64K : 0 0 0 | 0 0 0
64K - 128K : 0 0 0 | 0 0 0
128K - 256K : 0 0 0 | 0 0 0
256K - 512K : 0 0 0 | 0 0 0
512K - 1024K : 0 0 0 | 0 0 0
1M - 2M : 0 0 0 | 10 100 100
PID: 11491
0K - 4K : 0 0 0 | 0 0 0
4K - 8K : 0 0 0 | 0 0 0
8K - 16K : 0 0 0 | 0 0 0
16K - 32K : 0 0 0 | 20 100 100
PID: 11424
0K - 4K : 0 0 0 | 0 0 0
4K - 8K : 0 0 0 | 0 0 0
8K - 16K : 0 0 0 | 0 0 0
16K - 32K : 0 0 0 | 0 0 0
32K - 64K : 0 0 0 | 0 0 0
64K - 128K : 0 0 0 | 16 100 100
PID: 11426
0K - 4K : 0 0 0 | 1 100 100
PID: 11429
0K - 4K : 0 0 0 | 1 100 100
This table shows cumulative extents organized according to size for each process ID
(PID) with statistics provided separately for reads and writes. Each row in the table
shows the number of RPCs for reads and writes respectively (calls), the
relative percentage of total calls (%), and the cumulative percentage
to that point in the table of calls (cum %).
The brw_stats parameter file below the
osd-ldiskfs or osd-zfs directory
contains histogram data showing statistics for number of I/O requests
sent to the disk, their size, and whether they are contiguous on the
disk or not.
Example:
Enter on the OSS or MDS:
oss# lctl get_param osd-*.*.brw_stats
snapshot_time: 1372775039.769045 (secs.usecs)
read | write
pages per bulk r/w rpcs % cum % | rpcs % cum %
1: 108 100 100 | 39 0 0
2: 0 0 100 | 6 0 0
4: 0 0 100 | 1 0 0
8: 0 0 100 | 0 0 0
16: 0 0 100 | 4 0 0
32: 0 0 100 | 17 0 0
64: 0 0 100 | 12 0 0
128: 0 0 100 | 24 0 0
256: 0 0 100 | 23142 99 100
read | write
discontiguous pages rpcs % cum % | rpcs % cum %
0: 108 100 100 | 23245 100 100
read | write
discontiguous blocks rpcs % cum % | rpcs % cum %
0: 108 100 100 | 23243 99 99
1: 0 0 100 | 2 0 100
read | write
disk fragmented I/Os ios % cum % | ios % cum %
0: 94 87 87 | 0 0 0
1: 14 12 100 | 23243 99 99
2: 0 0 100 | 2 0 100
read | write
disk I/Os in flight ios % cum % | ios % cum %
1: 14 100 100 | 20896 89 89
2: 0 0 100 | 1071 4 94
3: 0 0 100 | 573 2 96
4: 0 0 100 | 300 1 98
5: 0 0 100 | 166 0 98
6: 0 0 100 | 108 0 99
7: 0 0 100 | 81 0 99
8: 0 0 100 | 47 0 99
9: 0 0 100 | 5 0 100
read | write
I/O time (1/1000s) ios % cum % | ios % cum %
1: 94 87 87 | 0 0 0
2: 0 0 87 | 7 0 0
4: 14 12 100 | 27 0 0
8: 0 0 100 | 14 0 0
16: 0 0 100 | 31 0 0
32: 0 0 100 | 38 0 0
64: 0 0 100 | 18979 81 82
128: 0 0 100 | 943 4 86
256: 0 0 100 | 1233 5 91
512: 0 0 100 | 1825 7 99
1K: 0 0 100 | 99 0 99
2K: 0 0 100 | 0 0 99
4K: 0 0 100 | 0 0 99
8K: 0 0 100 | 49 0 100
read | write
disk I/O size ios % cum % | ios % cum %
4K: 14 100 100 | 41 0 0
8K: 0 0 100 | 6 0 0
16K: 0 0 100 | 1 0 0
32K: 0 0 100 | 0 0 0
64K: 0 0 100 | 4 0 0
128K: 0 0 100 | 17 0 0
256K: 0 0 100 | 12 0 0
512K: 0 0 100 | 24 0 0
1M: 0 0 100 | 23142 99 100
The tabular data is described in the table below. Each row in the
table shows the number of reads and writes occurring for the statistic
(ios), the relative percentage of total reads or
writes (%), and the cumulative percentage to that
point in the table for the statistic (cum %).
|
Field |
Description |
|---|---|
|
|
Number of pages per RPC request, which should match aggregate client
|
|
|
Number of discontinuities in the logical file offset of each page in a single RPC. |
|
|
Number of discontinuities in the physical block allocation in the file system for a single RPC. |
|
|
Number of I/Os that were not written entirely sequentially. |
|
|
Number of disk I/Os currently pending. |
|
|
Amount of time for each I/O operation to complete. |
|
|
Size of each I/O operation. |
Analysis:
This data provides an indication of extent size and distribution in the file system.
Each OSC has its own tree of tunables. For example:
$ lctl lctl list_param osc.*.* osc.myth-OST0000-osc-ffff8804296c2800.active osc.myth-OST0000-osc-ffff8804296c2800.blocksize osc.myth-OST0000-osc-ffff8804296c2800.checksum_dump osc.myth-OST0000-osc-ffff8804296c2800.checksum_type osc.myth-OST0000-osc-ffff8804296c2800.checksums osc.myth-OST0000-osc-ffff8804296c2800.connect_flags : : osc.myth-OST0000-osc-ffff8804296c2800.state osc.myth-OST0000-osc-ffff8804296c2800.stats osc.myth-OST0000-osc-ffff8804296c2800.timeouts osc.myth-OST0000-osc-ffff8804296c2800.unstable_stats osc.myth-OST0000-osc-ffff8804296c2800.uuid osc.myth-OST0001-osc-ffff8804296c2800.active osc.myth-OST0001-osc-ffff8804296c2800.blocksize osc.myth-OST0001-osc-ffff8804296c2800.checksum_dump osc.myth-OST0001-osc-ffff8804296c2800.checksum_type : :
The following sections describe some of the parameters that can be tuned in a Lustre file system.
Ideally, an optimal amount of data is packed into each I/O RPC and a consistent number of issued RPCs are in progress at any time. To help optimize the client I/O RPC stream, several tuning variables are provided to adjust behavior according to network conditions and cluster size. For information about monitoring the client I/O RPC stream, see Section 39.3.1, “Monitoring the Client RPC Stream”.
RPC stream tunables include:
osc.- Controls whether the client will calculate data integrity checksums for the bulk data transferred to the OST. Data integrity checksums are enabled by default. The algorithm used can be set using theosc_instance.checksumschecksum_typeparameter.osc.- Controls the data integrity checksum algorithm used by the client. The available algorithms are determined by the set of algorihtms. The checksum algorithm used by default is determined by first selecting the fastest algorithms available on the OST, and then selecting the fastest of those algorithms on the client, which depends on available optimizations in the CPU hardware and kernel. The default algorithm can be overridden by writing the algorithm name into theosc_instance.checksum_typechecksum_typeparameter. Available checksum types can be seen on the client by reading thechecksum_typeparameter. Currently supported checksum types are:adler,crc32,crc32cIntroduced in Lustre 2.12In Lustre release 2.12 additional checksum types were added to allow end-to-end checksum integration with T10-PI capable hardware. The client will compute the appropriate checksum type, based on the checksum type used by the storage, for the RPC checksum, which will be verified by the server and passed on to the storage. The T10-PI checksum types are:
t10ip512,t10ip4K,t10crc512,t10crc4Kosc.- Controls how many MiB of dirty data can be written into the client pagecache for writes by each OSC. When this limit is reached, additional writes block until previously-cached data is written to the server. This may be changed by theosc_instance.max_dirty_mblctl set_paramcommand. Only values larger than 0 and smaller than the lesser of 2048 MiB or 1/4 of client RAM are valid. Performance can suffers if the client cannot aggregate enough data per OSC to form a full RPC (as set by themax_pages_per_rpc) parameter, unless the application is doing very large writes itself.To maximize performance, the value for
max_dirty_mbis recommended to be at least 4 *max_pages_per_rpc*max_rpcs_in_flight.osc.- A read-only value that returns the current number of bytes written and cached by this OSC.osc_instance.cur_dirty_bytesosc.- The maximum number of pages that will be sent in a single RPC request to the OST. The minimum value is one page and the maximum value is 16 MiB (4096 on systems withosc_instance.max_pages_per_rpcPAGE_SIZEof 4 KiB), with the default value of 4 MiB in one RPC. The upper limit may also be constrained byofd.*.brw_sizesetting on the OSS, and applies to all clients connected to that OST. It is also possible to specify a units suffix (e.g.max_pages_per_rpc=4M), so the RPC size can be set independently of the clientPAGE_SIZE.osc.- The maximum number of concurrent RPCs in flight from an OSC to its OST. If the OSC tries to initiate an RPC but finds that it already has the same number of RPCs outstanding, it will wait to issue further RPCs until some complete. The minimum setting is 1 and maximum setting is 256. The default value is 8 RPCs.osc_instance.max_rpcs_in_flightTo improve small file I/O performance, increase the
max_rpcs_in_flightvalue.llite.- Maximum amount of read+write data cached by the client. The default value is 1/2 of the client RAM.fsname_instance.max_cached_mb
Note
The value for osc_instancefsname_instance* or a
filesystem-specific wildcard
fsname-*
client$ lctl get_param osc.testfs-OST0000*.rpc_stats osc.testfs-OST0000-osc-ffff88107412f400.rpc_stats= snapshot_time: 1375743284.337839 (secs.usecs) read RPCs in flight: 0 write RPCs in flight: 0
File readahead and directory statahead enable reading of data
into memory before a process requests the data. File readahead prefetches
file content data into memory for read() related
calls, while directory statahead fetches file metadata into memory for
readdir() and stat() related
calls. When readahead and statahead work well, a process that accesses
data finds that the information it needs is available immediately in
memory on the client when requested without the delay of network I/O.
File readahead is triggered when two or more sequential reads by an application fail to be satisfied by data in the Linux buffer cache. The size of the initial readahead is determined by the RPC size and the file stripe size, but will typically be at least 1 MiB. Additional readaheads grow linearly and increment until the per-file or per-system readahead cache limit on the client is reached.
Readahead tunables include:
llite.- Controls the maximum amount of data readahead on all files. Files are read ahead in RPC-sized chunks (4 MiB, or the size of thefsname_instance.max_read_ahead_mbread()call, if larger) after the second sequential read on a file descriptor. Random reads are done at the size of theread()call only (no readahead). Reads to non-contiguous regions of the file reset the readahead algorithm, and readahead is not triggered until sequential reads take place again.This is the global limit for all files and cannot be larger than 1/2 of the client RAM. To disable readahead, set
max_read_ahead_mb=0.llite.- Controls the maximum number of megabytes (MiB) of data that should be prefetched by the client when sequential reads are detected on one file. This is the per-file readahead limit and cannot be larger thanfsname_instance.max_read_ahead_per_file_mbmax_read_ahead_mb.llite.- Controls the maximum size of a file in MiB that is read in its entirety upon access, regardless of the size of thefsname_instance.max_read_ahead_whole_mbread()call. This avoids multiple small read RPCs on relatively small files, when it is not possible to efficiently detect a sequential read pattern before the whole file has been read.The default value is the greater of 2 MiB or the size of one RPC, as given by
max_pages_per_rpc.
Many system commands, such as ls -l,
du, and find, traverse a
directory sequentially. To make these commands run efficiently, the
directory statahead can be enabled to improve the performance of
directory traversal.
The statahead tunables are:
statahead_max- Controls the maximum number of file attributes that will be prefetched by the statahead thread. By default, statahead is enabled andstatahead_maxis 128 files (32 prior to Lustre 2.16.0).To disable statahead, set
statahead_maxto zero via the following command on the client:lctl set_param llite.*.statahead_max=0
To change the maximum statahead window size on a client:
lctl set_param llite.*.statahead_max=
nThe maximum
statahead_maxis 2048. Prior to Lustre 2.16.0, the maximum was 512, and prior to 2.12.0 and 2.10.5, it was 8192.The directory statahead thread will also prefetch the file size/block attributes from the OSTs, so that all file attributes are available on the client when requested by an application. This is controlled by the asynchronous glimpse lock (AGL) setting. The AGL behaviour can be disabled by setting:
lctl set_param llite.*.statahead_agl=0
statahead_stats- A read-only interface that provides current statahead and AGL statistics, such as how many times statahead/AGL has been triggered since the last mount, how many statahead/AGL failures have occurred due to an incorrect prediction or other causes.Note
AGL behaviour is affected by statahead since the inodes processed by AGL are built by the statahead thread. If statahead is disabled, then AGL is also disabled.
The server read cache feature provides read-only caching of file data on an OSS or MDS (for Data-on-MDT). This functionality uses the Linux page cache to store the data and uses as much physical memory as is allocated.
The server read cache can improves Lustre file system performance in these situations:
Many clients are accessing the same data set (as in HPC applications or when diskless clients boot from the Lustre file system).
One client is writing data while another client is reading it (i.e., clients are exchanging data via the filesystem).
A client has very limited caching of its own.
The server read cache offers these benefits:
Allows servers to cache read data more frequently.
Improves repeated reads to match network speeds instead of storage speeds.
Provides the building blocks for server write cache (small-write aggregation).
The server read cache is implemented on the OSS and MDS, and does not require any special support on the client side. Since the server read cache uses the memory available in the Linux page cache, the appropriate amount of memory for the cache should be determined based on I/O patterns. If the data is mostly reads, then more cache is beneficial on the server than would be needed for mostly writes.
The server read cache is managed using the following tunables.
Many tunables are available for both osd-ldiskfs
and osd-zfs, but in some cases the implementation
of osd-zfs prevents their use.
read_cache_enable- High-level control of whether data read from storage during a read request is kept in memory and available for later read requests for the same data, without having to re-read it from storage. By default, read cache is enabled (read_cache_enable=1) for HDD OSDs and automatically disabled for flash OSDs (nonrotational=1). The read cache cannot be disabled forosd-zfs, and as a result this parameter is unavailable for that backend.When the server receives a read request from a client, it reads data from storage into its memory and sends the data to the client. If read cache is enabled for the target, and the RPC and object size also meet the other criterion below, this data may stay in memory after the client request has completed. If later read requests for the same data are received, if the data is still in cache the server skips reading it from storage. The cache is managed by the Linux kernel globally across all targets on that server so that the infrequently used cache pages are dropped from memory when the free memory is running low.
If read cache is disabled (
read_cache_enable=0), or the read or object is large enough that it will not benefit from caching, the server discards the data after the read request from the client is completed. For subsequent read requests the server again reads the data from storage.To disable read cache on all targets of a server, run:
oss1# lctl set_param osd-*.*.read_cache_enable=0To re-enable read cache on one target, run:
oss1# lctl set_param osd-*.{target_name}.read_cache_enable=1To check if read cache is enabled on targets on a server, run:
oss1# lctl get_param osd-*.*.read_cache_enablewritethrough_cache_enable- High-level control of whether data sent to the server as a write request is kept in the read cache and available for later reads, or if it is discarded when the write completes. By default, writethrough cache is enabled (writethrough_cache_enable=1) for HDD OSDs and automatically disabled for flash OSDs (nonrotational=1). The write cache cannot be disabled forosd-zfs, and as a result this parameter is unavailable for that backend.When the server receives write requests from a client, it fetches data from the client into its memory and writes the data to storage. If the writethrough cache is enabled for the target, and the RPC and object size meet the other criterion below, this data may stay in memory after the write request has completed. If later read or partial-block write requests for this same data are received, if the data is still in cache the server skips reading it from storage.
If the writethrough cache is disabled (
writethrough_cache_enabled=0), or the write or object is large enough that it will not benefit from caching, the server discards the data after the write request from the client is completed. For subsequent read requests, or partial-page write requests, the server must re-read the data from storage.Enabling writethrough cache is advisable if clients are doing small or unaligned writes that would cause partial-page updates, or if the files written by one node are immediately being read by other nodes. Some examples where enabling writethrough cache might be useful include producer-consumer I/O models or shared-file writes that are not aligned on 4096-byte boundaries.
Disabling the writethrough cache is advisable when files are mostly written to the file system but are not re-read within a short time period, or files are only written and re-read by the same node, regardless of whether the I/O is aligned or not.
To disable writethrough cache on all targets on a server, run:
oss1# lctl set_param osd-*.*.writethrough_cache_enable=0To re-enable the writethrough cache on one OST, run:
oss1# lctl set_param osd-*.{OST_name}.writethrough_cache_enable=1To check if the writethrough cache is enabled, run:
oss1# lctl get_param osd-*.*.writethrough_cache_enablereadcache_max_filesize- Controls the maximum size of an object that both the read cache and writethrough cache will try to keep in memory. Objects larger thanreadcache_max_filesizewill not be kept in cache for either reads or writes regardless of theread_cache_enableorwritethrough_cache_enablesettings.Setting this tunable can be useful for workloads where relatively small objects are repeatedly accessed by many clients, such as job startup objects, executables, log objects, etc., but large objects are read or written only once. By not putting the larger objects into the cache, it is much more likely that more of the smaller objects will remain in cache for a longer time.
When setting
readcache_max_filesize, the input value can be specified in bytes, or can have a suffix to indicate other binary units such asK(kibibytes),M(mebibytes),G(gibibytes),T(tebibytes), orP(pebibytes).To limit the maximum cached object size to 64 MiB on all OSTs of a server, run:
oss1# lctl set_param osd-*.*.readcache_max_filesize=64MTo disable the maximum cached object size on all targets, run:
oss1# lctl set_param osd-*.*.readcache_max_filesize=-1To check the current maximum cached object size on all targets of a server, run:
oss1# lctl get_param osd-*.*.readcache_max_filesizereadcache_max_io_mb- Controls the maximum size of a single read IO that will be cached in memory. Reads larger thanreadcache_max_io_mbwill be read directly from storage and bypass the page cache completely. This avoids significant CPU overhead at high IO rates. The read cache cannot be disabled forosd-zfs, and as a result this parameter is unavailable for that backend.When setting
readcache_max_io_mb, the input value can be specified in mebibytes, or can have a suffix to indicate other binary units such asK(kibibytes),M(mebibytes),G(gibibytes),T(tebibytes), orP(pebibytes).writethrough_max_io_mb- Controls the maximum size of a single writes IO that will be cached in memory. Writes larger thanwritethrough_max_io_mbwill be written directly to storage and bypass the page cache entirely. This avoids significant CPU overhead at high IO rates. The write cache cannot be disabled forosd-zfs, and as a result this parameter is unavailable for that backend.When setting
writethrough_max_io_mb, the input value can be specified in mebibytes, or can have a suffix to indicate other binary units such asK(kibibytes),M(mebibytes),G(gibibytes),T(tebibytes), orP(pebibytes).
The OSS asynchronous journal commit feature asynchronously writes data to disk without forcing a journal flush. This reduces the number of seeks and significantly improves performance on some hardware.
Note
Asynchronous journal commit cannot work with direct I/O-originated writes
(O_DIRECT flag set). In this case, a journal flush is forced.
When the asynchronous journal commit feature is enabled, client nodes keep data in the
page cache (a page reference). Lustre clients monitor the last committed transaction number
(transno) in messages sent from the OSS to the clients. When a client
sees that the last committed transno reported by the OSS is at least
equal to the bulk write transno, it releases the reference on the
corresponding pages. To avoid page references being held for too long on clients after a
bulk write, a 7 second ping request is scheduled (the default OSS file system commit time
interval is 5 seconds) after the bulk write reply is received, so the OSS has an opportunity
to report the last committed transno.
If the OSS crashes before the journal commit occurs, then intermediate data is lost. However, OSS recovery functionality incorporated into the asynchronous journal commit feature causes clients to replay their write requests and compensate for the missing disk updates by restoring the state of the file system.
By default, sync_journal is enabled
(sync_journal=1), so that journal entries are committed synchronously.
To enable asynchronous journal commit, set the sync_journal parameter to
0 by entering:
$ lctl set_param obdfilter.*.sync_journal=0 obdfilter.lol-OST0001.sync_journal=0
An associated sync-on-lock-cancel feature (enabled by default)
addresses a data consistency issue that can result if an OSS crashes after multiple clients
have written data into intersecting regions of an object, and then one of the clients also
crashes. A condition is created in which the POSIX requirement for continuous writes is
violated along with a potential for corrupted data. With
sync-on-lock-cancel enabled, if a cancelled lock has any volatile
writes attached to it, the OSS synchronously writes the journal to disk on lock
cancellation. Disabling the sync-on-lock-cancel feature may enhance
performance for concurrent write workloads, but it is recommended that you not disable this
feature.
The sync_on_lock_cancel parameter can be set to the following
values:
always- Always force a journal flush on lock cancellation (default whenasync_journalis enabled).blocking- Force a journal flush only when the local cancellation is due to a blocking callback.never- Do not force any journal flush (default whenasync_journalis disabled).
For example, to set sync_on_lock_cancel to not to force a journal
flush, use a command similar to:
$ lctl get_param obdfilter.*.sync_on_lock_cancel obdfilter.lol-OST0001.sync_on_lock_cancel=never
The client metadata RPC stream represents the metadata RPCs issued in parallel by a client to a MDT target. The metadata RPCs can be split in two categories: the requests that do not modify the file system (like getattr operation), and the requests that do modify the file system (like create, unlink, setattr operations). To help optimize the client metadata RPC stream, several tuning variables are provided to adjust behavior according to network conditions and cluster size.
Note that increasing the number of metadata RPCs issued in parallel might improve the performance metadata intensive parallel applications, but as a consequence it will consume more memory on the client and on the MDS.
The MDC max_rpcs_in_flight parameter defines
the maximum number of metadata RPCs, both modifying and
non-modifying RPCs, that can be sent in parallel by a client to a MDT
target. This includes every file system metadata operations, such as
file or directory stat, creation, unlink. The default setting is 8,
minimum setting is 2 and maximum setting is 512.
To set the max_rpcs_in_flight parameter, run
the following command on the Lustre client:
client$ lctl set_param mdc.*.max_rpcs_in_flight=16
The MDC max_mod_rpcs_in_flight parameter
defines the maximum number of file system modifying RPCs that can be
sent in parallel by a client to a MDT target. For example, the Lustre
client sends modify RPCs when it performs file or directory creation,
unlink, access permission modification or ownership modification. The
default setting is 7, minimum setting is 1 and maximum setting is
511.
To set the max_mod_rpcs_in_flight parameter,
run the following command on the Lustre client:
client$ lctl set_param mdc.*.max_mod_rpcs_in_flight=12
The max_mod_rpcs_in_flight value must be
strictly less than the max_rpcs_in_flight value.
It must also be less or equal to the MDT
max_mod_rpcs_per_client value. If one of theses
conditions is not enforced, the setting fails and an explicit message
is written in the Lustre log.
The MDT max_mod_rpcs_per_client parameter is a
tunable of the kernel module mdt that defines the
maximum number of file system modifying RPCs in flight allowed per
client. The parameter can be updated at runtime, but the change is
effective to new client connections only. The default setting is 8.
To set the max_mod_rpcs_per_client parameter,
run the following command on the MDS:
mds$ echo 12 > /sys/module/mdt/parameters/max_mod_rpcs_per_client
The rpc_stats file contains histogram data
showing information about modify metadata RPCs. It can be helpful to
identify the level of parallelism achieved by an application doing
modify metadata operations.
Example:
client$ lctl get_param mdc.*.rpc_stats
snapshot_time: 1441876896.567070 (secs.usecs)
modify_RPCs_in_flight: 0
modify
rpcs in flight rpcs % cum %
0: 0 0 0
1: 56 0 0
2: 40 0 0
3: 70 0 0
4 41 0 0
5: 51 0 1
6: 88 0 1
7: 366 1 2
8: 1321 5 8
9: 3624 15 23
10: 6482 27 50
11: 7321 30 81
12: 4540 18 100The file information includes:
snapshot_time- UNIX epoch instant the file was read.modify_RPCs_in_flight- Number of modify RPCs issued by the MDC, but not completed at the time of the snapshot. This value should always be less than or equal tomax_mod_rpcs_in_flight.rpcs in flight- Number of modify RPCs that are pending when a RPC is sent, the relative percentage (%) of total modify RPCs, and the cumulative percentage (cum %) to that point.
If a large proportion of modify metadata RPCs are issued with a
number of pending metadata RPCs close to the
max_mod_rpcs_in_flight value, it means the
max_mod_rpcs_in_flight value could be increased to
improve the modify metadata performance.
In a Lustre file system, RPC timeouts are set using an adaptive timeouts mechanism, which is enabled by default. Servers track RPC completion times and then report back to clients estimates for completion times for future RPCs. Clients use these estimates to set RPC timeout values. If the processing of server requests slows down for any reason, the server estimates for RPC completion increase, and clients then revise RPC timeout values to allow more time for RPC completion.
If the RPCs queued on the server approach the RPC timeout specified by the client, to avoid RPC timeouts and disconnect/reconnect cycles, the server sends an "early reply" to the client, telling the client to allow more time. Conversely, as server processing speeds up, RPC timeout values decrease, resulting in faster detection if the server becomes non-responsive and quicker connection to the failover partner of the server.
The adaptive timeout parameters in the table below can be set
persistently system-wide using lctl set_param -P
on the MGS. For example, the following command sets the
at_max value for all servers and clients
associated with the file systems connected to this MGS:
mgs# lctl set_param -P at_max=1500
Note
Clients that access multiple Lustre file systems must use the same adaptive timeout values for all file systems.
Since Lustre 2.16 it is preferred to set
at_min as a per-target tunable using the
*.
parameter instead of the global fsname*.at_minat_min
parameter. This avoids issues if a single client mounts two
separate filesystems with different at_min
tunable settings.
mgs# lctl set_param -P *.testfs-*.at_max=1500
|
Parameter |
Description |
|---|---|
|
|
Minimum adaptive timeout (in seconds). The default value
is 5 (since 2.16). The If, for some reason (usually due to temporary network
outages or sudden spikes in load immediately after mount),
the adaptive timeout value is too short and clients time
out their RPCs, you can increase the Introduced in Lustre 2.16
Since Lustre 2.16 it is preferred to set
|
|
|
Maximum adaptive timeout (in seconds). The
Setting Introduced in Lustre 2.16
Since Lustre 2.16 it is preferred to set
NoteIf slow hardware causes the service estimate to
increase beyond the default |
|
|
Time period (in seconds) within which adaptive timeouts remember the slowest event that occurred. The default is 600. Introduced in Lustre 2.16
Since Lustre 2.16 it is preferred to set
|
|
|
Amount of time before the Lustre server sends an early reply (in seconds). Default is 5. |
|
|
Incremental amount of time that a server requests with each early reply (in seconds). The server does not know how much time the RPC will take, so it asks for a fixed value. The default is 30, which provides a balance between sending too many early replies for the same RPC and overestimating the actual completion time. When a server finds a queued request about to time out
and needs to send an early reply out, the server adds the
If you see multiple early replies for the same RPC asking
for 30-second increases, change |
|
|
Minimum lock enqueue time (in seconds). The default is
100. The it takes to enqueue a lock, shown as the
Lustre Distributed Lock Manager (LDLM) lock enqueues
have a dedicated minimum Introduced in Lustre 2.16
Since Lustre 2.16 it is preferred to set
|
Adaptive timeout information can be obtained via
lctl get_param {osc,mdc}.*.timeouts files on each
client and lctl get_param {ost,mds}.*.*.timeouts
on each server. To read information from a
timeouts file, enter a command similar to:
# lctl get_param -n ost.*.ost_io.timeouts service : cur 33 worst 34 (at 1193427052, 1600s ago) 1 1 33 2
In this example, the ost_io service on this
node is currently reporting an estimated RPC service time of 33
seconds. The worst RPC service time was 34 seconds, which occurred
26 minutes ago.
The output also provides a history of service times. Four "bins" of adaptive timeout history are shown, with the maximum RPC time in each bin reported. In both the 0-150s bin and the 150-300s bin, the maximum RPC time was 1. The 300-450s bin shows the worst (maximum) RPC time at 33 seconds, and the 450-600s bin shows a maximum of RPC time of 2 seconds. The estimated service time is the maximum value in the four bins (33 seconds in this example).
Service times (as reported by the servers) are also tracked in the client OBDs, as shown in this example:
# lctl get_param osc.*.timeouts last reply : 1193428639, 0d0h00m00s ago network : cur 1 worst 2 (at 1193427053, 0d0h26m26s ago) 1 1 1 1 portal 6 : cur 33 worst 34 (at 1193427052, 0d0h26m27s ago) 33 33 33 2 portal 28 : cur 1 worst 1 (at 1193426141, 0d0h41m38s ago) 1 1 1 1 portal 7 : cur 1 worst 1 (at 1193426141, 0d0h41m38s ago) 1 0 1 1 portal 17 : cur 1 worst 1 (at 1193426177, 0d0h41m02s ago) 1 0 0 1
In this example, portal 6, the ost_io service
portal, shows the history of service estimates reported by the portal.
Server statistic files also show the range of estimates including min, max, sum, and sum-squared. For example:
# lctl get_param mdt.*.mdt.stats ... req_timeout 6 samples [sec] 1 10 15 105 ...
The Lustre software provides two sets of static (fixed) timeouts, LND timeouts and Lustre timeouts, which are used when adaptive timeouts are not enabled.
LND timeouts - LND timeouts ensure that point-to-point communications across a network complete in a finite time in the presence of failures, such as packages lost or broken connections. LND timeout parameters are set for each individual LND.
LND timeouts are logged with the
S_LNDflag set. They are not printed as console messages, so check the Lustre log forD_NETERRORmessages or enable printing ofD_NETERRORmessages to the console using:lctl set_param printk=+neterror
Congested routers can be a source of spurious LND timeouts. To avoid this situation, increase the number of LNet router buffers to reduce back-pressure and/or increase LND timeouts on all nodes on all connected networks. Also consider increasing the total number of LNet router nodes in the system so that the aggregate router bandwidth matches the aggregate server bandwidth.
Lustre timeouts - Lustre timeouts ensure that Lustre RPCs complete in a finite time in the presence of failures when adaptive timeouts are not enabled. Adaptive timeouts are enabled by default. To disable adaptive timeouts at run time, set
at_maxto 0 by running on the MGS:# lctl conf_param
fsname.sys.at_max=0Note
Changing the state of adaptive timeouts at runtime may cause transient client timeouts, recovery, and reconnection.
Lustre timeouts are always printed as console messages.
If Lustre timeouts are not accompanied by LND timeouts, increase the Lustre timeout on both servers and clients. Lustre timeouts are set across the whole filesystem using a command such as the following:
mgs# lctl set_param -P timeout=30
Timeout parameters are described in the table below.
| Parameter | Description |
|---|---|
timeout |
The time that a client waits for a server to complete an RPC (default 100s). Servers wait half this time for a normal client RPC to complete and a quarter of this time for a single bulk request (read or write of up to 4 MB) to complete. The client pings recoverable targets (MDS and OSTs) at one quarter of the timeout, and the server waits one and a half times the timeout before evicting a client for being "stale." Lustre client sends periodic 'ping' messages to servers with which it has had no communication for the specified period of time. Any network activity between a client and a server in the file system also serves as a ping. |
ldlm_timeout |
The time that a server waits for a client to reply to an initial AST (lock cancellation request). The default is 20s for an OST and 6s for an MDS. If the client replies to the AST, the server will give it a normal timeout (half the client timeout) to flush any dirty data and release the lock. |
fail_loc |
An internal debugging failure hook. The default value of
|
dump_on_timeout |
Triggers a dump of the Lustre debug log when a timeout
occurs. The default value of |
dump_on_eviction |
Triggers a dump of the Lustre debug log when an
eviction occurs. The default value of |
LNet information is located via lctl get_param
in these parameters:
peers- Shows all NIDs known to this node and provides information on the queue state.Example:
# lctl get_param peers nid refs state max rtr min tx min queue 0@lo 1 ~rtr 0 0 0 0 0 0 192.168.10.35@tcp 1 ~rtr 8 8 8 8 6 0 192.168.10.36@tcp 1 ~rtr 8 8 8 8 6 0 192.168.10.37@tcp 1 ~rtr 8 8 8 8 6 0
The fields are explained in the table below:
Field
Description
refsA reference count.
stateIf the node is a router, indicates the state of the router. Possible values are:
NA- Indicates the node is not a router.up/down- Indicates if the node (router) is up or down.
maxMaximum number of concurrent sends from this peer.
rtrNumber of available routing buffer credits.
minMinimum number of routing buffer credits seen.
txNumber of available send credits.
minMinimum number of send credits seen.
queueTotal bytes in active/queued sends.
Credits are initialized to allow a certain number of operations (in the example above the table, eight as shown in the
maxcolumn. LNet keeps track of the minimum number of credits ever seen over time showing the peak congestion that has occurred during the time monitored. Fewer available credits indicates a more congested resource.The number of credits currently available is shown in the
txcolumn. The maximum number of send credits is shown in themaxcolumn and never changes. The number of currently active transmits can be derived by(max - tx), as long astxis greater than or equal to 0. Oncetxis less than 0, it indicates the number of transmits on that peer which have been queued for lack of credits.The number of router buffer credits available for consumption by a peer is shown in
rtrcolumn. The number of routing credits can be configured separately at the LND level or at the LNet level by using thepeer_buffer_creditsmodule parameter for the appropriate module. If the routing credits is not set explicitly, it'll default to the maximum transmit credits defined bypeer_creditsmodule parameter. Whenever a gateway routes a message from a peer, it decrements the number of available routing credits for that peer. If that value goes to zero, then messages will be queued. Negative values show the number of queued message waiting to be routed. The number of messages which are currently being routed from a peer can be derived by(max_rtr_credits - rtr).LNet also limits concurrent sends and number of router buffers allocated to a single peer so that no peer can occupy all resources.
nis- Shows current queue health on the node.Example:
# lctl get_param nis nid refs peer max tx min 0@lo 3 0 0 0 0 192.168.10.34@tcp 4 8 256 256 252
The fields are explained in the table below.
Field
Description
nidNetwork interface.
refsInternal reference counter.
peerNumber of peer-to-peer send credits on this NID. Credits are used to size buffer pools.
maxTotal number of send credits on this NID.
txCurrent number of send credits available on this NID.
minLowest number of send credits available on this NID.
queueTotal bytes in active/queued sends.
Analysis:
Subtracting
maxfromtx(max-tx) yields the number of sends currently active. A large or increasing number of active sends may indicate a problem.
Free space is allocated using either a round-robin or a weighted algorithm. The allocation method is determined by the maximum amount of free-space imbalance between the OSTs. When free space is relatively balanced across OSTs, the faster round-robin allocator is used, which maximizes network balancing. The weighted allocator is used when any two OSTs are out of balance by more than a specified threshold.
Free space distribution can be tuned using these two tunable parameters:
lod.*.qos_threshold_rr- The threshold at which the allocation method switches from round-robin to weighted is set in this file. The default is to switch to the weighted algorithm when any two OSTs are out of balance by more than 17 percent.lod.*.qos_prio_free- The weighting priority used by the weighted allocator can be adjusted in this file. Increasing the value ofqos_prio_freeputs more weighting on the amount of free space available on each OST and less on how stripes are distributed across OSTs. The default value is 91 percent weighting for free space rebalancing and 9 percent for OST balancing. When the free space priority is set to 100, weighting is based entirely on free space and location is no longer used by the striping algorithm.- Introduced in Lustre 2.9
osp.*.reserved_mb_low- The low watermark used to stop object allocation if available space is less than this. The default is 0.1% of total OST size. - Introduced in Lustre 2.9
osp.*.reserved_mb_high- The high watermark used to start object allocation if available space is more than this. The default is 0.2% of total OST size.
For more information about monitoring and managing free space, see Section 19.8, “Managing Free Space”.
The lru_size parameter is used to control the
number of client-side locks in the LRU cached locks queue. LRU size is
normally dynamic, based on load to optimize the number of locks cached
on nodes that have different workloads (e.g., login/build nodes vs.
compute nodes vs. backup nodes).
The total number of locks available is a function of the server RAM.
The default limit is 50 locks/1 MB of RAM. If memory pressure is too high,
the LRU size is shrunk. The number of locks on the server is limited to
num_osts_per_oss * num_clients * lru_size
as follows:
To enable automatic LRU sizing, set the
lru_sizeparameter to 0. In this case, thelru_sizeparameter shows the current number of locks being used on the client. Dynamic LRU resizing is enabled by default.To specify a maximum number of locks, set the
lru_sizeparameter to a value other than zero. A good default value for compute nodes is around100 *. It is recommended that you only setnum_cpuslru_sizeto be signifivantly larger on a few login nodes where multiple users access the file system interactively.
To clear the LRU on a single client, and, as a result, flush client
cache without changing the lru_size value, run:
# lctl set_param ldlm.namespaces.osc_name|mdc_name.lru_size=clearIf the LRU size is set lower than the number of existing locks,
unused locks are canceled immediately. Use
clear to cancel all locks without changing the value.
Note
The lru_size parameter can only be set
temporarily using lctl set_param, it cannot be set
permanently.
To disable dynamic LRU resizing on the clients, run for example:
# lctl set_param ldlm.namespaces.*osc*.lru_size=5000
To determine the number of locks being granted with dynamic LRU resizing, run:
$ lctl get_param ldlm.namespaces.*.pool.limit
The lru_max_age parameter is used to control the
age of client-side locks in the LRU cached locks queue. This limits how
long unused locks are cached on the client, and avoids idle clients from
holding locks for an excessive time, which reduces memory usage on both
the client and server, as well as reducing work during server recovery.
The lru_max_age is printed in milliseconds.
Since Lustre 2.11, in addition to setting the
maximum lock age in milliseconds, it can also be set using a suffix of
s or ms to indicate seconds or
milliseconds, respectively. For example to set the client's maximum
lock age to 15 minutes (900s) run:
# lctl set_param ldlm.namespaces.*MDT*.lru_max_age=900s
# lctl get_param ldlm.namespaces.*MDT*.lru_max_age
ldlm.namespaces.myth-MDT0000-mdc-ffff8804296c2800.lru_max_age=900000
MDS and OSS thread counts tunable can be used to set the minimum and maximum thread counts or get the current number of running threads for the services listed in the table below.
|
Service |
Description |
mds.MDS.mdt
|
Main metadata operations service |
mds.MDS.mdt_readpage
|
Metadata |
mds.MDS.mdt_setattr
|
Metadata |
ost.OSS.ost
|
Main data operations service |
ost.OSS.ost_io
|
Bulk data I/O services |
ost.OSS.ost_create
|
OST object pre-creation service |
ldlm.services.ldlm_canceld
|
DLM lock cancel service |
ldlm.services.ldlm_cbd
|
DLM lock grant service |
For each service, tunable parameters as shown below are available.
To temporarily set these tunables, run:
# lctl set_param
service.threads_min|max|started=numTo permanently set this tunable, run the following command on the MGS:
mgs# lctl set_param -P
service.threads_min|max|startedIntroduced in Lustre 2.5For Lustre 2.5 or earlier, run:
mgs# lctl conf_param
obdname|fsname.obdtype.threads_min|max|started
The following examples show how to set thread counts and get the
number of running threads for the service ost_io
using the tunable
service.threads_min|max|started
To get the number of running threads, run:
# lctl get_param ost.OSS.ost_io.threads_started ost.OSS.ost_io.threads_started=128
To set the number of threads to the maximum value (512), run:
# lctl get_param ost.OSS.ost_io.threads_max ost.OSS.ost_io.threads_max=512
To set the maximum thread count to 256 instead of 512 (to avoid overloading the storage or for an array with requests), run:
# lctl set_param ost.OSS.ost_io.threads_max=256 ost.OSS.ost_io.threads_max=256
To set the maximum thread count to 256 instead of 512 permanently, run:
# lctl conf_param testfs.ost.ost_io.threads_max=256
Introduced in Lustre 2.5For version 2.5 or later, run:
# lctl set_param -P ost.OSS.ost_io.threads_max=256 ost.OSS.ost_io.threads_max=256
To check if the
threads_maxsetting is active, run:# lctl get_param ost.OSS.ost_io.threads_max ost.OSS.ost_io.threads_max=256
Note
If the number of service threads is changed while the file system is running, the change
may not take effect until the file system is stopped and rest. If the number of service
threads in use exceeds the new threads_max value setting, service threads
that are already running will not be stopped.
By default, a detailed log of all operations is generated to aid in
debugging. Flags that control debugging are found via
lctl get_param debug.
The overhead of debugging can affect the performance of Lustre file system. Therefore, to minimize the impact on performance, the debug level can be lowered, which affects the amount of debugging information kept in the internal log buffer but does not alter the amount of information to goes into syslog. You can raise the debug level when you need to collect logs to debug problems.
The debugging mask can be set using "symbolic names". The symbolic format is shown in the examples below.
To verify the debug level used, examine the parameter that controls debugging by running:
# lctl get_param debug debug= ioctl neterror warning error emerg ha config console
To turn off debugging except for network error debugging, run the following command on all nodes concerned:
# sysctl -w lnet.debug="neterror" debug=neterror
To turn off debugging completely (except for the minimum error reporting to the console), run the following command on all nodes concerned:
# lctl set_param debug=0 debug=0
To set an appropriate debug level for a production environment, run:
# lctl set_param debug="warning dlmtrace error emerg ha rpctrace vfstrace" debug=warning dlmtrace error emerg ha rpctrace vfstrace
The flags shown in this example collect enough high-level information to aid debugging, but they do not cause any serious performance impact.
To add new flags to flags that have already been set, precede each one with a "
+":# lctl set_param debug="+neterror +ha" debug=+neterror +ha # lctl get_param debug debug=neterror warning error emerg ha console
To remove individual flags, precede them with a "
-":# lctl set_param debug="-ha" debug=-ha # lctl get_param debug debug=neterror warning error emerg console
Debugging parameters include:
subsystem_debug- Controls the debug logs for subsystems.debug_path- Indicates the location where the debug log is dumped when triggered automatically or manually. The default path is/tmp/lustre-log.
These parameters can also be set using:
sysctl -w lnet.debug={value}Additional useful parameters:
panic_on_lbug- Causes ''panic'' to be called when the Lustre software detects an internal problem (anLBUGlog entry); panic crashes the node. This is particularly useful when a kernel crash dump utility is configured. The crash dump is triggered when the internal inconsistency is detected by the Lustre software.upcall- Allows you to specify the path to the binary which will be invoked when anLBUGlog entry is encountered. This binary is called with four parameters:- The string ''
LBUG''.- The file where the
LBUGoccurred.- The function name.
- The line number in the file
Note
See also
Section 12.4, “
CollectL
” (collectl).
OST stats files can be used to provide statistics showing activity
for each OST. For example:
# lctl get_param osc.testfs-OST0000-osc.stats snapshot_time 1189732762.835363 ost_create 1 ost_get_info 1 ost_connect 1 ost_set_info 1 obd_ping 212
Use the llstat utility to monitor statistics over time.
To clear the statistics, use the -c option to
llstat. To specify how frequently the statistics
should be reported (in seconds), use the -i option.
In the example below, the -c option clears the
statistics and -i10 option reports statistics every
10 seconds:
$ llstat -c -i10 ost_io
/usr/bin/llstat: STATS on 06/06/07
/proc/fs/lustre/ost/OSS/ost_io/ stats on 192.168.16.35@tcp
snapshot_time 1181074093.276072
/proc/fs/lustre/ost/OSS/ost_io/stats @ 1181074103.284895
Name Cur. Cur. #
Count Rate Events Unit last min avg max stddev
req_waittime 8 0 8 [usec] 2078 34 259.75 868 317.49
req_qdepth 8 0 8 [reqs] 1 0 0.12 1 0.35
req_active 8 0 8 [reqs] 11 1 1.38 2 0.52
reqbuf_avail 8 0 8 [bufs] 511 63 63.88 64 0.35
ost_write 8 0 8 [bytes] 169767 72914 212209.62 387579 91874.29
/proc/fs/lustre/ost/OSS/ost_io/stats @ 1181074113.290180
Name Cur. Cur. #
Count Rate Events Unit last min avg max stddev
req_waittime 31 3 39 [usec] 30011 34 822.79 12245 2047.71
req_qdepth 31 3 39 [reqs] 0 0 0.03 1 0.16
req_active 31 3 39 [reqs] 58 1 1.77 3 0.74
reqbuf_avail 31 3 39 [bufs] 1977 63 63.79 64 0.41
ost_write 30 3 38 [bytes] 1028467 15019 315325.16 910694 197776.51
/proc/fs/lustre/ost/OSS/ost_io/stats @ 1181074123.325560
Name Cur. Cur. #
Count Rate Events Unit last min avg max stddev
req_waittime 21 2 60 [usec] 14970 34 784.32 12245 1878.66
req_qdepth 21 2 60 [reqs] 0 0 0.02 1 0.13
req_active 21 2 60 [reqs] 33 1 1.70 3 0.70
reqbuf_avail 21 2 60 [bufs] 1341 63 63.82 64 0.39
ost_write 21 2 59 [bytes] 7648424 15019 332725.08 910694 180397.87
The columns in this example are described in the table below.
|
Parameter |
Description |
|---|---|
Name | Name of the service event. See the tables below for descriptions of service events that are tracked. |
|
|
Number of events of each type sent in the last interval. |
|
|
Number of events per second in the last interval. |
|
|
Total number of such events since the events have been cleared. |
|
|
Unit of measurement for that statistic (microseconds, requests, buffers). |
|
|
Average rate of these events (in units/event) for the last interval during
which they arrived. For instance, in the above mentioned case of
|
|
|
Minimum rate (in units/events) since the service started. |
|
|
Average rate. |
|
|
Maximum rate. |
|
|
Standard deviation (not measured in some cases) |
Events common to all services are shown in the table below.
|
Parameter |
Description |
|---|---|
|
|
Amount of time a request waited in the queue before being handled by an available server thread. |
|
|
Number of requests waiting to be handled in the queue for this service. |
|
|
Number of requests currently being handled. |
|
|
Number of unsolicited lnet request buffers for this service. |
Some service-specific events of interest are described in the table below.
|
Parameter |
Description |
|---|---|
|
|
Time it takes to enqueue a lock (this includes file open on the MDS) |
|
|
Time it takes to process an MDS modification record (includes
|
Note
See also
Section 12.4, “
CollectL
” (collectl).
MDT stats files can be used to track MDT
statistics for the MDS. The example below shows sample output from an
MDT stats file.
# lctl get_param mds.*-MDT0000.stats snapshot_time 1244832003.676892 secs.usecs open 2 samples [reqs] close 1 samples [reqs] getxattr 3 samples [reqs] process_config 1 samples [reqs] connect 2 samples [reqs] disconnect 2 samples [reqs] statfs 3 samples [reqs] setattr 1 samples [reqs] getattr 3 samples [reqs] llog_init 6 samples [reqs] notify 16 samples [reqs]
Table of Contents
This chapter describes user utilities.
The
lfs utility can be used for user configuration routines
and monitoring.
lfs lfs changelog [--follow]mdt_name[startrec [endrec]] lfs changelog_clearmdt_name id endreclfs checkmds|osts|serverslfs data_version [-nrw]filenamelfs df [-i] [-h] [--pool]-pfsname[.pool] [path] [--lazy] lfs find [[!] --atime|-A [-+]N] [[!] --mtime|-M [-+]N] [[!] --ctime|-C [-+]N] [--maxdepth|-D N] [--name|-npattern] [--print|-p] [--print0|-P] [[!] --obd|-Oost_name[,ost_name...]] [[!] --size|-S [+-]N[kMGTPE]] --type |-t {bcdflpsD}] [[!] --gid|-g|--group|-Ggname|gid] [[!] --uid|-u|--user|-Uuname|uid]dirname|filenamelfs getname [-h]|[path...] lfs getstripe [--obd|-Oost_name] [--quiet|-q] [--verbose|-v] [--stripe-count|-c] [--stripe-index|-i] [--stripe-size|-s] [--pool|-p] [--directory|-d] [--mdt-index|-M] [--recursive|-r] [--raw|-R] [--layout|-L]dirname|filename... lfs setstripe [--size|-s stripe_size] [--stripe-count|-cstripe_count] [--overstripe-count|-Cstripe_count] [--stripe-index|-istart_ost_index] [--ost-list|-oost_indicies] [--pool|-ppool]dirname|filenamelfs setstripe -ddirlfs osts [path] lfs pool_listfilesystem[.pool]|pathnamelfs quota [-q] [-v] [-h] [-oobd_uuid|-Iost_idx|-imdt_idx] [-uusername|uid|-ggroup|gid|-pprojid]/mount_pointlfs quota -t -u|-g|-p/mount_pointlfs setquota {-u|--user|-g|--group|-p|--project}uname|uid|gname|gid|projid[--block-softlimitblock_softlimit] [--block-hardlimitblock_hardlimit] [--inode-softlimitinode_softlimit] [--inode-hardlimitinode_hardlimit]/mount_pointlfs setquota -u|--user|-g|--group|-p|--projectuname|uid|gname|gid|projid[-bblock_softlimit] [-Bblock_hardlimit] [-iinode-softlimit] [-Iinode_hardlimit]/mount_pointlfs setquota -t -u|-g|-p [--block-graceblock_grace] [--inode-graceinode_grace]/mount_pointlfs setquota -t -u|-g|-p [-bblock_grace] [-iinode_grace]/mount_pointlfs help
Note
In the above example, the
parameter refers to the mount point of the Lustre file
system./mount_point
Note
By default the lfs quota command provides
aggregated cluster-wide statistics.
To obtain the detailed report of cluster-wide limits,
usage and statistics, use the lfs quota -v command.
To see the detailed report of per-user limits and usage,
use the lfs quota -a command.
The lfs utility is used to create a new file
with a specific striping pattern,
determine the default striping pattern,
gather the layout (object numbers and location) for a specific file,
find files with specific attributes, list OST information,
or set quota limits.
It can be invoked interactively without any arguments,
or in a non-interactive mode with one of the supported arguments.
The various lfs options are described below.
For a complete list of available options,
type help at the lfs prompt.
|
Option |
Description | |
|---|---|---|
|
|
Shows the metadata changes on an MDT. Start and end
points are optional. The
| |
|
|
Indicates that changelog records previous to
| |
check
|
Displays the status of MDS or OSTs (as specified in the command) or all servers (MDS and OSTs). | |
|
|
Displays the current version of file data. If
Even with The data version is the sum of the last committed transaction numbers of all data objects of a file. It is used by HSM policy engines for verifying that file data has not been changed during an archive operation or before a release operation, and by OST migration, primarily for verifying that file data has not been changed during a data copy, when done in non-blocking mode. | |
df [-i] [-h] [--pool|-p
|
Use
By default, the usage of all mounted Lustre file systems
is reported. If the
If the
| |
|
|
Searches the directory tree rooted at the given directory/filename for files that match the given parameters. Using
| |
--atime
|
File was last accessed N*24 hours ago. (There is no
guarantee that
OSTs by default only hold a transient
Introduced in Lustre 2.13
In Lustre 2.14, it is possible to set
the OSTs to persistently store atime with each object, in
order to get more accurate persistent atime updates for files
that are open for a long time via the similarly-named
The client considers the latest | |
|
|
|
File status was last changed N*24 hours ago. |
|
|
|
File data was last modified N*24 hours ago. |
|
|
|
File has an object on a specific OST(s). |
|
|
|
File has a size in bytes, or kilo-, Mega-, Giga-, Tera-, Peta- or Exabytes if a suffix is given. |
|
|
|
File has the type - block, character, directory, pipe, file, symlink, socket or door (used in Solaris operating system). |
|
|
|
File has a specific numeric user ID. |
|
|
|
File owned by a specific user (numeric user ID allowed). |
|
|
|
File has a specific group ID. |
|
|
|
File belongs to a specific group (numeric group ID allowed). |
|
|
-
|
Limits find to descend at most N levels of the directory tree. |
|
|
|
Prints the full filename, followed by a new line or NULL character correspondingly. |
|
|
Lists all OSTs for the file system. If a path located on a mounted Lustre file system is specified, then only OSTs belonging to this file system are displayed. | |
|
|
List each Lustre file system instance associated with each Lustre mount point. If no path is specified, all Lustre mount points are interrogated. If a list of paths is provided, the instance of each path is provided. If the path is not a Lustre instance 'No such device' is returned. | |
|
|
Lists striping information for a given filename or directory. By default, the stripe count, stripe size and offset are returned. If you only want specific striping information, then the
options of
If the
The | |
|
|
|
Lists files that have an object on a specific OST. |
|
|
|
Lists details about the file's object ID information. |
|
|
|
Prints additional striping information. |
|
|
|
Lists the stripe count (how many OSTs to use). |
|
|
|
Lists the index for each OST in the file system. |
|
|
|
Lists the OST index on which file striping starts. |
|
|
|
Lists the pools to which a file belongs. |
|
|
|
Lists the stripe size (how much data to write to one OST before moving to the next OST). |
|
|
|
Lists entries about a specified directory instead of its
contents (in the same manner as
|
|
|
|
Recurses into all sub-directories. |
|
|
Create new files with a specific file layout (stripe pattern) configuration. [a] | |
|
|
|
Number of OSTs over which to stripe a file. A
|
|
|
|
The same as --stripe-count, but allows overstriping,
which will place more than one stripe per OST if
|
|
|
|
Number of bytes to store on an OST before moving to the next OST. A stripe_size of 0 uses the file system's default stripe size, (default is 1 MB). Can be specified with k(KB), m(MB), or g(GB), respectively. |
|
|
|
The OST index (base 10, starting at 0) on which to start
striping for this file. A start_ost_index value of -1 allows
the MDS to choose the starting index. This is the default
value, and it means that the MDS selects the starting OST as it
wants. We strongly recommend selecting this default, as it
allows space and load balancing to be done by the MDS as
needed. The
|
|
|
|
This option is used to specify the exact stripe
layout on the the file system. |
|
|
|
Name of the pre-defined pool of OSTs (see
Section 44.2, “
lctl”) that will be used
for striping. The
|
|
|
Deletes default striping on the specified directory. | |
|
|
Lists pools in the file system or pathname, or OSTs in the file system's pool. | |
|
|
Displays disk usage and limits, either for the full file
system or for objects on a specific OBD. A user or group name
or an usr, group and project ID can be specified. If all user,
group project ID are omitted, quotas for the current UID/GID
are shown. The | |
|
|
Displays block and inode grace times for user (
| |
|
|
Sets file system quotas for users, groups or one project.
Limits can be specified with
| |
|
|
Sets the file system quota grace times for users or
groups. Grace time is specified in '
| |
|
|
Provides brief help on various
| |
|
|
Quits the interactive
| |
[a] The file cannot exist prior to using
[b] The default stripe-size is 0. The default start-ost is -1. Do NOT confuse them! If you set start-ost to 0, all new file creations occur on OST 0 (seldom a good idea). [c] The old
| ||
Creates a file striped on two OSTs with 128 KB on each stripe.
$ lfs setstripe -s 128k -c 2 /mnt/lustre/file1
Deletes a default stripe pattern on a given directory. New files use the default striping pattern.
$ lfs setstripe -d /mnt/lustre/dir
Lists the detailed object allocation of a given file.
$ lfs getstripe -v /mnt/lustre/file1
List all the mounted Lustre file systems and corresponding Lustre instances.
$ lfs getname
Efficiently lists all files in a given directory and its subdirectories.
$ lfs find /mnt/lustre
Recursively lists all regular files in a given directory more than 30 days old.
$ lfs find /mnt/lustre -mtime +30 -type f -print
Recursively lists all files in a given directory that have objects on OST2-UUID. The lfs check servers command checks the status of all servers (MDT and OSTs).
$ lfs find --obd OST2-UUID /mnt/lustre/
Lists all OSTs in the file system.
$ lfs osts
Lists space usage per OST and MDT in human-readable format.
$ lfs df -h
Lists inode usage per OST and MDT.
$ lfs df -i
List space or inode usage for a specific OST pool.
$ lfs df --poolfilesystem[.pool] |pathname
List quotas of user 'bob'.
$ lfs quota -u bob /mnt/lustre
List quotas of project ID '1'.
$ lfs quota -p 1 /mnt/lustre
Show grace times for user quotas on
/mnt/lustre.
$ lfs quota -t -u /mnt/lustre
Sets quotas of user 'bob', with a 1 GB block quota hardlimit and a 2 GB block quota softlimit.
$ lfs setquota -u bob --block-softlimit 2000000 --block-hardlimit 1000000 /mnt/lustre
Sets grace times for user quotas: 1000 seconds for block quotas, 1 week and 4 days for inode quotas.
$ lfs setquota -t -u --block-grace 1000 --inode-grace 1w4d /mnt/lustre
Checks the status of all servers (MDT, OST)
$ lfs check servers
Creates a file striped on two OSTs from the pool
my_pool
$ lfs setstripe --pool my_pool -c 2 /mnt/lustre/file
Lists the pools defined for the mounted Lustre file system
/mnt/lustre
$ lfs pool_list /mnt/lustre/
Lists the OSTs which are members of the pool
my_pool in file system
my_fs
$ lfs pool_list my_fs.my_pool
Finds all directories/files associated with
poolA.
$ lfs find /mnt/lustre --pool poolA
Finds all directories/files not associated with a pool.
$ lfs find /mnt//lustre --pool ""
Finds all directories/files associated with pool.
$ lfs find /mnt/lustre ! --pool ""
Associates a directory with the pool
my_pool, so all new files and directories are created
in the pool.
$ lfs setstripe --pool my_pool /mnt/lustre/dir
The
lfs_migrate utility is a simple to migrate file
data between OSTs.
lfs_migrate [lfs_setstripe_options]
[-h] [-n] [-q] [-R] [-s] [-y] [-0] [file|directory ...]
The
lfs_migrate utility is a tool to assist migration
of file data between Lustre OSTs. The utility copies each specified
file to a temporary file using supplied lfs setstripe
options, if any, optionally verifies the file contents have not changed,
and then swaps the layout (OST objects) from the temporary file and the
original file (for Lustre 2.5 and later), or renames the temporary file
to the original filename. This allows the user/administrator to balance
space usage between OSTs, or move files off OSTs that are starting to show
hardware problems (though are still functional) or will be removed.
Warning
For versions of Lustre before 2.5,
lfs_migrate was not integrated with the MDS at all.
That made it UNSAFE for use on files that were being modified by other
applications, since the file was migrated through a copy and rename of
the file. With Lustre 2.5 and later, the new file layout is swapped
with the existing file layout, which ensures that the user-visible
inode number is kept, and open file handles and locks on the file are
kept.
Files to be migrated can be specified as command-line arguments. If
a directory is specified on the command-line then all files within the
directory are migrated. If no files are specified on the command-line,
then a list of files is read from the standard input, making
lfs_migrate suitable for use with
lfs find to locate files on specific OSTs and/or
matching other file attributes, and other tools that generate a list
of files on standard output.
Unless otherwise specified through command-line options, the
file allocation policies on the MDS dictate where the new files
are placed, taking into account whether specific OSTs have been
disabled on the MDS via lctl (preventing new
files from being allocated there), whether some OSTs are overly full
(reducing the number of files placed on those OSTs), or if there is
a specific default file striping for the parent directory (potentially
changing the stripe count, stripe size, OST pool, or OST index of a
new file).
Note
The
lfs_migrate utility can also be used in some cases to
reduce file
fragmentation. File fragmentation will typically reduce
Lustre file system performance. File fragmentation may be observed on
an aged file system and will commonly occur if the file was written by
many threads. Provided there is sufficient free space (or if it was
written when the file system was nearly full) that is less fragmented
than the file being copied, re-writing a file with
lfs_migrate will result in a migrated file with
reduced fragmentation. The tool
filefrag can be used to report file fragmentation.
See
Section 40.3, “
filefrag
”
Note
As long as a file has extent lengths of tens of megabytes (
read_bandwidth * seek_time) or more, the
read performance for the file will not be significantly impacted by
fragmentation, since the read pipeline can be filled by large reads
from disk even with an occasional disk seek.
Options supporting
lfs_migrate are described below.
|
Option |
Description |
|---|---|
|
|
Restripe file using the specified stripe count. This
option may not be specified at the same time as the
|
|
|
Display help information. |
-l
|
Migrate files with hard links (skips, by default). Files
with multiple hard links are split into multiple separate files
by
|
-n
|
Only print the names of files to be migrated. |
|
|
Run quietly (does not print filenames or status). |
-R
| Restripe file using default directory striping instead of
keeping striping. This option may not be specified at the same
time as the
-c option. |
-s
| Skip file data comparison after migrate. Default is to compare migrated file against original to verify correctness. |
|
|
Answer '
|
-0
| Expect NUL-terminated filenames on standard input, as
generated by lfs find -print0 or
find -print0. This allows filenames with
embedded newlines to be handled correctly.
|
Rebalance all files in
/mnt/lustre/dir:
$ lfs_migrate /mnt/lustre/dir
Migrate files in /test filesystem on OST0004 larger than 4 GB in size and older than a day old:
$ lfs find /test -obd test-OST0004 -size +4G -mtime +1 | lfs_migrate -y
The
e2fsprogs package contains the
filefrag tool which reports the extent of file
fragmentation.
The
filefrag utility reports the extent of fragmentation in
a given file. The
filefrag utility obtains the extent information from
Lustre files using the
FIEMAP ioctl, which is efficient and fast, even for
very large files.
In default mode
[5],
filefrag prints the number of physically discontiguous
extents in the file. In extent or verbose mode, each extent is printed
with details such as the blocks allocated on each OST. For a Lustre file
system, the extents are printed in device offset order (i.e. all of the
extents for one OST first, then the next OST, etc.), not file logical
offset order. If the file logical offset order was used, the Lustre
striping would make the output very verbose and difficult to see if there
was file fragmentation or not.
Note
Note that as long as a file has extent lengths of tens of
megabytes or more (i.e.
read_bandwidth * seek_time >
extent_length), the read performance for the file will
not be significantly impacted by fragmentation, since file readahead
can fully utilize the disk disk bandwidth even with occasional
seeks.
In default mode
[6],
filefrag returns the number of physically discontiguous
extents in the file. In extent or verbose mode, each extent is printed
with details. For a Lustre file system, the extents are printed in device
offset order, not logical offset order.
The options and descriptions for the
filefrag utility are listed below.
|
Option |
Description |
|---|---|
|
|
Uses the 1024-byte blocksize for the output. By default, this blocksize is used by the Lustre file system, since OSTs may use different block sizes. |
|
|
Uses the extent mode when printing the output. This is the default for Lustre files in verbose mode. |
|
|
Displays extents in LUN offset order. This is the only available mode for Lustre. |
|
|
Synchronizes any unwritten file data to disk before requesting the mapping. |
|
|
Prints the file's layout in verbose mode when checking file fragmentation, including the logical to physical mapping for each extent in the file and the OST index. |
Lists default output.
$ filefrag /mnt/lustre/foo /mnt/lustre/foo: 13 extents found
Lists verbose output in extent format.
$ filefrag -v /mnt/lustre/foo Filesystem type is: bd00bd0 File size of /mnt/lustre/foo is 1468297786 (1433888 blocks of 1024 bytes) ext: device_logical: physical_offset: length: dev: flags: 0: 0.. 122879: 2804679680..2804802559: 122880: 0002: network 1: 122880.. 245759: 2804817920..2804940799: 122880: 0002: network 2: 245760.. 278527: 2804948992..2804981759: 32768: 0002: network 3: 278528.. 360447: 2804982784..2805064703: 81920: 0002: network 4: 360448.. 483327: 2805080064..2805202943: 122880: 0002: network 5: 483328.. 606207: 2805211136..2805334015: 122880: 0002: network 6: 606208.. 729087: 2805342208..2805465087: 122880: 0002: network 7: 729088.. 851967: 2805473280..2805596159: 122880: 0002: network 8: 851968.. 974847: 2805604352..2805727231: 122880: 0002: network 9: 974848.. 1097727: 2805735424..2805858303: 122880: 0002: network 10: 1097728.. 1220607: 2805866496..2805989375: 122880: 0002: network 11: 1220608.. 1343487: 2805997568..2806120447: 122880: 0002: network 12: 1343488.. 1433599: 2806128640..2806218751: 90112: 0002: network /mnt/lustre/foo: 13 extents found
The standard
mount(8) Linux command is used to mount a Lustre file
system. When mounting a Lustre file system, mount(8) executes the
/sbin/mount.lustre command to complete the mount. The
mount command supports these options specific to a Lustre file
system:
|
Server options |
Description |
|---|---|
|
|
Aborts recovery when starting a target |
|
|
Starts only MGS/MGC servers |
|
|
Start a MDT with a co-located MGS without starting the MGS |
|
|
Starts with a dead OST |
|
|
Sets the stripe cache size for server side disk with a striped raid configuration |
|
Client options |
Description |
|---|---|
|
|
Enables/disables global flock or local flock support |
|
|
Enables/disables user-extended attributes |
|
|
Enables/disables FID to path translation by regular users |
|
|
Number of times a client will retry to mount the file system |
Timeouts are the most common cause of hung applications. After a timeout involving an MDS or failover OST, applications attempting to access the disconnected resource wait until the connection gets established.
When a client performs any remote operation, it gives the server a reasonable amount of time to respond. If a server does not reply either due to a down network, hung server, or any other reason, a timeout occurs which requires a recovery.
If a timeout occurs, a message (similar to this one), appears on the
console of the client, and in
/var/log/messages:
LustreError: 26597:(client.c:810:ptlrpc_expire_one_request()) @@@ timeout req@a2d45200 x5886/t0 o38->mds_svc_UUID@NID_mds_UUID:12 lens 168/64 ref 1 fl RPC:/0/0 rc 0
This chapter describes public programming interfaces to that can be used to control various aspects of a Lustre file system from userspace. This chapter includes the following sections:
Note
Lustre programming interface man pages are found in the lustre/doc folder.
This section describes the supplementary user/group upcall, which allows the MDS to retrieve and verify the supplementary groups to which a particular user is assigned. This avoids the need to pass all the supplementary groups from the client to the MDS with every RPC.
Note
For information about universal UID/GID requirements in a Lustre file system environment, see Section 8.1.2, “Environmental Requirements”.
The MDS uses the utility as specified by
lctl get_param mdt.${FSNAME}-MDT{xxxx}.identity_upcall
to look up the supplied UID in order to retrieve the user's supplementary
group membership. The result is temporarily cached in the kernel (for
five minutes, by default) to avoid the overhead of calling into
userspace repeatedly.
The identity_upcall parameter contains the path
to an executable that is run to map a numeric UID to a group membership
list. This upcall executable opens the
mdt.${FSNAME}-MDT{xxxx}.identity_info parameter file
and writes the related identity_downcall_data data
structure (see Section 41.1.3, “Data Structures”). The
upcall is configured with
lctl set_param mdt.${FSNAME}-MDT{xxxx}.identity_upcall.
The default identity upcall program installed is
lustre/utils/l_getidentity.c in the Lustre source
distribution.
The mechanism for the primary/secondary group is as follows:
The MDS issues an upcall (set per MDS) to map the numeric UID to the supplementary group(s).
If there is no upcall or if there is an upcall and it fails, one supplementary group at most will be added as supplied by the client.
The default upcall
/usr/sbin/l_getidentitycan interact with the user/group database on the MDS to map the UID to the GID and supplementary GID. The user/group database depends on how authentication is configured on the MDS, such as local/etc/passwd, Network Information Service (NIS), Lightweight Directory Access Protocol (LDAP), or SMB Domain services, as configured. If the upcall interface is set to NONE, then upcall is disabled, and the MDS uses only the UID, GID, and one supplementary GID supplied by the client.The MDS will wait a limited time for the group upcall program to complete, to avoid MDS threads and clients hanging due to errors accessing a remote service node. The upcall must finish within 30s before the MDS will continue without the supplementary data. The upcall timeout in seconds can be set on the MDS using:
lctl set_param mdt.*.identity_acquire_expire=secondsThe default group upcall is set permanently by
mkfs.lustre. To set a custom upcall for a particular filesystem, usetunefs.lustre --paramorlctl set_param -P mdt.FSNAME-MDTxxxx.identity_upcall=pathThe group downcall data is cached by the kernel to avoid repeated upcalls for the same user slowing down the MDS. This cache is expired from the kernel after 1200s (20 minutes) by default. The cache age in seconds can be set on the MDS using:
lctl set_param mdt.*.identity_expire=secondsTo force eviction of cached identity data (e.g. after adding or removing a user from a supplementary group), the cache entry for a specific numeric UID can be flushed on the MDS using:
lctl set_param mdt.*.identity_flush=To flush the cached records for all users from cache, useUID-1for the UID:lctl set_param mdt.*.identity_flush=-1
Table of Contents
This chapter describes the llapi library of commands used for setting Lustre file properties within a C program running in a cluster environment, such as a data processing or MPI application. The commands described in this chapter are:
Note
Lustre programming interface man pages are found in the lustre/doc folder.
Use llapi_file_create to set Lustre properties for a new file.
#include <lustre/lustreapi.h> int llapi_file_create(char *name, long stripe_size, int stripe_offset, int stripe_count, int stripe_pattern);
The llapi_file_create() function sets a file descriptor's Lustre
file system striping information. The file descriptor is then accessed with
open().
|
Option |
Description |
|---|---|
|
|
If the file already exists, this parameter returns to ' |
|
|
This value must be an even multiple of system page size, as shown by |
|
|
Indicates the starting OST for this file. |
|
|
Indicates the number of OSTs that this file will be striped across. |
|
|
Indicates the RAID pattern. |
Note
Currently, only RAID 0 is supported. To use the system defaults, set these values: stripe_size = 0, stripe_offset = -1, stripe_count = 0, stripe_pattern = 0
System default size is 4 MB.
char *tfile = TESTFILE; int stripe_size = 65536
To start at default, run:
int stripe_offset = -1
To start at the default, run:
int stripe_count = 1
To set a single stripe for this example, run:
int stripe_pattern = 0
Currently, only RAID 0 is supported.
int stripe_pattern = 0; int rc, fd; rc = llapi_file_create(tfile, stripe_size,stripe_offset, stripe_count,stripe_pattern);
Result code is inverted, you may return with 'EINVAL' or an ioctl error.
if (rc) {
fprintf(stderr,"llapi_file_create failed: %d (%s) 0, rc, strerror(-rc));return -1; }llapi_file_create closes the file descriptor. You must re-open the descriptor. To do this, run:
fd = open(tfile, O_CREAT | O_RDWR | O_LOV_DELAY_CREATE, 0644); if (fd < 0) \ {
fprintf(stderr, "Can't open %s file: %s0, tfile,
str-
error(errno));
return -1;
}Use llapi_file_get_stripe to get striping information for a file or directory on a Lustre file system.
#include <lustre/lustreapi.h> int llapi_file_get_stripe(const char *path, void *lum);
The llapi_file_get_stripe() function returns striping information for a file or directory path in lum (which should point to a large enough memory region) in one of the following formats:
struct lov_user_md_v1 {
__u32 lmm_magic;
__u32 lmm_pattern;
__u64 lmm_object_id;
__u64 lmm_object_seq;
__u32 lmm_stripe_size;
__u16 lmm_stripe_count;
__u16 lmm_stripe_offset;
struct lov_user_ost_data_v1 lmm_objects[0];
} __attribute__((packed));
struct lov_user_md_v3 {
__u32 lmm_magic;
__u32 lmm_pattern;
__u64 lmm_object_id;
__u64 lmm_object_seq;
__u32 lmm_stripe_size;
__u16 lmm_stripe_count;
__u16 lmm_stripe_offset;
char lmm_pool_name[LOV_MAXPOOLNAME];
struct lov_user_ost_data_v1 lmm_objects[0];
} __attribute__((packed));|
Option |
Description |
|---|---|
|
|
Specifies the format of the returned striping information. |
|
|
Holds the striping pattern. Only |
|
|
Holds the MDS object ID. |
|
|
Holds the MDS object group. |
|
|
Holds the stripe size in bytes. |
|
|
Holds the number of OSTs over which the file is striped. |
|
|
Holds the OST index from which the file starts. |
|
|
Holds the OST pool name to which the file belongs. |
|
|
An array of the following format: struct lov_user_ost_data_v1 {
__u64 l_object_id;
__u64 l_object_seq;
__u32 l_ost_gen;
__u32 l_ost_idx;
} __attribute__((packed));
|
|
|
Holds the OST's object ID. |
|
|
Holds the OST's object group. |
|
|
Holds the OST's index generation. |
|
|
Holds the OST's index in LOV. |
llapi_file_get_stripe() returns:
0 On success
!= 0 On failure, errno is set appropriately
|
Errors |
Description |
|---|---|
|
|
Failed to allocate memory |
|
|
Path was too long |
|
|
Path does not point to a file or directory |
|
|
Path does not point to a Lustre file system |
|
|
Memory region pointed by lum is not properly mapped |
#include <stdio.h>
#include <stdlib.h>
#include <errno.h>
#include <lustre/lustreapi.h>
static inline int maxint(int a, int b)
{
return a > b ? a : b;
}
static void *alloc_lum()
{
int v1, v3, join;
v1 = sizeof(struct lov_user_md_v1) +
LOV_MAX_STRIPE_COUNT * sizeof(struct lov_user_ost_data_v1);
v3 = sizeof(struct lov_user_md_v3) +
LOV_MAX_STRIPE_COUNT * sizeof(struct lov_user_ost_data_v1);
return malloc(maxint(v1, v3));
}
int main(int argc, char** argv)
{
struct lov_user_md *lum_file = NULL;
int rc;
int lum_size;
if (argc != 2) {
fprintf(stderr, "Usage: %s <filename>\n", argv[0]);
return 1;
}
lum_file = alloc_lum();
if (lum_file == NULL) {
rc = ENOMEM;
goto cleanup;
}
rc = llapi_file_get_stripe(argv[1], lum_file);
if (rc) {
rc = errno;
goto cleanup;
}
/* stripe_size stripe_count */
printf("%d %d\n",
lum_file->lmm_stripe_size,
lum_file->lmm_stripe_count);
cleanup:
if (lum_file != NULL)
free(lum_file);
return rc;
}
The llapi_file_open command opens (or creates) a file or device on a
Lustre file system.
#include <lustre/lustreapi.h> int llapi_file_open(const char *name, int flags, int mode, unsigned long long stripe_size, int stripe_offset, int stripe_count, int stripe_pattern); int llapi_file_create(const char *name, unsigned long long stripe_size, int stripe_offset, int stripe_count, int stripe_pattern);
The llapi_file_create() call is equivalent to the llapi_file_open call with flags equal to O_CREAT|O_WRONLY and mode equal to 0644, followed by file close.
llapi_file_open() opens a file with a given name on a Lustre file
system.
|
Option |
Description |
|---|---|
|
|
Can be a combination of |
|
|
Specifies the permission bits to be used for a new file when |
|
|
Specifies stripe size (in bytes). Should be multiple of 64 KB, not exceeding 4 GB. |
|
|
Specifies an OST index from which the file should start. The default value is -1. |
|
|
Specifies the number of OSTs to stripe the file across. The default value is -1. |
|
|
Specifies the striping pattern. In this release of the Lustre software, only
|
llapi_file_open() and llapi_file_create() return:
>=0 On success, for llapi_file_open the return value is a file descriptor
<0 On failure, the absolute value is an error code
|
Errors |
Description |
|---|---|
|
|
|
|
|
Striping information has already been set and cannot be altered; |
|
|
Striping information has already been set and cannot be altered |
|
|
|
#include <stdio.h>
#include <lustre/lustreapi.h>
int main(int argc, char *argv[])
{
int rc;
if (argc != 2)
return -1;
rc = llapi_file_create(argv[1], 1048576, 0, 2, LOV_PATTERN_RAID0);
if (rc < 0) {
fprintf(stderr, "file creation has failed, %s\n", strerror(-rc));
return -1;
}
printf("%s with stripe size 1048576, striped across 2 OSTs,"
" has been created!\n", argv[1]);
return 0;
}
Use llapi_quotactl to manipulate disk quotas on a Lustre file system.
#include <lustre/lustreapi.h>
int llapi_quotactl(char" " *mnt," " struct if_quotactl" " *qctl)
struct if_quotactl {
__u32 qc_cmd;
__u32 qc_type;
__u32 qc_id;
__u32 qc_stat;
struct obd_dqinfo qc_dqinfo;
struct obd_dqblk qc_dqblk;
char obd_type[16];
struct obd_uuid obd_uuid;
};
struct obd_dqblk {
__u64 dqb_bhardlimit;
__u64 dqb_bsoftlimit;
__u64 dqb_curspace;
__u64 dqb_ihardlimit;
__u64 dqb_isoftlimit;
__u64 dqb_curinodes;
__u64 dqb_btime;
__u64 dqb_itime;
__u32 dqb_valid;
__u32 padding;
};
struct obd_dqinfo {
__u64 dqi_bgrace;
__u64 dqi_igrace;
__u32 dqi_flags;
__u32 dqi_valid;
};
struct obd_uuid {
char uuid[40];
};The llapi_quotactl() command manipulates disk quotas on a Lustre file system mount. qc_cmd indicates a command to be applied to UID qc_id or GID qc_id.
|
Option |
Description |
|---|---|
|
|
Gets disk quota limits and current usage for user or group qc_id. qc_type is |
|
|
Sets disk quota limits for user or group qc_id. qc_type is |
|
|
Gets information about quotas. qc_type is either
|
|
|
Sets quota information (like grace times). qc_type is
either |
llapi_quotactl() returns:
0 On success
-1 On failure and sets error number (errno) to indicate the error
llapi_quotactl errors are described below.
|
Errors |
Description |
|---|---|
|
|
qctl is invalid. |
|
|
Kernel or Lustre modules have not been compiled with the |
|
|
Insufficient memory to complete operation. |
|
|
qc_cmd is invalid. |
|
|
uuid does not correspond to OBD or mnt does not exist. |
|
|
The call is privileged and the caller is not the super user. |
|
|
No disk quota is found for the indicated user. Quotas have not been turned on for this file system. |
Use llapi_path2fid to get the FID from the pathname.
#include <lustre/lustreapi.h> int llapi_path2fid(const char *path, unsigned long long *seq, unsigned long *oid, unsigned long *ver)
The llapi_path2fid function returns the FID (sequence : object ID : version) for the pathname.
Use llapi_ladvise to give IO advice/hints on a
Lustre file to the server.
#include <lustre/lustreapi.h>
int llapi_ladvise(int fd, unsigned long long flags,
int num_advise, struct llapi_lu_ladvise *ladvise);
struct llapi_lu_ladvise {
__u16 lla_advice; /* advice type */
__u16 lla_value1; /* values for different advice types */
__u32 lla_value2;
__u64 lla_start; /* first byte of extent for advice */
__u64 lla_end; /* last byte of extent for advice */
__u32 lla_value3;
__u32 lla_value4;
};
The llapi_ladvise function passes an array of
num_advise I/O hints (up to a maximum of
LAH_COUNT_MAX items) in ladvise for the file
descriptor fd from an application to one or more
Lustre servers. Optionally, flags can modify how
the advice will be processed via bitwise-or'd values:
LF_ASYNC: Clients return to userspace immediately after submitting ladvise RPCs, leaving server threads to handle the advices asynchronously.LF_UNSET: Unset/clear a previous advice (Currently only supports LU_ADVISE_LOCKNOEXPAND).
Each of the ladvise elements is an llapi_lu_ladvise structure, which contains the following fields:
|
Field |
Description |
|---|---|
|
|
Specifies the advice for the given file range, currently one of:
|
|
|
The offset in bytes for the start of this advice. |
|
|
The offset in bytes (non-inclusive) for the end of this advice. |
|
|
Additional arguments for future advice types and should be set to zero if not explicitly required for a given advice type. Advice-specific names for these fields follow. |
|
|
When using LU_ADVISE_LOCKAHEAD, the 'lla_value1' field is used to communicate the requested lock mode, and can be referred to as lla_lockahead_mode. |
|
|
When using advices which support them, the 'lla_value2' field is used to communicate per-advice flags and can be referred to as 'lla_peradvice_flags'. Both LF_ASYNC and LF_UNSET are supported as peradvice flags. |
|
|
When using LU_ADVISE_LOCKAHEAD, the 'lla_value3' field is used to communicate the result of the request, and can be referred to as lla_lockahead_result. |
llapi_ladvise() forwards the advice to Lustre
servers without guaranteeing how and when servers will react to the
advice. Actions may or may not be triggered when the advices are
received, depending on the type of the advice as well as the real-time
decision of the affected server-side components.
A typical usage of llapi_ladvise() is to
enable applications and users (via lfs ladvise)
with external knowledge about application I/O patterns to intervene in
server-side I/O handling. For example, if a group of different clients
are doing small random reads of a file, prefetching pages into OSS
cache with big linear reads before the random IO is an overall net
benefit. Fetching that data into each client cache with
fadvise() may not be beneficial, due to much more
data being sent to the clients.
LU_LADVISE_LOCKAHEAD merits a special comment. While it is possible and encouraged to use it directly in your application to avoid lock contention (primarily for writing to a single file from multiple clients), it will also be available in the MPI-I/O / MPICH library from ANL for use with the i/o aggregation mode of that library. This is intended (eventually) to be the primary way this feature is used.
At the time of writing, this support is proposed as a patch but is not yet merged in to the public ANL code base. Users are encouraged to check their MPICH documentation and/or check with their library provider about support.
While conceptually similar to the
posix_fadvise and Linux
fadvise system calls, the main difference of
llapi_ladvise() is that
fadvise() / posix_fadvise() are client side
mechanisms that do not pass advice to the filesystem, while
llapi_ladvise() sends advice or hints to one or
more Lustre servers on which the file is stored. In some cases it may
be desirable to use both interfaces.
llapi_ladvise returns:
0 On success
-1 if an error occurred (in which case, errno
is set appropriately).
Use llapi_file_create to set Lustre software properties for a new file.
For a synopsis and description of llapi_file_create and examples of how to
use it, see Chapter 43, Configuration Files and Module Parameters.
You can set striping from inside programs like ioctl. To compile the sample program, you need to install the Lustre client source RPM.
A simple C program to demonstrate striping API - libtest.c
/* -*- mode: c; c-basic-offset: 8; indent-tabs-mode: nil; -*-
* vim:expandtab:shiftwidth=8:tabstop=8:
*
* lustredemo - a simple example of lustreapi functions
*/
#include <stdio.h>
#include <fcntl.h>
#include <dirent.h>
#include <errno.h>
#include <stdlib.h>
#include <lustre/lustreapi.h>
#define MAX_OSTS 1024
#define LOV_EA_SIZE(lum, num) (sizeof(*lum) + num * sizeof(*lum->lmm_objects))
#define LOV_EA_MAX(lum) LOV_EA_SIZE(lum, MAX_OSTS)
/*
* This program provides crude examples of using the lustreapi API functions
*/
/* Change these definitions to suit */
#define TESTDIR "/tmp" /* Results directory */
#define TESTFILE "lustre_dummy" /* Name for the file we create/destroy */
#define FILESIZE 262144 /* Size of the file in words */
#define DUMWORD "DEADBEEF" /* Dummy word used to fill files */
#define MY_STRIPE_WIDTH 2 /* Set this to the number of OST required */
#define MY_LUSTRE_DIR "/mnt/lustre/ftest"
int close_file(int fd)
{
if (close(fd) < 0) {
fprintf(stderr, "File close failed: %d (%s)\n", errno, strerror(errno));
return -1;
}
return 0;
}
int write_file(int fd)
{
char *stng = DUMWORD;
int cnt = 0;
for( cnt = 0; cnt < FILESIZE; cnt++) {
write(fd, stng, sizeof(stng));
}
return 0;
}
/* Open a file, set a specific stripe count, size and starting OST
* Adjust the parameters to suit */
int open_stripe_file()
{
char *tfile = TESTFILE;
int stripe_size = 65536; /* System default is 4M */
int stripe_offset = -1; /* Start at default */
int stripe_count = MY_STRIPE_WIDTH; /*Single stripe for this demo*/
int stripe_pattern = 0; /* only RAID 0 at this time */
int rc, fd;
rc = llapi_file_create(tfile,
stripe_size,stripe_offset,stripe_count,stripe_pattern);
/* result code is inverted, we may return -EINVAL or an ioctl error.
* We borrow an error message from sanity.c
*/
if (rc) {
fprintf(stderr,"llapi_file_create failed: %d (%s) \n", rc, strerror(-rc));
return -1;
}
/* llapi_file_create closes the file descriptor, we must re-open */
fd = open(tfile, O_CREAT | O_RDWR | O_LOV_DELAY_CREATE, 0644);
if (fd < 0) {
fprintf(stderr, "Can't open %s file: %d (%s)\n", tfile, errno, strerror(errno));
return -1;
}
return fd;
}
/* output a list of uuids for this file */
int get_my_uuids(int fd)
{
struct obd_uuid uuids[1024], *uuidp; /* Output var */
int obdcount = 1024;
int rc,i;
rc = llapi_lov_get_uuids(fd, uuids, &obdcount);
if (rc != 0) {
fprintf(stderr, "get uuids failed: %d (%s)\n",errno, strerror(errno));
}
printf("This file system has %d obds\n", obdcount);
for (i = 0, uuidp = uuids; i < obdcount; i++, uuidp++) {
printf("UUID %d is %s\n",i, uuidp->uuid);
}
return 0;
}
/* Print out some LOV attributes. List our objects */
int get_file_info(char *path)
{
struct lov_user_md *lump;
int rc;
int i;
lump = malloc(LOV_EA_MAX(lump));
if (lump == NULL) {
return -1;
}
rc = llapi_file_get_stripe(path, lump);
if (rc != 0) {
fprintf(stderr, "get_stripe failed: %d (%s)\n",errno, strerror(errno));
return -1;
}
printf("Lov magic %u\n", lump->lmm_magic);
printf("Lov pattern %u\n", lump->lmm_pattern);
printf("Lov object id %llu\n", lump->lmm_object_id);
printf("Lov stripe size %u\n", lump->lmm_stripe_size);
printf("Lov stripe count %hu\n", lump->lmm_stripe_count);
printf("Lov stripe offset %u\n", lump->lmm_stripe_offset);
for (i = 0; i < lump->lmm_stripe_count; i++) {
printf("Object index %d Objid %llu\n", lump->lmm_objects[i].l_ost_idx, lump->lmm_objects[i].l_object_id);
}
free(lump);
return rc;
}
/* Ping all OSTs that belong to this filesystem */
int ping_osts()
{
DIR *dir;
struct dirent *d;
char osc_dir[100];
int rc;
sprintf(osc_dir, "/proc/fs/lustre/osc");
dir = opendir(osc_dir);
if (dir == NULL) {
printf("Can't open dir\n");
return -1;
}
while((d = readdir(dir)) != NULL) {
if ( d->d_type == DT_DIR ) {
if (! strncmp(d->d_name, "OSC", 3)) {
printf("Pinging OSC %s ", d->d_name);
rc = llapi_ping("osc", d->d_name);
if (rc) {
printf(" bad\n");
} else {
printf(" good\n");
}
}
}
}
return 0;
}
int main()
{
int file;
int rc;
char filename[100];
char sys_cmd[100];
sprintf(filename, "%s/%s",MY_LUSTRE_DIR, TESTFILE);
printf("Open a file with striping\n");
file = open_stripe_file();
if ( file < 0 ) {
printf("Exiting\n");
exit(1);
}
printf("Getting uuid list\n");
rc = get_my_uuids(file);
printf("Write to the file\n");
rc = write_file(file);
rc = close_file(file);
printf("Listing LOV data\n");
rc = get_file_info(filename);
printf("Ping our OSTs\n");
rc = ping_osts();
/* the results should match lfs getstripe */
printf("Confirming our results with lfs getstripe\n");
sprintf(sys_cmd, "/usr/bin/lfs getstripe %s/%s", MY_LUSTRE_DIR, TESTFILE);
system(sys_cmd);
printf("All done\n");
exit(rc);
}
Makefile for sample application:
gcc -g -O2 -Wall -o lustredemo libtest.c -llustreapi clean: rm -f core lustredemo *.o run: make rm -f /mnt/lustre/ftest/lustredemo rm -f /mnt/lustre/ftest/lustre_dummy cp lustredemo /mnt/lustre/ftest/
Table of Contents
This section describes configuration files and module parameters and includes the following sections:
LNet network hardware and routing are now configured via module parameters. Parameters should be specified in the /etc/modprobe.d/lustre.conffile, for example:
options lnet networks=tcp0(eth2)
The above option specifies that this node should use the TCP protocol on the eth2 network interface.
Module parameters are read when the module is first loaded. Type-specific LND modules (for instance, ksocklnd) are loaded automatically by the LNet module when LNet starts (typically upon modprobe ptlrpc).
LNet configuration parameters can be viewed under /sys/module/lnet/parameters/, and LND-specific parameters under the name of the corresponding LND, for example /sys/module/ksocklnd/parameters/ for the socklnd (TCP) LND.
For the following parameters, default option settings are shown in parenthesis. Changes to parameters marked with a W affect running systems. Unmarked parameters can only be set when LNet loads for the first time. Changes to parameters marked with Wc only have effect when connections are established (existing connections are not affected by these changes.)
With routed or other multi-network configurations, use
ip2netsrather than networks, so all nodes can use the same configuration.For a routed network, use the same 'routes' configuration everywhere. Nodes specified as routers automatically enable forwarding and any routes that are not relevant to a particular node are ignored. Keep a common configuration to guarantee that all nodes have consistent routing tables.
A separate
lustre.conffile makes distributing the configuration much easier.If you set
config_on_load=1, LNet starts atmodprobetime rather than waiting for the Lustre file system to start. This ensures routers start working at module load time.
# lctl # lctl> net down
Remember the
lctl ping {nid}command - it is a handy way to check your LNet configuration.
This section describes LNet options.
Network topology module parameters determine which networks a node should join, whether it should route between these networks, and how it communicates with non-local networks.
Here is a list of various networks and the supported software stacks:
|
Network |
Software Stack |
|---|---|
|
o2ib |
OFED Version 2 |
Note
The Lustre software ignores the loopback interface (lo0), but the
Lustre file system uses any IP addresses aliased to the loopback (by default). When in
doubt, explicitly specify networks.
ip2nets is a string that lists globally
available networks, each with a set of IP address ranges. LNet
determines the locally-available networks from this list by matching
the IP address ranges with the local IPs of a node. Its purpose is
to allow the same modules.conf file to be used
across a variety of nodes on different networks. The string has the
following syntax.
<ip2nets> :== <net-match> [ <comment> ] { <net-sep> <net-match> }
<net-match> :== [ <w> ] <net-spec> <w> <ip-range> { <w> <ip-range> }
[ <w> ]
<net-spec> :== <network> [ "(" <interface-list> ")" ]
<network> :== <nettype> [ <number> ]
<nettype> :== "tcp" | "elan" | "o2ib" | ...
<iface-list> :== <interface> [ "," <iface-list> ]
<ip-range> :== <r-expr> "." <r-expr> "." <r-expr> "." <r-expr>
<r-expr> :== <number> | "*" | "[" <r-list> "]"
<r-list> :== <range> [ "," <r-list> ]
<range> :== <number> [ "-" <number> [ "/" <number> ] ]
<comment :== "#" { <non-net-sep-chars> }
<net-sep> :== ";" | "\n"
<w> :== <whitespace-chars> { <whitespace-chars> }
<net-spec> contains enough information to
uniquely identify the network and load an appropriate LND. The LND
determines the missing "address-within-network" part of the
NID based on the interfaces it can use.
<iface-list> specifies which hardware
interface the network can use. If omitted, all interfaces are used. LNDs
that do not support the <iface-list> syntax
cannot be configured to use particular interfaces and just use what is
there. Only a single instance of these LNDs can exist on a node at any
time, and <iface-list> must be omitted.
<net-match> entries are scanned in the
order declared to see if one of the node's IP addresses matches one
of the <ip-range> expressions. If there is a
match, <net-spec> specifies the network to
instantiate. Note that it is the first match for a particular network
that counts. This can be used to simplify the match expression for the
general case by placing it after the special cases. For example:
ip2nets="tcp(eth1,eth2) 134.32.1.[4-10/2]; tcp(eth1) *.*.*.*"
4 nodes on the 134.32.1.* network have 2 interfaces (134.32.1.{4,6,8,10}) but all the rest have 1.
ip2nets="o2ib 192.168.0.*; tcp(eth2) 192.168.0.[1,7,4,12]" This describes an IB cluster on 192.168.0.*. Four of these nodes also have IP interfaces; these four could be used as routers.
Note that match-all expressions (For instance,
*.*.*.*) effectively mask all other
<net-match> entries specified after
them. They should be used with caution.
Here is a more complicated situation, the route parameter is explained below. We have:
Two TCP subnets
One Elan subnet
One machine set up as a router, with both TCP and Elan interfaces
IP over Elan configured, but only IP will be used to label the nodes.
options lnet 'ip2nets="tcp 198.129.135.* 192.128.88.98; \
elan 198.128.88.98 198.129.135.3;"' \
'routes="tcp 1022@elan # Elan NID of router; \
elan 198.128.88.98@tcp # TCP NID of router"'This is an alternative to "ip2nets"
which can be used to specify the networks to be instantiated explicitly.
The syntax is a simple comma separated list of
<net-spec>s (see above). The default is only
used if neither 'ip2nets' nor 'networks' is
specified.
This is a string that lists networks and the NIDs of routers that forward to them.
It has the following syntax (<w> is one or more whitespace characters):
<routes> :== <route>{ ; <route> }
<route> :== [<net>[<w><hopcount>]<w><nid>[:<priority>]{<w><nid>[:<priority>]}Note: the priority parameter was added in release 2.5.
So a node on the network tcp1 that needs to go through a router to get to the Elan network:
options lnet networks=tcp1 routes="elan 1 192.168.2.2@tcpA"
The hopcount and priority numbers are used to help choose the best path between multiply-routed configurations.
A simple but powerful expansion syntax is provided, both for target networks and router NIDs as follows.
<expansion> :== "[" <entry> { "," <entry> } "]"
<entry> :== <numeric range> | <non-numeric item>
<numeric range> :== <number> [ "-" <number> [ "/" <number> ] ]The expansion is a list enclosed in square brackets. Numeric
items in the list may be a single number, a contiguous range of numbers,
or a strided range of numbers. For example, routes="elan
192.168.1.[22-24]@tcp" says that network
elan0 may be adjacent or behind another network
(hopcount is undefined); and is accessible via 3 routers on the
tcp0 network (192.168.1.22@tcp,
192.168.1.23@tcp and
192.168.1.24@tcp).
routes="[tcp,o2ib] 2 [8-14/2]@elan"
says that 2 networks (tcp0 and o2ib0) are accessible through 4 routers (8@elan, 10@elan, 12@elan and 14@elan). The hopcount of 2 means that traffic to both these networks will be traversed 2 routers - first one of the routers specified in this entry, then one more.
Duplicate entries, entries that route to a local network, and entries that specify routers on a non-local network are ignored.
Prior to release 2.5, a conflict between equivalent entries was resolved in favor of the route with the shorter hopcount. The hopcount, if omitted, is undefined, but is treated as 1 when being compared to other routes during selection (as if the remote network is adjacent).
Since 2.5, equivalent entries are resolved in favor of the route with the lowest priority number or shorter hopcount if the priorities are equal. The priority, if omitted, defaults to 0. The hopcount, if omitted, is undefined, but is treated as 1 when being compared to other routes during selection (as if the remote network is adjacent).
It is an error to specify routes to the same destination with routers on different local networks.
If a route string contains no hop count, then the hop count is
undefined. Explicitly setting the hop count to 1 is recommended if the
remote network is adjacent and
avoid_asym_router_failure is enabled
to ensure proper operation of the feature.
This is a string that can be set either to
"enabled" or
"disabled" for explicit control of whether
this node should act as a router, forwarding communications between all
local networks.
A standalone router can be started by simply starting LNet
('modprobe ptlrpc') with appropriate
network topology options.
The acceptor is a TCP/IP service that some LNDs use to establish communications. If a local network requires it and it has not been disabled, the acceptor listens on a single port for connection requests that it redirects to the appropriate local network. The acceptor is part of the LNet module and configured by the following options:
|
Variable |
Description |
|---|---|
|
|
The type of connections that the acceptor will allow from remote nodes.
|
|
|
Port number on which the acceptor should listen for connection requests. All nodes in a site configuration that require an acceptor must use the same port. |
|
|
Maximum length that the queue of pending connections may grow to (see listen(2)). |
|
|
Maximum time in seconds the acceptor is allowed to block while communicating with a peer. |
|
|
Version of the acceptor protocol that should be used by outgoing connection requests. It defaults to the most recent acceptor protocol version, but it may be set to the previous version to allow the node to initiate connections with nodes that only understand that version of the acceptor protocol. The acceptor can, with some restrictions, handle either version (that is, it can accept connections from both 'old' and 'new' peers). For the current version of the acceptor protocol (version 1), the acceptor is compatible with old peers if it is only required by a single local network. |
rnet_htable_size is an integer that indicates how many remote networks the internal LNet hash table is configured to handle. rnet_htable_size is used for optimizing the hash table size and does not put a limit on how many remote networks you can have. The default hash table size when this parameter is not specified is: 128.
The SOCKLND kernel TCP/IP LND (socklnd) is
connection-based and uses the acceptor to establish communications via sockets with its
peers.
It supports multiple instances and load balances dynamically over multiple interfaces.
If no interfaces are specified by the ip2nets or networks module
parameter, all non-loopback IP interfaces are used. The address-within-network is determined
by the address of the first IP interface an instance of the socklnd
encounters.
Consider a node on the 'edge' of an InfiniBand network,
with a low-bandwidth management Ethernet (eth0), IP
over IB configured (ipoib0), and a pair of GigE NICs
(eth1,eth2) providing off-cluster
connectivity. This node should be configured with '
networks=o2ib,tcp(eth1,eth2)' to ensure that the
socklnd ignores the management Ethernet and IPoIB.
|
Variable |
Description |
|---|---|
|
|
Time (in seconds) that communications may be stalled before the LND completes them with failure. |
|
|
Sets the number of connection daemons. |
|
|
Minimum connection retry interval (in milliseconds). After a failed connection
attempt, this is the time that must elapse before the first retry. As connections
attempts fail, this time is doubled on each successive retry up to a maximum of
' |
|
|
Maximum connection retry interval (in milliseconds). |
|
|
Boolean that determines whether the |
|
|
Boolean that determines whether the |
|
|
Determines when a message is considered "bulk". |
|
|
Socket buffer sizes. Setting this option to zero (0), allows the system to auto-tune buffer sizes. WarningBe very careful changing this value as improper sizing can harm performance. |
|
|
Boolean that determines if |
|
|
Time (in seconds) that a socket can remain idle before a keepalive probe is sent. Setting this value to zero (0) disables keepalives. |
|
|
Time (in seconds) to repeat unanswered keepalive probes. Setting this value to zero (0) disables keepalives. |
|
|
Number of unanswered keepalive probes before pronouncing socket (hence peer) death. |
|
|
Boolean that determines whether to enable IRQ affinity. The default is zero (0). When set, |
|
|
Determines the minimum message fragment that should be considered for
zero-copy sends. Increasing it above the platform's |
Table of Contents
- 44.1. l_getidentity
- 44.2. lctl
- 44.3. ll_decode_filter_fid
- 44.4. llobdstat
- 44.5. llog_reader
- 44.6. llstat
- 44.7. llverdev
- 44.8. lshowmount
- 44.9. lst
- 44.10. lustre_rmmod.sh
- 44.11. lustre_rsync
- 44.12. mkfs.lustre
- 44.13. mount.lustre
- 44.14. routerstat
- 44.15. tunefs.lustre
- 44.16. Additional System Configuration Utilities
This chapter includes system configuration utilities and includes the following sections:
The l_getidentity tool normally handles Lustre user/group mapping upcall.
The l_getidentity utility is called from the
MDS to map a numeric UID value into the list of supplementary group
values for that UID, and writes this into the
mdt.*.identity_info parameter file. The list of
supplementary groups is cached in the kernel to avoid repeated
upcalls. See Section 41.1, “User/Group Upcall” for more
details.
The l_getidentity utility can also be run
directly for debugging purposes to ensure that the UID mapping for a
particular user is configured correctly, by using the
-d argument instead of the MDT name.
|
Option |
Description |
|---|---|
|
|
Metadata server target name |
|
|
User identifier |
The lctl utility is used for root control and configuration. With lctl you can directly control Lustre via an ioctl interface, allowing various configuration, maintenance and debugging features to be accessed.
The lctl utility can be invoked in interactive mode by issuing the lctl command. After that, commands are issued as shown below. The most common lctl commands are:
dl dk device networkup|downlist_nids pingnidhelp quit
For a complete list of available commands, type help at the lctl prompt. To get basic help on command meaning and syntax, type help . Command completion is activated with the TAB key (depending on compile options), and command history is available via the up- and down-arrow keys.command
For non-interactive use, use the second invocation, which runs the command after connecting to the device.
Lustre parameters are not always accessible using the procfs
interface, as it is platform-specific. As a solution,
lctl {get,set}_param provides a platform-independent
interface to the Lustre tunables. Avoid any direct references to
/proc and /sys files in scripts.
For future portability, instead use lctl {get,set}_param, which handles
these details internally.
When the file system is running, use the
lctl set_param command on the affected node(s) to
temporarily set parameters (mapping to items in).
The lctl set_param command uses this syntax:
lctl set_param [-n] [-P] [-d]obdtype.obdname.property=value
For example:
mds# lctl set_param mdt.testfs-MDT0000.identity_upcall=NONE
Use -P option to set parameters
permanently. Option -d deletes permanent parameters.
For example:
mgs# lctl set_param -P mdt.testfs-MDT0000.identity_upcall=NONE mgs# lctl set_param -P -d mdt.testfs-MDT0000.identity_upcall
Many permanent parameters can be set with the
lctl conf_param utility. In general,
lctl conf_param can be used to specify any OBD
device parameter settable in a /proc/fs/lustre file. The
lctl conf_param command must be run on the MGS node,
and uses this syntax:
obd|fsname.obdtype.property=value)
For example:
mgs# lctl conf_param testfs-MDT0000.mdt.identity_upcall=NONE $ lctl conf_param testfs.llite.max_read_ahead_mb=16
Caution
The lctl conf_param command
permanently sets parameters in the file system
configuration for all nodes of the specified type.
To get current Lustre parameter settings, use the
lctl get_param command on the desired node with the
same parameter name as lctl set_param:
# lctl get_param [-n] obdtype.obdname.parameter
For example:
mds# lctl get_param mdt.testfs-MDT0000.identity_upcall
To list Lustre parameters that are available to set, use the lctl list_param command, with this syntax:
# lctl list_param [-R] [-F] obdtype.obdname.*
For example, to list all of the parameters on the MDT:
oss# lctl list_param -RF mdt
For more information on using lctl to set temporary and permanent parameters, see Section 13.12.3, “Setting Parameters with
lctl”.
Network Configuration
|
Option |
Description |
|---|---|
|
|
Starts or stops LNet, or selects a network type for other |
|
|
Prints all NIDs on the local node. LNet must be running. |
|
|
From a list of NIDs for a remote node, identifies the NID on which interface communication will occur. |
|
|
Checks LNet connectivity via an LNet ping. This uses the fabric appropriate to the specified NID. |
|
|
Prints the network interface information for a given network type. |
|
|
Prints the known peers for a given network type. |
|
|
Prints all the connected remote NIDs for a given network type. |
|
|
This command prints active transmits. It is only used for the Elan network type. |
|
|
Prints the complete routing table. |
Device Selection
|
Option |
|
Description |
|---|---|---|
|
|
|
This selects the specified OBD device. All other commands depend on the device being set. |
|
|
|
Shows the local Lustre OBDs, a/k/a |
Device Operations
|
Option |
Description | |
|---|---|---|
|
|
Lists the Lustre or LNet parameter name.
| |
|
|
|
Adds '/', '@' or '=' for directories, symlinks and writeable files, respectively. |
|
|
|
Recursively lists all parameters under the specified path. If |
|
|
Gets the value of a Lustre or LNet parameter from the specified path. | |
|
|
|
Prints only the parameter value and not the parameter name. |
|
|
|
Prints only matched parameter names and not the values; especially useful when using patterns. |
|
|
|
When |
|
|
Sets the value of a Lustre or LNet parameter from the specified path. | |
|
|
|
Disables printing of the key name when printing values. |
|
|
Sets a permanent configuration parameter for any device via the MGS. This command must be run on the MGS node. All writeable parameters under
For more information on setting permanent parameters, see Section 13.12.3.2, “Setting Permanent Parameters” (Setting Permanent Parameters). | |
|
|
|
Deletes a parameter setting (use the default value at the next restart). A null value for |
|
|
Re-activates an import after the deactivate operation. This setting is only effective until the next restart (see | |
|
|
Deactivates an import, in particular meaning do not assign new file stripes to an OSC. Running lctl deactivate on the MDS stops new objects from being allocated on the OST. Running lctl deactivate on Lustre clients causes them to return -EIO when accessing objects on the OST instead of waiting for recovery. | |
|
|
Aborts the recovery process on a re-starting MDT or OST. | |
Note
Lustre tunables are not always accessible using the procfs interface, as it is platform-specific. As a solution, lctl {get,set,list}_param has been introduced as a platform-independent interface to the Lustre tunables. Avoid direct references to /proc/{fs,sys}/{lustre,lnet}. For future portability, use lctl {get,set,list}_param instead.
Virtual Block Device Operations
Lustre can emulate a virtual block device upon a regular file. This emulation is needed when you are trying to set up a swap space via the file.
|
Option |
Description |
|---|---|
|
|
Attaches a regular Lustre file to a block device. If the device node does not exist, |
|
|
Detaches the virtual block device. |
|
|
Provides information about the Lustre file attached to the device node. |
Changelogs
|
Option |
Description |
|---|---|
|
|
Registers a new changelog user for a particular device.
Changelog entries are saved persistently on the MDT with each
filesystem operation, and are only purged beyond all registered
user's minimum set point (see
|
|
changelog_deregister |
Unregisters an existing changelog user. If the user's "clear" record number is the minimum for the device, changelog records are purged until the next minimum. |
Debug
|
Option |
Description |
|---|---|
|
|
Starts and stops the debug daemon, and controls the output filename and size. |
|
|
Dumps the kernel debug buffer to stdout or a file. |
|
|
Converts the kernel-dumped debug log from binary to plain text format. |
|
|
Clears the kernel debug buffer. |
|
|
Inserts marker text in the kernel debug buffer. |
|
|
Filters kernel debug messages by subsystem or mask. |
|
|
Shows specific types of messages. |
|
|
Lists all subsystem and debug types. |
|
|
Provides GDB-friendly module information. |
Use the following options to invoke lctl.
|
Option |
Description |
|---|---|
|
|
Device to be used for the operation (specified by name or number). See device_list. |
|
|
Ignores errors during script processing. |
lctl
$ lctl lctl > dl 0 UP mgc MGC192.168.0.20@tcp btbb24e3-7deb-2ffa-eab0-44dffe00f692 5 1 UP ost OSS OSS_uuid 3 2 UP obdfilter testfs-OST0000 testfs-OST0000_UUID 3 lctl > dk /tmp/log Debug log: 87 lines, 87 kept, 0 dropped. lctl > quit
The ll_decode_filter_fid utility displays the
Lustre object ID and MDT parent FID.
The ll_decode_filter_fid utility decodes and prints the Lustre OST
object ID, MDT FID, stripe index for the specified OST object(s), which
is stored in the "trusted.fid" attribute on each OST object.
This is accessible to ll_decode_filter_fid when the
OST file system is mounted locally as type ldiskfs for maintenance.
The "trusted.fid" extended attribute is stored on each OST object when it is first modified (data written or attributes set), and is not accessed or modified by Lustre after that time.
The OST object ID (objid) may be useful in case of OST directory corruption, though LFSCK can normally reconstruct the entire OST object directory tree, see Section 36.4, “ Checking the file system with LFSCK” for details. The MDS FID can be useful to determine which MDS inode an OST object is (or was) used by. The stripe index can be used in conjunction with other OST objects to reconstruct the layout of a file even if the MDT inode was lost.
root@oss1# cd /mnt/ost/lost+found root@oss1# ll_decode_filter_fid #123454 #123455 #123458 #123454: objid=690670 seq=0 parent=[0x751c5:0xfce6e605:0x0] #123455: objid=614725 seq=0 parent=[0x18d11:0xebba84eb:0x1] #123458: objid=533088 seq=0 parent=[0x21417:0x19734d61:0x0]
This shows that the three files in lost+found have decimal object IDs - 690670, 614725, and 533088, respectively. The object sequence number (formerly object group) is 0 for all current OST objects.
The MDT parent inode FIDs are hexadecimal numbers of the form sequence:oid:idx. Since the sequence number is below 0x100000000 in all these cases, the FIDs are in the legacy Inode and Generation In FID (IGIF) namespace and are mapped directly to the MDT inode = seq and generation = oid values; the MDT inodes are 0x751c5, 0x18d11, and 0x21417 respectively. For objects with MDT parent sequence numbers above 0x200000000, this indicates that the FID needs to be mapped via the MDT Object Index (OI) file on the MDT to determine the internal inode number.
The idx field shows the stripe number of this OST object in the Lustre RAID-0 striped file.
The llobdstat utility displays the
Lustre object ID and MDT parent FID.
The llobdstat utility displays a line of OST statistics for the given ost_name every interval seconds. It should be run directly on an OSS node. Type CTRL-C to stop statistics printing.
# llobdstat liane-OST0002 1 /usr/bin/llobdstat on /proc/fs/lustre/obdfilter/liane-OST0002/stats Processor counters run at 2800.189 MHz Read: 1.21431e+07, Write: 9.93363e+08, create/destroy: 24/1499, stat: 34, p\ unch: 18 [NOTE: cx: create, dx: destroy, st: statfs, pu: punch ] Timestamp Read-delta ReadRate Write-delta WriteRate -------------------------------------------------------- 1217026053 0.00MB 0.00MB/s 0.00MB 0.00MB/s 1217026054 0.00MB 0.00MB/s 0.00MB 0.00MB/s 1217026055 0.00MB 0.00MB/s 0.00MB 0.00MB/s 1217026056 0.00MB 0.00MB/s 0.00MB 0.00MB/s 1217026057 0.00MB 0.00MB/s 0.00MB 0.00MB/s 1217026058 0.00MB 0.00MB/s 0.00MB 0.00MB/s 1217026059 0.00MB 0.00MB/s 0.00MB 0.00MB/s st:1
The llog_reader utility translates a Lustre configuration log into human-readable form.
The llog_reader utility parses the binary format of Lustre's on-disk configuration logs. Llog_reader can only read logs; use tunefs.lustre to write to them.
To examine a log file on a stopped Lustre server, mount its backing file system as ldiskfs or zfs, then use llog_reader to dump the log file's contents, for example:
mount -t ldiskfs /dev/sda /mnt/mgs llog_reader /mnt/mgs/CONFIGS/tfs-client
To examine the same log file on a running Lustre server, use the ldiskfs-enabled debugfs utility (called debug.ldiskfs on some distributions) to extract the file, for example:
debugfs -c -R 'dump CONFIGS/tfs-client /tmp/tfs-client' /dev/sda llog_reader /tmp/tfs-client
Caution
Although they are stored in the CONFIGS directory, mountdata files do not use the configuration log format and will confuse the llog_reader utility.
The llstat utility displays statistics from any of the Lustre
statistics parameter files on the local node that share a common format
and are updated at interval seconds. To stop stats
printing, use CTRL-C.
|
Option |
Description |
|---|---|
|
|
Clears the statistics file. |
|
|
Specifies the polling period (in seconds). |
|
|
Specifies graphable output format. |
|
|
Displays help information. |
|
|
Specifies either the full path to a statistics file or the shorthand reference, |
To monitor /proc/fs/lustre/ost/OSS/ost/stats at 1 second intervals, run;
llstat -i 1 ost
The llstat files are located at:
/proc/fs/lustre/mdt/MDS/*/stats /proc/fs/lustre/mdt/*/exports/*/stats /proc/fs/lustre/mdc/*/stats /proc/fs/lustre/ldlm/services/*/stats /proc/fs/lustre/ldlm/namespaces/*/pool/stats /proc/fs/lustre/mgs/MGS/exports/*/stats /proc/fs/lustre/ost/OSS/*/stats /proc/fs/lustre/osc/*/stats /proc/fs/lustre/obdfilter/*/exports/*/stats /proc/fs/lustre/obdfilter/*/stats /proc/fs/lustre/llite/*/stats
The llverdev verifies a block device is functioning properly over its full size.
llverdev [-cchunksize] [-f] [-h] [-ooffset] [-l] [-p] [-r] [-ttimestamp] [-v] [-w]device
Sometimes kernel drivers or hardware devices have bugs that prevent them from accessing the full device size correctly, or possibly have bad sectors on disk or other problems which prevent proper data storage. There are often defects associated with major system boundaries such as 2^32 bytes, 2^31 sectors, 2^31 blocks, 2^32 blocks, etc.
The llverdev utility writes and verifies a unique test pattern across the entire device to ensure that data is accessible after it was written, and that data written to one part of the disk is not overwriting data on another part of the disk.
It is expected that llverdev will be run on large size devices (TB). It is always better to run llverdev in verbose mode, so that device testing can be easily restarted from the point where it was stopped.
Running a full verification can be time-consuming for very large devices. We recommend starting with a partial verification to ensure that the device is minimally sane before investing in a full verification.
|
Option |
|
Description |
|---|---|---|
|
|
I/O chunk size in bytes (default value is 1048576). | |
|
|
Forces the test to run without a confirmation that the device will be overwritten and all data will be permanently destroyed. | |
|
|
Displays a brief help message. | |
|
|
Offset (in kilobytes) of the start of the test (default value is 0). | |
|
|
Runs a full check, writing and then reading and verifying every block on the disk. | |
|
|
Runs a partial check, only doing periodic checks across the device (1 GB steps). | |
|
|
Runs the test in read (verify) mode only, after having previously run the test in | |
|
|
Sets the test start time as printed at the start of a previously-interrupted test to ensure that validation data is the same across the entire file system (default value is the current time()). | |
|
|
Runs the test in verbose mode, listing each read and write operation. | |
|
|
Runs the test in write (test-pattern) mode (default runs both read and write). | |
Runs a partial device verification on /dev/sda:
llverdev -v -p /dev/sda llverdev: permanently overwrite all data on /dev/sda (yes/no)? y llverdev: /dev/sda is 4398046511104 bytes (4096.0 GB) in size Timestamp: 1009839028 Current write offset: 4096 kB
Continues an interrupted verification at offset 4096kB from the start of the device, using the same timestamp as the previous run:
llverdev -f -v -p --offset=4096 --timestamp=1009839028 /dev/sda llverdev: /dev/sda is 4398046511104 bytes (4096.0 GB) in size Timestamp: 1009839028 write complete read complete
The lshowmount utility shows Lustre exports.
The lshowmount utility shows the hosts that have Lustre mounted to a server. This utility looks for exports from the MGS, MDS, and obdfilter.
|
Option |
Description |
|---|---|
|
|
Causes lshowmount to list each client mounted on a separate line instead of trying to compress the list of clients into a hostrange string. |
|
|
Causes lshowmount to print out a usage message. |
|
|
Causes lshowmount to try to look up the hostname for NIDs that look like IP addresses. |
|
|
Causes lshowmount to output export information for each service instead of only displaying the aggregate information for all Lustre services on the server. |
The lst utility starts LNet self-test.
LNet self-test helps site administrators confirm that Lustre Networking (LNet) has been properly installed and configured. The self-test also confirms that LNet and the network software and hardware underlying it are performing as expected.
Each LNet self-test runs in the context of a session. A node can be associated with only one session at a time, to ensure that the session has exclusive use of the nodes on which it is running. A session is create, controlled and monitored from a single node; this is referred to as the self-test console.
Any node may act as the self-test console. Nodes are named and allocated to a self-test session in groups. This allows all nodes in a group to be referenced by a single name.
Test configurations are built by describing and running test batches. A test batch is a named collection of tests, with each test composed of a number of individual point-to-point tests running in parallel. These individual point-to-point tests are instantiated according to the test type, source group, target group and distribution specified when the test is added to the test batch.
To run LNet self-test, load these modules: libcfs, lnet, lnet_selftest and any one of the klnds (ksocklnd, ko2iblnd...). To load all necessary modules, run modprobe lnet_selftest, which recursively loads the modules on which lnet_selftest depends.
There are two types of nodes for LNet self-test: the console node and test nodes. Both node types require all previously-specified modules to be loaded. (The userspace test node does not require these modules).
Test nodes can be in either kernel or in userspace. A console user can invite a kernel test node to join the test session by running lst add_group NID, but the user cannot actively add a userspace test node to the test session. However, the console user can passively accept a test node to the test session while the test node runs lst client to connect to the console.
LNet self-test includes two user utilities, lst and lstclient.
lst is the user interface for the self-test console (run on the console node). It provides a list of commands to control the entire test system, such as create session, create test groups, etc.
lstclient is the userspace self-test program which is linked with userspace LNDs and LNet. A user can invoke lstclient to join a self-test session:
lstclient -sesid CONSOLE_NID group NAME
This is a sample LNet self-test script which simulates the traffic pattern of a set of Lustre servers on a TCP network, accessed by Lustre clients on an IB network (connected via LNet routers), with half the clients reading and half the clients writing.
#!/bin/bash export LST_SESSION=$$ lst new_session read/write lst add_group servers 192.168.10.[8,10,12-16]@tcp lst add_group readers 192.168.1.[1-253/2]@o2ib lst add_group writers 192.168.1.[2-254/2]@o2ib lst add_batch bulk_rw lst add_test --batch bulk_rw --from readers --to servers brw read check\ =simple size=1M lst add_test --batch bulk_rw --from writers --to servers brw write chec\ k=full size=4K # start running lst run bulk_rw # display server stats for 30 seconds lst stat servers & sleep 30; kill $! # tear down lst end_session
The lustre_rmmod.sh utility removes all Lustre and LNet modules (assuming no Lustre services are running). It is located in /usr/bin.
Note
The lustre_rmmod.sh utility does not work if Lustre modules are being used or if you have manually run the lctl network up command.
The lustre_rsync utility synchronizes (replicates) a Lustre file system to a target file system.
lustre_rsync --source|-ssrc--target|-ttgt--mdt|-mmdt[--user|-uuserid] [--xattr|-xyes|no] [--verbose|-v] [--statuslog|-llog] [--dry-run] [--abort-on-err] lustre_rsync --statuslog|-lloglustre_rsync --statuslog|-llog--source|-ssource--target|-ttgt--mdt|-mmdt
The lustre_rsync utility is designed to synchronize (replicate) a Lustre file system (source) to another file system (target). The target can be a Lustre file system or any other type, and is a normal, usable file system. The synchronization operation is efficient and does not require directory walking, as lustre_rsync uses Lustre MDT changelogs to identify changes in the Lustre file system.
Before using lustre_rsync:
A changelog user must be registered (see lctl (8) changelog_register)
- AND -
Verify that the Lustre file system (source) and the replica file system (target) are identical before the changelog user is registered. If the file systems are discrepant, use a utility, e.g. regular rsync (not lustre_rsync) to make them identical.
|
Option |
Description |
|---|---|
|
|
The path to the root of the Lustre file system (source) which will be synchronized. This is a mandatory option if a valid status log created during a previous synchronization operation (--statuslog) is not specified. |
|
|
The path to the root where the source file system will be synchronized (target). This is a mandatory option if the status log created during a previous synchronization operation (--statuslog) is not specified. This option can be repeated if multiple synchronization targets are desired. |
|
|
The metadata device to be synchronized. A changelog user must be registered for this device. This is a mandatory option if a valid status log created during a previous synchronization operation (--statuslog) is not specified. |
|
|
The changelog user ID for the specified MDT. To use lustre_rsync, the changelog user must be registered. For details, see the changelog_register parameter in the lctl man page. This is a mandatory option if a valid status log created during a previous synchronization operation (--statuslog) is not specified. |
|
|
A log file to which synchronization status is saved. When lustre_rsync starts, the state of a previous replication is read from here. If the status log from a previous synchronization operation is specified, otherwise mandatory options like --source, --target and --mdt options may be skipped. By specifying options like --source, --target and/or --mdt in addition to the --statuslog option, parameters in the status log can be overridden. Command line options take precedence over options in the status log. |
|
|
Specifies whether extended attributes (xattrs) are synchronized or not. The default is to synchronize extended attributes. NOTE: Disabling xattrs causes Lustre striping information not to be synchronized. |
|
|
Produces a verbose output. |
|
|
Shows the output of lustre_rsync commands (copy, mkdir, etc.) on the target file system without actually executing them. |
|
|
Shows the output of lustre_rsync commands (copy, mkdir, etc.) on the target file system without actually executing them. |
Register a changelog user for an MDT (e.g., MDT lustre-MDT0000).
$ ssh
$ MDS lctl changelog_register \
--device lustre-MDT0000 -n
cl1Synchronize/replicate a Lustre file system (/mnt/lustre) to a target file system (/mnt/target).
$ lustre_rsync --source=/mnt/lustre --target=/mnt/target \
--mdt=lustre-MDT0000 --user=cl1 \
--statuslog replicate.log --verbose
Lustre filesystem: lustre
MDT device: lustre-MDT0000
Source: /mnt/lustre
Target: /mnt/target
Statuslog: sync.log
Changelog registration: cl1
Starting changelog record: 0
Errors: 0
lustre_rsync took 1 seconds
Changelog records consumed: 22
After the file system undergoes changes, synchronize the changes with the target file system. Only the statuslog name needs to be specified, as it has all the parameters passed earlier.
$ lustre_rsync --statuslog replicate.log --verbose Replicating Lustre filesystem: lustre MDT device: lustre-MDT0000 Source: /mnt/lustre Target: /mnt/target Statuslog: replicate.log Changelog registration: cl1 Starting changelog record: 22 Errors: 0 lustre_rsync took 2 seconds Changelog records consumed: 42
Synchronize a Lustre file system (/mnt/lustre) to two target file systems (/mnt/target1 and /mnt/target2).
$ lustre_rsync --source=/mnt/lustre \ --target=/mnt/target1 --target=/mnt/target2 \ --mdt=lustre-MDT0000 --user=cl1 --statuslog replicate.log
The mkfs.lustre utility formats a disk for a Lustre service.
mkfs.lustretarget_type[options]device
where target_type is one of the following:
|
Option |
Description |
|---|---|
|
|
Object storage target (OST) |
|
|
Metadata storage target (MDT) |
|
|
Network(s) to which to restrict this OST/MDT. This option can be repeated as necessary. |
|
|
Configuration management service (MGS), one per site. This service can be
combined with one |
mkfs.lustre is used to format a disk device for use as part of a
Lustre file system. After formatting, a disk can be mounted to start the Lustre service
defined by this command.
When the file system is created, parameters can simply be added as a
--param option to the mkfs.lustre command. See Section 13.12.1, “Setting Tunable Parameters with
mkfs.lustre”.
|
Option |
Description | |
|---|---|---|
|
|
Forces a particular format for the backing file system such as ldiskfs (the default) or zfs. | |
|
|
Sets a user comment about this disk, ignored by the Lustre software. | |
|
|
Sets the device size for loop devices. | |
|
|
Only prints what would be done; it does not affect the disk. | |
--servicenode=
| Sets the NID(s) of all service nodes, including primary
and failover partner service nodes. The
--servicenode option cannot be used with
--failnode option. See
Section 11.2, “Preparing a Lustre File System for Failover” for
more details. | |
|
|
Sets the NID(s) of a failover service node for a primary server for a target.
The NoteWhen the | |
|
|
The Lustre file system of which this service/node will be a part. The default
file system name is
NoteThe file system name is limited to 8 characters. | |
|
|
Specifies the OST or MDT number (0...N). This allows mapping between the OSS and MDS node and the device on which the OST or MDT is located. | |
|
|
Formats options for the backing file system. For example, ext3 options could be set here. | |
|
|
Sets the mount options used when the backing file system is mounted. WarningUnlike earlier versions of The defaults for ldiskfs are: MGS/MDT: OST: Introduced in Lustre 2.5
OST: Use care when altering the default mount options. | |
|
|
Network(s) to which to restrict this OST/MDT. This option can be repeated as necessary. | |
|
|
Sets the NIDs of the MGS node, required for all targets other than the MGS. | |
|
|
Sets the permanent parameter | |
|
|
|
System obd timeout. |
|
|
|
Default stripe size. |
|
|
|
Default stripe count. |
|
|
|
Returns errors instead of waiting for recovery. |
|
|
Prints less information. | |
|
|
Reformats an existing Lustre disk. | |
|
|
Used to optimize the MDT's inode size. | |
|
|
Prints more information. | |
Creates a combined MGS and MDT for file system testfs on, e.g., node cfs21:
mkfs.lustre --fsname=testfs --mdt --mgs /dev/sda1
Creates an OST for file system testfs on any node (using the above
MGS):
mkfs.lustre --fsname=testfs --mgsnode=cfs21@tcp0 --ost --index=0 /dev/sdb
Creates a standalone MGS on, e.g., node cfs22:
mkfs.lustre --mgs /dev/sda1
Creates an MDT for file system myfs1 on any node (using the above MGS):
mkfs.lustre --fsname=myfs1 --mdt --mgsnode=cfs22@tcp0 /dev/sda2
Section 44.12, “ mkfs.lustre” mkfs.lustre,
Section 44.13, “ mount.lustre” mount.lustre,
The mount.lustre utility starts a Lustre client or target service.
The mount.lustre utility starts a Lustre client or target service. This program should not be called directly; rather, it is a helper program invoked through mount(8), as shown above. Use the umount command to stop Lustre clients and targets.
There are two forms for the device option, depending on whether a client or a target service is started:
|
Option |
Description |
|---|---|
|
|
Mounts the Lustre file system named
|
|
|
Starts the target service defined by the
|
|
Option |
Description |
|---|---|
|
|
|
|
|
Each |
|
|
Specifies the encryption flavor for the initial network
RPC connection to the MGS. Non-security flavors are:
|
|
|
Introduced in Lustre 2.9
Path to a file or directory with the keyfile(s) to load for
this mount command. Keys are inserted into the
|
|
|
Starts a client or MDT with a colon-separated list of known inactive OSTs that it will not try to connect to. |
In addition to the standard mount(8) options, Lustre understands the following client-specific options:
|
Option |
Description |
|---|---|
|
|
Introduced in Lustre 2.9
The client will periodically ping the server when it is
idle, even if the server |
|
|
Enables advisory file locking support between
participating applications using the |
|
|
Enables client-local |
|
|
Disables |
|
|
Allows |
|
|
Requires that |
|
|
Enables get/set of extended attributes by regular users
in the |
|
|
Disables use of extended attributes in the
|
|
|
Enable extra mount/umount console messages. |
|
|
Disable mount/umount console messages. |
|
|
Enable FID-to-path translation by regular users. NoteThis option allows a potential security hole because it allows regular users direct access to a file by its Lustre File ID. This bypasses POSIX path-based permission checks, and could allow the user to access a file in a directory that they do not have access to. Regular POSIX file mode and ACL permission checks are still performed on the file itself, so users cannot access a file to which they have no permission. |
|
|
Disable FID to path translation by
regular users. Root and processes with
|
In addition to the standard mount options and backing disk type (e.g. ldiskfs) options, Lustre understands the following server-specific mount options:
|
Option |
Description |
|---|---|
|
|
Starts the MGC (and MGS, if co-located) for a target service, not the actual service. |
|
|
Starts only the MDT (with a co-located MGS), without starting the MGS. |
|
|
Aborts client recovery on that server and starts the target service immediately. |
|
|
Introduced in Lustre 2.10
Sets the block device parameter
|
|
|
Sets the stripe cache size for server-side disk with a striped RAID configuration. |
|
|
Allows The default soft recovery timeout is 3 times the value of the Lustre timeout parameter (see Section 39.5.2, “Setting Static Timeouts”). The default Lustre timeout is 100 seconds, which would make the soft recovery timeout default to 300 seconds (5 minutes). The soft recovery timeout is set at mount time and will not change if the Lustre timeout is changed after mount time. |
|
|
The server is allowed to incrementally extend its timeout
up to a hard maximum of The default hard recovery timeout is 9 times the value of the Lustre timeout parameter (see Section 39.5.2, “Setting Static Timeouts”). The default Lustre timeout is 100 seconds, which would make the hard recovery timeout default to 900 seconds (15 minutes). The hard recovery timeout is set at mount time and will not change if the Lustre timeout is changed after mount time. |
|
|
Typically the MDT will detect restoration from a file-level backup during mount. This mount option prevents the OI Scrub from starting automatically when the MDT is mounted. Manually starting LFSCK after mounting provides finer control over the starting conditions. This mount option also prevents OI scrub from occurring automatically when OI inconsistency is detected (see Section 36.4.4.2, “Auto scrub”). |
Starts a client for the Lustre file system
chipfs at mount point
/mnt/chip. The Management Service is running on
a node reachable from this client via the cfs21@tcp0 NID.
mount -t lustre cfs21@tcp0:/chipfs /mnt/chip
Similar to the above example, but mounting a
subdirectory under chipfs as a fileset.
mount -t lustre cfs21@tcp0:/chipfs/v1_0 /mnt/chipv1_0
Starts the Lustre metadata target service from /dev/sda1 on mount point /mnt/test/mdt.
mount -t lustre /dev/sda1 /mnt/test/mdt
Starts the testfs-MDT0000 service (using the disk label), but aborts the recovery process.
mount -t lustre -L testfs-MDT0000 -o abort_recov /mnt/test/mdt
The routerstat utility prints Lustre router statistics.
The routerstat utility displays LNet router statistics. If no intervalinterval
The routerstat output includes the following fields:
|
Output |
Description |
|---|---|
|
|
Number of messages currently being processed by LNet (The maximum number of messages ever processed by LNet concurrently) |
|
|
Number of LNet errors |
|
|
Total size (length) of messages sent in bytes/ Number of messages sent |
|
|
Total size (length) of messages received in bytes/ Number of messages received |
|
|
Total size (length) of messages routed in bytes/ Number of messages routed |
|
|
Total size (length) of messages dropped in bytes/ Number of messages dropped |
When an interval
|
Output |
Description |
|---|---|
|
|
Number of messages currently being processed by LNet (The maximum number of messages ever processed by LNet concurrently) |
|
|
Number of LNet errors per second |
|
|
Rate of data sent in Mbytes per second/ Count of messages sent per second |
|
|
Rate of data received in Mbytes per second/ Count of messages received per second |
|
|
Rate of data routed in Mbytes per second/ Count of messages routed per second |
|
|
Rate of data dropped in Mbytes per second/ Count of messages dropped per second |
# routerstat 1 M 0(13) E 0 S 117379184/4250 R 878480/4356 F 0/0 D 0/0 M 0( 13) E 0 S 7.00/ 7 R 0.00/ 14 F 0.00/ 0 D 0.00/0 M 0( 13) E 0 S 7.00/ 7 R 0.00/ 14 F 0.00/ 0 D 0.00/0 M 0( 13) E 0 S 8.00/ 8 R 0.00/ 16 F 0.00/ 0 D 0.00/0 M 0( 13) E 0 S 7.00/ 7 R 0.00/ 14 F 0.00/ 0 D 0.00/0 M 0( 13) E 0 S 7.00/ 7 R 0.00/ 14 F 0.00/ 0 D 0.00/0 M 0( 13) E 0 S 7.00/ 7 R 0.00/ 14 F 0.00/ 0 D 0.00/0 M 0( 13) E 0 S 7.00/ 7 R 0.00/ 14 F 0.00/ 0 D 0.00/0 M 0( 13) E 0 S 8.00/ 8 R 0.00/ 16 F 0.00/ 0 D 0.00/0 M 0( 13) E 0 S 7.00/ 7 R 0.00/ 14 F 0.00/ 0 D 0.00/0 ...
The tunefs.lustre utility modifies configuration
information on a Lustre target disk.
tunefs.lustre is used to modify configuration
information on a Lustre target disk. This does not reformat the disk or
erase the target information, but incorrectly modifying the configuration
information may result in an unusable file system.
Caution
Changes made here affect a file system only when the target is mounted the next time.
With tunefs.lustre, parameters are
"additive" -- new parameters are specified in addition to old
parameters, they do not replace them. To erase all previously-specified
tunefs.lustre parameters and use only newly-specified
parameters, run:
$ tunefs.lustre --erase-params --param=new_parameters
The tunefs.lustre command can be used to set any
parameter settable in a /proc/fs/lustre file and that has its own OBD
device. The parameter names generally take the form
{obd|fsname}.obdtype.parameter=value.
For example:
$ tunefs.lustre --param mdt.identity_upcall=NONE /dev/sda1
The tunefs.lustre options are listed and explained below.
|
Option |
Description |
|---|---|
|
|
Sets a user comment about this disk, ignored by Lustre. |
|
|
Only prints what would be done; does not affect the disk. |
|
|
Removes all previous parameter information. |
--servicenode= | Sets the NID(s) of all service nodes, including primary and failover partner
service nodes. The --servicenode option cannot be used with
--failnode option. See
Section 11.2, “Preparing a Lustre File System for Failover” for
more details. |
|
|
Sets the NID(s) of a failover service node for a primary
server for a target. The NoteWhen the
|
|
|
The Lustre file system of which this service will be a part. The default file
system name is |
|
|
Forces a particular OST or MDT index. |
|
|
Sets the mount options used when the backing file system is mounted. WarningUnlike earlier versions of tunefs.lustre, this version completely replaces the existing mount options with those specified on the command line, and issues a warning on stderr if any default mount options are omitted. The defaults for ldiskfs are: MGS/MDT: OST: Introduced in Lustre 2.5
OST: Do not alter the default mount options unless you know what you are doing. |
|
|
Network(s) to which to restrict this OST/MDT. This option can be repeated as necessary. |
|
|
Adds a configuration management service to this target. |
|
|
Sets the NID(s) of the MGS node; required for all targets other than the MGS. |
|
|
Removes a configuration management service to this target. |
|
|
Prints less information. |
|
|
Prints more information. |
|
|
Erases all configuration logs for the file system to which this MDT belongs, and regenerates them. This is dangerous operation. All clients must be unmounted and servers for this file system should be stopped. All targets (OSTs/MDTs) must then be restarted to regenerate the logs. No clients should be started until all targets have restarted. The correct order of operations is:
|
Change the MGS's NID address. (This should be done on each target disk, since they should all contact the same MGS.)
tunefs.lustre --erase-param --mgsnode=new_nid --writeconf /dev/sdaAdd a failover NID location for this target.
tunefs.lustre --param="failover.node=192.168.0.13@tcp0" /dev/sda
This section describes additional system configuration utilities for Lustre.
Lustre includes per-client and improved MDT statistics:
Per-client statistics tracked on the servers
Each MDS and OSS now tracks LDLM and operations statistics for every connected client, for comparisons and simpler collection of distributed job statistics.
{mds,obdfilter}.*.exports
Improved MDT statistics
More detailed MDT operations statistics are collected for better profiling.
mdt.*.md_stats
Lustre offers the following test and debugging utilities.
The lr_reader utility translates the content of the last_rcvd and reply_data files into human-readable form.
The following utilities are part of the Lustre I/O kit. For more information, see Chapter 33, Benchmarking Lustre File System Performance (Lustre I/O Kit).
The sgpdd-survey utility tests 'bare metal' performance,
bypassing as much of the kernel as possible. The sgpdd-survey tool does
not require Lustre, but it does require the sgp_dd package.
Caution
The sgpdd-survey utility erases all data on the device.
The obdfilter-survey utility is a shell script that tests
performance of isolated OSTS, the network via echo clients, and an end-to-end test.
The ior-survey utility is a script used to run the IOR benchmark. Lustre includes IOR version 2.8.6.
With the fileset feature, Lustre now provides subdirectory mount support. Subdirectory mounts, also referred to as filesets, allow a client to mount a child directory of a parent filesystem, thereby limiting the filesystem namespace visibility on a specific client. A common use case is for a client to use a subdirectory mount when there is a desire to limit the visibility of the entire filesystem namesapce to aid in the prevention of accidental file deletions outside of the subdirectory mount.
It is important to note that invocation of the subdirectory mount is voluntary by the client and not does prevent access to files that are visible in multiple subdirectory mounts via hard links. Furthermore, it does not prevent the client from subsequently mounting the whole file system without a subdirectory being specified.
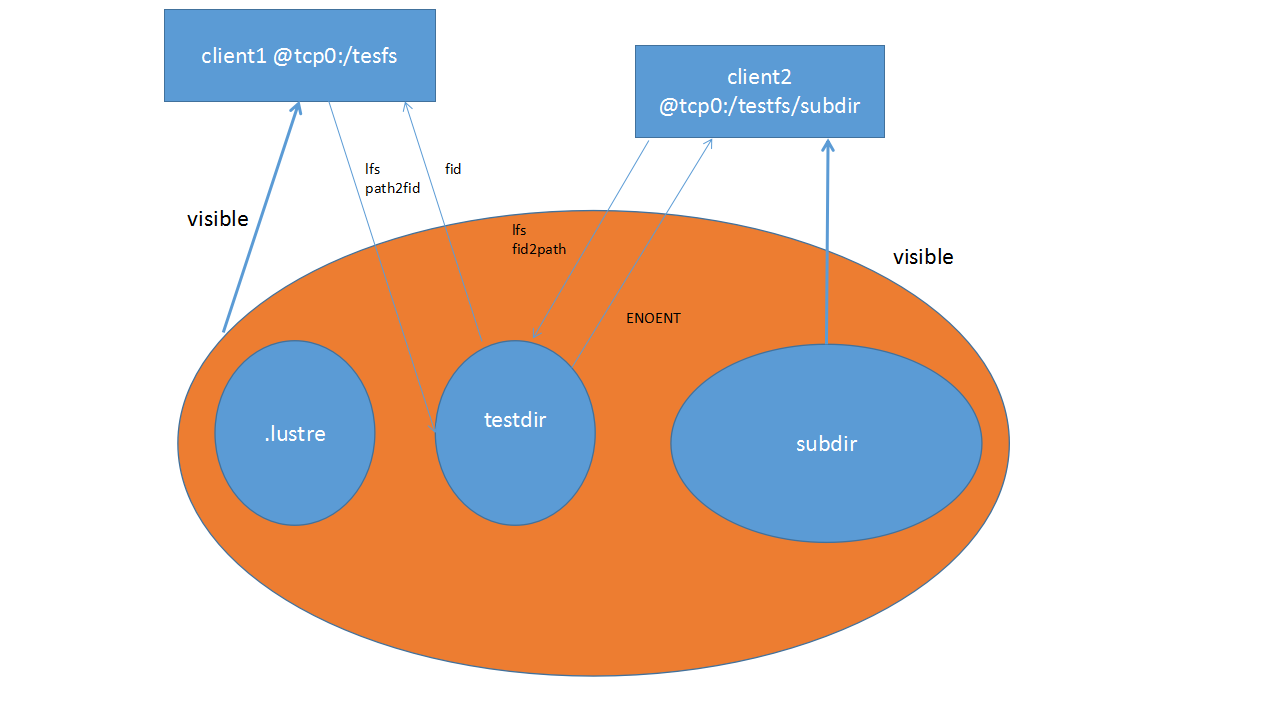
The following example will mount the
chipfs filesystem on client1 and create a
subdirectory v1_1 within that filesystem. Client2
will then mount only the v1_1 subdirectory as a
fileset, thereby limiting access to anything else in the
chipfs filesystem from client2.
client1# mount -t lustre mgs@tcp:/chipfs /mnt/chip client1# mkdir /mnt/chip/v1_1
client2# mount -t lustre mgs@tcp:/chipfs/v1_1 /mnt/chipv1_1
You can check the created mounts in /etc/mtab. It should look like the following:
client1
mds@tcp0:/chipfs/ /mnt/chip lustre rw 0 0
client2
mds@tcp0:/chipfs/v1_1 /mnt/chipv1_1 lustre rw 0 0Create a directory under the /mnt/chip mount, and get its FID
client1# mkdir /mnt/chip/v1_2 client1# lfs path2fid /mnt/chip/v1_2 [0x200000400:0x2:0x0]
If you try resolve the FID of the /mnt/chip/v1_2
path (as created in the example above) on client2, an error will be returned
as the FID can not be resolved on client2 since it is not part of the
mounted fileset on that client. Recall that the fileset on client2 mounted
the v1_1 subdirectory beneath the top level
chipfs filesystem.
client2# lfs fid2path /mnt/chip/v1_2 [0x200000400:0x2:0x0] fid2path: error on FID [0x200000400:0x2:0x0]: No such file or directory
Subdirectory mounts do not have the .lustre
pseudo directory, which prevents clients from opening or accessing files
only by FID.
client1# ls /mnt/chipfs/.lustre
fid lost+foundclient2# ls /mnt/chipv1_1/.lustre
ls: cannot access /mnt/chipv1_1/.lustre: No such file or directory
Table of Contents
- 45.1. General API Information
- 45.2. The LNet Configuration C-API
- 45.2.1. Configuring LNet
- 45.2.2. Enabling and Disabling Routing
- 45.2.3. Adding Routes
- 45.2.4. Deleting Routes
- 45.2.5. Showing Routes
- 45.2.6. Adding a Network Interface
- 45.2.7. Deleting a Network Interface
- 45.2.8. Showing Network Interfaces
- 45.2.9. Adjusting Router Buffer Pools
- 45.2.10. Showing Routing information
- 45.2.11. Showing LNet Traffic Statistics
- 45.2.12. Adding/Deleting/Showing Parameters through a YAML Block
- 45.2.13. Adding a route code example
This section describes the LNet Configuration C-API library. This API allows the developer to programatically configure LNet. It provides APIs to add, delete and show LNet configuration items listed below. The API utilizes IOCTL to communicate with the kernel. Changes take effect immediately and do not require restarting LNet. API calls are synchronous
Configuring LNet
Enabling/Disabling routing
Adding/removing/showing Routes
Adding/removing/showing Networks
Configuring Router Buffer Pools
LUSTRE_CFG_RC_NO_ERR 0 LUSTRE_CFG_RC_BAD_PARAM -1 LUSTRE_CFG_RC_MISSING_PARAM -2 LUSTRE_CFG_RC_OUT_OF_RANGE_PARAM -3 LUSTRE_CFG_RC_OUT_OF_MEM -4 LUSTRE_CFG_RC_GENERIC_ERR -5
All APIs take as input a sequence number. This is a number that's assigned by the caller of the API, and is returned in the YAML error return block. It is used to associate the request with the response. It is especially useful when configuring via the YAML interface, since typically the YAML interface is used to configure multiple items. In the return Error block, it is desired to know which items were configured properly and which were not configured properly. The sequence number achieves this purpose.
Once a YAML block is parsed it needs to be stored structurally in order to facilitate passing it to different functions, querying it and printing it. Also it is required to be able to build this internal representation from data returned from the kernel and return it to the caller, which can query and print it. This structure representation is used for the Error and Show API Out parameters. For this YAML is internally represented via this structure:
typedef enum {
EN_YAML_TYPE_FALSE = 0,
EN_YAML_TYPE_TRUE,
EN_YAML_TYPE_NULL,
EN_YAML_TYPE_NUMBER,
EN_YAML_TYPE_STRING,
EN_YAML_TYPE_ARRAY,
EN_YAML_TYPE_OBJECT
} cYAML_object_type_t;
typedef struct cYAML {
/* next/prev allow you to walk array/object chains. */
struct cYAML *cy_next, *cy_prev;
/* An array or object item will have a child pointer pointing
to a chain of the items in the array/object. */
struct cYAML *cy_child;
/* The type of the item, as above. */
cYAML_object_type_t cy_type;
/* The item's string, if type==EN_YAML_TYPE_STRING */
char *cy_valuestring;
/* The item's number, if type==EN_YAML_TYPE_NUMBER */
int cy_valueint;
/* The item's number, if type==EN_YAML_TYPE_NUMBER */
double cy_valuedouble;
/* The item's name string, if this item is the child of,
or is in the list of subitems of an object. */
char *cy_string;
/* user data which might need to be tracked per object */
void *cy_user_data;
} cYAML;All APIs return a cYAML error block. This error block has the following format, when it's printed out. All configuration errors shall be represented in a YAML sequence
<cmd>:
- <entity>:
errno: <error number>
seqno: <sequence number>
descr: <error description>
Example:
add:
- route
errno: -2
seqno: 1
descr: Missing mandatory parameter(s) - networkAll Show APIs return a cYAML show block. This show block represents the information requested in YAML format. Each configuration item has its own YAML syntax. The YAML syntax of all supported configuration items is described later in this document. Below is an example of a show block:
net:
- nid: 192.168.206.130@tcp4
status: up
interfaces:
0: eth0
tunables:
peer_timeout: 10
peer_credits: 8
peer_buffer_credits: 30
credits: 40
/*
* lustre_lnet_config_ni_system
* Initialize/Uninitialize the LNet NI system.
*
* up - whether to init or uninit the system
* load_ni_from_mod - load NI from mod params.
* seq_no - sequence number of the request
* err_rc - [OUT] struct cYAML tree describing the error. Freed by
* caller
*/
int lustre_lnet_config_ni_system(bool up, bool load_ni_from_mod,
int seq_no, struct cYAML **err_rc);IOCTL to Kernel:
IOC_LIBCFS_CONFIGURE or IOC_LIBCFS_UNCONFIGURE
Description:
Configuring LNet
Initialize LNet internals and load any networks specified in the module
parameter if load_ni_from_mod is set. Otherwise do not
load any network interfaces.
Unconfiguring LNet
Bring down LNet and clean up network itnerfaces, routes and all LNet internals.
Return Value
0: if success
-errno: if failure
/*
* lustre_lnet_enable_routing
* Send down an IOCTL to enable or disable routing
*
* enable - 1 to enable routing, 0 to disable routing
* seq_no - sequence number of the request
* err_rc - [OUT] cYAML tree describing the error. Freed by caller
*/
extern int lustre_lnet_enable_routing(int enable,
int seq_no,
cYAML **err_rc);IOCTL to Kernel:
IOC_LIBCFS_ENABLE_RTR
Description:
Enabling Routing
The router buffer pools are allocated using the default values. Internally the node is then flagged as a Router node. The node can be used as a router from this point on.
Disabling Routing
The unused router buffer pools are freed. Buffers currently in use are not freed until they are returned to the unused list. Internally the node routing flag is turned off. Any subsequent messages not destined to this node are dropped.
Enabling Routing on an already enabled node, or vice versa
In both these cases the LNet Kernel module ignores this request.
Return Value
-ENOMEM: if there is no memory to allocate buffer pools
0: if success
/*
* lustre_lnet_config_route
* Send down an IOCTL to the kernel to configure the route
*
* nw - network
* gw - gateway
* hops - number of hops passed down by the user
* prio - priority of the route
* err_rc - [OUT] cYAML tree describing the error. Freed by caller
*/
extern int lustre_lnet_config_route(char *nw, char *gw,
int hops, int prio,
int seq_no,
cYAML **err_rc);IOCTL to Kernel:
IOC_LIBCFS_ADD_ROUTE
Description:
The LNet Kernel module adds this route to the list of existing routes, if one doesn't already exist. If the hops parameter is not specified then the hop count is set to "undefined"(-1). If the priority parameter is not specified then the priority is set to 0. All routes with the same hop and priority are used in round robin. Routes with lower number of hops and/or higher priority are preferred. 0 is the highest priority. "Undefined" hops (-1) is treated as 1 during route selection.
If a route already exists the request to add the same route is ignored.
Return Value
-EINVAL: if the network of the route is local
-ENOMEM: if there is no memory
-EHOSTUNREACH: if the host is not on a local network
0: if success
/*
* lustre_lnet_del_route
* Send down an IOCTL to the kernel to delete a route
*
* nw - network
* gw - gateway
*/
extern int lustre_lnet_del_route(char *nw, char *gw,
int seq_no,
cYAML **err_rc);IOCTL to Kernel:
IOC_LIBCFS_DEL_ROUTE
Description:
LNet will remove the route which matches the network and gateway passed in. If no route matches, then the operation fails with an appropriate error number.
Return Value
-ENOENT: if the entry being deleted doesn't exist
0: if success
/*
* lustre_lnet_show_route
* Send down an IOCTL to the kernel to show routes
* This function will get one route at a time and filter according to
* provided parameters. If no filter is provided then it will dump all
* routes that are in the system.
*
* nw - network. Optional. Used to filter output
* gw - gateway. Optional. Used to filter ouptut
* hops - number of hops passed down by the user
* Optional. Used to filter output.
* prio - priority of the route. Optional. Used to filter output.
* detail - flag to indicate whether detail output is required
* show_rc - [OUT] The show output in YAML. Must be freed by caller.
* err_rc - [OUT] cYAML tree describing the error. Freed by caller
*/
extern int lustre_lnet_show_route(char *nw, char *gw,
int hops, int prio, int detail,
int seq_no,
cYAML **show_rc,
cYAML **err_rc);IOCTL to Kernel:
IOC_LIBCFS_GET_ROUTE
Description:
The routes are fetched from the kernel one by one and packed in a cYAML block, after filtering according to the parameters passed in. The cYAML block is then returned to the caller of the API.
An example with the detail parameter set to 1
route:
net: tcp5
gateway: 192.168.205.130@tcp
hop: 1.000000
priority: 0.000000
state: upAn Example with the detail parameter set to 0
route:
net: tcp5
gateway: 192.168.205.130@tcpReturn Value
-ENOMEM: If no memory
0: if success
/*
* lustre_lnet_config_net
* Send down an IOCTL to configure a network.
*
* net - the network name
* intf - the interface of the network of the form net_name(intf)
* peer_to - peer timeout
* peer_cr - peer credit
* peer_buf_cr - peer buffer credits
* - the above are LND tunable parameters and are optional
* credits - network interface credits
* smp - cpu affinity
* err_rc - [OUT] cYAML tree describing the error. Freed by caller
*/
extern int lustre_lnet_config_net(char *net,
char *intf,
int peer_to,
int peer_cr,
int peer_buf_cr,
int credits,
char *smp,
int seq_no,
cYAML **err_rc);IOCTL to Kernel:
IOC_LIBCFS_ADD_NET
Description:
A new network is added and initialized. This has the same effect as configuring a network from the module parameters. The API allows the specification of network parameters such as the peer timeout, peer credits, peer buffer credits and credits. The CPU affinity of the network interface being added can also be specified. These parameters become network specific under Dynamic LNet Configuration (DLC), as opposed to being per LND as it was previously.
If an already existing network is added the request is ignored.
Return Value
-EINVAL: if the network passed in is not recognized.
-ENOMEM: if no memory
0: success
/*
* lustre_lnet_del_net
* Send down an IOCTL to delete a network.
*
* nw - network to delete.
* err_rc - [OUT] cYAML tree describing the error. Freed by caller
*/
extern int lustre_lnet_del_net(char *nw,
int seq_no,
cYAML **err_rc);IOCTL to Kernel:
IOC_LIBCFS_DEL_NET
Description:
The network interface specified is deleted. All resources associated with this network interface are freed. All routes going over that Network Interface are cleaned up.
If a non existent network is deleted then the call return -EINVAL.
Return Value
-EINVAL: if the request references a non-existent network.
0: success
/*
* lustre_lnet_show_net
* Send down an IOCTL to show networks.
* This function will use the nw paramter to filter the output. If it's
* not provided then all networks are listed.
*
* nw - network to show. Optional. Used to filter output.
* detail - flag to indicate if we require detail output.
* show_rc - [OUT] The show output in YAML. Must be freed by caller.
* err_rc - [OUT] cYAML tree describing the error. Freed by caller
*/
extern int lustre_lnet_show_net(char *nw, int detail,
int seq_no,
cYAML **show_rc,
cYAML **err_rc);IOCTL to Kernel:
IOC_LIBCFS_GET_NET
Description:
The network interfaces are queried one at a time from the kernel and packed in a cYAML block, after filtering on the network (EX: tcp). If the detail field is set to 1, then the tunable section of the show block is included in the return.
An example of the detailed output
net:
nid: 192.168.206.130@tcp4
status: up
interfaces:
intf-0: eth0
tunables:
peer_timeout: 10
peer_credits: 8
peer_buffer_credits: 30
credits: 40An example of none detailed output
net:
nid: 192.168.206.130@tcp4
status: up
interfaces:
intf-0: eth0Return Value
-ENOMEM: if no memory to allocate the error or show blocks.
0: success
/*
* lustre_lnet_config_buf
* Send down an IOCTL to configure buffer sizes. A value of 0 means
* default that particular buffer to default size. A value of -1 means
* leave the value of the buffer unchanged.
*
* tiny - tiny buffers
* small - small buffers
* large - large buffers.
* err_rc - [OUT] cYAML tree describing the error. Freed by caller
*/
extern int lustre_lnet_config_buf(int tiny,
int small,
int large,
int seq_no,
cYAML **err_rc);IOCTL to Kernel:
IOC_LIBCFS_ADD_BUF
Description:
This API is used to configure the tiny, small and large router buffers dynamically. These buffers are used to buffer messages which are being routed to other nodes. The minimum value of these buffers per CPT are:
#define LNET_NRB_TINY_MIN 512 #define LNET_NRB_SMALL_MIN 4096 #define LNET_NRB_LARGE_MIN 256
The default values of these buffers are:
#define LNET_NRB_TINY (LNET_NRB_TINY_MIN * 4) #define LNET_NRB_SMALL (LNET_NRB_SMALL_MIN * 4) #define LNET_NRB_LARGE (LNET_NRB_LARGE_MIN * 4)
These default value is divided evenly across all CPTs. However, each CPT can only go as low as the minimum.
Multiple calls to this API with the same values has no effect
Return Value
-ENOMEM: if no memory to allocate buffer pools.
0: success
/*
* lustre_lnet_show_routing
* Send down an IOCTL to dump buffers and routing status
* This function is used to dump buffers for all CPU partitions.
*
* show_rc - [OUT] The show output in YAML. Must be freed by caller.
* err_rc - [OUT] struct cYAML tree describing the error. Freed by caller
*/
extern int lustre_lnet_show_routing(int seq_no, struct cYAML **show_rc,
struct cYAML **err_rc);
IOCTL to Kernel:
IOC_LIBCFS_GET_BUF
Description:
This API returns a cYAML block describing the values of each of the following per CPT:
The number of pages per buffer. This is a constant.
The number of allocated buffers. This is a constant.
The number of buffer credits . This is a real-time value of the number of buffer credits currently available. If this value is negative, that indicates the number of queued messages.
The lowest number of credits ever reached in the system. This is historical data.
The show block also returns the status of routing, whether enabled, or disabled.
An exmaple YAML block
routing:
- cpt[0]:
tiny:
npages: 0
nbuffers: 2048
credits: 2048
mincredits: 2048
small:
npages: 1
nbuffers: 16384
credits: 16384
mincredits: 16384
large:
npages: 256
nbuffers: 1024
credits: 1024
mincredits: 1024
- enable: 1Return Value
-ENOMEM: if no memory to allocate the show or error block.
0: success
/*
* lustre_lnet_show_stats
* Shows internal LNet statistics. This is useful to display the
* current LNet activity, such as number of messages route, etc
*
* seq_no - sequence number of the command
* show_rc - YAML structure of the resultant show
* err_rc - YAML strucutre of the resultant return code.
*/
extern int lustre_lnet_show_stats(int seq_no, cYAML **show_rc,
cYAML **err_rc);IOCTL to Kernel:
IOC_LIBCFS_GET_LNET_STATS
Description:
This API returns a cYAML block describing the LNet traffic statistics. Statistics are continuously incremented by LNet while it's alive. This API retuns the statistics at the time of the API call. The statistics include the following
Number of messages allocated
Maximum number of messages in the system
Errors allocating or sending messages
Cumulative number of messages sent
Cumulative number of messages received
Cumulative number of messages routed
Cumulative number of messages dropped
Cumulative number of bytes sent
Cumulative number of bytes received
Cumulative number of bytes routed
Cumulative number of bytes dropped
An exmaple YAML block
statistics:
msgs_alloc: 0
msgs_max: 0
errors: 0
send_count: 0
recv_count: 0
route_count: 0
drop_count: 0
send_length: 0
recv_length: 0
route_length: 0
drop_length: 0Return Value
-ENOMEM: if no memory to allocate the show or error block.
0: success
/*
* lustre_yaml_config
* Parses the provided YAML file and then calls the specific APIs
* to configure the entities identified in the file
*
* f - YAML file
* err_rc - [OUT] cYAML tree describing the error. Freed by caller
*/
extern int lustre_yaml_config(char *f, cYAML **err_rc);
/*
* lustre_yaml_del
* Parses the provided YAML file and then calls the specific APIs
* to delete the entities identified in the file
*
* f - YAML file
* err_rc - [OUT] cYAML tree describing the error. Freed by caller
*/
extern int lustre_yaml_del(char *f, cYAML **err_rc);
/*
* lustre_yaml_show
* Parses the provided YAML file and then calls the specific APIs
* to show the entities identified in the file
*
* f - YAML file
* show_rc - [OUT] The show output in YAML. Must be freed by caller.
* err_rc - [OUT] cYAML tree describing the error. Freed by caller
*/
extern int lustre_yaml_show(char *f,
cYAML **show_rc,
cYAML **err_rc);IOCTL to Kernel:
Depends on the entity being configured
Description:
These APIs add/remove/show the parameters specified in the YAML file respectively. The entities don't have to be uniform. Multiple different entities can be added/removed/showed in one YAML block.
An example YAML block
---
net:
- nid: 192.168.206.132@tcp
status: up
interfaces:
0: eth3
tunables:
peer_timeout: 180
peer_credits: 8
peer_buffer_credits: 0
credits: 256
SMP: "[0]"
route:
- net: tcp6
gateway: 192.168.29.1@tcp
hop: 4
detail: 1
seq_no: 3
- net: tcp7
gateway: 192.168.28.1@tcp
hop: 9
detail: 1
seq_no: 4
buffer:
- tiny: 1024
small: 2000
large: 512
...Return Value
Return value will correspond to the return value of the API that will be called to operate on the configuration item, as described in previous sections
int main(int argc, char **argv)
{
char *network = NULL, *gateway = NULL;
long int hop = -1, prio = -1;
struct cYAML *err_rc = NULL;
int rc, opt;
optind = 0;
const char *const short_options = "n:g:c:p:h";
const struct option long_options[] = {
{ "net", 1, NULL, 'n' },
{ "gateway", 1, NULL, 'g' },
{ "hop-count", 1, NULL, 'c' },
{ "priority", 1, NULL, 'p' },
{ "help", 0, NULL, 'h' },
{ NULL, 0, NULL, 0 },
};
while ((opt = getopt_long(argc, argv, short_options,
long_options, NULL)) != -1) {
switch (opt) {
case 'n':
network = optarg;
break;
case 'g':
gateway = optarg;
break;
case 'c':
rc = parse_long(optarg, &hop);
if (rc != 0) {
/* ignore option */
hop = -1;
continue;
}
break;
case 'p':
rc = parse_long(optarg, &prio);
if (rc != 0) {
/* ingore option */
prio = -1;
continue;
}
break;
case 'h':
print_help(route_cmds, "route", "add");
return 0;
default:
return 0;
}
}
rc = lustre_lnet_config_route(network, gateway, hop, prio, -1, &err_rc);
if (rc != LUSTRE_CFG_RC_NO_ERR)
cYAML_print_tree2file(stderr, err_rc);
cYAML_free_tree(err_rc);
return rc;
} For other code examples refer to
lnet/utils/lnetctl.c
A
- ACL
Access control list. An extended attribute associated with a file that contains enhanced authorization directives.
- Administrative OST failure
A manual configuration change to mark an OST as unavailable, so that operations intended for that OST fail immediately with an I/O error instead of waiting indefinitely for OST recovery to complete
C
- Completion callback
An RPC made by the lock server on an OST or MDT to another system, usually a client, to indicate that the lock is now granted.
- configlog
An llog file used in a node, or retrieved from a management server over the network with configuration instructions for the Lustre file system at startup time.
- Configuration lock
A lock held by every node in the cluster to control configuration changes. When the configuration is changed on the MGS, it revokes this lock from all nodes. When the nodes receive the blocking callback, they quiesce their traffic, cancel and re-enqueue the lock and wait until it is granted again. They can then fetch the configuration updates and resume normal operation.
D
- Default file layout
An extended attribute on the filesystem root directory that describes the default stripe count, stripe size, and layout pattern used for new files created in a file system. This can be amended by using a default file layout on a directory or a per-file layout.
- Direct I/O
A mechanism that can be used during read and write system calls to avoid memory cache overhead for large I/O requests. It bypasses the data copy between application and kernel memory, and avoids buffering the data in the client memory.
- Directory default file layout
An extended attribute that describes the default file layout used for new files created within that directory. This is also inherited by new subdirectories created in that directory at creation time.
- Distributed Namespace Environment (DNE)
A collection of metadata targets serving a single file system namespace. Without DNE, Lustre file systems are limited to a single metadata target for the entire name space. Without the ability to distribute metadata load over multiple targets, Lustre file system performance may be limited. The DNE functionality has two types of scalability. Remote Directories (DNE1) allows sub-directories to be serviced by an independent MDT(s), increasing aggregate metadata capacity and performance for independent sub-trees of the filesystem. This also allows performance isolation of workloads running in a specific sub-directory on one MDT from workloads on other MDTs. In Lustre 2.8 and later Striped Directories (DNE2) allows a single directory to be serviced by multiple MDTs.
E
- EA
Extended attribute (also xattr). A small amount of metadata stored on a file that can be retrieved by a name associated with a particular inode. A Lustre file system uses EAs to store striping information (indicating the location of file data on OSTs). Examples of extended attributes are ACLs, striping information, and the FID of the file.
- Eviction
The process of removing a client's state from the server if the client is unresponsive to server requests after a timeout or if server recovery fails. If a client is still running, it is required to flush the cache associated with the server when it becomes aware that it has been evicted.
- Export
The state held by a server for a client that is sufficient to transparently recover all in-flight operations when a single failure occurs.
- Extent
A range of contiguous bytes or blocks in a file that are addressed by a {start, length} tuple instead of individual block numbers.
- Extent lock
An LDLM lock used by the OSC to protect an extent in an OST object for concurrent control of read/write, file size acquisition, and truncation operations.
F
- Failback
The failover process in which the default active server regains control from the backup server that had taken control of the service.
- Failout OST
An OST that is not expected to recover if it fails to answer client requests. A failout OST can be administratively failed, thereby enabling clients to return errors when accessing data on the failed OST without making additional network requests or waiting for OST recovery to complete.
- Failover
The process by which a standby computer server system takes over for an active computer server after a failure of the active node. Typically, the standby computer server gains exclusive access to a shared storage device between the two servers.
- FID
Lustre File Identifier. A 128-bit file system-unique identifier for a file or object in the file system. The FID structure contains a unique 64-bit sequence number (see FLDB), a 32-bit object ID (OID), and a 32-bit version number. The sequence number is unique across all Lustre targets (OSTs and MDTs).
- Fileset
A group of files that are defined through a directory that represents the start point of a file system.
- FLDB
FID Location Database. This database maps a sequence of FIDs to a specific target (MDT or OST), which manages the objects within the sequence. The FLDB is cached by all clients and servers in the file system, but is typically only modified when new servers are added to the file system.
- Flight group
Group of I/O RPCs initiated by the OSC that are concurrently queued or processed at the OST. Increasing the number of RPCs in flight for high latency networks can increase throughput and reduce visible latency at the client.
G
- Glimpse callback
An RPC made by an OST or MDT to another system (usually a client) to indicate that a held extent lock should be surrendered. If the system is using the lock, then the system should return the object size and timestamps in the reply to the glimpse callback instead of cancelling the lock. Glimpses are introduced to optimize the acquisition of file attributes without introducing contention on an active lock.
I
- Import
The state held by the client for each target that it is connected to. It holds server NIDs, connection state, and uncommitted RPCs needed to fully recover a transaction sequence after a server failure and restart.
- Intent lock
A special Lustre file system locking operation in the Linux kernel. An intent lock combines a request for a lock with the full information to perform the operation(s) for which the lock was requested. This offers the server the option of granting the lock or performing the operation and informing the client of the operation result without granting a lock. The use of intent locks enables metadata operations (even complicated ones) to be implemented with a single RPC from the client to the server.
L
- LBUG
A fatal error condition detected by the software that halts execution of the kernel thread to avoid potential further corruption of the system state. It is printed to the console log and triggers a dump of the internal debug log. The system must be rebooted to clear this state.
- LDLM
Lustre Distributed Lock Manager.
- lfs
The Lustre file system command-line utility that allows end users to interact with Lustre software features, such as setting or checking file striping or per-target free space. For more details, see Section 40.1, “
lfs”.- LFSCK
Lustre file system check. A distributed version of a disk file system checker. Normally,
lfsckdoes not need to be run, except when file systems are damaged by events such as multiple disk failures and cannot be recovered using file system journal recovery.- llite
Lustre lite. This term is in use inside code and in module names for code that is related to the Linux client VFS interface.
- llog
Lustre log. An efficient log data structure used internally by the file system for storing configuration and distributed transaction records. An
llogis suitable for rapid transactional appends of records and cheap cancellation of records through a bitmap.- llog catalog
Lustre log catalog. An
llogwith records that each point at anllog. Catalogs were introduced to givellogsincreased scalability.llogshave an originator which writes records and a replicator which cancels records when the records are no longer needed.- LMV
Logical Metadata Volume. A module that implements a DNE client-side abstraction device. It allows a client to work with many MDTs without changes to the llite module. The LMV code forwards requests to the correct MDT based on name or directory striping information and merges replies into a single result to pass back to the higher
llitelayer that connects the Lustre file system with Linux VFS, supports VFS semantics, and complies with POSIX interface specifications.- LND
Lustre network driver. A code module that enables LNet support over particular transports, such as TCP and various kinds of InfiniBand networks.
- LNet
Lustre networking. A message passing network protocol capable of running and routing through various physical layers. LNet forms the underpinning of LNETrpc.
- Lock client
A module that makes lock RPCs to a lock server and handles revocations from the server.
- Lock server
A service that is co-located with a storage target that manages locks on certain objects. It also issues lock callback requests, calls while servicing or, for objects that are already locked, completes lock requests.
- LOV
Logical Object Volume. The object storage analog of a logical volume in a block device volume management system, such as LVM or EVMS. The LOV is primarily used to present a collection of OSTs as a single device to the MDT and client file system drivers.
- Lustre client
An operating instance with a mounted Lustre file system.
- Lustre file
A file in the Lustre file system. The implementation of a Lustre file is through an inode on a metadata server that contains references to one or more objects on an OSSs.
M
- mballoc
Multi-block allocator. Functionality in ldiskfs that enables the
ldiskfsfile system to allocate multiple blocks with a single request to the block allocator.- MDC
MetaData Client. A Lustre client component that sends metadata requests via RPC over LNet to the metadata target (MDT).
- MDD
Metadata Disk Device. Lustre server component that interfaces with the underlying object storage device to manage the Lustre file system namespace (directories, file ownership, attributes).
- MDS
MetaData Server. The server node that is hosting the metadata target (MDT).
- MDT
MetaData Target. A storage device containing the file system namespace that is made available over the network to a client. It stores filenames, attributes, and the layout of OST objects that store the file data.
- MDT0000
The metadata target storing the file system root directory, as well as some core services such as quota tables. Multiple metadata targets are possible in the same file system. MDT0000 must be available for the file system to be accessible.
- MGS
Management Service. A software module that manages the startup configuration and changes to the configuration. Also, the server node on which this system runs.
N
- NID
Network IDentifier. Encodes the type, network number, and network address of a network interface on a node for use by the Lustre file system.
- Node affinity
Node affinity describes the property of process threads to be affine to specific cores on a NUMA system. Without node affinity, an operating system scheduler may move threads across processors in a sub-optimal way that significantly reduces performance of the system overall.
- NRS
Network Request Scheduler. A subcomponent of the PtlRPC layer, which specifies the order in which RPCs are handled by servers. This allows optimizing large numbers of incoming requests for disk access patterns, fairness between clients, and other administrator-selected policies.
- NUMA
Non-Uniform Memory Access. Describes a multi-processing architecture where the time taken to access specific memory differs depending on memory location relative to a given processor. Typically machines with multiple sockets are NUMA architectures.
O
- OBD
Object-Based Device. The generic term for components in the Lustre software stack that can be configured on the client or server. Examples include MDC, OSC, LOV, LMV, MDT, and OST.
- OBD type
Module that can implement the Lustre object or metadata APIs. Examples of OBD types include the LOV, OSC and OSD.
- Object storage
Refers to a storage-device API or protocol involving storage objects and offsets therein, rather than addressing storage by individual blocks.
- opencache
A cache of open file handles. This is a performance enhancement for NFS and files that are opened repeatedly on a client.
- Orphan objects
OST objects to which no Lustre file points. Orphan objects can arise from crashes and are automatically removed by an
llogrecovery between the MDT and OST. When a client deletes a file, the MDT unlinks it from the namespace. If this is the last link, it will atomically add the OST objects into a per-OSTllog(in case a crash occurrs) and then wait until the MDT unlink commits to disk. At this point, it is safe to destroy the OST objects. Once the OST object destroy is committed, the MDTllogrecords can be cancelled.- OSC
Object Storage Client. The client module communicating to an OST mounted on an OSS.
- OSD
Object Storage Device. A generic, industry term for storage devices with a more extended interface than block-oriented devices such as disks. For the Lustre file system, this name is used to describe a software module that implements an object storage API in the kernel. It is also used to refer to an instance of an object storage device created by that driver. The OSD device is layered on a file system, either ldiskfs (ext4) or ZFS, with methods that implement create, destroy and other I/O operations on file inodes.
- OSS
Object Storage Server. A server OBD that provides network access between the client and local OSTs.
- OST
Object Storage Target. An OSD made accessible through a network protocol. Typically, an OST is associated with a unique OSD which, in turn is associated with a formatted disk file system on the server containing the data objects.
- Overstriping
Using wide striping for a file that allocates multiple objects in a file to each OST. This allows the number of stripes to exceed the number of OSTs, and can improve scalability for IO and locking.
P
- pdirops
A locking protocol in the Linux VFS layer that allows for directory operations performed in parallel.
- Pool
OST pools allows the administrator to associate a name with an arbitrary subset of OSTs in a Lustre cluster. A group of OSTs can be combined into a named pool with unique access permissions and stripe characteristics.
- Portal
A service address on an LNet NID that binds requests to a specific request service, such as an MDS, MGS, OSS, or LDLM. Services may listen on multiple portals to ensure that high priority messages are not queued behind many slow requests on another portal.
- PtlRPC
An RPC protocol layered on LNet. This protocol deals with stateful servers and has exactly-once semantics and built in support for recovery.
R
- Recovery
The process that re-establishes the connection state when a client that was previously connected to a server reconnects after the server restarts.
- Remote directory
A remote directory describes a feature of Lustre DNE where a subdirectory may be stored on a different MDT than the parent directory. This is sometimes referred to as DNE1.
- Replay request
The concept of re-executing a server request after the server has lost information in its memory caches and shut down. The replay requests are retained by clients until the server(s) have confirmed that the data is persistent on disk. Only requests for which a client received a reply and were assigned a transaction number by the server are replayed. Requests that did not get a reply are resent.
- Resent request
An RPC request sent from a client to a server that has not had a reply from the server. This might happen if the request was lost on the way to the server, if the reply was lost on the way back from the server, or if the server crashes before or after processing the request. During server RPC recovery processing, resent requests are processed after replayed requests, and use the client RPC XID to determine if the resent RPC request was already executed on the server.
- Revocation callback
Also called a "blocking callback". An RPC request made by the lock server (typically for an OST or MDT) to a lock client to revoke a granted DLM lock.
- Root squash
A mechanism whereby the identity of a root user on a client system is mapped to a different identity on the server to avoid root users on clients from accessing or modifying root-owned files on the servers. This does not prevent root users on the client from assuming the identity of a non-root user, so should not be considered a robust security mechanism. Typically, for management purposes, at least one client system should not be subject to root squash.
- Routing
LNet routing between different networks and LNDs.
- RPC
Remote Procedure Call. A network encoding of a request, often sent from a client to a server to perform a particular action.
S
- Stripe
A contiguous, logical extent of a Lustre file written to a single OST. Used synonymously with a single OST data object that makes up part of a file visible to user applications.
- Striped Directory
A striped directory is when metadata for files in a given directory are distributed evenly over multiple MDTs. Striped directories are only available in Lustre software version 2.8 or later. A user can create a striped directory to increase metadata performance of very large directories (e.g. 1M+ entries) by distributing the metadata requests in a single directory over two or more MDTs. This is sometimes called DNE2.
- Stripe size
The maximum number of bytes that will be written to an OST object in a RAID0-striped Lustre file before the next object in the file's layout is used, when writing data sequentially to a file. Once a full stripe has been written to each of the objects in the layout, the first object will be written to again in round-robin fashion.
- Stripe count
The number of OSTs holding objects for a RAID0-striped Lustre file.
T
- T10-PI
Checksum format defined by the T10 SCSI committee to store data checksums together with the data on supporting storage devices.
- TBF
Token Bucket Filter. NRS policy that assigns tokens to each rule proportional to the priority of RPCs submitted that match the rule. When the tokens for a rule have all been consumed within a time period, any remaining RPCs matching that rule must wait until the next time period to be processed.
W
- Wide striping
Strategy of using many OSTs to store stripes of a single file. This obtains maximum bandwidth access to a single file through parallel utilization of many OSTs. For more information about wide striping, see Section 19.9, “Lustre Striping Internals”.
A
- Access Control List (ACL), Using ACLs
- examples, Examples
- how they work, How ACLs Work
- using, Using ACLs with the Lustre Software
- audit
- change logs, Audit with Changelogs
B
- backup, Backing up a File System
- aborting recovery, Aborting Recovery
- index objects, Backing Up an OST or MDT (Backend File System Level)
- MDT file system, Backing Up an OST or MDT (Backend File System Level)
- MDT/OST device level, Backing Up and Restoring an MDT or OST (ldiskfs Device Level)
- new/changed files, Backing up New/Changed Files to the Backup File System
- OST and MDT, Backing Up an OST or MDT
- OST config, Backing Up OST Configuration Files
- OST file system, Backing Up an OST or MDT (Backend File System Level)
- restoring file system backup, Restoring a File-Level Backup
- restoring OST config, Restoring OST Configuration Files
- rsync, Lustre_rsync
- examples, lustre_rsync Examples
- using, Using Lustre_rsync
- using LVM, Using LVM Snapshots with the Lustre File System
- creating, Creating an LVM-based Backup File System
- creating snapshots, Creating Snapshot Volumes
- deleting, Deleting Old Snapshots
- resizing, Changing Snapshot Volume Size
- restoring, Restoring the File System From a Snapshot
- ZFS to ldiskfs, Migrate from a ZFS to an ldiskfs based filesystem, Migrate from an ldiskfs to a ZFS based filesystem
- ZFS ZPL, Migration Between ZFS and ldiskfs Target Filesystems
- barrier, Global Write Barriers
- impose, Impose Barrier
- query, Query Barrier
- remove, Remove Barrier
- rescan, Rescan Barrier
- benchmarking
- local disk, Testing Local Disk Performance
- MDS performance, Testing MDS Performance (mds-survey)
- network, Testing Network Performance
- OST I/O, Testing OST I/O Performance (ost-survey)
- OST performance, Testing OST Performance (obdfilter-survey)
- raw hardware with sgpdd-survey, Testing I/O Performance of Raw Hardware (sgpdd-survey)
- remote disk, Testing Remote Disk Performance
- tuning storage, Tuning Linux Storage Devices
- with Lustre I/O Kit, Using Lustre I/O Kit Tools
C
- change logs (see monitoring)
- Client-side encryption, Encrypting files and directories
- commit on share, Commit on Share
- tuning, Tuning Commit On Share
- working with, Working with Commit on Share
- configlogs, Lustre Configuration Logs
- configuring, Introduction
- adaptive timeouts, Configuring Adaptive Timeouts
- LNet options, LNet Options
- module options, Module Options
- multihome, Multihome Server Example
- network
- accept, accept (secure)
- forwarding, forwarding ("")
- ip2nets, ip2nets ("tcp")
- rnet_htable_size, rnet_htable_size
- routes, routes ("")
- SOCKLND, SOCKLND Kernel TCP/IP LND
- tcp, networks ("tcp")
- network topology, Network Topology
D
- debug
- utilities, Testing / Debugging Utilities
- debugging, Diagnostic and Debugging Tools
- admin tools, Tools for Administrators and Developers
- developer tools, Tools for Developers
- developers tools, Lustre Debugging for Developers
- disk contents, Looking at Disk Content
- external tools, External Debugging Tools
- kernel debug log, Controlling Information Written to the Kernel Debug Log
- lctl example, Sample lctl Run
- memory leaks, Finding Memory Leaks Using leak_finder.pl
- message format, Understanding the Lustre Debug Messaging Format
- procedure, Lustre Debugging Procedures
- tools, Lustre Debugging Tools
- using lctl, Using the lctl Tool to View Debug Messages
- using strace, Troubleshooting with strace
- design (see setup)
- DLC
- Code Example, Adding a route code example
- dom, Introduction to Data on MDT (DoM), User Commands, DoM Stripe Size Restrictions, lfs getstripe for DoM files, lfs find for DoM files, The dom_stripesize parameter, Disable DoM
- disabledom, Disable DoM
- domstripesize, DoM Stripe Size Restrictions
- dom_stripesize, The dom_stripesize parameter
- intro, Introduction to Data on MDT (DoM)
- lfsfind, lfs find for DoM files
- lfsgetstripe, lfs getstripe for DoM files
- lfssetstripe, lfs setstripe for DoM files
- usercommands, User Commands
E
- ea_inode
- encryption access semantics, Client-side encryption access semantics
- encryption fscrypt policy, Manage encryption on directories
- encryption key hierarchy, Client-side encryption key hierarchy
- encryption modes usage, Client-side encryption modes and usage
- encryption threat model, Client-side encryption threat model
- errors (see troubleshooting)
F
- failover, What is Failover?, Setting Up a Failover Environment
- and Lustre, Failover Functionality in a Lustre File System
- capabilities, Failover Capabilities
- configuration, Types of Failover Configurations
- high-availability (HA) software, Selecting High-Availability (HA) Software
- MDT, MDT Failover Configuration (Active/Passive), MDT Failover Configuration (Active/Active)
- OST, OST Failover Configuration (Active/Active)
- power control device, Selecting Power Equipment
- power management software, Selecting Power Management Software
- setup, Preparing a Lustre File System for Failover
- feature overview
- configuration, Configuration
- file layout
- See striping, Lustre File Layout (Striping) Considerations
- filefrag, filefrag
- fileset, Fileset Feature
- fragmentation, Description
H
- Hierarchical Storage Management (HSM)
- introduction, Introduction
- High availability (see failover)
- HSM
- agents, Agents
- agents and copytools, Agents and copytool
- archiveID backends, Archive ID, multiple backends
- automatic restore, Automatic restore
- changelogs, change logs
- commands, Commands
- coordinator, Coordinator
- file states, File states
- grace_delay, grace_delay
- hsm_control, hsm_controlpolicy
- max_requests, max_requests
- policy, policy
- policy engine, Policy engine
- registered agents, Registered agents
- request monitoring, Request monitoring
- requests, Requests
- requirements, Requirements
- robinhood, Robinhood
- setup, Setup
- timeout, Timeout
- tuning, Tuning
I
- I/O, Handling Full OSTs
- adding an OST, Adding an OST to a Lustre File System
- bringing OST online, Returning an Inactive OST Back Online
- direct, Performing Direct I/O
- disabling OST creates, Disabling creates on a Full OST
- full OSTs, Handling Full OSTs
- migrating data, Migrating Data within a File System
- OST space usage, Checking OST Space Usage
- pools, Creating and Managing OST Pools
- imperative recovery, Imperative Recovery
- Configuration Suggestions, Configuration Suggestions for Imperative Recovery
- MGS role, MGS role
- Tuning, Tuning Imperative Recovery
- inodes
- installing, Steps to Installing the Lustre Software
- preparation, Preparing to Install the Lustre Software
- Introduction, Introduction
- Requirements, Requirements
- ior-survey, ior-survey
- Isolation, Isolating Clients to a Sub-directory Tree
- client identification, Identifying Clients
- configuring, Configuring Namespace Isolation
- multifilesets, Multiple Filesets
J
- jobstats (see monitoring)
K
- Kerberos, Configuring Kerberos (KRB) Security
L
- large_xattr
- ea_inode, File and File System Limits
- lctl, lctl
- ldiskfs
- formatting options, Setting ldiskfs File System Formatting Options
- lfs, lfs
- lfs_migrate, lfs_migrate
- llobdstat, llobdstat
- llog_reader, llog_reader
- llstat, llstat
- llverdev, llverdev
- ll_decode_filter_fid, ll_decode_filter_fid
- LNet, Introducing LNet, Overview of LNet Module Parameters, Dynamically Configuring LNet Routes, lustre_routes_config, lustre_routes_conversion, Route Configuration Examples (see configuring)
- best practice, Best Practices for LNet Options
- buffer yaml syntax, Enable Routing and Adjust Router Buffer Configuration
- capi general information, General API Information
- capi input params, API Common Input Parameters
- capi output params, API Common Output Parameters
- capi return code, API Return Code
- cli, Configuring LNet, Displaying Global Settings, Adding, Deleting and Showing Networks, Manual Adding, Deleting and Showing Peers, Adding, Deleting and Showing routes, Enabling and Disabling Routing, Showing routing information, Configuring Routing Buffers, Importing YAML Configuration File, Exporting Configuration in YAML format, Showing LNet Traffic Statistics
- asymmetrical route, Asymmetrical Routes
- dynamic discovery, Dynamic Peer Discovery
- comments, Including comments
- Configuring LNet, Configuring LNet via lnetctl
- cyaml, Internal YAML Representation (cYAML)
- error block, Error Block
- escaping commas with quotes, Escaping commas with quotes
- features, Key Features of LNet
- hardware multi-rail configuration, Hardware Based Multi-Rail Configurations with LNet
- InfiniBand load balancing, Load Balancing with an InfiniBand* Network
- ip2nets, Setting the LNet Module ip2nets Parameter
- lustre.conf, Setting Up lustre.conf for Load Balancing
- lustre_lnet_config_buf, Adjusting Router Buffer Pools
- lustre_lnet_config_net, Adding a Network Interface
- lustre_lnet_config_ni_system, Configuring LNet
- lustre_lnet_config_route, Adding Routes
- lustre_lnet_del_net, Deleting a Network Interface
- lustre_lnet_del_route, Deleting Routes
- lustre_lnet_enable_routing, Enabling and Disabling Routing
- lustre_lnet_show stats, Showing LNet Traffic Statistics
- lustre_lnet_show_buf, Showing Routing information
- lustre_lnet_show_net, Showing Network Interfaces
- lustre_lnet_show_route, Showing Routes
- lustre_yaml, Adding/Deleting/Showing Parameters through a YAML Block
- management, Updating the Health Status of a Peer or Router
- module parameters, Setting the LNet Module networks Parameter
- network yaml syntax, Network Configuration
- proc, Monitoring LNet
- route checker, Configuring the Router Checker
- router yaml syntax, Route Configuration
- routes, Setting the LNet Module routes Parameter
- routing example, Routing Example
- self-test, LNet Self-Test Overview
- show block, Show Block, The LNet Configuration C-API
- starting/stopping, Starting and Stopping LNet
- statistics yaml syntax, Show Statistics
- supported networks, Supported Network Types
- testing, Testing the LNet Configuration
- tuning, Tuning LNet Parameters
- understanding, Introducing LNet
- using NID, Using a Lustre Network Identifier (NID) to Identify a Node
- yaml syntax, YAML Syntax
- logs, Snapshot Logs
- lr_reader, lr_reader
- lshowmount, lshowmount
- lsom
- enablelsom, Enable LSoM
- intro, Introduction to Lazy Size on MDT (LSoM)
- lfsgetsom, lfs getsom for LSoM data
- usercommands, User Commands
- lst, lst
- Lustre, What a Lustre File System Is (and What It Isn't)
- at scale, Lustre Cluster
- cluster, Lustre Cluster
- components, Lustre Components
- configuring, Configuring a Simple Lustre File System
- additional options, Additional Configuration Options
- for scale, Scaling the Lustre File System
- simple example, Simple Lustre Configuration Example
- striping, Changing Striping Defaults
- utilities, Using the Lustre Configuration Utilities
- features, Lustre Features
- fileset, Fileset Feature
- I/O, Lustre File System Storage and I/O
- LNet, Lustre Networking (LNet)
- MGS, Management Server (MGS)
- Networks, Lustre Networks
- requirements, Lustre File System Components
- storage, Lustre File System Storage and I/O
- striping, Lustre File System and Striping
- upgrading (see upgrading)
- lustre
- errors (see troubleshooting)
- recovery (see recovery)
- troubleshooting (see troubleshooting)
- lustre_rmmod, lustre_rmmod.sh
- lustre_rsync, lustre_rsync
- LVM (see backup)
- l_getidentity, l_getidentity
M
- maintenance, Working with Inactive OSTs, Working with Inactive MDTs
- aborting recovery, Aborting Recovery
- adding a OST, Adding a New OST to a Lustre File System
- adding an MDT, Adding a New MDT to a Lustre File System
- backing up OST config, Backing Up OST Configuration Files
- bringing OST online, Returning an Inactive OST Back Online
- changing a NID, Changing a Server NID
- changing failover node address, Changing the Address of a Failover Node
- Clearing a config, Clearing configuration
- finding nodes, Finding Nodes in the Lustre File System
- full OSTs, Migrating Data within a File System
- identifying OST host, Determining Which Machine is Serving an OST
- inactive MDTs, Working with Inactive MDTs
- inactive OSTs, Working with Inactive OSTs
- mounting a server, Mounting a Server Without Lustre Service
- pools, Creating and Managing OST Pools
- regenerating config logs, Regenerating Lustre Configuration Logs
- reintroducing an OSTs, Returning a Deactivated OST to Service
- removing an MDT, Removing an MDT from the File System
- removing an OST, Removing and Restoring MDTs and OSTs, Removing an OST from the File System
- restoring an OST, Removing and Restoring MDTs and OSTs
- restoring OST config, Restoring OST Configuration Files
- separate a combined MGS/MDT, Separate a combined MGS/MDT
- set an MDT to readonly, Set an MDT to read-only
- Tune fallocate, Tune Fallocate for ldiskfs
- MDT
- multiple MDSs, Upgrading to Lustre Software Release 2.x (Major Release)
- migrating metadata, Migrating Metadata within a Filesystem, Whole Directory Migration, Striped Directory Migration, Directory Restriping, Directory Auto-Split
- mkfs.lustre, mkfs.lustre
- monitoring, Lustre Changelogs, Lustre Jobstats
- additional tools, Other Monitoring Options
- change logs, Lustre Changelogs, Working with Changelogs
- jobstats, Lustre Jobstats, How Jobstats Works, Enable/Disable Jobstats, Check Job Stats, Clear Job Stats, Configure Auto-cleanup Interval
- lljobstat, Identifying Top Jobs
- Lustre Monitoring Tool, Lustre Monitoring Tool (LMT)
- mount, mount
- mount.lustre, mount.lustre
- MR
- addremotepeers, Adding Remote Peers that are Multi-Rail Capable
- configuring, Configuring Multi-Rail
- deleteinterfaces, Deleting Network Interfaces
- deleteremotepeers, Deleting Remote Peers
- health, LNet Health
- mrhealth
- display, Displaying Information
- failuretypes, Failure Types and Behavior
- initialsetup, Initial Settings Recommendations
- interface, User Interface
- value, Health Value
- mrrouting, Notes on routing with Multi-Rail
- routingex, Multi-Rail Cluster Example
- routinghealth_aliveness, Route Aliveness Criteria
- routinghealth_config, Configuration
- routinghealth_discovery, Discovery
- routinghealth_routerhealth, Router Health
- routingmixed, Mixed Multi-Rail/Non-Multi-Rail Cluster
- routingresiliency, Utilizing Router Resiliency
- mrroutinghealth, Multi-Rail Routing with LNet Health
- multipleinterfaces, Configure Multiple Interfaces on the Local Node
- overview, Multi-Rail Overview
- multiple-mount protection, Overview of Multiple-Mount Protection
O
- obdfilter-survey, obdfilter-survey
- operations, Mounting by Label, Snapshot Operations
- create, Creating a Snapshot
- default dir stripe policy, Default Dir Stripe Policy
- degraded OST RAID, Handling Degraded OST RAID Arrays
- delete, Delete a Snapshot
- erasing a file system, Erasing a File System
- failover, Specifying Failout/Failover Mode for OSTs, Specifying NIDs and Failover
- identifying OSTs, Identifying To Which Lustre File an OST Object Belongs
- list, List Snapshots
- mkdir, Creating a directory striped across multiple MDTs
- modify, Modify Snapshot Attributes
- mount, Mounting a Snapshot
- mounting, Mounting a Server
- mounting by label, Mounting by Label
- multiple file systems, Running Multiple Lustre File Systems
- parameters, Setting and Retrieving Lustre Parameters
- reclaiming space, Reclaiming Reserved Disk Space
- remote directory, Creating a sub-directory on a specific MDT
- replacing an OST or MDS, Replacing an Existing OST or MDT
- setdirstripe, Creating a directory striped across multiple MDTs
- shutdownLustre, Stopping the Filesystem
- starting, Starting Lustre
- striped directory, Creating a directory striped across multiple MDTs
- unmount, Unmounting a Snapshot
- unmounting, Unmounting a Specific Target on a Server
- ost-survey, ost-survey
P
- performance (see benchmarking)
- pings
- evict_client, Client Death Notification
- suppress_pings, "suppress_pings" Kernel Module Parameter
- pools, Creating and Managing OST Pools
- usage tips, Tips for Using OST Pools
- proc
- adaptive timeouts, Configuring Adaptive Timeouts
- block I/O, Monitoring the OST Block I/O Stream
- client metadata performance, Tuning the Client Metadata RPC Stream
- client stats, Monitoring Client Activity
- configuring adaptive timeouts, Configuring Adaptive Timeouts
- debug, Enabling and Interpreting Debugging Logs
- free space, Allocating Free Space on OSTs
- LNet, Monitoring LNet
- locking, Configuring Locking
- OSS journal, Enabling OSS Asynchronous Journal Commit
- read cache, Tuning Server Read Cache
- read/write survey, Monitoring Client Read-Write Offset Statistics, Monitoring Client Read-Write Extent Statistics
- readahead, Tuning File Readahead and Directory Statahead
- RPC tunables, Tuning the Client I/O RPC Stream
- static timeouts, Setting Static Timeouts
- thread counts, Setting MDS and OSS Thread Counts
- watching RPC, Monitoring the Client RPC Stream
- profiling (see benchmarking)
- programming
- upcall, User/Group Upcall
Q
- Quotas
- allocating, Quota Allocation
- configuring, Working with Quotas
- creating, Quota Administration
- default, Default Quota
- enabling disk, Enabling Disk Quotas
- Interoperability, Quotas and Version Interoperability
- known issues, Granted Cache and Quota Limits
- pools, Pool Quotas
- statistics, Lustre Quota Statistics
- usage, Usage
- verifying, Quota Verification
R
- recovery, Recovery Overview
- client eviction, Client Eviction
- client failure, Client Failure
- commit on share (see commit on share)
- corruption of backing ldiskfs file system, Recovering from Errors or Corruption on a Backing ldiskfs File System
- corruption of Lustre file system, Recovering from Corruption in the Lustre File System
- failed recovery, Failed Recovery
- LFSCK, Checking the file system with LFSCK
- locks, Lock Recovery
- MDS failure, MDS Failure (Failover)
- metadata replay, Metadata Replay
- network, Network Partition
- oiscrub, Checking the file system with LFSCK
- orphaned objects, Working with Orphaned Objects
- OST failure, OST Failure (Failover)
- unavailable OST, Recovering from an Unavailable OST
- VBR (see version-based recovery)
- reporting bugs (see troubleshooting)
- restoring (see backup)
- root squash, Using Root Squash
- round-robin algorithm, Managing Free Space
- routerstat, routerstat
- rsync (see backup)
S
- selinux policy check, Checking SELinux Policy Enforced by Lustre Clients
- determining, Determining SELinux Policy Info
- enforcing, Enforcing SELinux Policy Check
- making permanent, Making SELinux Policy Check Permanent
- sending client, Sending SELinux Status Info from Clients
- setup, Hardware Considerations
- hardware, Hardware Considerations
- inodes, Setting Formatting Options for an ldiskfs MDT
- ldiskfs, Setting ldiskfs File System Formatting Options
- limits, File and File System Limits
- MDT, MGT and MDT Storage Hardware Considerations, Determining MDT Space Requirements
- memory, Determining Memory Requirements
- MGT, Determining MGT Space Requirements
- network, Implementing Networks To Be Used by the Lustre File System
- OST, OST Storage Hardware Considerations, Determining OST Space Requirements
- space, Determining Space Requirements
- sgpdd-survey, sgpdd-survey
- space, How Lustre File System Striping Works
- considerations, Lustre File Layout (Striping) Considerations
- determining MDT requirements, Determining MDT Space Requirements
- determining MGT requirements, Determining MGT Space Requirements
- determining OST requirements, Determining OST Space Requirements
- determining requirements, Determining Space Requirements
- free space, Managing Free Space
- location weighting, Adjusting the Weighting Between Free Space and Location
- striping, How Lustre File System Striping Works
- storage
- configuring, Selecting Storage for the MDT and OSTs
- external journal, Choosing Parameters for an External Journal
- for best practice, Reliability Best Practices
- for mkfs, Computing file system parameters for mkfs
- MDT, Metadata Target (MDT)
- OST, Object Storage Server (OST)
- RAID options, Formatting Options for ldiskfs RAID Devices
- SAN, Connecting a SAN to a Lustre File System
- performance tradeoffs, Performance Tradeoffs
- striping (see space)
- allocations, Stripe Allocation Methods
- configuration, Setting the File Layout/Striping Configuration (lfs setstripe)
- considerations, Lustre File Layout (Striping) Considerations
- count, Setting the Stripe Count
- Foreign, Foreign Layout
- getting information, Retrieving File Layout/Striping Information (getstripe)
- how it works, How Lustre File System Striping Works
- metadata, Creating a directory striped across multiple MDTs
- on specific OST, Creating a File on a Specific OST
- overview, Lustre File System and Striping
- per directory, Setting the Striping Layout for a Directory
- per file system, Setting the Striping Layout for a File System
- PFL, Progressive File Layout(PFL)
- remote directories, Locating the MDT for a remote directory
- round-robin algorithm, Managing Free Space
- SEL, Self-Extending Layout (SEL)
- size, Choosing a Stripe Size
- stripe count limit, Per File System Stripe Count Limit
- weighted algorithm, Managing Free Space
- wide striping, Lustre Striping Internals
- suppressing pings, Suppressing Pings
T
- troubleshooting, Lustre Error Messages
- 'Address already in use', Handling/Debugging "Bind: Address already in use" Error
- 'Error -28', Handling/Debugging Error "- 28"
- common problems, Common Lustre File System Problems
- error messages, Viewing Error Messages
- error numbers, Error Numbers
- OST out of memory, Log Message 'Out of Memory' on OST
- reporting bugs, Reporting a Lustre File System Bug
- slowdown during startup, Slowdown Occurs During Lustre File System Startup
- timeouts on setup, Handling Timeouts on Initial Lustre File System Setup
- tunefs.lustre, tunefs.lustre
- tuning, Optimizing the Number of Service Threads (see benchmarking)
- for small files, Improving Lustre I/O Performance for Small Files
- Large Bulk IO, Large Bulk IO (16MB RPC)
- libcfs, libcfs Tuning
- LND tuning, LND Tuning
- LNet, Tuning LNet Parameters
- lockless I/O, Lockless I/O Tunables
- MDS binding, Binding MDS Service Thread to CPU Partitions
- MDS threads, Specifying the MDS Service Thread Count
- Network interface binding, Binding Network Interface Against CPU Partitions
- Network interface credits, Network Interface Credits
- Network Request Scheduler (NRS) Tuning, Network Request Scheduler (NRS) Tuning
- client round-robin over NIDs (CRR-N) policy, Client Round-Robin over NIDs (CRR-N) policy
- Delay policy, Delay policy
- first in, first out (FIFO) policy, First In, First Out (FIFO) policy
- object-based round-robin (ORR) policy, Object-based Round-Robin (ORR) policy
- Target-based round-robin (TRR) policy, Target-based Round-Robin (TRR) policy
- Token Bucket Filter (TBF) policy, Token Bucket Filter (TBF) policy
- OSS threads, Specifying the OSS Service Thread Count
- portal round-robin, Portal Round-Robin
- router buffers, Router Buffers
- service threads, Optimizing the Number of Service Threads
- with lfs ladvise, Server-Side Advice and Hinting
- write performance, Understanding Why Write Performance is Better Than Read Performance
U
- upgrading, Release Interoperability and Upgrade Requirements
- 2.X.y to 2.X.y (minor release), Upgrading to Lustre Software Release 2.x.y (Minor Release)
- major release (2.x to 2.x), Upgrading to Lustre Software Release 2.x (Major Release)
- utilities
- debugging, Testing / Debugging Utilities
- system config, Additional System Configuration Utilities
V
- version
- which version of Lustre am I running?, Revisions
- Version-based recovery (VBR), Version-based Recovery
- messages, VBR Messages
- tips, Tips for Using VBR
W
- weighted algorithm, Managing Free Space
- wide striping, File and File System Limits, Upgrading to Lustre Software Release 2.x (Major Release), Lustre Striping Internals
- large_xattr
- ea_inode, File and File System Limits
X
- xattr
- See wide striping, File and File System Limits